Diy Crochet Knotless Full Lace Braided Wig - How To Diy A Braided Wig
- Posted on 19 April, 2022
- Lace Closure
- By Anonymous
Hey Lovelies, in Today's video we are venilating and braiding a full lace braided wig from start to finish. I hope you enjoy this diy full lace braided wig tutorial and you learn something new, that would help you make your braided wig better. #diybraidedwig #diyfulllacebraidedwig
My Online Store: https://www.instagram.com/tbmwigtools/...
Small Crochet Ventilating Neeele : https://amzn.to/3fNj9lO
EBIN NEW YORK Wonder Lace Bond Adhesive Spray: https://amzn.to/3jRuqUs
INTRO (WHAT TO EXPECT):00:00 - 00:59
WIG CAP FITTING AND MEASUREMENTS: 01:00 - 06:18
VENTILATING WIG CAP: 06:18 - 12:58
BRAIDING OF THE WIG CAP: 12:59 - 16:04
INSTALLING THE BRAIDED WIG: 16:04 - 20:23
FREQUENTLY ASKED QUESTIONS: 20:24 - 24:14
OUTRO: 24:15 - 25:27
Orders to watch previous videos for better understanding;
HOW TO PREP YOUR WIG CAP FOR A WELL FITTED BRAIDED WIG (CLOSURE &FRONTAL):
DIY CROCHET CLOSURE BRAIDED WIG USING EXPRESSION ATTACHMENT:
DIY CROCHET KNOTLESS FRONTAL BRAIDED WIG USING EXPRESSION ATTACHMENT:
+ FILMING EQUIPMENT
- Canon 750D
- Ringlight
- 2 LED LIGHTS
_______________
+ PLACES TO FIND ME
INSTAGRAM: https://www.instagram.com/the_basil_me...
EMAIL: [email protected]
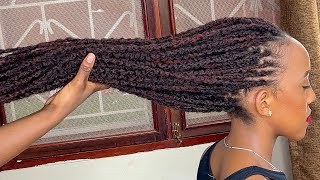
Hey lovelies welcome back to my channel. I am the basil mercy in case you don't already know, and in today's video i'm going to show you how to make a full lace. Braided wig, not just how to make the lace wig. Also, i'm going to show you how to ventilate the wig cap from scratch all right, so, yes, we're making this wig from scratch from start to finish, we'll be ventilating. The wig cap we'll be braiding it also. This is to save you money like you, get to save money, because i mean just doing this. Buying this alone will cost a lot, but doing it yourself will get to save you so much, and i really hope you learned a lot because in this video i spilled everything it's so juicy. I i brought up all the tips, all the tricks all right. So if that sounds like something interested in then make sure to keep on watching love, you so lovely. The first thing we're going to be starting with we're going to start with this full lace. Wig cap. This is the wig cap we're going to be using today. You can go ahead to make this according to your own head measurement. You can go ahead and make it yourself, but i'm using a store-bought one today, so i'm just going to go ahead and place that wig cap on my canvas head and just pin it securely. You want to make sure you place it the right way, all right so place it the right way. Pin it securely, you don't want it to move, so you don't make mistake when you're taking your measurements, it's very essential that you pin it down very well. So i'm just going to go ahead and use my head measurement as you can see written on the screen, i'm just going to take the front to back measurement and i'm just going to pin that down all right, so i'm doing 14 inches front to back. That'S my head measurement, but i actually think you should at least leave one inch more so that you have enough space because it's a full lace, wig! You want to give room for space or for like an allowance. Maybe so i think you should add an inch or half an inch will be fine to add to your measurements. I didn't add any to my measurement, but i actually think it's very necessary. So the next thing i'm going to do now is take my ear to ear measurement. I just went ahead to put seven and a half in the middle, because my ear to ear measurement is 15 inch. So i'm just gon na use seven and a half in the middle and then pin it down at one and fifteen on both side, which will give me my perfect measurement. So that's really what i'm doing for each ear measurement just to know where to ventilate where to start and where to end. Basically, so you want to make sure you're using your right measurement to ventilate and not another kind of measurement. So for this part, i have gone ahead to pin the wig cap down right so now i'm just going to go ahead and take in the excess, but guys i'll be honest with you. If i had known better, i would not have done this step because i feel it's not necessary and this space right here is what gives room for the head shape. I mean if it was a person with a smaller head shape, then fine, but my head shape is kind of. I won't say my head is big but yeah it is it's not really like tiny, like some people's head. So i don't think this is really necessary. If you ask me the wake up after i was done, it actually was a bit smaller than me. To be honest, so i would actually skip this depending on the person's head shape, but if you think it's too big, this is one way to take it in all right. So i'm using an invisible thread. You want to make sure you're using an invisible thread. You don't want to use white straight. You don't want to use black thread all right, one step forward, two steps backwards, yeah and much your lover who don't use big. I don't need words at all, because i know what i want baby can't you figure it out. What'S going on in your heart, so the next thing i'm going to do is take the measurement of how small and or how large i want my column and row to be. So that's what i'm going to go ahead to do. You want to make sure you pin the tape right at the beginning of the hair or and at the end, also the beginning of the wake up and the end of the recap. So you want to go ahead and use that to determine how big you want it honestly guys. I would really have just gone for a much bigger spacing to be honest, because this hair took a lot of time if it was a lot more bigger than what i did. It would have been lesser time, but i don't mind it. The outcome was flawless, so yeah, i'm actually marking a 1.5 inch row but later changed my mind. I wanted it to be one inch by one inch all right, so it's just your decision. Whatever you want to do. If you don't understand what i'm doing, please watch the first video. I think that was a little bit more explanatory, but now i'm just going to create the column line and what i'm doing, i'm just placing the tape vertically right. I think this is vertical and but i'm just going to do that, i'm just placing the tape and then i'm just going to mark one inch. So i wanted to go ahead and do one and a half inch by one inch, but it just didn't look right. I'M going to show you guys the sample of what i wanted to do first of all, but it just didn't look right to me, so i just went with one inch by one inch, so this is just me measuring out the column, so i'm showing you i Wanted to do one and a half inch by one inch, but you see it just looks a bit. It looks rectangular, it doesn't look square, so i didn't really want that to be the outcome of the braid. So i just went ahead to take that off and then i just went in by one inch by one inch as you can see on the screen. I'M going to use my measuring tape to measure that out. So you can see that it's exactly one inch vertically and it's exactly one inch horizontal. That'S the roll is one inch and the column is one inch. So the next thing i'm going to go ahead and do is ventilating the wig cap. I want you to keep in mind that this recap was store-bought like i said so. He had three sections. He had the front listener, he had the backlessness and he had the middle neck. The middle nut is like a very different material. Then this is the pin. I'M going to be using to ventilate. This is the pain i use is a crochet hook. I don't use the normal ventilating pain all right, so i'm just going to go ahead and start ventilating. The back of the wig. All right, i'm going to show you guys how to ventilate for the three sections we have the front, the back and the middle. So this is me ventilating, the back of the wig, it's actually pretty explanatory, and i can actually just let you watch this video and just let you see what i'm doing, because there's really nothing serious i'm doing, but for the spacing. What i'm doing is i ventilate one hole leave a space, then ventilate the next hole. Basically, then, i ventilate three by three to create a box. If you know what i mean so i ventilate the box three, then the next line, three three three to make a box. I hope that is very explanatory, so i ventilated three lines to make a box so because you don't have to ventilate the whole box because still it won't, it won't show it doesn't really matter if you ventilate the old bus or you just ventilate, that three line And even for the middle part, i actually went in with two lines by two lines, because i was getting really tired and i just felt it was the middle part. Nobody was really looking like at it like that, like it won't be so visible. If i did two line by two line compared to when i do three line by three line in the front and the back so for the middle part, i did like two lines and for this part i'm doing three by three. So a lot of you asked me or what, if you don't want to, you know, draw a line. You know it's for someone, you don't have to necessarily draw a line and honestly, once you do your fixed box, it kind of determines the rest of the boxes. So, like you don't even have to draw, i just do it for um display purposes. So if people get a better understanding of what i'm doing, you necessarily do not have to draw anything on the wig cap and you can still be able to ventilate you. Don'T even have to put powder on it like it can still look very clean and very fresh for when you you know you're making it for someone else everything baby why'd. You have to love. Me love me like that. So i've gone ahead to ventilate the back of the wig, fully and half of the nets, the medial net. So i'm going to show you how i ventilate the middle net right now so for ventilating, the middleness. What you want to start by doing is using these little pins, all right you could use. I don't advise using t pins when you're working with a lace net, because it can easily rip through the net. So using this very tiny pins, you want to go ahead and stretch that material, so this tutorial is for those that are going to be using the store bought with cap. If you make it yourself, you don't necessarily have to use this material of lace all right. So because the store bought, we have to work with what we're giving so i'm just going to go ahead and use that pin to stretch the material out, so you can easily put your needle through it and see what you're doing very well so with this, i Hope it's clearer how i ventilate i leave a line and then ventilate the next line. Basically, so there's always one spacing between them, but when it's like a pattern, it becomes two nets or two spacing if that makes any sense. So, that's really what i do so you can see i'm ventilating two by two two by two like i said because it's even a stretching material. So once i'm done it's going to shrink back and you won't even see that. Oh, it's not really like. It'S not really full or, like. I didn't do three by three, so normally for the back. I ventilate one to two strands when i'm ventilating, because i'm ventilating three by three, but since i'm ventilating two by two on this part, the strand of hair i use, can be as much as three four just so it has enough hair to hold it or to Cover it up so now i was really doubtful when making this wig. I really wanted to see if it would fit. If i was doing rubbish, i just really wanted to know what was going on. So i went ahead to cut out the eos with the measurement with my ear to ear measurements, which is 15, so i went ahead to cut it out. You don't have to cut it out if you're doing this for somebody it would be so rude of you to cut it out. If this is for someone, but if it's for you, you can go ahead to cut it out, just to make sure you're doing the right thing. So i went ahead to try to just see i was going and see if i was actually getting my measurement right, because this is the first time i'm actually working with the full lace nets. This is the first time i'm actually working with it. So i really needed to be careful and needed to know what i was doing so for the front of the list. What i do is, i use a bundle normally, but i didn't have a bundle, so i just went ahead to cut off an old lace. I cut off some hair from an old wig and then i just brushed it out and that's what i used in ventilating the front of the week when i said the front of the week i mean the edges part of the wig, where your like, where is The front the first row of the wig, the first thing you see when you look at the wig, i use the hairs to ventilate. I use the human hair to ventilate when i'm ventilating that i don't use the normal expression that i use. Why? I just feel it has a very softer look and i feel it blends in more when you lay the hair, that's my opinion and i always use the human hair for edges because it just looks. It looks weird when people use attachment for edges. I'M sorry, that's just my opinion, but i think it looks really weird when people use attachment for their edges. It just doesn't look right, so i advise you to get a bundle. You don't have to cut from your wig. You can get the cell bundles just normal. Bundles and you can just use the ventilates just the front part, it doesn't have to be the whole hair. Just the front part and your edges and you're good, like you're good, just make sure the color match when you're getting it. Because i had to use my wig that was a that was black that was jet black, so it matches with the extension i was using to ventilate normally so guys. This is what it looks like when we're done with the ventilation of the week. So i'm just going to go ahead to the bridging of the wig. If you're enjoying this video make sure to give it a thumbs up, make sure to hit that subscribe button if you're not subscribed. So the attachment we're going to be using for today is the darling prequel curly braids attachment it's in the color 1 27. So this is what it looks like straight out of the pack. It'S actually a really nice attachment. Actually so i'm going to go ahead and use a bit of oil. You just want to use a very little bit of oil and just run through the hair or the extension you're going to be working with. You want to do this, so you can lightly tangle. It or so you can lightly detangle it rather so you can easily remove it and be able to pat it easily without it tangling up. So that's why the oil is very necessary, so i've already gone ahead to start braiding off camera. I'M just going to show you how i braid so first things. First, i'm just going to go ahead and lose that braid we've made once we finish ventilating, you want to loosen that up, make sure you comb it very thoroughly, and then you want to take the pins. Those little pins they're very important when you're working with ventilating hairs all right. So i'm just going to go ahead and make sure i use that to kind of pin the hair down, because if you don't do that you're kind of going to braid the nets while you're braiding, i don't know how to make that make sense. But if you're doing it, you kind of see what i'm saying so, i'm going to take my shine and jam, i'm just going to go ahead and use that to braid you guys now. I always love using this to braid. If this is the first video you're watching of my braided wig, please go back and watch the other previous videos. There are way more details. This is just me skipping through, because i expect that there are knowledge already, so you can go ahead to watch the previous ones. If you haven't, i'm going to leave them up here for you to check and also in the description box, so make sure to check that out. So i'm just going to go ahead and start braiding this. So one thing you want to take note of if you're braiding for like you, you want your extension to be really small. Rather, you want your braids to be really small. You have to consider the hair that you're ventilating, because the hair you ventilated now, if you're, using the expression like i am it's bulky, it's not as thin as the human hair will be. So you want to consider it when you're adding your attachment, because i really wanted this braids to be tiny. I didn't want them to be as bold here. I wanted them to be something very simple and slick and nice and small, so you want to consider that's why you see me i braid too, like i braid a lot before i start adding little by little attachments all right. So i add very little because i just wanted that size to be the same. I kind of wanted the same size. The extension was already. If you get what i mean, so i just add very little when i'm eventually braiding to kind of just give that feel of the attachment, so don't go in make sure you consider the extension also because it's more bulky than your normal human hair. So this is what the wig looks like immediately. We'Re done, i'm just going to go ahead and ventilate some edges on it. So i just went ahead to ventilate the edges on the ends of the hair and the side bones. I don't know how to place it, but you can see where i did the edges so now we're going to go ahead and install this wig, my favorite part of this video, because finally i was done braiding and ventilating this hair. So i'm just going to go ahead and use my foundation on that lace. All right. She wants to tint it to match you your skin tone. Obviously so i'm going to go ahead and cut off the excess lace, and you see i didn't put foundation into media because it's net and it won't really show through i'm, going to show you what to do about that in a minute. So you're going to use a brush, a very tiny brush and foundation and just go over the lines. I know it's stressful, but it's needed so it doesn't look. It doesn't look weird right because imagine the rest of the hair being tinted and the middle just looks you know, but see me being all excited because i'm about to slay this week or so i thought i actually did mess up this in-store a lot. So i'm just going to go ahead and put my wig cap on very important. You want to use a board cap because it's a fullest wig. It'S not going to look so fine if you're not using a wig cap - and i didn't do this - the butt cup method way i just wore it. I didn't do anything. I didn't put anything on the board on the wig cap all right, so i'm just going to go ahead and wear that week. I'M gon na go ahead and put on that wig and baby like it's giving cup already. If i didn't spoil this in store, i know it would be giving so much more. No, the info wasn't so bad. I just made a few mistakes which i'm going to a light, so you don't end up making that same mistake like me, but look at that hair like it looks so good and i'm so impressed with everything. So i'm just going to use the scissors to get rid of the essence list, so i can see what i'm doing before. I start you know actually going through with the install so for today's install i'm going to be using this wonderlace bond spray. It'S my first time using it and baby baby this this spray is the bomb like. I know people were putting me on it, but i just didn't get it, but now that i've gotten it, i kind of understand what the hype is about. The fact that it's controllable more than got to be spray and the fact that, like it smells so good and one thing also it doesn't leave residue. I am hooked like i love it, but you can go ahead to use, got to be spray. If you have that, also, if you go ahead to use any bonding substance, will do the job actually, so i just went ahead to lay the lace like you can see, and then i'm just going to cut off the excess lace actually, and that's really it for This install, so how did i mess up the install? The lace is darker than my skin tone. I don't know how i did that i think i used my contour powder while i was setting the lace, which is so wrong of me, so the lace was darker. My skin and it just didn't, look good, it's not bad though, but like it could be better. You know so really that's just my problem with the install and i did mess up the edges, which you will see very soon, but yeah we're still cutting the lace and it's giving scarp and i didn't put the wig in the middle part. I always make that mistake for some reason. I have no idea why, but it's not in the middle part, but it still gave i mean it still gave and i'm really impressed trying to find some balance in my life. So i'm just going to go ahead and start doing my edges, and this is where i messed up my edges, guys. I don't know what i was thinking. I don't know and i'm so i'm so pissed, but it's fine. All right, like you, can literally see my face in twitter aurora because i was like what did i just do. Why did i mess this up? What is going on, but yeah we still kind of pulled through and it still looks i mean it looks good. It looks good, but it could be better. That'S the annoying part, but so i'm just going to go ahead and use my powder all over that. So you can literally see that lace only because it's darker than my skin tone, if not it could have melted. Even though this lace is different from the first lace we used, but still i don't mind it at all, just a sweet lace. If i'm correct the previous list is an hd, transparent list and yeah solar, please we're done with this braided week. This is how it looks like this is how it came out. I'M really excited about it. I'M really impressed that it came out this way, so i just really wanted to answer. A few very frequently asked questions. Okay, so number one is: how did i cut the hair? I normally see that i didn't cut this hair. Obviously i think i've mentioned that already. This is like the length it came, so it became pre treated frequent. I'M not really a fan of this attachment. In case i've not really mentioned it, i don't think it's the right attachment for wigs. You can use it for braids and i think it'll be flawless, but for like because of durability, i don't really would recommend it, but it's not bad, then. Secondly, i get asked a lot what i used to ventilate the phase of the week. I always use an expression attachment an expression, black attachment you could use whatever color you actually want. You could use whatever base color you want. Maybe you want blue and you're trying to make the whole hair blue. You could use that too. You must not use black or i've seen different, wigs different braided extensions with different colors all right, so it mustn't be black and for the front i kind of cut whatever old glaze i have, or i could just buy a bundle and kind of use it to Ventilate the front, but this time i cut it from an old wig like i showed you guys so really, that's, basically it for how i ventilate or what i use in vents, listen to base. I always i just have a bunch of attachment now that, like like black, tiny attachment like cut into four and normally cut it into four and you know, use it to ventilate, so i always have it handy. So i just pick from it and start ventilating. Whenever i want to ventilate so another frequently asked question, i get is um the needle the ventilating needle i used. Does he rip the net? I mean if he rips the net, i won't be using it. Okay, i mean this is proof that it doesn't rip the net. So i have that on my online store. You can check it out at tbm hair tools, so you can get whatever air tools there, also from tbm week, two's period, all right. So that's where you find the ventilating needle and i'm also gon na leave the amazon link down below in case you want to. You know, get it from amazon. You can check down below in the description box. Also, then yeah. I think that's really the questions i get most asked for my braided wigs then really i just then before i forget to mention i put this hair in hot water, the um, the pack of the darling attachment, said no hot water treatment because of the coils. Obviously so i actually turned it upside down, because it's a week i can do that, so i turned it upside down human head. Obviously you can't turn it upside down and put the person's head inside like very steamy hot water. So what i do is, i just take the wii and, yes, you can put the wig cap inside hot water, very hot water, and this won't get damaged all right. Someone asked me that in the previous video you can't put the whole hair inside hot water. If he didn't have the quality, i would just dip the inside out water, but you have to dip it in a kind of way that it doesn't cause the hair to like bend like. So the hair is still very straight all right, because there's a way you place it in hot water, it kind of loses shape, and it just looks anyhow, so you have to be careful also, so i went ahead to dip the hair. Just this part to the end where the curls stopped and then i dipped it inside hot water. I don't think i don't like hair, they don't dip inside hot water. It'S kind of very heavy, and it's not flexible so also hair is very important for any braided week. I do so, that's basically it. I really hope i've answered all the frequently asked questions and i really hope to learn a lot from this vlog from this vlog from this tutorial. I really hope she learns a lot honestly and truly because i brought out tips i put out technique. I showed everything i do in achieving a braided wig. We messed up the the edges, but that's fine. I think it's actually not bad, because i'm not really an edges fan, but if i think it was bad, i could just easily go ahead and ventilate it again. I think that's one of the packs of knowing how to ventilate, because you can go ahead and customize a wig the way you want it, so lovely, that's really it for this tutorial. I really hope you liked it if you liked it. Please hit this video and give it a thumbs up make sure to hit that thumbs it up. Let them know that you loved this video, because i really brought my hearts and all the information into this video and also, if you're not subscribed to this channel. Please do subscribe to this channel join this family all right. Thank you so much for watching to the end of this video and if you're, watching the end of this video, you already know you're the one you already know, you're the real mvp. Thank you so much and i'll see you in my next week's video love you bye,


Comments
Grace Meniru: So well detailed and beautiful ❤️
Soma mnh: A tutorial on how to make your own wig cap would be great
Dana Knowles: WELL DONE MS MERCY. IM SO SO PROUD OF YOU. THANK YOU
Da Family Deals: beautiful. How long did it take you to finish up the wig?
iAmKi: Great job sis!
mobia ruth: Thanks for being my inspiration. Your videos are so detail
Lisa Vandy Kinson: Amazing work! Did you use the spry at the back side for installation?
Ukachukwu Judith: This is beautiful
Nathie M: Hey I want to know please, how many times did you spend to do this wig?
Molatelo Motloung: Mind blowing ♥️♥️♥️
FURO TV: Beautiful wise I can seat and do it.
Abdullahi Ibrahim: impressive
Adesina Dademu: Yay , we have missed you. Good to have you back. I don't think this ventilating is for me o. You're really gifted Mercy.
mirriam Chikaipa: Beautiful,,,you are talented.
Desola Ojotu: So I have a question, I bought a frontal ventilated wig and the lace part is too wide for me, how do I make it fit? Thanks in advance
Stella Babayemi: I've been waiting for this
Modukpè Rola: How many time or day you do this…so nicei will try it too
Verona James: I love it
Doreen Abang: How do you remove the wig???
DIY All things: How many weeks did this take?
Epilowe Hope: Thanks dear
Longe Margaret:
Betty -Doris Osei -Afisei: Please where did you get the lace please
yesu kaka: Hi did you make for sale?
Juliet Anyanwu: Hi girl! I’m far from my wig head can I prebraid the hair first then sew unto my wig cap later ? Plssssssss reply thanks
Verona James: ur right about that
Precious Duniya: Did u tie the ends?? I meant the curls side?? Wen finishing it how did u do it
stella omekara: Wish u can make this wig for me
Ciara Azra: Do u make wig for sale i need one pla
Soma mnh: Third
Liliane M.: First ☺️
JaneIjioma: Second