How To Cut And Sew Closure, Frontals
- Posted on 17 April, 2022
- Lace Closure
- By Anonymous
Thankx for watching please like share and subscribe for more amazing contents xo
Lace ventilation series
https://youtube.com/playlist?list=PL3l...
Shop tools on Amazon
1.Brass ventilating needle set
2. Two holder brass ventilating needle set
3. Full lace net
4. Canvas block head
5. Wig stand
Let’s be friends on ig
@wigsbysharon
@life_of_sharon.o
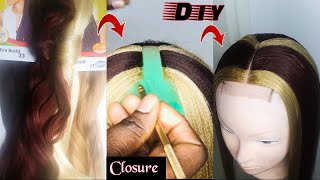
Hey guys welcome back to my channel if you're new here welcome, my name is sharon and please consider subscribing for more amazing content. So in today's video i'm basically going to be showing you guys how you can cut and sew your closures and frontal list so without wasting much time, let's head right into the video, so we'll be using the swiss lace for this. These are glasses and you also need like a tape, your scissors um thread and your sorry needle and your transparent trade, and then you need something to mark the lace, sweets. Okay, so for me i use concealers. You can use like a chalk or anything that you can just basically use to mark out the lace: okay, okay, let's start from the two by four closure: okay, so when you're here to buy foreclosure, what that means is that the closure is running two inches horizontally. That'S from here to here two inches and from the top to bottom, four inches: okay, it's the same thing with um two by six closure. There'S two inches from here to here and six inches from here to here right. The same thing with four by four four by four basically just means from here to here is four, and from here to here is folding five by five six by six, seven by seven, whatever um size of closure is the same thing: okay, so to cut it Two by four closure, because that's what we're starting with according to my foreclosure, the first thing that you want to take note of is the direction of the grid on your list. Okay, so this is the list. If you look closely you'd see the grids, i don't know if you can see that, but i'm going to do a video to show you what i'm trying to say. Okay, you see the grids which is the hose okay, so you see like the grids or the holes running in a straight line in a straight line, and that is where you want um. That is how you want to place your closure. Okay, so you don't want to turn it this way, but you want it to be this way in a way that the holes are running towards this direction. To be just take a closer look at it and you see where the holes the direction the holes are going towards and that's how you want to cut the lace. Okay, that's how you want to measure so first we're going to measure the four inches so to measure the four inches. You just basically want to place your tape at the start of the lace and then just measure the four inches. But what you want to do is this: when you want to measure the four inches you want to add, like an extra for me, i add extra two inches, because you know um that extra lace you have on your list after ventilating that you normally cut off During installation, so that's like the two extra inches that are going to leave okay instead of four inches. So now that we have our six inches you're, just going to mark mark the point where you have the six inches: okay, okay, so we're starting from the top and then six inches there. So now i want to mark two inches running from this side. To this side, so for that i add extra one inch when i want to do this because we need extra space to sew so instead of two inches with marking out we'll be taking three inches instead. So i'm just going to place that here right. So we have three inches from here to here and six inches from here to here, so we're going to cut this out now, so you want to also give like a slightly curved shape at the end. So you see what this is looking like already, so this is all this is looking like, so we have six inches from the start to the bottom four inches from here to here and three inches from here to here. So now you're going to fold the ends so you're just going to fold it into two and then you pin with your office pin so i'm just basically folding the ends and pinning them with my office pins to hold it together. So i can easily sew it. This is what it's looking like so far. This is what it's looking like. So if you have a sewing machine, you can just um sew it around or if you don't, you can use your needle and thread to sew up all these parts together. So now, let's take the measurement and see so after sewing this one we're going to have. You can see that we took six inches and after folding we have five and a half inches, and on this side we have two and a half inches and we took three inches. So this is the reason why you need to give extra space so we're going to use the same process for making a 10 by four frontal, so watch and understand what i'm doing so. What i basically just did was that, after cutting out the 14 by six inches, i folded it into two and pinned the two sides with my office pin. So i did like a curved angle from the bottom, i'm going to the top. As you can see - and i did it halfway so i stopped and then just cut off the excess lace that we would not be needing so just watch and understand the remaining parts you


Comments
evelyn jabule: Thanks alot sis, please what about measurements for 360?
Epilowe Hope: Thanks sis but where you added the curve didn’t show well