Hd Lace Frontal Wig Install *Detailed* + How I Keep My Curls Looking Wet All Day
- Posted on 05 June, 2021
- Lace Frontal
- By Anonymous
Hiiii, today i'll be showing you how I install this HD lace frontal wig.... how i keep my curls looking bomb all day.... anddd how I protect my hair at night! I hope you guys learn something from this video! All tools mentioned are linked down below.
PRODUCTS MENTIONED:
Hot Comb https://bit.ly/34BgeY3
Pencil Flat Iron https://bit.ly/3c9lwhC
Spray Bottle https://amzn.to/3g2xJGc
C O N N E C T W I T H M E
INSTAGRAM: INSTAGRAM.COM/TALENTEDTYE
TWITTER: TWITTER.COM/TALENTEDTYE
CONTACT: [email protected]
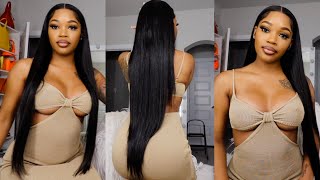
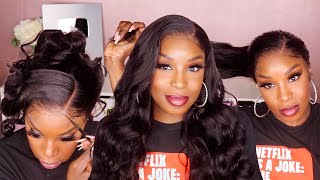
Hey y'all welcome back to my channel. I am tyriana and in today's video i'm gon na be showing you guys how i keep my girls popping all day. I'M also gon na be showing you guys how i installed this wig okay. So first i'm going to take this at the low in a paper towel and i'm just going to clean my forehead. I'M going to put this glue, it make sure there's no excess thermal oils. This is going to help your wig last longer because, if you put glue on top of oily or dirty skin, it's just not gon na stick or it's not gon na last. As long next, i'm gon na take this erica j hold me down skin guard, i'm going to spray on the same paper, towel on the dry side and just applied it to my skin and we're going to let that dry. So the wig cap, i'm going to be using, is just this neutral song, it's kind of close to my skin or whatever you want to stretch it as much as you can, i'm just going to take these little scissors and we're going to cut around the ears. I'M going to be doing a ball cap and i think you could do it two different ways you can either use glue or you could use like a spritz or gel or something i use this olive oil grip gel. I use this with a combination of it's got to be installed, but that takes a while to dry. So sometimes i just go ahead and use my lace glue. This is bow, hold extreme, hold lace glue, i'm just going to use the glue instead because it's not going to take as long to dry and i'm going to use this little popsicle stick to smooth it out. I don't like using my combs or my edge brushes to smooth out this glue because it gets stuck on it and it just ruins my stuff. So i just get popsicle sticks. You can buy them at walmart for a pack of like 500 or whatever, or you can find them on amazon. So i just started drying i'm going to plug on my hot combs, so we could prep this girl over there yeah. This is my hot comb that i got it's made cute. I got this from this girl, instagram girl, girl, studio. That'S what's coming from this icon goes up to 400; no, it was up to 500 degrees and it like shows the actual three that you set it on and like y'all see it increasing, i'm to put it on for 55.. So this is miss girl that we're going to be putting on today. This is a curly wig that i need a few weeks ago. This is my third time installing this wig. I only wear it for like a week before i take it off. So this is deep wave hair. This is the hd lace front and i believe it's probably 26 inches. So first i'm going to take this heat spray. I like this one because it you know, protects the hair and it also leaves the hair. I want to say shiny but like it leaves the clothes to it, so i'm just going to spray it on the hairline and then pop on my back. I'M doing this to make sure that none of the hair sticks into the glue when i lay it. So i'm just pushing all the hair back so that it's slick - and you know not in my way when i get ready to install my wig - and it also looks better so now that this glue is dry. I'M going to go ahead and take my little scissors and i'm going to cut this cap off, i'm cutting as close to the glue as possible. That way, you know it looks more blended into my skin. I'M also not going to cut this thick band and y'all will see why, in a few you can also like kind of pull up on the cap a little. So you can like actually get all the way to the edge of this. But please be careful, you don't want to cut yourself, you will bleed so then i just take this and i just bring it to the leg that way. I don't have to slow down my cat. Now, i'm getting ready to color my cap. Try to blend it with my skin tone. This is what i use ellie girl pro conceal in medium beige. You can use whatever product you like. I prefer a powder product actually, especially for darker tones. I like using a powder foundation - and i just blend it on the cap - you don't want to use products, that's oil-based or water-based, because it will weaken the binds of your glue and your lace will start lifting quicker. So now i'm going to go in with more alcohol to clean up this makeup off my forehead and then i'm going to go in with the skin card again to protect my skin from the glue. So now i'm just putting my wig on my head to get an idea of where i'm going to put it at and i'm going to take my tweezers and just plug some more because it needs more plugging the first two times i wear this wig. I was actually rushing when i was installing it, so i'm just making sure that it's up too far up to my liking, just plugging it more adding more customizations, tweaks or whatever so yeah and the tweezers i use are the very pointy ones make sure you get You some good tweezers. I always find mine at tj, maxx they're like five dollars, and it comes with like scissors and all that so yeah cause they be high at walmart. So get you some squeezes from tj maxx. So today, i'm going to be using the boho extreme, hold lace, glue, i'm going to put three layers and i'm going to make sure that they're like a inch and a half wide. What you see me doing is like the perfect amount you want to have like half on a cap and then half on your skin to make sure there's enough room for your lace, glue to actually hold your wig. So now you're going to take your wig and you're going to place the lace directly into the glue then you're going to just press on it, bring your fingers through it press it. If you need to use the comb, use, the comb just make sure you're press pressing this lace into the glue. That'S how you're going to get that melted. Look i'm just going to press down on this for a few minutes and then we're going to start cutting this extra lace over here by the hair and also gluing the lace. That'S not down! You can see that okay, so this part is for my girls. Two lace be lifted on them sides. You want to make sure you cut all that lace from behind your ear. If you don't cut that, and it's not laying properly behind your ear, it's gon na lift, you need to make sure you cut all that at least behind your ear. They lay out you don't need to hold on to it cut it. You see me cutting this cut it, you don't need it so now you see me adding more glue where it's needed. I'M just going to do three layers again in the spots that i missed and i'm just going to lay my lace directly into the glue and i'm going to use my comb to press it down. Try not getting glue in front of your lace because it's not going to look cute easy with it, but it's not going to look cute. It'S going to be sticky. Your hair is going to be sticking into it. You don't want it like that. Just make sure you just wipe it off if you get too much glue or if you need to use an alcohol pad or something just wipe it off. Okay. So if you pay attention, you can see that i have a little glue in front of my leaves and you're going to see these hairs trying to stick to it. So you want to, if that happens, to you, you want to make sure you use your comb or something and get all the hair out of the glue and then go in and wipe that glue off your forehead. You don't want that on your forehead, because once it's dry, that glue is dry and you're trying to do your baby hairs. Your baby hairs are going to stick into that glue, so you want to make sure, there's no extra glue and that your hair is not stuck like your hair is not glued down, and when i am laying my glue down, i don't put too much on the Sides because i'm not sure exactly where the lace is stopping so now, i'm going back in and i'm going to add more glue on the side, because i can now see exactly where it needs to be, and i'm going to glue that down perfectly so now. I'M just plucking my way, some more now that it's glued down when i first bleached the knots on this wig. I did over bleach it, but i went ahead and corrected it. So now you can see me pouring this wig anywhere and it looks good, looks seamless. Doesn'T look over bleached at all, so if you guys want a video on how i correct that, just let me know down below in the comments or leave a like. So today we're doing the sidebar i'm pouring my pork and i'm also going to take some hair at the bag to cover up the little white piece at the front of the charcoal see and then i'm going to take my hot comb and then press out. My part make it look, neat and sleek. So now it's time for our baby hair. So you can do your baby hairs, a lot of different ways. You can use shells or you can use no gels at all shout out to eric and for showing us how we curl our babies and just get them to look effortless. So i'm going to be using this kiss pencil pro styler flat eye to curl my baby hairs and yeah. So i'm tweezing them, then i'm gon na cut it some and then i'm gon na actually curl it. So here i'm just taking my edge brush and playing with it, getting it to lay how i wanted to get it to you know: do that little curl or whatever i'm just going to do this all over until i get it, how i want it to also, If you want, i'm not going to put anything on it, just curl it, but if you want to you, can use it like a a slight spritz or something just so it get cold and stay in place all day. Because with me, not you know putting anything down, i do have to continually like redo it every day, basically kind of okay. No i'm lying like when i sat down at night, it'd still be holding that curl. But if i don't tie down - and i like get in the shower and stuff - you know it's gon na fall or whatever so the curls gon na fall so i'll be having to redo it. But whenever i tie it down, i could just like wake up in the morning like comb out the curls and they still be cute, but i really do love how natural and soft the flat iron method makes your baby hairs. Look it's just so cute and effortless. So yeah, that's how i've been doing mine lately and i'm just leaving these clips in so y'all can see how i just play with my baby, hair and change it up. You know: try different things to see what i like. Oh, i can't believe so now. I'M just clipping my hair up, so i can tie down my beauty hairs. I'M going to use an elastic band to tie them down. This just helps with your legs. It helps your legs melt even more and it helps your baby hair stay in place, but i'm just doing it so i can prepare to you know style. This curly hair first product i use is water, of course, you're going to need water, and i use one tool, and that is my detangling brush, that i got from maybe walmart, i'm not sure. So. First, i'm going to just go ahead and spray. My hair, with some water, i got this water bottle from baby amazon's. It was maybe seven eight dollars, i'm not sure, i'm gon na link it down below for you guys. So i just spray my hair with water make sure you get those ends. Girls now that it's done, i'm going to use my olive oil mousse by ores, i'm just going to pop it in my hand and smooth it through my hair. So now i'm just going to take my brush and brush this through. So now i'm going to repeat the same process to this side, so this product, you literally need, if you have curly hair, this is going to keep your hair looking like this all day. This is the blueberry bliss curl control jelly by curls. I got this from target, i believe, if you just use water and mousse by the time this dry up, it's going to look similar to what we started with. But if you use this, this is going to keep your hair looking shiny, curls popping, and it's going to still give you that weight. Look it's going to look like you just wet it! So i'm just going to run this through. I'M not going to put too much make sure you get those ends really good. Add more water. Add more mousse. Add more of that curl jelly! You just want to make sure it looks nice and juicy at the bottom. You don't want it looking crusty and cute and the last products i use in my hair. I only use either or i don't use both of them. Yes, i do i like to use this og eggs, coconut oil, weightless, hydrating oil mist. I like to use this product, you just mist it on and give you that little shine y'all see the shine. It gives you the shine, or i will go in with my bio silk sub therapy. I just use a little this rubber embossing on my hands and just rub it through my hair. This product smells so good and it looks so good on every hair texture. So let's take off my wrap. So now i'm just combing out these baby hairs. You know getting it to look even more soft now, if you need to you can go ahead and sharpen up your part. Mine is pretty much giving already like it's giving, so i'm not going to put any makeup on so this is the final look. How my hair looks yes, i did that it's very much giving the girls very much scalp and extraneous with wb hairs. I look how freaking cute curls. Is she popping popping popping i'm going to show you how i tied up at night to keep it? You know. So i'm just going to put in some sections - i'm actually just going to make this another section, and i'm just going to twist my hair into a little twist that way it's not getting tangled, while i'm sleeping so i'm basically just going to be putting four twists In my hair, i'm already so after i put these twists in my hair, i'm just going to pin it up or clip it up. I'M going to tie down my edges and i'm also going to either put on a bunny or just tie down my hair with a scarf. So that's all for this video. I hope you guys enjoy don't forget to like comment and subscribe and as always thank you guys for watching

Comments
Drewkayla D.: Im so glad I've watched this it really helped a lot thanks boo!
Taeyaa X: I loved this video thank you
Cutie 2: My favorite, more wig videos please!
Darrie Robertson: The baby hairs are givinggg✨.. but def do a video on covering the knots!
ASJAHDIORR: yesss loving the baby hairs
PookieThePlug: Looks good cousin
Aaliyah Ireille: baby hairss your beautiful!
Simply Danielle✨: Yesss
Quenga Don: Live