Freebornnoble Wigs Hd Lace Frontal Wig Application | Sixties Inspired Look 2019
- Posted on 02 September, 2019
- Lace Frontal
- By Anonymous
***** MY MOST REQUESTED VIDEO *****
Instagram @freebornnoblewigs
WATCH IN HD...
please thumbs up share ✨ & subscribe for more videos!
Hair Details
▷ BUSINESS PAGE - To Order Extensions & Wig Services
INSTAGRAM ‣ Freebornnoblewigs
Email ‣ [email protected]
https://www.instagram.com/freebornnob...
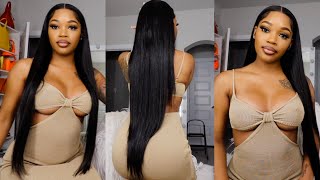
14 inches HD LACE FRONTAL WIG
Product Used
Tru Zone
Blue Bleach Powder
40 volume Peroxide
BOOTS STORE
VO5 / boots Heat Protector Spray
VO5 / boots HAIR SERUM
Holding Spray
Got2be Gel
Tools
Andis Hot comb - Amazon
Nicky Clarke Hair Straightener
♡ ♡ ♡ ♡ ♡ ♡ ♡ ♡ ♡ ♡ ♡ ♡ ♡ ♡ ♡
▷ CONNECT WITH ME!
TWITTER ‣ Freebornnoble
INSTAGRAM ‣ Freebornnoble
SNAPCHAT ‣ Freebornnoble
▷ MY CONTACT
Got a question?
Email: [email protected]
Want to work with me?
Email: [email protected]
MUSIC:
Let You Go (feat. Tara Flanagan) (Instrumental) by Spectrum https://spoti.fi/2ZLAORn
Hi guys welcome back to my channel, so I'm getting straight into this video. So this is the Freeborn noble, wigs, HD lace, frontal, and this wig is a must-have. I am not joking just showing you exactly how you received it for lace, wig and how you can customize it to your own taste. So now I'm applying my bleach and peroxide mixing it together to get a nice thick consistency make sure you use gloves, make sure you have the right equipment applying this onto your lace front, so bear in mind. This is a HD lace front. Also, it's a skin-like frontal, so you have to be extremely gentle with it. So here I'm applying the here, I'm applying the bleach and I'm basically putting it around the the wig just around the lace area, and I would leave this in for about 25 minutes. Sometimes you'd have to probably wash it off after 15 minutes, depending just depending on how what you want it bleached. So here we have the finished, look after washing it off and add in my conditioner to kind of get the moisture back into the hair. And here you have it see it's skin, like beautiful, beautiful beautiful Here I am plucking. The frontal now now bear in mind. This will take a good while so give yourself an hour or an hour and a half to make sure you pluck this very very well. I'M adding my heat protector spray, my serum and then I'm using this lovely hot comb. I absolutely love this hot comb. It'S called andis and you can get this on Amazon. I don't know a specific link, but you could just type in Anders and yeah there. You have it, as you can see, I'm using the hot comb and I'm putting the hair and section-by-section just to get it as flat and natural as possible. You could only see the hairline, it's absolutely stunning. The HD lace, I just say, do little to no plug in because you kind of wanted to last you for a long time. You also wanted to look as natural as possible. So that's why I didn't plug it as much as just a normal frontal voila there. You have it see how beautiful this lace frontal wig is so now I am styling it I'm cutting it. You know get the shape of the bob and you know we're going for the 60s look. I forgot to mention that earlier, so we're going for the 60. Look 60s look, and you can see this all over Instagram Twitter, so I just said why not just film this with this full lace wig, why not? So, as you can see, I'm doing this very carefully and I'm going back to trim ish and then I head on to styling it, and you could just watch this carefully, how I kind of work my way down. So I have it straight and then I curve it when I get towards the bottom and then I add both two sections just to kind of give it a nice form. So it doesn't look like one is up and one is down so you can see. I am doing it gently perfect voila that is so now. What we would like to do is make sure the unit matches your skin as much as possible, so I'm adding my tinting spray as well as my powder that matches my own skin tone. I added bands as well around the ear to ear just to give it more security, and I just absolutely love it. Look at our natural look at our natural. It looks so now. I'M just gon na get my comb and I'm going to mark around the ears and I'm gon na cut the ear area, the excess ear area, I'm going to cut it with scissors gently and then I'm gon na use got to be blue for this particular style. Just because I'm just going out for like a few minutes and taking pictures and that's it, but now you can see how it matches my skin just perfectly. Usually, I recommend you to do this before applying your makeup, because it kind of gets a little bit messy. It gets very messy, so if you want to do this next time, make sure you have your makeup on after you apply the glue on your head and the lace on your head as well. I mean the wig on your head. So now I'm applying my got to be gently and I'm going to blow-dry it. I'M gon na place it on carefully. You just make sure you get it tacky and not too dry before applying the lace onto the glue until the gel area, and that's it really for the video. I hope you enjoy it. I'M just trying to show you how easy can be once you. You know exactly what you're doing this. This frontal unit is absolutely affordable. Anyone can get it, anyone can wear it. You could wear it for occasions, it's very, very easy to put on and just go so make sure you place your orders by emailing us on book. Free bonobo, hair at gmail.com and I'll see you all in my next video make sure you like comment subscribe to. My channel also make sure you follow us on Instagram freeborn over wigs. You get to see new Styles new trends whatnot, but yeah. It was lovely having this video up and I hope to see you guys in my next video bye
Comments
Deborah Grace: Looked fab I really enjoyed this video Detailed and easy to follow ... well done Cam xx
insert name here: this is such a gorgeous look
BELLA BELLA: You slayed the hair sis love you
Above Rubies TV: You’re so pretty!! ✨
Sandra Frank: Wow nice work
RheRheSmily: Reminds me of gabrielle union in 10 things i hate about you movie