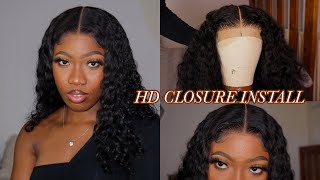
Beauty Forever Hair | Hd Lace Frontal Wig
- Posted on 28 February, 2021
- Lace Frontal
- By Anonymous
Hey y’all it’s my first wig install video using beauty forever hair! It’s a hd lace 13x4 frontal it comes pre plucked and everything! I got mine in 20inches it’s linked down below!
___________________________________________________
Coupon code $5 off: https://m.beautyforever.com/?mw_reward...
Link to wig: https://www.beautyforever.com/beautyfo...
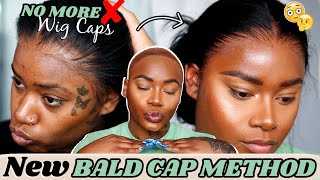
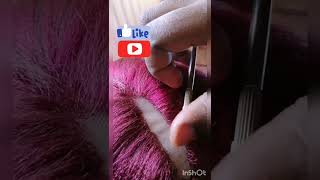
So, hey y'all, okay, we're back with another video and today, as you can see, we're back with some a little bit of inches a little bit of bundles okay um. This is going to be a bit like how to slash. Watch me install my wig video um. This wig is from beauty forever, so beauty forever hair. That'S what it's from um. I got a 20 inch 20 inch, frontal hd, hd frontal um. It is, i don't know, i'm pretty sure. It'S like you know. Five inches goes back. It goes back to about like um about like right here, it's the middle of my head, obviously ear to ear, because it's a frontal has a decent parting space on the sides um and, like i said it's 20 inches. So it goes down right here so right under my boobs um real cute, i like the hair. It'S the hair is very nice, i would say um. I think this was 150 density, but i will put all of that in the description box down below um, but yeah. If you want to just see me, you know get into the hair, then keep on watching and um. Oh, and also, let me show you what the hair came in, so the hair came with um a wig cap. That'S not my color, but yeah a week out, and it also came with this elastic band that you can attach to the back of your wig. I didn't attach mine because it kind of fits snug for my head, but um yeah. It comes with those things and it obviously comes the wig, the wigs in the back. So yes, it also is um a pre-plucked frontal. And yes, so i did some slight plucking customization and bleached my knots off camera um. If you want a video on how to do that, let me know - and i can show y'all that part of it, but basically this video is just all about the installation like hockey it's on my head, how i got the baby hairs together, um and just yeah. How did i make this shake? So if you want to see that then keep on watching, so i have already um well, the wig was pre-plucked, but i already went in and did some more extra plucking not too much, not a professional or anything. But i tried to you know: get it to look good or whatever, so now that the plucking's done i'm going to install it here on camera for y'all, so it's probably going to be a voice over and just have y'all watch um. What i do and i'll show you some products that i'm using and stuff like that? Okay, so here i'm using the got to be glued spray, it came out kind of wrong, but yeah, i'm just spraying my edges to push them back right because you know i'm doing the ball cap method and if you ever did this method. You know what you got to do. You know. What'S up so i just pushed my edges back as much as possible. Then pull the wig cap forward. I got a brown one for my skin tone. Then i cut my ears out. I saw a glimpse on tay. Do this so now i do it and yeah it makes it more flat. I guess that's the point of it, but whatever um yes, so this is just me getting my ears together. Okay, doing the most, and now you just spray your edges and a little bit in front of your edges, um with the got to be spray, and that should hold it down. So here's me just spraying my edges and then i'll start spraying, like maybe a little more kind of in front of my edges. Well, as you can see, some of it kind of came in front of my edges, so you know you know the vibes um and i like to spray a little bit beyond my edges in the back to make sure the wig cap is on on and then You know what you got ta, do you got ta dry it. So then you just hit it with a dry real fast um mine was on hot setting, but you could do it on cool, either way, you're just trying to wake up. Okay, now you got ta cut off the wig cap extra pieces or whatever i use this razor um, it's the first time i actually use the razor. I usually use scissors, but i think the razor works better as far as like getting a close cut. So it doesn't get messed up or whatever so yeah. As you can see, i'm just horse using the razor like kind of like horizontally, try not to cut yourself. You know be careful what not and then yeah then i'm just gon na go on the other side. I want to come back and like clean up the pieces i missed, but this kind of just like first patch trying to get everything done so yeah all right, i'm back with the got to be, and i like to just hit the got to be on the Little edge of the wig cap to kind of really melt it in because i don't want it to like kind of look crazy like i was looking before so i just hit the edge of the wig cap where a little got to be, then i get my Little scarf tied down, as you can see right there. Yes, just a little scarf honestly, i would say: y'all invest in a like a thin scarf, especially like just for your edges, not for nothing else. So yeah. Now i'm just pushing down the little uh corner pieces and i'm gon na get a blow dryer and push them down to get them real, stuck down or whatever i'm doing to this side and the other side and kind of like blow dry. My whole head again well now that all the pre-prep is done, and now i look kind of bald um we're up. Okay, we're giving okay we're giving it now, it's probably time to get the wig on. We got the alcohol. You know the vibes just just to cleanse the area. Okay, so now i'm just wiping off cleaning my forehead, basically wiping all the excess um got to be glued any dirt or anything else. On my forehead and now i'm just cutting off the little like ear tab. So it fits my head specifically because you know these wigs ain't just for your head when you get them, so you got to make that customization as well. So that's just what i'm doing right here! Okay! So this is when i decided that i was going to use some bold hole to actually stick this down, so i'm just pushing all the baby hairs and all the hairs back as you can see, i'm using this hot comb that i got from amazon i'll leave. The link below, if you want to purchase it um, it's a plug-in one of course but yeah. So i just pushed all the hairs back with the hot comb, and now i am just placing the wig where i want it to be trying to figure out what it's looking like, what it's hitting on and now here's the razor comb. I honestly highly suggest using a razor comb to cut your lace now that i've done it, because it's my first time and it makes it so much easier. It makes that jagged edge that you really need to make it really melt into your skin, like girl. If you wasn't using a razor to cut off your legs before, let me tell you you need to start okay, so yeah, as you all saw, i started from the middle and went to one side now, i'm going to the other side, and i like to just Do like a beginning, cut and then i'll come back and do any extra cutting that i need to do. But you see that jagged edge. That is creating that's like perfect, for when you actually are melting it down so yeah. So now that it's all off and i cut off all the excess lace - you see that jagged edge - i was talking about yeah um, we're using bold hold xl. It didn't really focus, but that's the one i'm using i'll put in the description box, and that is what we're going to put over our little area whatever. So i did a little dots try to keep it thin, um and whatever. I don't really actually like measure out like all that stuff, like some people be doing, i just try to get as close to the hairline as possible and yeah, and then i took my little edge brush and i just flattened it out. I put a little bit on the um, the wig cap as well just to make everything seamless. You know what i'm saying yeah so yeah, i'm just smoothing down: let's pull them all and then after you smooth it out, you're just gon na wait for this first layer to get dry. We gon na do two layers, two layers. So now it's like white. So now we're putting on another layer, okay, so after a little dance party, we check it's kind of white, so now it's time to get this lace on there. So i started with the middle place that on there i topped my fingers, but you should have topped with your fingers. You should get a tool, so it doesn't turn white on you from your um. You know finger oils and whatnot, so i got a little um. Yeah i got a comb placed everything back. Um tried to get everything flat and now, as you can see it's a couple of places, i don't have any glue there, so i'll just go back and add some glue but yeah. This is just me, checking on it and all that cutting some lace, making everything good or whatever, and now you see i'm going back in some places and i'm gon na be adding the glue. So, let's see how do i do it? There is yeah me adding some extra glue, so i just added it to the lace, make sure i got it exactly where i needed to go. I just put a little bit: try to get it to dry a little bit and then i push it down. So now i'm just taking out the baby hairs or what i want to be baby hairs and just separating that from all the rest of the hairs, i'm gon na get my little scarf that i was talking about and i'm going to tie down that area. Okay, so i'm showing y'all this balm hair wax stick, and that is what i use to make my hair. Actually it's my first time using, but i really like it um just to make your hair flat. You know the flyaways go away other kind of stuff. I put that on my part before i took my hot comb and well, i guess i kind of fixed my part first and then i took my hot comb and you know smoothed it down or whatever. So i guess you would probably see a little bit of that. Yes see how comb my smoothie down, okay, i decided i was just going to flat iron, the hair, so it's just me starting um. I do the chase method. Of course, the best way to fly iron is hair, the hair flat ironed actually really well and real straight real smooth. So i would say you know 10 out of 10 would recommend for that. But yeah just you know it's a little bit of b-roll. Let me straighten my hair: is i'm only doing cash guys? Oh, is it's time to get this? You know, lace, slash, baby, hairs, stuff together. Okay, that looks good y'all. That looks good. It'S freak okay period, so here's me fixing the part again trying to get it straight and whatnot um that was kind of hard, so i decided to pluck it some more actually after i straightened down the piece hold on i'll show you yeah right here, i'm just Going in doing a little more plucking trying to make it straight okay, so i went in and did a little bit more plucking on the actual edges of the lace, and i use my nairobi styling um foam to start, you know figuring out what these edges are Going to look like so this time, i did it really kind of spoopy, but i think next time i install the wig i'm going to try to just do like a no baby, hair. Look and i'll see what it looks like so check out my instagram at lindyor and you well at underscore lindy or oh. I almost got my own instagram. What what is this but yes, check out my instagram to see that look, because if i do it i'll definitely be posting it on there. I put some ice on you got. It is so after everything i'm just. This is like the last piece of little baby hairs that i end up doing just a little swoop on the edge and oh, the other edge, to try to make it look the same so afterwards i just hit it with got to be just to make it Them a little more stiff and like put together. I try to do it like a slight layer: nothing not too heavy um, so yeah, then, as soon as you can a thin layer of got to be spray and then our last time wrapping the hair up is right. Now so we're just going to take the head, wrap scarf, lay it down nice and flat, and that's just that on that, but yeah. So this is the final look. I really like it like. I said in the intro it it comes like right here under the booby, so that's really good. I like i wanted something kind of short and i probably might cut it and like style it more, but um yeah. So this is just this is where we're at this is the final finale look. Thank you. So much for watching like comment subscribe, how it should go down in dm's, and let me know if you want to see more videos like this. You want to see more wigs, more weight, installs you're, trying to see how to bleach and pluck your frontal all that so yeah thanks for watching a robot
Comments
Lizette Baldeo: You did an amazing job for this being your first frontal! Please do more wig installs & how to bleach and pluck your frontals too! I also got hair from Beauty Forever and can’t wait to try it!
Age of the Aquarius: layed and slayed! ⚡️
Gumwings: great video