4 Easy Relaxed Hairstyles Using Clip In Extensions | Jazzie Jae T
- Posted on 13 November, 2021
- Clip-in Hair Extensions
- By Anonymous
Are you looking for some new styles to incorporate in your rotation? In this video I share 4 different hairstyles that can be recreated in under 10 minutes and are simple to follow along! For this video I used clip in extensions. If your looking to create your own clip ins check out this video here :
How To Make Clip In Extensions https://youtu.be/e-C5O5bNKUQ
Thank you everyone for subscribing to my channel! S U B S C R I B E H E R E http://bit.ly/2t2XSPz We're now at 77k supporters ! Make sure you hit that notification bell so you will be notified when I upload content as my normal upload days are Monday and Thursday at 7am & 5pm central time BOTH DAYS! However sometimes I like to throw in bonus videos!
Checkout A Few of My Other Relaxed Hair Videos
How I Apply My Clip Ins | Jazzie Jae T https://youtu.be/Vdvj8IoG1Ig
Why I Love My Relaxed Hair TAG https://youtu.be/dOs52HN4hDk
How To Grow Relaxed Hair https://youtu.be/V0ltTUIq8mA
How To Wrap Your Hair https://youtu.be/bJShZumZ6ic
Corrective Relaxer : Under Processed Hair https://youtu.be/r5eed9x3yYs
Lets stay connected on social media
Follow me on my social media
Twitter : http://bit.ly/2HF7ljw OR JazzieJaeT
TikTok : JazzieJaeT
Instagram : http://bit.ly/2F0iltd OR JazzieJaeT
Tumblr :http://bit.ly/2otAxkL OR JazzieJaeT
SnapChat : JazzieJaeT
Facebook: http://bit.ly/2ompDya OR JazzieJaeT/ Jazmine JazzieJaeT
Click here to subscribe to my channel:
https://www.youtube.com/c/jazziejaet?s...
If you are a company looking to contact me I can be reached at [email protected]
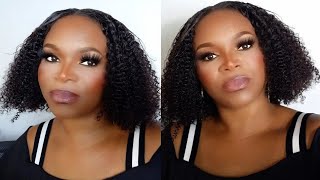
Hi guys welcome to my channel. My name is jazzy and in today's video i want to share with you guys how i create four easy hairstyles use, lip and extensions. These hairstyles are great for work or even school. The first style i want to share with you guys is the deep side part a classic look and also the easiest tutorial to follow in this video. The first step is to apply the clip and extensions working. Your way from the back to the front, i use the two clip west closest to my nape. When you're sectioning off your hair, making your parts you don't have to have the perfect parts, just a straight enough guide to apply them neatly, that's good! Moving on to the front section, i applied the longest four clip width because i have a small head. I had to curve my part this way, so i could wrap the extension around after you've applied majority of the extensions it's time to create the deep part i like to start my part off a little off centered from the middle and then curve it to create That deep side part on the opposite side. I added my last two extensions to create volume, as this side has more hair. To finish off the look, i styled my baby hairs with the am pro styling gel. This is the finished look, and it was quick and easy. It takes less than five minutes to achieve. Moving on to the second hairstyle transitioning from the deep side part with the extensions in the same position, i start off brushing my hair straight down when braiding your hair, close to the hairline, make sure your hair is covering the edge of the extension. A great trick is to loosen the braid as you go. By pulling the hair slightly, i like to leave a few small strands of hair out of the braid to style later, the goal of this style is to braid the hair downwards, while adding hair. As you go, while also loosening the braid to create an effortless look, i braided the hair all the way down to the ends, as this style doesn't look good with hair ties on the end, i suggest using rubber bands only if you want extra security at the Ends of the braids, i then go back over the braid and loosen it up even more separating the hair to make the braid look fluffier, i repeat the same steps on the other side, leaving out more pieces of hair to style. I follow up with my flat irons to the loose pieces of hair we previously left out, creating a loose curl, making the style super flirty and girly. I really love this style. It'S super easy, but it completes any look in a short period of time for the next hairstyle. You want to start with a clean slate by removing all the clip in extensions and making a part down the middle once you've secured your middle part. I then like to go ahead and section off the front from the back and clip it up using an alligator clip focusing my attention on the back now i like to part my hair off right above my ears and clip that section off as well. This will help us eliminate any tension that this style creates on the nape. When you secure your ponytail once the hair has been applied to the back. I didn't like to focus my attention on the front by re-sectioning off my hair down the middle. I then apply a weft above my ears on each side, far enough away from the part where it still looks sleek, while adding volume to the ponytail for this style. I use seven out of the ten of the extensions once they're all applied. I then like to take my brush and smooth everything down and before i secure my ponytail, i take a dime size of gel and i apply it evenly throughout my head making sure i have no flyaways, i like to use hair scrunchies for this style, as it Removes the tension of the bulkiness and makes it seem more realistic versus using a smaller hair tie. This style is super chic. It can be worn dressed up for a date night or dressed down for a sporting event. The last style is the most difficult, even though it looks like it takes the least amount of effort. The first step is to create a part using your ears as a guide and instead of clipping the hair downwards, you want to flip the hair up. So your webs will be going in the same direction as the position of your bun. I applied the clip-ins upwards three times and on the fourth fifth and sixth wet i apply the clip-ins in the normal position for the style. I only used six wefts and when they were all applied, i flipped my head in the upside down position to help brush the hair in the position for the bun placement for this style you're going to need two hair bands, one small hair tie and a hair Scrunchie to help secure the bun after i brush all of my hair upwards. I take my first hair tie to gauge if my bun is centered not necessarily to secure the ponytail. I take the hair scrunchie to secure the ponytail by replacing the hair tie with the scrunchie making sure i have a secure grip. I brush my ponytail forward and i wrap the hair around my hand, creating a loop wrapping the ends of the hair to the back. This adds to the messy look once you've manipulated the shape of the bun. I then like to go in with the second hair tie and secure it in place to help tuck away any hairs that are out of place, and that is how you master a messy bun. I hope you guys found this video extremely helpful and found a few new hairstyles to try out if you did be sure, to give this video a thumbs up. That really helps me out here on youtube and also, if you're interested in the clipping extensions. I use for this video make sure you guys check the description box. If you want more details, i'll catch, you guys in my next video. Maybe you should take this

Comments
Mrs. FWR: I absolutely love these hairstyles so cute and so easy! They all look beautiful! I will be watching the video on how to make my own clips-ins!
0tismadaline: Absolutely gorgeous styles and it blended soo well
Janice Mayers: Great quick and simple - when you know how . I like the way the first style went into the second style so easy thanks for sharing ❤️
Shakeira C: Absolutely love these styles!
Chassity Oubre: You part hair like a pro!! I love that French Braids style
Rita Walker: The one with the two braids the most I love ❤️
JC_DubbJr: I follow you on Twitter Keep doin ya thang girl
Tarica Awesomeness: All styles looks beautiful. Where do you get the clip in extensions to buy?
From Darkness to Light Scriptures: Great video.
Leslie: omg people with talent piss me off
Noah Baker: hey going on a date today any advice and nice video i wish i had hair