How To Install Prebond U-Tip Hair Extensions - Doctoredlocks.Com
- Posted on 26 August, 2011
- Fusion Hair Extensions
- By Anonymous
Supply: doctoredlocks.com, Questions: [email protected]
Fusion installation for hair extensions doesn't get any easier than this! Doc walks you through the process of applying U-tips.
Products Used:
The Classic Heat Wand:
http://www.doctoredlocks.com/product/T...
Crocodile Clips:
http://www.doctoredlocks.com/product/c...
Steps:
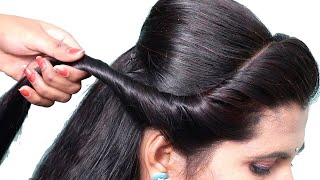
1. Isolate a piece of the natural hair using a clip.
2. Position the extension hair onto the natural hair with the adhesive tip just a few millimeters below the scalp.
3. Fuse the bond and the extension hair using the heat wand.
4. Release the bond and let cool slightly and roll the bond into place.
5. Do a rotation test and check for cross hairs; reheat and reposition if needed.
6. Repeat until desired style is reached.
For more tricks, tips and hot deals "Like" us on Facebook!
http://fb.com/DoctoredLocksInc
For hair extension packages and tutorials, visit our website!
Adding fusion you tip extensions is simple and easy. The first thing that you're going to do is separate a small amount of the natural hair away from the rest of the hair and add a clip underneath that strand to hold it up above the rest of the hair. Next you're going to grab your you tip extension and position it just underneath the natural hair and you need it to be a few millimeters away from the scalp. Once you have your tip in place, take your heat wand and position it over the bond and wait until you hear a slight sizzle from the glue. Adhesive melting pull your wand away. Let that cool just slightly while it's still forming! You want to go ahead and roll that together once you've added your you tip bond. The last step is to make sure that you can do a full rotation with that bond. If you can't, if it feels a little too tight to the scalp, it's going to be really uncomfortable for your client, so apply a bit more heat and move that bond into a different position until you can get that full rotation. The other thing that you want to make sure that you do is when you roll that bond into it's nice cylinder shape. You need to make sure that you're doing that at an angle that you want the hair to lay. So when I did that, I positioned that hair going downward if you position it so that the hair is coming out like if you're not thinking about it, and you go like this - that hair is going to stick straight out. So it's really important that you make sure that you actually position it where you want it to go. The last thing to note is that you want to make sure that you don't have any cross hairs in this small section, because if you have little tiny hairs that are supposed to be in different sections, that's also going to be really uncomfortable for your client and From there you just continue adding those bonds until you have a full installation. Oh

Comments
capetry9109: Ahmaaaazing. My first two looked like crap when we first put them in. All the ones after this tutorial look awesome. The rolling is key.
gaylene sillito: how long do they last for ?
Doctored Locks: Yay!! So glad this helped you. :)
Dawn Lynch: can you use this type of hair with micro rings?
Fairytalejunkie: Can you use a flat iron or do you need a special tool? I plan on doing it to myself no clients at risk :)
Kristy Elizabeth: What temperature is required with this tool
Ashley west: i love your hair!!!!
Daisyinfectious beenie bow: i want to do this to my hair but will it damage my hair!? D:
Doom Doll: Love ur hair
jessica kiefer: Well...she made this look too easy...lol. I bet I would screw this up in a hot minute!!! But, I really want extensions....I am getting older and my hair is thinning a bit.....ahhh, sigh......might need to think this over awhile. LOL
GWEN WILSON: You can just use straight iron ?