V For Volume I-Tip Hair Extensions Install For Density By Dorothy - Dreamcatchers Educator
- Posted on 02 October, 2020
- Fusion Hair Extensions
- By Anonymous
Model: Madison
Installation: DreamCatchers I-tip V for Volume Density installation
DreamCathers Educator: Dorothy
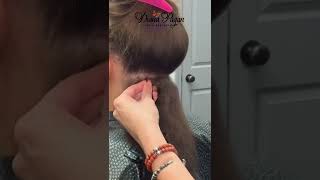
On Madison today we just added volume. What that means is she is only really looking for density, she already has her length. So what we did is alternated between two different colors OM4 and 711. OM4 is going to be an ombre mix, and 711 is going to be a blended two-color result. On her, Dorothy used light brown cylinders and full point extensions. Madison has an average texture that matches the cylinders that Dorothy used.
DreamCatchers - The World’s Best Hair Extensions
For Stylists: https://bit.ly/3hCG1Dn
For Clients: https://bit.ly/3c3Yw2l
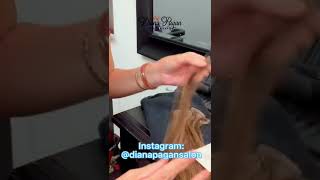
Okay, hey everyone dorothy reitzman, here one of the dream: catchers educators today, i'm here with my beautiful model, maddie and she's, looking for just density. But what i'm going to do is i'm going to enhance her color just a little bit by giving her some more dimension with it, while giving her the density and volume that she's looking for today, i'm going to do a v for volume on her and i'll Show you exactly how to do that in just a minute, so now that i'm sectioning for my vapor volume for my density application, it's going to be approached differently than what you would do, your classic full head for classic full heads, you'll start down on the nape Working your way up what i'm going to be doing on her is i'm going to be working with the rounds and the heights of her head to enhance that to give her the density. So i'm going to be sectioning right along her parental ridge and then i'm going to be doing a steep, deep v to reach back into her occipital bone. This is because the parietal ridge is the widest point of the head on the sides, and then the occipital bone is the widest point on the head in the opposite dimension. So, by placing hair extensions in these areas, you're already enhancing those areas that have the height to them, giving her that volume that she's looking for and then all the colors going to be added as well. So when i'm working through the side here, i'm going right again on her parietal ridge, i'm taking a horizontal line, you want to be very clean and precise with your line so working with like a tail comb versus using your clips or something like that, you're going To be able to get a very clean result, so i'm going to be working horizontal along that parietal ridge and then what you're going to do is you're going to dip down into a deep v hitting the top of her occipital bone through here each person is Going to be slightly different as every single head is not going to be the same, everybody has slightly different ridges that you're working with and then different depths and sizes of heads in general. So if your v looks a little bit different than mine, that's going to be fine as long as you know why! What you're doing what you're doing i'm placing it on the parietal ridge to get that height on the side? And then i'm dipping back at that. Deep v to hit my occipital bone to also hit that reach in the back, trying to work as clean as possible, also with trying to keep it simplistic spin, her around make sure i'm balanced on both sides or that i'm hitting the center back, because you do Want to be very balanced when working with your head shapes, although even if somebody doesn't have a balanced head shape, you might be able to help balance out that area that they're working on or that they're lacking on one side or another. So i appear to be balanced to my knowledge that i can tell so i'm going to go ahead and set this down, clip this up and then work with getting her flyaways laid down nice and clean everything's up in one. Then i'm going to grab my flyaways blondes and she also has that finer texture, they're, going to have a tendency to have a little bit more flyaways than others. So we have the flyaway velcro strips you're just going to grab it. It just has some grip through here and you're, going to place it right at the edge of your section and go against. I'M sorry go with the grain of the hair, not against the grain of the hair, so i'm going to grab it right here. Push just a little bit to create that tension. You'Ll notice, it's going to clean my line up right through there, i'm going to take my other one. Do it to my other side, same thing, tension clean all the way through and now i'm going to go ahead and get my cylinders. Threaded onto my threader and i'll start my application as i'm starting my fifa volume, there's not one right or wrong area that you can start i'm starting in the front. I just like to get my side panel done first and then i work towards the back. I like to get my exact color placement that i want around the face and then, if i need to finesse the colors at all, it would happen in the back. If you want to start in the back and work your way forward. That works just fine too. I'M going to be working with about two two and a half bundles on my model today, just to give her that volume that she needs on average. It should take two bundles when you're doing your v for volume, but each head shape is a little bit different. So i would always anticipate going a little bit more because you'd rather have too much hair than not enough. So right now, i'm starting on the sides. I am going to be starting one to two finger widths away from her hairline, it's on average about a half of an inch. The reason i do that is so when she pulls her hair back, you don't see it. She does do cheer a lot. So i want to make sure she's still able to pull her hair back and it's not going to be noticeable. So as i go through, i'm just going to take a fine sliver of hair to ensure that it's nice and clean on the underneath. Now that i know i'm starting in this front section here, i'm going to take out that hair right around the face that i don't want to apply the extension once i've determined how much hair i want to leave out. I am then going to dwindle it down to the size of my cylinder. You don't want the hair to be any bigger than the size of your cylinder. The reason being is the hair naturally grows straight down by putting in extensions you don't want to cause any damage or breakage, so you don't want to alter its natural growth pattern so by me, keeping the hair going straight down, even as it grows out. It'S going to stay in its natural growth pattern. If you start getting triangles and over directing hair from different areas, it doesn't naturally grow that way. So you could create damage because there's too much tension on certain parts of the hair or you could create new growth patterns. So you want to be very cautious about that. You also want to make sure that you don't have any over direction from the underneath. So i just felt right here that i have a little bit of over direction, so i'm going to slice that little piece of hair off it needs to be a perfect square of hair, which means it's even on every single side. So now that i've determined that this is the exact size of hair that i want to put in my cylinder, i am then going to grab my threader, i'm going to put my fingers through it wrap it around. I have chosen the light brown cylinders. The reason i chose the light brown cylinders is because i want to match my clients, natural regrowth. I don't want to match her extensions, because if the wind blows - and i have too light of a cylinder - it's going to be really noticeable. You want to match the natural regrowth so, for whatever reason it gets seen, it looks like a shadow or a regrowth, so i chose light brown for her. I'M also working with full point, which is just average for your clients, meaning she has no concerns. Her hair is not extremely fragile or anything like that. Once i put my cylinder on, i'm then going to take my eye tip sticking to the bottom. I'M going to pinch my hair so that i can let go and i can maneuver with my crimpers once i do that. As you can see, the tip is outside of my cylinder, but you always want the tip to be covered. So with my crimpers, i'm going to take my cylinder and i'm going to make it flush with the tip of the extension having that cylinder flush with the extension is going to protect the tip of the extension making your hair be able to last longer once i've Done that i made it flush, i crimped it nice and tight, and then it's going to lay completely flat to the head. I'M going to be placing all of my extensions side by side no natural hair in between, because i'm trying to build that density for her. Putting them right next to each other is always going to build. If i wanted to do more layering, i would leave a space, and then i'd put my cylinder right here, but we're trying to give her maximum density and give her that different color variation. So i'm going to be putting them right next to each other, so i'm going to dwindle down. I'Ve got my square of hair. I'M going to install my next extension directly side by side of the first one. I installed nice movement giving her a little bit of dimension around the face, as you notice, as i'm installing my extensions. If you look really closely at the hair, the grain of hair, that's going straight down, you will notice that there's a little bit of a space in the center of my cylinder. The reason for that is because i have an even distribution of weight, as i'm clipping. My cylinders tight, so that means the hair is splitting into either side your goal. When you're doing your extensions is to have that even balanced weight because it's going to grow straight down and it's not going to have a tendency to flip or turn. If you have all of your hair, that's inside the cylinder shift it to one side or another as it grows and gets that movement away from the head. It'S going to have a tendency to flip or lean in that direction. If you have it just like this, where the space is right in the middle, that means when you clamped it down and you're getting your placement done. It was exactly centered with how the section naturally grows, so it created that perfect space in between so as you're. Installing the extensions with the eye tips, you want to be very cautious about your standing position if you're shifted one way or another you're going to have a tendency to see that your eye tips are going to follow in that direction. So when you guys are installing your extensions, you want to stand very central with the eye tip that you're, actually installing, so that you're staying very centered and it's going to go straight down. I do see that i could add at least one more over on this front side here, so i'm going to go ahead and do that come on all right, so i'm just finishing my last eye tip. So, as you can see, i've done a v around the head. We call it v for volume, so you can get that density. We'Ve added some dimensional color for her. She likes those warmer sun, kissed golden kind of looks so i used the 711 dc and also the ombre four, so the om4, because she does have that regrowth area. So i wanted to give that drag down dimension towards the back as well, but maintaining that brightness through the ends, because, as we saw when we first started, she does have that brightness through her ends as well. So i did horizontal on the sides vertical down towards the back, hitting that occipital bone and again going up towards that other side. When you're doing a v for volume, you really only want to work with one sectioning every now and then, depending on how thin they are on the sides. You could add an additional horizontal row, either above or below your section here, just to give them a little bit more density around the face. So now that i finished here, i'm going to go ahead and cut her extensions when you're working with a v for volume. You'Re cutting the extensions to match their natural length. A v for volume does not give any length you're only doing it for density. If your client needs length you're going to need to go towards a full head or a creative classic application and then work your way somewhere else, so i finished her v for volume, installation and, as you can see, it doesn't add a ton of length because that's Not what it was intended for. It just adds that volume, but you do want to make sure that you don't have the scraggly ends, so you are going to cut it to match their length. So as you pull through you're going to see her natural hair stops right here, so that's exactly where i'm going to take my razor and i'm going to cut two using very soft strokes, i'm cutting it exactly the same to match their length so pulling it through. She does have a little bit more of a v, so i'm going to go down at a little bit more of an angle to mirror exactly what she naturally has continuing down giving her that slightly rounded v shape that she also came in with pulling it back. Very little cutting that goes into your fee for volume right through here all right. Now i'm going to have her turn around and just ensuring that when she pulls it forward, i'm spinning her around so pulling this hair forward so that when she pulls it forward, i'm going to ensure it actually looks good as well so just going through here, you Can see it has a little bit of straightness here in comparison to where her natural stops. So i'm just going to do a little bit of face framing you can see those colors popping through that we added just a little bit of that dimension. She was getting a little bit too solid and we're nearing the end of summer so going to this side as well. Creating that softness right around the face all right now we're going to go ahead and get her styled and we'll show you guys the end result. So so
Comments
Flusteraded: This was so satisfying to watch! You are always a delight, thanks Dorthy! ❤️
Jasmine Bischof: Thanks for making these videos. The additional help is so much needed and well appreciated.
DivinelyBlessedK: Ok so you will learn this technique taking the online certification class?