Dyson Airwrap: Best Styling Tips & Curling Hair Extensions - Hair Tutorial | Ariba Pervaiz
- Posted on 22 October, 2018
- Microlink Hair Extensions
- By Anonymous
Hey guys!
I decided to film a follow up to my Dyson Airwrap Review since you all had SO many questions. I'll be addressing the most asked:
Do the curls last?
Is it time consuming?
Does it get tangled?
Can you hold it upside down instead of changing the nozzle?
I'll also be sharing some styling tips that I have picked up in the last couple of weeks of using this tool. I'll show you hairstyling techniques to get voluminous, longer lasting curls AND how to curl hair extensions.
Here is the link to the "DYSON AIRWRAP" -
Here is the original Review that I did:
Subscribe https://www.youtube.com/c/aribapervaiz...
******************************************************************
Let's connect :
Website: https://www.aribapervaiz.com
Instagram: https://www.instagram.com/ariba_pervai...
TikTok: https://vm.tiktok.com/G1UPas/
Facebook: https://www.facebook.com/aribapervaiz....
Pinterest: https://www.pinterest.com/Aribapervaiz...
Make sure you LIKE, COMMENT, SHARE & SUBSCRIBE to my youtube channel and follow us on our family adventures!
Thanks for dropping by!
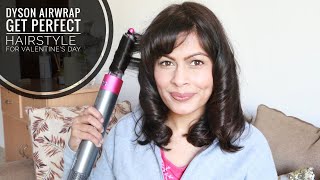
Hey guys it's Arriba and I'm back so I wanted to quickly come on here and film, a follow-up to my dyson review. For you guys, my inbox has been flooding with questions, so I have a few events and I have to go to tonight and I figure it'll. Whilst I do my hair and get ready, I might as well do it for you guys and answer some of your questions that you guys have been asking me so because this is styling. My hair, with mostly air, as opposed to heat like a traditional curling iron or curling wand. A lot of you guys have been curious to know whether or not the curls have been lasting me just as good as a curling iron. So I'm gon na answer that, for you guys in this tutorial those of you guys that watched my original review, you saw me and packaged these smooth and controlled kit, so I'm just gon na show you really really quickly. This is the full package. This has everything in it. This is the complete kit, so it has the machine. Obviously it has your round brush. It has your brush for thick hair, it has your brush for fine hair, and then it has two of your 30 millimeter barrels going clockwise and counter clockwise and two of your 40 millimeter barrows going clockwise and counter clockwise, and then it has your rough dry attachment. So a lot of you guys were asking me if it comes in any other colors right now from what I believe it doesn't come in any other colors. This is the only color that it comes in and when I did my original review, I unpackaged it and used it for the very first time on camera, but now that I've been playing around with it for a couple of weeks, I've picked up a few more Like tricks to help style, my hair a little bit faster and easier and better with this tool, so I'm gon na share those tips with you guys, and I have to leave the house in my 30 minutes. So this is gon na be really really fast and to the point, so I'm gon na plug everything in and we're just gon na get right into it. So, in my original review, a lot of you guys wanted to know what products I used in my hair. In that review, I didn't use any products in my hair because I wanted to see how much shine and how well the styles on it's very home. But today, because I'm going out - and I want to show you guys like how I use this on a daily basis - I am going to be using products. So I'm using like a leave-in hair treatment. That adds like a lot of shine in my hair and it also works as a detangler and I'm also using a blow-dry spray. So this just helps tame a lot of my frizz and it adds a lot of moisture in my hair. So now I'm just going in with a wet brush and I'm just like detangling, my hair, ok. So the next most asked question that I received was how much water to actually remove from your hair before your styling it. So this is really important. I want you guys to pay attention to this part, because this is something I picked up after I did the review, so what I would recommend, if you guys, are going to be curling your hair with this, when you are doing your rough dry, try to focus On your root area and make sure that that's almost completely dry, because when you go in with the with the actual one attachment, it doesn't smooth your hair out 100 % on the root like because my hair is so curly. It was leaving a little bit of a kink right at my root. I don't think those of you that have straight hair or smooth hair or even fine hair we're gon na have that problem. It'S only those of us that have that really curly thick hair. It'S leaving a little bit of a kink if you don't rough dry, the root properly and then for your remaining hair. You want to leave about 50 % of the moisture in your hair, for those of you that have really fine baby hair. You can take out with 80 % of the moisture in your hair, no problem, so we're just going to get right into it, because I go a little bit and their drivers, so I'm gon na share with you guys this really simple technique that a lot of Hairdressers use to create, like almost double the size of volume in your hair, so it's super super easy. All you have to do is split your hair in half, even if you part your hair off to the side, don't stress over it just create two sections. Very roughly and then right above your ear, you're gon na split your hair again into two sections. So what we're gon na do is we're gon na call all of this hair forward. So it's gon na create all this big volume around here and then we're gon na curl all of this hair back. So the hair is basically going to be going like this, so it's going to be flowing like that, so it's gon na create like tons of like volume and movement, so very quickly, I'm just gon na pop on this barrel, and this is the one that curls Your hair forward, I'm just gon na, hold it out, and you want to hold it out straight because it wraps the easiest that way if you're curling your hair forward and you're gon na hold it in front of the section if you're curling your hair back you're Gon na hold it in the back of the section, alright, so we're gon na heat it for 15 seconds and then we're gon na put the cold line on for 10 seconds, and then I'm gon na turn it off and we're going to unwrap. And that's it done, then we're gon na move on with our lives hold on you guys we're asking why we do a cold blast. It'S because hair sucks once it's heated and cooled in the same exact position. So that's why you see when I curl my hair. I don't pull off a curl right away. I leave it alone because it's still setting until it's completely cooled down. Okay, so I'm going to show you guys, like a little trick that I picked up while using this. So when you like originally wrap your hair around this you're going to find that sometimes not all the time it doesn't like wrap perfectly. So I'm going to show you how to do it have kind of like tight-knit on here. I can show you better than I can explain to you back and forth, but that support like tightens up a little bit and the curl is on there a little bit more and release so we're all cross forward in here now we're gon na curl these backs. So I'm going to unlock - and I'm gon na hold this to take it off, because this is still too warm to touch pop it off, and I'm just gon na pop this on and remember, because I'm curling this section back as opposed to curling it in the Forward, I'm going to hold it at the back of the section, so I'm taking fairly large like long sections, so microbes are going to be a lot looser. Okay, if you want tighter, pose even with a 40 millimeter barrel, takes longer sections, while all these like little baby hairs literally, is not a problem, just lift it and throw it back in because it's just controlling the situation, remember you can always slide it out and Slide it back in together we're gon na turn it off and we're gon na. Oh, my goodness, I'm very sorry, but my hair is so wet, so I just turned the heat down a little bit. Yes, okay! This is done. Okay, so now that all my curls are done on the side, I'm still not opening these curls up, because I'm trying to wash my hair once a week - and this has to ask me all week so we're just gon na leave it in these lovely little ringlets And I'm gon na just quickly mist my hair with a medium hold hairspray, you could even go down to the lake hold hairspray and I'm just going to mist it. There hit me on the curls and then I'm gon na scrunch it to make sure that it's like in there okay and then I'm gon na open all of these up, because I'm not kind of look like curly sue. I will open them up eventually, once the site is done, okay, so this is where we're at right now and just another friendly little tip the mall help that is going back away from your face on this side. Is the lettuce going forward on this side? I didn't switch my nozzle because the one going back here is where I ended, and the one going forward here is where I started so I'm still using the same nozzle and I grab another section and we're gon na turn it up. Okay, so all of our pieces back here are curled and before I switch off the nozzle to curl my hair back here. So many of you guys asked instead of switching the nozzle, if you could just hold them the wand upside down. So I'm gon na answer that for you right now, okay, so this is still the nozzle that is curling everything forward, but I want this piece to go back so we're going to see if it works. It works it's just a little bit more comfortable. I find you just switch out the novel so that you don't have to hold it your hand up here the entire time. So let's turn that off and release and see it's being curled back exactly the same as on this side. But my arms are not strong enough for that, so I'm gon na switch out the nozzle, because that's what it's made for for those of you guys wondering how time-consuming it is for me to style my hair with this tool, because this is a wet to dry. Styler, I can go ahead and just curl my hair, while it's wet normally to get this finish. I have to completely dry and smooth my hair out with either a paddle brush or a round brush and then go in with a curling iron or a curling wand. So I'm skipping a whole entire step, so it's definitely quite a bit faster, also another trick that you guys should keep in mind when you're sectioning, your hair and you're, starting from the bottom up. All of this hair is styled, so all of these damp pieces don't just leave them hanging on top of your already styled, hair, pinned them up and away from the hair. That'S already been curled, or else it's just gon na weigh down your curls. Those of you guys wondering - and there are a lot of you if your hair can get tangled in this lawn - it cannot. There are no open, ridges or cracks for your hair to get stuck in. The only way your hair is going to spiral out of control. Is if you release your curl before turning off your one? So remember you wrap it around first and you hold it in place and you turn it off before you release the curl, or else it's gon na, send your curl flying all over the place. Okay, so now that I know that this side is completely set, what I like to do is go in with like a shine serum and I'm just going to a little bit. I made this one myself. I have the DIY of the shine serum on my Instagram page. If you guys want to see it and I'm just going to very quickly just kind of scrunch, a little bit of shine serum into my hair and now I'll run kind of open the mobs. That'S where we're at and while we're chatting I'm just gon na, let this site set a little bit longer. So the main question that you guys asked me was: do these curls last as well as a curling iron, because I'm styling with air got heat. The answer to that is for me personally: they are not lasting any better and they are not lasting any worse. There are lasting just as much as they would. If I round brush my hair or curl my hair, it's holding just as well as anything else would, the only difference I'm noticing is that the difference between curling, my hair, with a curling iron and curling, my hair with the air rap, is that my curls are Bouncier and airier, and lighter, like this to me, looks like a professional round brushed curl like that's what it feels like it feels like it's been curled with one of those smaller round brushes and blown up professionally. That'S the finish. This reminds me of because you're not going to get this fluff and airiness with a curling iron or curling wand. So that's what I've really been enjoying about this, because it's making me feel all Beyonce dough. You know it's all like no okay, so I'm just gon na shake out this side now, so that we're all like big and fab on both sides, I'm gon na be like flipping my hair around all night. I have two little Halloween party right now, so I'm gon na be all like. You know: hey y'all, I'm here, okay for this party, I need to flip into my hair extensions and I haven't called them yet. My extremely supportive, beautiful husband is gon na help me to curl your hair extensions. You want to just make sure your hair extensions are being held up by a hanger or a lovely assistant like I have here and you're just going to mist it a little bit damp because remember. This is a wet to dry styler and you need moisture in your hair to style your hair with it and you're gon na curl. Your hair, in the same exact manner that you do your own hair you're, going to hold it ten centimeters from the end, wrap it around the barrel, hold it up blast your cool shot and release okay. So I curled these this way and I curled these. This way so that when I put them in there I'll be going forward thanks, you love that. So this is what my hair looks like without the hair extensions and how I'm going to be rocking it and most likely all week, long I'll also be flipping it around constantly, and this is what it looks like with the hair extensions in just for the party. I won't be leaving these in a very long at all. I hope you guys enjoyed this tutorial if you did be sure to give this video a thumbs up. Leave me some comments below and I'll see you guys on the next one.
Comments
Ariba Pervaiz: This is NOT sponsored by Dyson. I did attend a demonstration for the Airwrap before filming this. The Dyson team gifted me the Airwrap, but not in exchange for content. These are my honest opinions on the tool.
Danny S.: This lady knows how to deal with that machine. There is so many miserable and messy videos about the airwrap on YouTube.
Mentally Unstable: Wow the first review I’ve seen where she actually knows and shows real trying
Kelsey Roxanne Davis: I HAVE BEEN SEATCHING FOR SOMEONE WITH A COMPETENT & SKILLED REVIEW. these other chicks are just letting their tangled thick sections get sucked in to the wand willy-nilly and then theyre surprised its not smooth when it comes out? I would be pissed if I worked at Dyson PR for wasting a package on them. Thank you so much for showing how it actually works when you brush and spray some treatment in your hair. I also want to applaud you for doing a second tutorial after you had some time for the learning curve. The first time using a new hair tool is always awkward. Also i never knew about the trick hairdressers use by curling the back of your head the opposite was as the front. I cant wait to try it!
The Whisperer: Finally someone who understands the importance of sectioning the hair. It’s quite important to do so when using this tool because you end up just blowing you unsectioned hair all over the place. Gorgeous hair, great tutorial and tips
Rimuliz: I appreciate this review. I understand that the product is expensive (it's Dyson - it's obviously going to be overpriced) but it's not some magical hair tool that does absolutely everything, perfectly with no manual effort. I think because it's shaped like a hot curling wand, testers are presuming its going to give 2second perfect coils just by holding it next to their head. But it's obviously more like a blowdry curl (with a roundbrush). You still need to 'place' your hair (the loose flyaways) around the barrel ~ and slide the dryer down and back up your hair to get good tension ~ and not touch the curls until your whole head is finished. You've provided some really basic but useful tips that no one else is explaining, to get some really great results from this product.
Cuteasa Button: Hair texture plays an important role here too. Her hair is thick, coarser and not naturally pin straight. This usually gives better curling results that are more lasting imo. Great tutorial I enjoyed watching.
Rose B: This is the 4th demo I’ve watched and the first 3 were all disasters. This is the only one where I’ve seen someone who knows what she’s doing. Seriously awesome
Maria Martinez: Best review hands down. Sectioned hair, followed directions, GAVE IT TIME, had patience and actually wanted to give an honest hard worked review. You never slack on us Girl!! ❤️❤️❤️
Sleeping Labradors: I’ve watched so many reviews and decide I’m not going to buy it, but then I see your videos and I’m hyped, ready for Dyson to take my money ♀️
SuperDooTube: You finally convinced me to buy! After all of the negative reviews, I was hesitant but found your channel. Thank you for demonstrating how to properly use it, because with your tips, I now have the curls of my dreams!
Kiwi Tropicana: The only person who used it correctly and made it look easy. I’ve watched other YouTubers use this and make it extremely difficult lol
M S: This is still the best tutorial on this device. I've watched it like 4 times now and my airwrap has not failed me thanks to you. Thank you so much!
balinder kaur: Yep this is def the best review, she knew exactly how to use it. Other reviewers would either be using it wrong or not adding any hair product at all and then complain the curls came out; like Dyson never said you don’t need use hair spray with it. Great review
Deee R.: I've watched this video at least six times and I'm enjoying every minutes because for the very first time I'm learning how to actually curl my hair and you've given me hope. I have severe carpal tunnel and tennis elbow so it looks like I can finally curl my beautiful long, thick and shiny hair. Thank you so much, girl. <3
Miss Lakritz: Thank you very much for your tutorial- it helped me a lot ! Got the airwrap to Christmas from my husband and now I‘m trying all the brushes and different attachments. It‘s so much fun and I love what I see . Sometimes the hairstyle is a bit disordered ( hope you understand me ) , but the results get better and better . A lot of people asked me if I was just at the hairdresser . Many greetings from Germany ⭐️
starfish8D: Thank you for this detailed demonstration! I received my airwrap today and was able to make it work beautifully because of your easy-to-follow instructions. My curls turned out just like yours! :) woohoo! Def money well spent, I regret NOTHING!!!!
Lynne Keyes: What a great tutorial- you explain it all so well and make it look so easy . You have taken the time to see how it works which it seems many are not . Like any new hair tool it takes practice. Beautiful hair too x
Stephanie Hales: So glad I found your tutorial! I’d used my air wrap a few times thinking it wasn’t all that. Turns out, I just wasn’t using it properly! Thanks for making me love my Airwrap rather than thinking it was a waste of money, loving the results now!
Jess schofield: Absolutely mesmerised by your beauty! I just bought an air wrap today and I’ve watched so many videos and this is by far the best tutorial I’ve watched!! Thankyou!!
Lisa Rosen: Thank you for doing this tutorial. You are so articulate and I really appreciate the way you explained everything thoroughly and easily! Beautiful lady and wonderful tutorial!
Ellen Osborne: This was the most competent, complete, and easy to follow review! Thank you!!! You and Milabu are the ONLY ones who showed how to use it correctly. Finally I can make my decision to buy it!
B Gar: By far the best how to use the airwrap video I’ve have seen! Thank you for taking the time to show ppl how to correctly use this product. I decided to order the Dyson because of this video. Can’t wait to start using it.
iceys1113: Wow someone who actually tried to use it rather than just mess around ! Thanks for ur awesome tutorial ❤️
DanniDivaMUA: This is the best tutorial ive seen on this device yet. You actually explained and gave tips and tricks to assist in getting the best results.
Gina Page: There actually is another color, it’s gray & purple rather than gray & pink. Also the 2 straight attachments aren’t necessarily for thick hair or thin hair, they are firm smoothing & soft smoothing attachments for either a pin straight look or a more voluminous, blown-out look. But awesome video! You did much better than some of these larger channels that just fly through it!
Coralie HiHi: The way it catches the hair is so satisfying
BayRaeDay: You’re gorgeous and your tutorials on this are amazing! My mom bought it for me for Christmas but I have to wait to play with it!
Thea B: @Ariba Pervaiz! Just watched your video and I was unsure about the price but I love that it grabs the hair automatically and your step by step process to section that was really helpful. I’m a new official fan and will be watching more of your ideas. ☀️
Ana Dias: Handsdown the best review so far.Also curling the back section FORWARDS? GENIUS!
Lupita Gil: Finally a helpful tutorial ! Curls look amazing
Abby Rose: My airwrap just shipped today!!! So excited!!! Ive watched so many reviews and even another hairdresser couldent figure it out... this looks simple to use and i cant wait!!! Your reviews are thorough and easy to understand and i appreciate it!! Thank you!!!
Dinosaurbeanbag: Your hair is amazing without the extensions! That was a good tutorial, thank you.
Michele Coccaro: Thank you for making a professional and HELPFUL video on how to use this product, other videos are nothing more than ridiculous and I cant even believe people posted them. I've tried it once so far and had to come rewatch this video bec you're a great teacher, I will keep practicing
Chillout: Love your video , its a lot better than someone doing a demo on your and not being able to do it yourself , i love my airwrap , my hair is so much more healthier aswell as i am not using straighteners on my hair which dry my hair out , well done on your demonstration
Summer C: I bought a air wrap finally and used it a couple days ago. I didn't know what I was doing and my hair still turned out AMAZING. Im going to try your way next time I wash my hair (:
Toronto Real Estate Agent - Karen Law: Thank you Ariba for the awesome tip on volume to wrap the back half sections curl forward while the front half sections are curled back!
Billy Babee: Excellent Review....you addressed all the things I was wondering about, and provided a very easy to follow yet detailed review
88margaux88: Thanks for the great tips! I'm loving mine so far and your video got me even more excited to play around with my airwrap!
Flowerpotgirl: Thank you for taking the time to learn how to use it and give good feedback. This was actually helpful!
Marianne Muro: Thank you so much for reading the instructions prior to recording the video!!! You are one of the few that has. Very helpful, great job!
Karel Conklin: 2 videos answered all my questions thank you for being one of the few people on the internet that actually knows how to use this styler
Chezyxxx: Love it. Your hair looks so smooth and beautifully curled xxx
Hazel de Mello: Awesome! Just discovered your channel and I love the Dyson demos! Just wondering what happens after you sleep on your styled hair... How do you manage one week between washes?? What do you do in the AM before heading out for the day? Also - why didn't you put the extensions on and then curl them? Is that harder? Thanks...!
Anita Patel: Hands down, the clearest instructions on how to use this product. Watched this a few times. Hair goals.
Doreen Rose: Awesome video. I found after a couple weeks of use that it gets easier and easier and you learn more tricks. I want to know how will you keep the curls in for an entire week after sleeping on them? My hair does hold curl, but I find that after sleeping on it, the back especially doesn't hold as well. What is the secret to keeping it the way it is for a week?
Catherine Morrin: Excellent review, really informative & i've learned a lot. Still not 100% sure if i'm going to buy one of these yet but I am tempted Also really good to see you curling your extensions too. Your hair is beautiful - with or without extensions
Germaine Baur: Gracias Ariba. You are Gorgeous! You had me laughing so hard when you said hold the curl and we are going to let go and move on with our lives. Hahaha!!!! So cute. I have had my eye on this product for a year now. I love all the Dyson products and will be gifting this to myself for Christmas. Yay! Thank you for your review and demo of the AirWrap. Happy Thanksgiving. G
Chris Keech: This is the only video that I’ve seen that explains and shows how to use the Dyson Airwrap in detail where it is easy to understand. Thank you
Laura Ashley: Thanks so much for your follow up video! This is for sure going on my Christmas wish list!
noelia bravo: I LOVE LOVE LOVE LOVE the way you used the product on your hair, surely did know what you were talking about and I really liked how you also shared some hair tips with us because it’s not something a lot of You-tubers would do
J Bhimji: This is a fantastic video! Thank you! So many people write it off and don't even try - or act like its a magic wand!
Ashley B: Thank you! This was so helpful! Do you think you could do a tutorial using the blowout brush or the straightening brush?
Katie: FINALLY! someone who sectioned their hair correctly! I've watched about 5 other tutorials before I spend a lot of money on it and it's as if no one knows how to section properly.. Great video..
L C: Best tutorial ever for this product. Thank you so much xx
Adriana Bozzi: Hey, new subscriber here What a great tutorial. I watched both videos. So thorough. Thanks for that. I tried to use this tool downwards like the way u did it. I blow dried my roots first too. My issue is my hair is super super thick and, it didn’t last at all. I don’t know what I’m doing wrong! maybe my hair is just too heavy? ♀️ ugh any suggestions?
Ernestina Carranza: I love how easy you make it. You explain very well. Unfortunately I don’t have the luxury to spend 500 dollars lol
Kathy v: Thank you for the tutorial! I am waiting for my AirWrap to be delivered and just watching tutorial videos, yours is the best I’ve seen! You are a doll!
abigail93m: Seeing this review video is so pleasing because she's doing it right!!
Lisa P: I was sad to see the warranty is only two years, you would think it would be longer for the price. Still very excited about this product! Less damage and less time is amazing. Thanks for making this video it’s really helpful.
Kristin Wooldridge: Great tutorial. Really thorough. Appreciate this, thank you.
Rigby Janstar: Omg youre stunning great job on this video and thank you for the tips and tricks. Tati should of watched this to learn from a pro. Great job look forward to your videos
Clara Rupprecht: The best display of how it can work when used properly. U understood the tool and used basic logic! Love it!! ✅✨
greeniejoey: You are the first reviewer who makes me feel this is worth the investment. Thank you!
Annick Tinga: Thanks so much for these clear tips, have been trying to find a good tutorial. This will really help me with my new airwrap!
Eco C: This has to be the best video tutorial I’ve seen. Very informative. Thank you
Plum Bird: I’m going to try it because I can’t blowout and curl my hair in the back well. This seems like an amazing option. I also like how I don’t need to dry my hair first and that there is less heat damage.
Kirsten Von Stransky: Thank you for your review!! I have this styler but honestly I couldn’t quite figure this option out and couldn’t find any other helpful pointers. Gorgeous!!
Star CookingCinema: I know this is not sponsored but Dyson should definitely sponsor u!!!!! Great work gurl!
Mary J Dove: i was so disapointed at first but i love it now, we have the same hair so thank you so for the help! when i ordered mine off customer chat they had two colors <3 Your hair looks gorgeous btw!!
Sophia Sargeant: Best tutorial I have seen on the airstyler! Thanks for all of the tips x
Taj Farid: Literally most realist review. Thank you for this video !
Ana: You're the only person I've seen that actually knows how to use this product. Thank you!
PMSmissile: Could you do styling tips for all the tools? I'm mainly confused on the best way to use their round volumizing brush; other than following your, 'Voluminous Blow Out (Lock and Twist) - Hair Tutorial.'
Lady: I saw so many mixed reviews about the Dyson Hairwrap on Youtube. I`m not sure about how this product would work on long and thick hair. This video really shows that, it looks like it does a good job on long and thick hair too.
Daniella: The only way I could get this to work for me is if I could hang up all my hair like she did her extensions She did an amazing job but I’m so uncoordinated I think I’ll just stick to my flat iron
Ciara McEvoy: My fiance bought me this and I really couldn't get the curling attachments down. This video is great, going to go home now tonight and try it again. Thanks girl!
Kimberlite66: Awesome review. You know what you are doing with this product. Very inspiring. I might buy one of these. Your hair is amazing!
Sarah Shaikh: The first tutorial that has been so helpful on how to use the air wrap
Sam King TV: Wow you done an amazing job! All other reviews have been half arsed and negative! Your hair looks amazing!!!! And you definitely used it how it should be
Kcullen Dav: You did that effortlessly love it! Im new to this tool and it’s arrows got me all confused lol ♥️
Ciara R: This was by far the most helpful tip video I’ve seen, thanks so much!
As_sweet_as_honey: So amazing this turtorial!!!! Very Helpful! From where did you get your extensions? ❤
Luthien Oronar: Great review, most people don't really know how to use this new item and their reviews are sad... Not planning on buying such an expensive gadget for my hair, but I enjoyed this video!! Thank you!!
Caroline Sarwar: Your hair is so beautiful, I didn’t feel you needed the extensions x
euniceliciousTV: Wow! your hair curly so fluffy. I watch many reviewer they complaint Dyson Airwrap cannot blow too thick, but i saw you really putting thickness into the airwrap. It looks fine and no problem at all.
Laetitia Mary: Best video I've seen about this subject. Very beautiful demo and hair style. Thanks for the great tips too.
electroclick: Oh my goodness this is SO helpful. Thanks so much!
Iida Toivonen: Thank you for an amazing video. Best in here about this device. Im going to buy one, you made it look so easy.
Amrita Sodhi: Best tutorial ever. So detailed
Bec__ One: Absolutely have won me over. I watched other tutorials with people who didn't understand the whole air curl, but I love it now I know just how to use it. I'm just curious how it will work with thin ling blonde hair and if I can achieve the same volume and curl.
smridhi Dang: This is legit the best video on the youtube about the airwrap, in most videos people don’t use it properly and then they are like it doesnt work. But honestly guys I have the airwrap and I absolutely love it and its totally works.
T. P.: This was a great demo, thanks so much!
TheLauren1113: Thanks - I am thinking of getting this when it is back in stock at Ulta. I think I want the complete kit because I want both the round brush and the brush for thick hair. I have curly hair so I have been waiting for solid reviews from people with truly curly hair.
Gucci Yang: I was losing hope watching other people's review until I came across yours. I love it! Thanks for this video!
Kate McGovern: This is the best tutorial I’ve seen for this yet❤️subscribed
Wendy Gallo: FINALLY - someone who actually TRIED to do it right.
Alice Vicidomini: so helpful! The only tutorial so far with someone who knows how to use it :)
oanh nguyen: So informative and thorough. Thanks!
Sara-Ann: Gorgeous!!! Thank you for these tips!!!