Better Than Tape Ins !? How I Install Microlinks + I Tips At Home Ft Better Length
- Posted on 04 April, 2022
- Microlink Hair Extensions
- By Anonymous
How to install microlinks and I Tip extensions on short relaxed hair at home. I extensions I am using are by Better length in 16 inches, texture Yaki Coarse texture. In this video I demonstrate how to install I Tip extensions on yourself, this video is a step by step guide and is very detailed. No more tape glue or thread all you need is micro rings! THEY ARE LIGHTER THAN TAPEINS
T H E H A I R
Check out BetterLength for your textured extensions: https://www.betterlength.com/?utm_sour...
Save $5 OFF any natural textured hair
Promo code: Sherelle1004
Follow BetterLength Instagram: http://www.instagram.com/betterlength
My I tips Info
Texture: Kinky coarse for natural hair blowout
Hair Length: 16"
Color: Natural Color
Link to the same hair: https://www.betterlength.com/itip-tape...
#betterlength #itipextensions #Microlinks
I N S T A G R A M - https://www.instagram.com/sherellesain...
M U S I C
Music by Brentin Davis - Good Life Handbook - https://thmatc.co/?l=A746C248
Disclaimer: Some of the links above may be affiliate links. This means that at no additional cost to you, I will earn a small commission if you use the link to make a purchase.
B U I S N E S S E N Q U I R I E S
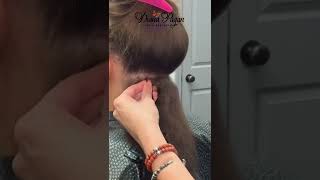
Have you ever wanted to try itip or micro link extensions, but then saw the installation price? I was like whoa, that's too much in this video i'll, be teaching you how to install it yourself at home, save yourself some coin and still end up with a beautiful natural. Looking result that can even be worn up in a ponytail hello and welcome to my channel today we're trying our eye tip extensions. This hair is from better length it's in 16 inches and the hair texture is in kinky coarse. First of all, let me say i am impressed look at all that movement in the hair. It resembles my own hair almost perfectly now. Let'S take a look at it. Extensions. Each bundle contains a hundred strands. Currently i have 300 altogether and the bundle of 100 is separated into 10.. With these bundles, i got another silk bag which contains a loop tool to help put on the beads. In my hair i also got a pair of pliers and we've got a small pouch. Full of beads - this didn't look like enough, so i did go ahead and purchase my own on amazon. This little container contains a thousand beads that definitely won't be running out anytime soon. So what exactly are eye tip extensions? These hair extensions are held together at the tip by keratin bond. Each hair extension is separated into one gram of hair. Normally, a typical bundle will weigh 100 grams, so you will have a hundred eye tips in your bundle. These strands are installed individually with beads. These tiny beads are made of aluminium. They are soft and can be compressed on the inside of a bead there's a ring of silicone which helps protect your hair. You use pliers to compress the beads and that's how you install the eye tips. The beads that i have are in seven millimeters. These beads can come in various colors to match your own hair, so it's less detectable and they also come in different sizes. You can get even smaller extensions called nano links, but that's for another video, i'm starting with my hair, freshly washed and blown out, and the first thing that we're going to do is section out our leave out. I have some at the front as a middle part, and i also have a little bit on the sides as the ear tabs and lastly, i have a tiny bit of leave out at the back. Just in case, i wanted to wear the hair in a ponytail started off by sectioning, a part of my hair that i wanted to start with. I felt like it would be a little bit easier to do my hair in two halves, so i did this part in in the middle of my head to work as a kind of guideline to help make the installation move a little bit quicker. I thread numerous beads onto the loop tool. This is so that you don't have to keep on going back and putting a bead on every single time. You try and put one in your hair. The installation is very easy. Just put your hair in between the loop tool thread: a bead upwards until it meets your hair and then pull the loop tool, and that will leave you with a bead on your hair. Next, just grab an eye tip and push it through the loop and then use the pliers to secure it in place, and there you go. That'S one eye tip installed so again, last section of a small piece of hair pull the bead up on the tool until it meets your own hair and then pull the tool out that will leave one bead on your hair, then grab the end of the eye Tip and push it through the loop and use pliers to secure it. Installing the eye tips are extremely easy, but it can be a little bit time consuming and plus it can wreak havoc on your arms. Making sure that your partings are very neat will help you throughout this process. In the beginning, i was installing the eye tips one by one, but then i thought this is taking way too long. How about i just thread a whole load of beads onto my hair and then install the eye tips and, to be honest with you, that method was a lot quicker working row by row saved me so much time. In a nutshell, i installed all of the beads. First and then went in with the eye tips instead of doing them individually. Another tip is to make sure that you're putting enough hair inside of the bead. You don't want to put too little hair, because that could cause too much tension, and you also don't want to have too much because then you won't be able to fit your eye tip inside the bead. I did do a few that contain a little bit too much of my own hair, but it is a learning process. Eventually, i did get it and i was able to install the eye tips quicker and quicker. This is what it looked like halfway through the process. This part is the part where i thought would be a little bit more complicated, because that's where i had my leave out, but i decided to just take my time and work slowly. Braiding up your leave out or putting it in rubber band will ensure that you're not putting your micro links in the wrong place. It'S also a good idea to think of what kind of hairstyle you'd wear mainly beforehand, to make sure that you have a seamless install also when applying the beads. You don't want to put them directly up to your scalp. That will make the eye tips really really tight. You want to make sure that there's a little bit of give. Otherwise, when you tie your hair up, you're going to be in a lot of pain, sway, side to side and up and down just to make sure that it's not too tight and that you're not feeling any tension on your scalp overall. The process took me about two hours and i was really surprised. The time went so quick. My arms were killing me, but i made it go ahead and fly in the hair afterwards, because i wanted to put the hair in a ponytail and sleep with it. Just to make sure that there wasn't any tension on my hair and, to my surprise it was perfectly fine. The eye tips are extremely lightweight. If you have watched my video on tape - ins, it's lighter than that, i could barely feel them when you think of metal. You just think pulling itching stabbing, but if you're not too good with parting, i can imagine having tapings at the back and then around the sides having micro links. Oh my god, it's the perfect combination. This is the finished. Look the hair flat ironed beautifully. When i went out the next day and the wind blew honey, my hair was blown everywhere with not a track, not a bead, not a taping in sight. Another thing that i really love about eye tips is the fact that you can reach your hair. Like i love washing my hair, i wash my hair every single week and i do not skip it so being able to take care of my hair still underneath made me smile so much. Another thing that i really love about this hair is that you can tie in a ponytail. Would you ever consider installing micro links yourself? If you do have any questions, don't hesitate to ask me down below, because i love replying to you guys's comments. Everything that i use in this video will be down in the description box below plus all the information on the hair will be down there too. Don'T forget to thumbs up this video and subscribe. If you would like to see more - and i will see you in the next video bye - you

Comments
Tami Divine: girl at this point , you're a pro
ZLS Drums: Looking gorgeous as always Sherelle my only worry with micro links is deep conditioning as I deep condition overnight so unsure if they would slip out
Regulus AHAYAH' Bath Kol & Garden of Eden: Greetings, From St. Augustine Florida. This looks so pretty on you. Improve the way you make all your styles look so natural. I've saw these technique many times. It was interesting seeing you do this. Thanks for sharing your experience with us. I really think this is the "Best" of then all. Due, to being able to wash the hair and set it up in a ponytail if desired. This turned out well. I was also thinking about how your arms maybe feeling. The style is gorgeous on you. Your skin is looking clear and beautiful. Don't forget to do a video showing us how you take it all out. Ahhh....and the little dog is so cute. Until next time... ️ ~Shalom Princess~
0tismadaline: Wow you did an amazing job and you are looking absolutely gorgeous
NJERI KIMEMIA: How long does this last on your hair? And are they reusable?
Grace O: I've been searching up microlink videos recently but none were good enough. THIS IS A SIGN for me to get them!!!!
Chandler Lane: now THIS is my type of content! so excited that I found your page
Naho Simon: Hello! I was wondering how long it took for this to come in for you?
Srishti Sharma: What product u using for hyperpigmentation?
Brit Dacre: Girllllllllll. I didn't even know what microlinks were and now I want them ❤
Ever True Christianson: How do you take those out. How long does this last before you take them out? Thanks for any feedback your channel btw
Joi T.: Of the three bundles, how many did you use? And if you had to estimate how many rows on the back and side how many would you say? - great job!!
Monika Williams: How do you take them out?
Saved Only By Grace: When you wash it does your roots swell? I want them so badly but im concerned with it pulling my hair out.
Jin J: How do you wash and what about when your hair goes back curly does it tangle?
jeannell mcelrath: Ugh thankkkk you!!!! ❤️ I love you videos
Davina♡: Congrats, so close to 100k
Faith A: I need to learn how to install this
Meeky: They can get tangled quick.
I'm keyya: Please do they have curly ? This looks amazing on you
Ri Ray: Great job on yourself have you tried a braidless weave?
tytygirl11: Can you pleaseeeee show how you wash your hair
O'LAINES: Your voice is mesmerizing