How To Make & Install Your Own Hair Extensions! (Microbead/Micro-Ring/Itip)
- Posted on 28 September, 2019
- Microlink Hair Extensions
- By Anonymous
Microbead hair extensions are one of the most expensive types of hair extensions out there, and with good reason. THEY ARE AMAZING. In this video I will teach you how to save hundreds and possible thousands (depending on the type of hair and salon you go to) on microbead hair extensions. You can do it yourself at home!
OTHER VIDEO YOU MAY LIKE:
WATCH: How to do your own hair extensions at home: https://www.youtube.com/watch?v=j-NfaL...
WATCH: IRRESISTIBLE ME HAIR EXTENSIONS REVIEW AND DEMO | Clip-in ponytail tutorial | Coupon code - https://www.youtube.com/watch?v=ASaK-_...
LINK TO THE ITEMS MENTIONED IN THE VIDEO:
Hair Extension Kit: https://amzn.to/2XaGKoQ
Keratin Glue Beads: https://amzn.to/2UGTQs6
-----------------------------------------------------------------------------------------------------------------------
QUESTIONS I GET A LOT:
More shopping suggestions?: https://linktr.ee/angelaboss
What camera do you use to film? Canon Powershot G7x Mark II - https://amzn.to/33pK3f5
DISCOUNT CODES:
AMAZING BEAUTY HAIR (hair extensions)
$15 off code: ABHBoss
IRRESISTIBLE ME (hair extensions)
5% off code: Angela5
ZAFUL (clothing and accessories)
18% off code: Boss18
THE LASH DRIP (eyelashes)
20% off code: ANGELABOSS
https://thelashdrip.co/?ref=7ryq4r2qh3...
LIQUID I.V. (hydration drink products)
25% off + free shipping code: angelab0ss
https://glnk.io/koyv/angelab0ss
SMART UV STERILIZER (sterilizer box)
30% off code: ANGELA30
https://www.shopmissa.com/products/lel...
ST.TROPICA (hair growth vitamins)
10% off code - ANGELABOSSsttropica
https://www.sttropica.com/products/st-...
VANLINKER (sunglasses & glasses)
15% off code: 11angela15
https://www.amazon.com/stores/VANLINKE...
Disclaimer: This video is NOT sponsored. All opinions are my own and honest. Some links are affiliate links, which means I may earn a very small commission (at no extra cost to you) should you make a purchase through one of the links. This helps me to continue creating content.
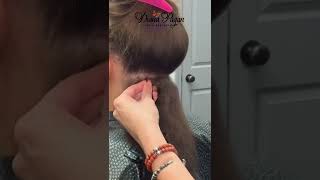
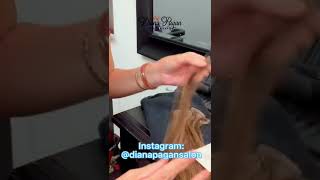
You know today, I'm going to teach you guys how to make your own micro B hair extensions and how to install them into your head. So if you have ever heard of micro B hair extensions, they are also called eye tip extensions. It'S the same thing: micro, bead type. They are amazing. That'S why the past two years, I've had them professionally done at the salon. Legit micro, bead, hair extensions. You can wash them dry them, curl them the hair laughs from six months to a year. There is no heat, there's no glue, there's none of that involved. It'S literally just a hair extension of B. They attach it to your hair and they clip it down the down side of my 4b. Hair extensions is that it's really freakin expensive man, so the initial purchase of the hair that you need to put into your head and the salon charging you whatever. In my experience has can range you anywhere it can cost you anywhere from $ 1,000 to $ 1,500. That'S a lot and then, on top of that, every 4-6 weeks you have to go back and you have to get them split up and that can cost you anywhere. In my experience from $ 175 to $ 250, so yeah, I just I've been doing it for the past few years and I've been biting the bullet because I just love the extensions so so much. But it's time for me to not spend that money. On my hair and to be responsible and to spend money on other things like bills and food, I had a pack of clip-in extensions at home and I decided to cut up the extensions and buy some supplies on Amazon and make my own and install them and That is why I'm sitting here with beautiful hair, I also cut in layers as you can see, I'm not the best hair cutter. I am NOT professional by the way disclaimer, so um, I'm filming, holding own hair. I cut it up, so it's blend it in and I'm super super excited with how my hair turned out. I think it just looks so good, I'm probably going to keep these in for about a month. If you want to learn how to make your own hair extensions, so you are going to need a few things first, you're going to need a pack of hair extensions. These are my clip in hair extensions, and I know I'm not going to be using these anymore. These have been laying around my house for a couple years now, so I might as well recycle them and make them into micro, bead extensions and I'm actually going to use. You are also going to need a flat iron that you do not care about. Why? Because this is what happens to it, so you don't want to use a good one. I just ran into t.j.maxx and I bought this one, and this is the luxe willow flat iron and it was ten bucks and it works perfectly well for what I'm using it. For you are going to need some keratin hair extension glue. This is the one I have and this I got off of Amazon. I believe it was $ 7.99 or $ 8.99. You get 400 pieces of glue and then this is just kind of how it looks like just little cute little yellow beads. You are going to need a pair of scissors to cut the extensions out of the clips and you're also going to need a comb to comb out the hair extensions that you made to make sure you don't have any fallout to put in the hair extensions. You are obviously going to need the beautiful micro bead extensions that you made or that you bought, but in this video we are making them. So these are the ones that I made myself out of the clip ins and then you are going to need a pair of pliers, a hair, loop-d-loop thingy. That looks like this and microbeads and just make sure your microbeads match the color of your hair because they do come in different. Now this plier microbead and Harry loop-d-loop thingy. I got off of Amazon and it was called a micro, bead extension kit and actually came with all these three things and I think it was like $ 8.99 or $ 9.99. I know it's under ten bucks, so super affordable and also it came with 200 beads. So in this video I'm going to teach you first how to make your own extensions and then I'm going to teach you how to install your own extensions. So I already cut my hair out of the extensions. So these were the clips right here and all I did was I went in with a scissor and I snipped it off. I'M going throw that to the side and then I'm going to just grab a little piece of glue. You see some focus. Okay, we can grab a little bit of glue and I'm just going to place it on to the flat iron. I'M just gon na wait for that to melt it melts pretty quickly, while I'm waiting for that, I'm just gon na grab a little piece of hair to here's, my little piece of hair and just kind of eyeball it and there we go and I hold it In a pretty tight grip, so you just have a little piece of hair in a tight grip and then I'm going to go back with my flat iron, and you see that the glue is melted, pretty much it will. Let me tip it over to the side. Okay, I am going to take the hair and I'm just going to place it into the glue and I'm going to press it down, and then I'm just going to work the glue into the strands and you just go through it a couple of times to three Times until all the strands are coated put my flat iron down and then you kind of have just this bunch eNOS, so you're going to wait a couple of seconds for the glue to kind of dry and then what I do is I twist and I just Go like this and I try to make the glue tip as small as possible by twisting it, because you want to make sure the tip of this fits into your my a bead, okay and then the glue dries pretty quickly so once it dries. I just take a pair of scissors and I cut it right about there and then you have yourself a nice micro, bead, hair extension, I'm going to go in with my comb and I'm gon na brush out any fallout, because the last thing you want is your Hair falling out once you have it in your hair and there you go nice and simple. I'M just going to do the last of my hair and I'll get this thing fast forward. It'S I can teach you how to install your own extensions. So I'm going to put in my microbeads into my hair loop-de-loop thing. I think I'm just going to start out by putting in ten of them. Okay and all you do, is you take the micro bead and you just slide it in through the top, and then you just slide it down so grab a little piece of hair just start right into the middle, and then I'm going to take my hair. I'M going to loop it through and then I'm going to grab a bead one very on the top and then I'm going to push my hair through the lip and then your bead should be here and I hold it right on the top. I take my hair extension and I stick it into the loop. I stick it into the bead and make sure that it's nice and in and then I take my pliers and then I clamp it down and there it is my first micro-b. So I got the second layer in. I think I'm just going to add a few more because when I feel ironically, there needs to be a few more in here so going. No. I hope that this video helps you guys out. It'S gon na help. You save a little bit of money. It was very tedious to make the extensions I want to say. I spent like a couple hours a day for like 3 days to make all of the extensions and then to put them in and took me like four hours, but that was the first. This is the first first time I'm actually I've actually done it. So I'm sure, next time, if I decides that I want to make my own hair extensions again, it hopefully won't take as long so I'm super excited by how this turned out so excited. I just just want to dance but um yeah. If you guys liked this video, please give it a thumbs up. Thank you guys so much for watching. I hope that you've learned something cool today, um and don't forget to subscribe, and I will see you guys.
Comments
Andrea Ashby: You're adorable! I have some questions, when you are sticking the extension through the bead are you going from the bottom of the bead or inserting from the top? Also, how far in do you push the extension into the bead?
Tiger bowman: how long do they last/stay in and are they difficult or damaging to remove?
GalCharlotte: I’m getting ready to try this. How much money do you think that you save by making your own extensions? I thought that the true savings was in the installation. Please let me know. Thank you?
Crystal Hennessy: It’s nice thank you I’m going to do mines tomorrow:) ❤️
Museme Me: Girl your hair looks really good
Ranjitha Anju: I just Lv her explanation
mishka: Can I use keratin flat tips instead of granules?
Name Brand Kids: Possibly a dumb question but why can't I just use small amounts of hit glue instead of buying Karatin glue or can I?
sorrybutimalibra: Im doing this and my hair straighteners are a mess! How did you clean them?
Name Brand Kids: My arms are tired just watching this lol you go girl
Gabi Borja: Woah ! This is so cool!
Jill Yan: where did you buy your hair? do you have any reccomendations?
Hoorain khan: This video is so good nd money saving but how can I remove them..or do these micro beads hurt when you sleep
Tiger bowman: thanks!
윤hk p: great!!! how many peace?