How To Do Feather Hair Extensions
- Posted on 31 May, 2011
- Microlink Hair Extensions
- By Anonymous
Check out Bas Rutten's Liver Shot on MMA Surge: http://bit.ly/MMASurgeEp1
In this video, Mahalo beauty expert Jamie Pierce shows you how to put in feather hair extensions.
What You'll Need
---------------------------------------------------------------------
2 clamp tools (1 that closes the bead and 1 that opens)* Wire tool
* Beads that match the color of your hair
* Hair clips
* Sectioning comb
* Feathers
Most of these items can be purchased at your local beauty supply store. However, it may be beneficial to ask a store clerk to help you locate what you need, since each of these tools have a very specific function.Additionally, if you don't want to purchase both tools, you can opt for only the opening tool but removing the extension will be a little more difficult.
Step 1: Decide Where to Place
---------------------------------------------------------------------
Before you begin, decide where you want to place your feathers. Try holding it up in different positions so you get an idea of what it would look like.
For example, if you want it to frame your face, hold it near your fringe or front layers.
Step 2: Prep Your Hair
---------------------------------------------------------------------
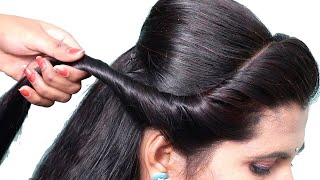
Using your sectioning comb, part the hair you want to keep out of the way during this process and clip back. Grab a very thin section of hair for the feather to go onto.
The section should be big enough for the bead to clamp onto but small enough so that the hair and feather both fit in the bead.
Step 3: Add the Bead
---------------------------------------------------------------------
With the larger loop on the end of your wire tool, pull the section of hair through. Slide the top bead off the tool and onto the hair. Make sure the bead rests away from the cuticle of the hair, which could damage it.
Step 4: Attach Feathers
---------------------------------------------------------------------
Slide the end of the feathers you've selected into the bead. Start with three and see if that is enough weight for the bead to clamp down on and withstand everyday wear.
Push the tips a little past the end of the bead and adjust until you have a comfortable fit. If you will be doing a lot of styling to your hair, move the bead a little farther away from the root.
Step 5: Use Clamp Tool
---------------------------------------------------------------------
Once you have the perfect positioning, use your clamp tool to close in around bead and hold the feathers in place. Clamp down a few times on the edges and middle to ensure a tight hold.
The feathers may be slightly arched at first, but after you wash your hair once, it will hold whatever shape you style you hair into.
Step 6: Removing the Feathers
---------------------------------------------------------------------
Don't try to just pull the extensions out without the proper tool. To remove the feathers from your hair, use the kinked removal tool and clamp around the bead. You'll hear a pop. You can then slide the feathers and bead safely out of your hair.
Wearing Your Feathers
---------------------------------------------------------------------
Most of the time, the feathers you'll be putting in your hair are color-resistant, meaning you can leave them in even if you plan on coloring your hair. They will also stay in when you shampoo, blow dry, curl or straighten your hair.
Read more by visiting our page at:
http://www.mahalo.com/how-to-do-feathe...
Hi, ladies we're back again I'm Jamie from DNA. This is Braille and my beautiful model today we're going to be showing you how to do some feather hair extensions. So before we get started, I'm just going to go through the basics of what's crucially needed. In order to do these so you're going to need at least one of two basic tools. These are the clamp tools that actually put the bead into your hair, which is what holds the feather into your hair, as you can see, this one's a flat base, one which is for closing the bead, and this one actually has some kinks in it. This opens the bead, so this is how you remove it. That'S how you put it in. If you don't have the one with the kinks, you can get it out with the flat one. It is a little bit harder takes a little bit more work, but it can be done. Second off is this little wire tool. Right here looks like nothing can't get the bead on the hair without this tool, so you're going to need to do this, and this already loaded with my beads beads are very small and they come in alternating colors. So I have some brown ones right here: it's going to blend in better with braylon's roots, as opposed to like a blonde bead or black bead. So we'll get started like that. You'Re going to need a couple Clips, so clip the extra hair out of the way and a nice fine-tooth comb to slice your sectioning out that you're going to need. So, let's get started, I've picked out two different color feathers, a very striped vivid one and a white one, just to contrast against berlin's hair. Now the feathers come in a million colors shades lengths textures most of the time, their color resistance. You can leave them in if you're coloring, your hair, they hold curl if you want to curl them into the hair blow dry, wet shampoo, one through in you're good to go so I've already kind of previously talked with Braylon about where she'd, like the placement of Her feathers, I want to frame her face, so we're going to kind of put him in the end of her fringe, so I'm going to come in and slice the hair right, where I kind of want it, I'm going to leave her bangs down, so you can Hide her forehead. Nobody really likes their forehead, I'm gon na do that. Like I said, you need the clip to clip the hair out of the way, and I can see that this is where I want the feathers to lay right here. So they can kind of pop through through the ends of her bangs. So you're going to come in and take pretty small section almost in a triangle shape, so you can even see just how small of a section I'm taking. If you take a section, that's too big when you put the extension on it's kind of bulky and sticks out and if it's a little too thin, the extensions will slip out so you're going to have to kind of practice with the texture and the thickness of Your own hair to figure out what works the best. So once I've established my sectioning, I'm going to come in with my tool as you can tell there's a larger loop on the bottom half and a smaller loop on the top. So the actual way that you put it onto the hair is you're going to put your fingers through the larger loop grab that section and pull the hair through once the hair is through. You grab the top bead on your loaded tool and slide through now. The bead is on the hair without having to go up against the cuticle which can damage there. So that's why this tool is very essential to putting these in I'm going to go ahead and grab a couple feathers now, because the feathers are quite thin. I like to put at least three in per bead that way. I know with the thickness of the section I've already taken, plus the feathers I'm putting in once. I clamp it. It'Ll be enough weight and girth inside of the bead to withstand the pulling and brushing of everyday maintenance. I'M actually going to mix this one and put a white and two of my vibrant stripes and I push them a little bit higher past the bead. That way, at the same time, I can kind of pull them out and even that now braelynn does a lot of styling to her hair. So I'm actually going to pull the bead a little bit farther away from the root. Have you put your head down? Just a little bit just so, we can see there's a maybe a quarter of an inch space between the actual root of her hair and where I'm going to place the bead. As you can see, I'm holding the section of her hair with one finger and holding the bead in place with the other. That way doesn't slip because I haven't climbed it close. Yet when they come back to my flat tool once again, and I'm going to clamp a couple of times on the edges in the middle just so that I know it's really in there so like I said, I left it away from her root a little bit. So that if she wants to curl and move its not going to pull and create a lot of tension, you don't want to get breakage or anything so giving that little bit of give space will make them a little bit more comfortable and won't hurt. You don't have any soreness, so that's how you do a feather extension. I can do one more just so we can see the process real quickly, so we'll come in and we're going to put another one not too far away. Maybe a little bit lower a little section out a little bit more thing. So you can see the thickness of the section I'm taking once again holding it taunt Lee taking my tool sliding the hair and soft hair isn't steel, so you always want to be soft with it can break now. You notice the feathers have a small arch in them. That'S just how they were placed in the bundle when I purchased them. However, once she shampoos it the first time or takes a curling iron to it, it'll hold the shape that you'd like to see. Give it a little bit of slack at the top clamp down there. We go so, let's just see how that Falls. Once we drop the hair on it, I'm gon na shake your head a little bit Braylon. So we get a natural fall. Beautiful. So now shows a couple feather pieces right by her face. So once again, like I said, you're going to need the essential tools which are the clamping tools, metal prongs, your wire tool to actually put the beads on the beads and a wire comb. You can purchase any of these items that your local beauty supply sort. I would highly suggest going to the counter first and asking for help without just going and buying any thing so real quickly. I'M also going to show you just how to remove one. Just you can see how easy that is to hear a lot of stories of girls trying to pull these out. You don't want to pull them out. You will remove that chunk of hair. So this is the removal tool, like I said, there's a difference between the tool that actually puts it in which is a flat base which flattens that middle circle - and this has circle rings in it, which takes that flat shape back to a circle. So just slide right out: don't pull these out of your hair? You kind of hear it pop back into that circle shape, and there goes quick and easy thanks again for watching. This has been Jamie with studio, DNA and Mahalo. If you have any other questions, send your request to request at Mahalo comm or, if you'd like to be a super hair. Stylist hit me up on Facebook or Twitter I'll see you next time.

Comments
DelDestruction: I payed literally $6 for mine all together. Feathers from Sexy Sparkles on Amazon and a bag of 100 beads(for installation. They are the wax centered crimp beads). I also didn't use any tool but my hands to instal. I twisted the thin strand of hair tightly then made a small loop, pushed the bead to the top of my hair, out the feathers in it, then crimped them in with pliers. And since I have over 100 beads, I can take them out and put them back in once a month so I can dye my hair with no issues. And if they fall out, I can out then back in really easy. (Plus my hair grows 1 inch per month and I am currently growing out a pixie cut so they have to be pushed up often haha). I hope this helps :)
grace: who remembers when this was THE thing to get in ur hair when u were 11
debra chapman: Thanks. That Made it easy
Vera x: Can you take feather extensions from at least 5 to 6 inches in medium long hair?
MHlovesorigami1: thank you sooooo much i needed to watch this sooo bad but where do i get the metal hoop to hold it in place i have everything else do they sell them in a hardwear store ?
Elise Marlin: thnx! i tried pulling mine out a while ago and it did rip out that chunk of hair...it was horrible!
jade: I used to get these all the time when I was like 3-8 and I constantly got black and pink for no reason
Jessica: i had that done with a purple hair extension instead of dying and it was used glue. the problem was every time i brushed my hair little peices broke as my hair grew.
Donut🙂: Can this be done without the wire? I have long feathers and beads. This is my 1st time doing this. I also dont have the proper too however I managed to use a tool i use for working on my vape.
Haley Rischar: i got more neutral colors and i have this one thats grey with really cute dots on it.
Cæcilie Rousing: 1:10 the model looks so annoyed.. But she smiled in the rest of the video(:
respectthepath: Thank you Jamie you are dope
Maria Alice Seara: YOU'RE AMAZING JAMIEEEEEEEE
sweetbiella: might as well buy clip on ones. I bought them on ebay for $2 each
Dayllily: came out cute! she looks happy she got em in.
ettagirl101: where the feather was placed is really weird... id go with placing it like low lights or under just 1 layer of hair about 1/2 way btwn the 4head and the back of the head... thats just me tho
Vivian Le: i personally think the stylist is prettier then the model just sayinn' ( in my opinon )
Vanessa Jones: Very pretty
Gillian Murray: im doing this soon... #9YearsLate
Dayllily: i really wanna be a hair& make-up model.
Jenny Smith: That is too cool
Coera17: 1:11-1:13 model's got sass haha, wow, she looks SO excited with the result 7:11-7:14 haha wow...
McKenzii: How does she look irritated.....i really didnt se any signof that!! She was actaully smiling and nodding and was pretty much quite pleasant throughout.
Callie Konane Rickards: I love my forehead. Stopped watching after that comment about people not liking their forehead. boo hiss body shamer. Yay to body love and body positivity. I'll find another video to teach me this technique.
Emileigh: A.W.E.S.O.M.E that spells awesome!
taylornb: I got these before but they were weird
Caylei: Not me watching this now bc I bought some
Virginie Perier: the model always look so pissed in all of the videos...
yycryme: wow, u kinda look like aria from pretty little liars!!!! thats so cool
Abby Chris: Is anyone else just looking at old fashion trends lol
Black moon Mermaid: that model looked like UHG *Rolls eyes* hehe
Amy Faye: 4:34 she looks well pissed off.
Nikki Lewis: Cool
Sierra Manhoso: Cool
Elijah Alvarez: "Hi ladies" Me - "Did you just assume my gender...TRIGGERED"
Rachel Rose: COol<3
Green Ghost: Can people just stop commenting on people’s looks
Kimberly Mac: she looks like lucy hale!
jade moody: the model dont look happy☺
Lauren Blakely: looking at the thumb nail, i thought the model was the girl from the inbetweeners that simon gets with. The episode where he cant get his willy up
Steve R: THAT IS MY BIG SISTER
yasmeenmilko: Ya look like sisters or sumite.
Patsy Cabrera: good
Alex Nicole: Why was this a thing