Make Your Quickweave Look Like Microlinks/Tapeins| Unice Hair
- Posted on 27 March, 2022
- Microlink Hair Extensions
- By Anonymous
Hey Y'all! Im about to get in my hair zone! In this video, I share how I did this very Versatile quickweave. Please Like, Comment, and subscribe!
Thanks for Watching!
Hair Used: https://www.unice.com/unice-malaysian-... (to get 2 26'' and 2 28'', click the pink box that says "more" next to the lengths.
Protective Shield: (You can get at your local beauty supply but here is a amazon link to it) https://www.amazon.com/Roberts-Diamond...
Other products used:
Weave Cap
Tint brush (to apply protective shield
NYX Jumbo Pencil - Milk
Hair glue
Email: [email protected] (two e's)
IG: _nakiasymone
Click here: https://www.youtube.com/channel/UCe5PS...
This video is not Sponsored !
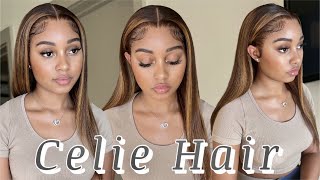
I can put it in the vine. I got my edge back. What'S up you guys, it is your girl, nikia simone, welcome back to my channel. If you are new here, make sure you go ahead and hit that subscribe button you're going to want to stick around for a little while bro today's video, i'm going to be showing you guys how i achieved this very versatile, quick weave um. This is my first time doing a quick weave and it turned out really really well, so i decided to show the girls how to put this stuff together. It'S very versatile. You can put it up in a ponytail, you can put it in a bun and i can put it in a vine. I can put it in the bun. I got my edges back, but yes, so you could put in a ponytail. I got the back up. Do not judge me for how my kitchen look, because i can't see back there and i know we look a mess okay, but i did leave here on the back, so i can put it up in a ponytail if i want, of course, if i actually do Put it up in a ponytail, i'm gon na fix my kitchen first, but i can probably finesse a half up half down if i really wanted to, because i could wear this probably like a flip over method, you know how the girls be. You know how the girls do one of these little numbers. I could do one of them. If i wanted, you can put the hair behind your ear pool because no tracks detected it's given very much micro link pool so yeah. I'M going to show you guys how to do your own, quick weave at home, because it's 20 22.. We need to be able to know how to get ourselves together, okay, but this is my first time doing my own quick weave at home and i'm just really surprised at how it came out. So i'm glad that i recorded it. This particular hair is from eunice.com. I got four bundles two 28's and 226's, but i ended up cutting it here. So it comes about right here to my waist. So it's still pretty long, but i ended up cutting it a little bit in layers so that it can look a little more natural and full, and i still actually have it almost looks like i have, like a bundle left. I actually reused this hair um because i had it sewn in in my first video that i have on my channel. I had the same hair in, but i had a side part that was a sony and i actually use the same hair. So i've reused it eunice has really good hair and it's affordable and they have after paper, and this video is not sponsored, i'm just putting the girls home because that's what i do, i'm not stand you with the tea okay spring is here, which means that summer Is gon na soon come tumbling after, which means that we need to save as much point as we can and we're gon na start with the hair, because i know i'll be spending about a good six hundred dollars on getting my hair done. We'D be 400, then it'll be 200 to get it sewn in okay, that's money that we can spend on the trip. There'S money that we can spend on what i eat: that's money that we can spend on clothes and shoes for the summertime. So, let's save our point up, i'm still gon na go to the salon baby for that sewing, but to know how to do this quickly, when i ain't trying to spend my little six hundred dollars on getting my hair done, boo, it's elite. So if you want to see how to achieve your own, versatile cookie from home, make sure you keep on watching give this video a thumbs up. If you learned something and i'm going to continue to push these hair videos out, so we can save some coin. But let me stop chit chatting, let's get into the video all right y'all. I finally cut off all of my heat damage, so healthy hair kia, but anyway i decided on the middle part. So right here i am just making small sections beside my part. That is going to cover the track, and i just want to make sure that both of them are even the same amount of hair on each side of the part. Okay, and once you got a good amount of hair left out for your leave out in the middle, you want to go ahead and secure it away. I prefer to go ahead and braid it down so that i can feel the braid through my cap when i start to glue the tracks down all right and then i left a small section out all the way around the perimeter. So what works for me for my edges, i just did right before my ear and i just pulled it back to make sure it was enough hair to cover a track and that's how i determine what was enough hair and what wasn't i secured this away, because I wanted to make sure that i pull out the same amount all the way around my head, so i just put in a rubber band, but i am going to end up braiding it all together. So that way, when i put the cap on, i can feel the braids and know which part not to put tracks on. It was a little hard for me to make my part straight in the back. I just grabbed another mirror and did my best. It doesn't have to be perfect, however, because you just want to make sure that it's just enough amount of hair to cover your tracks, so i ended up braiding all of the leave out into one braid, so that i know which part is my leave out when I put my cap on so you'll see. I don't know where this super power came from y'all. This is my first time doing. Braids on my hair, i literally just separated into three and just kept adding hair in so just try your best y'all. Even my braids that i do under my foundation wasn't the best, but it worked. Y'All just try to make it as flat as you can. Y'All can see okay, so i put my leave out into a little bantu knot, so i can get it out the way and we're going to start on our braids that are going to be under the cap that we're going to be putting our tracks. On top of now, i did about six braids and they were kind of big, but i tried to make them as tight as i can and as neat as i can again. This is my first time doing braids on myself. So if you don't know how just try separate it into three and just keep adding hair into it, so if you see i just take a small section, put it into three and as i braid i take my index finger to grab some more hair and keep Adding it in whatever i did on one side, i made sure to go ahead and do it on the other side so that my braids can be even and as flat as possible. All right and i'm not going to bore you out with the repetition. So i pretty much did the same thing for the last couple of braids, but i do want to show y'all that when i was doing my braids as i was braiding it down, i added in the piece i was hanging for the other braid. So i'm gon na show y'all exactly what i mean, but basically i pulled the braid up and i added it into my braid. You can see here i'm pulling it into the braid and braided it down. So that way, i can get rid of the pieces that were hanging okay, so i'm gon na fold, the last two braids and i'm gon na take a needle and thread and sew them to the top of the braids. So that way, those two pieces are secured and ready to go under the cap in no particular formation, where you're sewing these braids down to the top um. You just want to try to get them to stay so that they're not hanging down. So i was pretty much sticking the needle anywhere, but it worked well um. So this is how they ended up. Turning out y'all, it's getting very much gel braids, it's giving very much hard knock life like it's just. I really thought i was doing something, but it worked. Y'All nobody's going to see the braids anyway, so it doesn't matter a cap hand. Tracks is about to go on top of that caution before you. Spray got to be on these braids, make sure you or your scalp, because my hair was itching literally like four days later from this got to be spray. So all you just got first, and then i put the got to be spray on so that when i put my cap on it kind of sticks a little bit. Okay and i used a white little makeup pencil. This is a nyx jumbo pencil in milk and i'm basically just going to outline where my leave out is so i'm looking through the cap and i'm just drawing a line so that i know where not to put tracks at you guys. So i basically did that. All the way around my head, so i know where my track should start and end y'all when i lifted this cap up and saw that that makeup pencil went through onto my hair. I was distraught, but i just rubbed it out. So it was okay but make sure y'all use a light hand if you all use that particular pencil, but just use a regular one. If you can okay - and i got this protective shield from the beauty supply, it's supposed to act as a barrier between the glue and tracks in your hair, so it's supposed to protect it from the glue. So once you wet it, it's pretty much supposed to just come right off, so i'll leave the name of that in the description box. I won't know if it worked really really well until i take my hair down, but it seems like it would act as a good barrier. I laid it on very, very thickly, and you have to make sure that this stuff is completely dry. Like i mean completely dry before you start to lay your tracks on with the glue or it won't stick, so i have blow dried it for a really really long time. Okay and this stuff can get messy, so you just want to be careful with it and make sure you stay inside, of your white lines, um all right - and this is how it looks when it was dry. So now i'm going to start to size my tracks to the back of my head and i'm going to start with my first track right above my white line, i was double checking to make sure that it was dry before i started to lay my tracks. I also like to blow dry the track a little bit once i put the glue on just so that it can be easier to stick but yeah. You see i'm going straight above my white line and i just did a few tracks. I try to do at least two or three um around the same size, maybe a little bit longer on the edges, and you want to lay your tracks in kind of like a really wide u-shape, you kind of want them to curve up. So that way, when you pull it up into a ponytail, you can't see any of the tracks, but i'll show you guys, as you keep watching all right and as i said, this is reused here, so i had to go through and flat iron mine. You know killing two birds in one stone: okay and i'm just laying the tracks kind of close together um in like a u-shape kind of like a smile. It should look like a smile in the back of your head, but pretty much just keep lining them up. Cutting them, you know sizing them up, putting them next to the first track and just making it a little bit longer each time on the edges kind of bringing it up. So you should basically be laying your tracks like in the shape of a smile. So your tracks, the way they are laid. It should look like a really wide view or like a smile world all right and just remember that each track should be just a tiny bit longer so you'll notice when you start to get to the front, because you have to keep making it a little bit Longer and a little bit longer each time you lay a track, so it should become a little bit easier once you get to like the middle of your head. Alright, if you're making your tracks close together, you shouldn't see anything when you lift the hair up, so they should be really neat. It should look really really easy to blend when you lift it up and for those longer track, shawls just ball it up in your hand like a bunch of flowers and that's how i was putting this along. So that's what i'm showing y'all here so y'all see when i pull it back. You can't see the tracks it's because i laid it close together and i'm pulling them up to the edge i'm getting higher and higher and pulling them in as i go up. So just keep making that u shape or smile shape, kind of making your edges tilt in and that's what will make it look seamless when you pull it up? Okay, so it got to a point where i had pulled the track in a little bit too much. You can see that track right there, it's already covering my white line, so i kind of just went behind it and i started to make more of a tighter. U shape so um just make sure you don't go over that white line because again, remember that is your leave out all right now notice that the back is starting to look a little star, so i made some tracks to fit, especially in that smaller spot back There so i can start bringing my you to a close, and i put my last and final track right on top of the white line, because i am going to cut off the rest of the cap and i want to make sure that it's tight and lay It down so that it doesn't pop off all right y'all. So this as far as i'm gon na go with the tracks and it turned out pretty good, it was pretty seamless, as you can see, when i pull it up, you can't see any tracks. It looks really good, but this one side - i guess i wasn't curving them in enough to my line, so i ended up having to add a track or two in in the front so that when i pull it back, you can't see that space all right. So now it's time to cut the cap off, so it's better to go straight down the middle and then once the edges lift up, you can just go around right before your track and cut that off. You do have to do it all the way around your head. Just be careful, remember your leave out. Is there your braid? So you don't want to cut any of your hair, so just pull it out when you cut it and be careful use another mirror behind you. If you can. Thank you all right girl. Once you cut all your cap off it's time to do your victory dance, because those are all the hard parts. Everything from here is pretty much easy. You just take your leave out, braids down and flat iron the hair and put some extra color on and style. Your hair all right and then i decided to add a few layers to mine in the front, just because i decided that i was going to curl it. I didn't really want to leave it straight, so i added some loose curls to it, but i just kind of went down the front of the hair and kind of layered. It started from my natural hair all the way down all right and i'm not an expert at curling hair, i'm actually using my flat iron to curl um, but my method is just to go away from the face, so i just flip it back and then i Let the curl cool in my hand, before i drop it just so that it lasts a little bit longer, so i'm just going to put a little edge control along and we're pretty much done all right, and this is the organics like transfer. I just sprayed two pumps in my hand and kind of ran it through to get rid of the flyaways, but i don't want to put too much directly over here, because i don't want it to weigh it down or make it oily. I'M just showing y'all the coverage and, like i said this is my first time doing my own quick weave and i'm proud of me. It turned out really really well so this was me just playing around with it y'all putting it up in a bun and all type of stuff, but yeah y'all y'all can do it really really cute. Like look at me, i feel, like a spanish, i feel, like a, i feel, like a puerto rican in this hair. Okay, what that tic-tac-toe, but yeah y'all, that's pretty much it. I was just playing around with it, but it turned out really really well. So all right, you guys, so that is pretty much it for this video i hope you enjoyed. I hope you learned something girl go ahead order. Your weave girl get you a cab all the products that i mentioned in this video, and do it yourself re-watch this video as many times as you need to you, can put yourself together, girl you got ta know how to do something to yourself. If you need to go somewhere, you can't get mature with your stylist, okay, be sure to like comment and subscribe and i'll see you in my next video bye, guys


Comments
Courtney Beckett: Girl it looks beautiful ! Great job
tiffanyjackson521: U did an amazing job you couldn’t tell that was your first time babyyyyyyy you just gave me The confidence do install my own quick weave thank you
EboniK: I definitely commented on this video I was at work I don’t think I hit send . You did so good !!! & you look so pretty. I’m definitely trying this
Betterme4lf: I have been looking for this type of video for soooo long new sub
KD Netwurthhh: Absolutely love it!
Clouded ByL: It turned out so cute. ❤️❤️
Nikki Hona: Awesome job!!!
Toya Allure: I just did this style and I’m loving it! I need to find great hair with volume on the weft my head so small it be looking thin
Peaches Nicholson: You look so excited about the results but you “did that”. I shared the video with my sister bcuz she don’t know she’ll be doing it too!!! ✅
Aykia Tartt: Yassssss ❤❤❤❤ u did really good.!!!
FeeFeeGlam: You did great
linda turner: I love this I want to do a quick weave you made yours look so simple and not a whole bunch of jail I like to know how long did it last and I thought it was very good for your first time
Leslie Jones: How do u get the wig cap to stay on after u cut it? Every time I’ve tried it always slides and comes apart
CocoaBananas23: You did that girl! Its giving sewin....its giving is that your real hair? lol good job for your first time
Tykeyha Randolph: I’m trying this!!!!! It’s so cute
Zhane Hickson: I got that same shirt ❤❤
Lourdes Araujo: Yo, Brasil...tem tradução?
Xavier Richardson: Subscribed when she said I spend abt 600$ on hair I said YEP this my channel!!!