How To Get An Ombre Using Extensions
- Posted on 26 January, 2021
- Microlink Hair Extensions
- By Anonymous
Hey Everyone! today I will be showing you how to achieve an ombre effect without the use of chemicals! My client today came in with so many layers of black box dye in her hair and wanted to have platinum blonde or silver ombre ends! so since the test strand that we did (obviously) didn't work, we decided to use extensions to achieve this really fun and wild look!
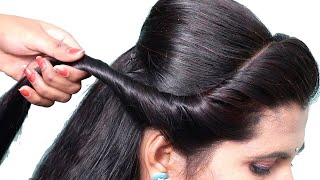
Hey everyone, it's katie from bobby hair studio today, my client has black boxed eye on her hair and plenty of it. She has many layers of it and what she's trying to do is grow out her natural root, which is at the top there and try to go into a silver blonde. Eventually, these are some photos of what she showed me she wanted to originally come in with, but we can't lighten her hair because we've actually tried. So what we're doing is we're just going to pre-cut. I haven't shown you in the video, but i did pre-cut her hair to soften in these tape and extensions which are going to be giving the illusion of the black to blonde look that she wants for the time being while she grows out her hair. So i'm just gon na walk you through how i do my tape and extensions i like to take a fine, but not too fine section to sandwich between my two tapes. You wanna make sure, there's enough hair that it holds on and it's sturdy when she brushes through and she doesn't start ripping little hairs out of her scalp. And then. What i personally like to do is leave a little bit of room on each side of the tape, so that there's just no hair there getting in the way and both tapes can like stick together as much as possible on the side. Because i find that sometimes the sides will peel open if you have too much hair in the sides and then you're going to get glue in other spots, your hair, which can cause matting and breakage. So, in my opinion, this is the safest way of putting in extensions, and i also like to use a clamp and really sandwich it down and really really get that glue together. I also tell my clients, during their first day with their extensions, that they should be massaging the tapes together very, very gently, just kind of almost doing little pinching motions to make sure that the tapes are fully adhered together, because this is a high contrast. Look i'm just going to go through with why i chose the colors. I chose for this client because she has a whole lot of colors in her hair. Now she has her natural level 8 roots, which she's growing out until she gets to have her silver platinum blonde. We get to bleach one full bleaching over she's, fully growing out the black getting rid of it, but we still have a lot of that black in there. So we got to make sure that the ends look bright and the top looks dark and that we try to distract from the top as much as possible. What i did was, i purchased two sets of tapes for her. I purchased one, which was like a platinum, silvery blonde and one which was a rooted brown to light blonde color. Now, of course, we couldn't get silver or white that wasn't available in the sets of extensions that we were looking at, but she was happy to go with blonde and then just purple shampoo it a few days after she gets them put in. So the glue has enough time to adhere. So what we're doing here is i'm putting the really light, one underneath and the ombre one on top, so that it doesn't show when she wears her hair down or when she wears her hair up either way. This is a high contrast. Look, so it does have a high risk of showing, but when you have something like an ombre one laid down on top, it covers that root area. So i've worked in a horseshoe shape around the top area of her head kind of where her head starts to curve over, and here i'm dropping her top layer onto her hair and you're going to see that actually kind of blends pretty well like it's a look. It'S a very specific kind of look, but it's it's working in my opinion, i feel like this is going in a pretty good direction and now what i'm doing is i'm separating out her second section we're doing a horseshoe shaped section again, but what i'm doing is I'M angling it down so that the back of her hair appears longer than the front so a little higher up towards the temples and then coming down and around. As you can see that slight angle there i like to do that just for the flow of the hair and to make it look a little bit longer in the back. I always like to work with really clean sections for tape ins because of the adhesive. It can get really really irritating for the clients when you don't have clean sections and it can actually cause a lot of breakage and damage if you don't have enough hair in between the tapes either. So here i'm just double: checking on either side how high the starting point is doing any readjustments that i need to and then i'll get started on my second row, i should talk about the haircut really quickly. What i did was i elevated all of her hair and i took my thinning shears and i thinned out, using kind of like a cut in point in cut method to soften up the ends and make them really shaggy. So that there's not a lot of bulk. At the ends, if that makes sense, so that there's very few hairs that go in all different lengths to blend in the black to the blonde you'll see what i mean at the end. I should also mention that i do like to work from side to side when i'm working with two separate colors and we're trying something new for the first time. So i'm not trying to do the whole left side and then maybe run out and then realize that the right side isn't going to have a balanced amount of hair. So i'm just doing from the front left right working all the way to the back. Going left right with each piece so that i make sure i don't run out of hair because i mean it hasn't happened before to me. But i've seen it happen and it's really weird to have to have so much hair on one side and then not enough on the other, and you have to go get more hair and book another appointment. It'S a whole mess just super unprofessional. So i recommend that you work from side to side. Of course, it's not exactly what she wanted to do, because what she wanted to do was bleach her hair, but considering the fact that her hair wouldn't even lift past a dark red to to do anything in one session means that she's not going to have silver Ends she's always going to have red or brown ends and that's not what she wants. So we are cheating the system and doing tape and extensions instead. So today, i'm going to show you how i do that it's a very, very high contrast, look and it's not everyone's taste. So please be kind in the comments. This is not something that everyone wants to get, but i think it's pretty cool. It kind of makes me think of, like eagle or you know, kind of scene hair and that's what this client wanted. So i understand: if it's not your taste, it's not necessarily mine either, but the client wanted this and she got what she wanted and she loved it, and i think overall, it's well done and that's what matters also keep in mind. You don't have to go from black to blonde. You can do anything that you can think of. You can go red to blue. You can do whatever you want uh. What i personally like about this is that it's just it's a lot of fun and it's different than everyone else's hair, and if you want to go with the no damage root - and you don't want to have to bleach your hair or color it or even you Know you're trying to grow out your natural color, but you want to do something fun for the time being. This is a really good way of doing it. You buy tape and extensions. You get a tape and extensionist to put them in and blend your hair into them, and then there you go. You have low commitment, low maintenance, but a really fun hair color, and you could even do this with. Let'S say if you wanted to go from dark brown to like a medium light brown, you don't have to do high contrast. You can do honestly, whatever you want and that's what i like about this so me personally, i don't like to do tape. Removal at all. I think it's really tedious and really sticky, and i just don't like doing it and it's pretty easy to do at home. It just takes a little while. So i do give my clients a thorough walkthrough on how to take out their tapes and you know, protect their hair, make sure it's in the best. You know condition as possible, so i do take care of that aspect of the job. I let them know what they're doing when they when they have to take out their tapes. But personally i don't like doing it. So i only do the application for them and then, when they're ready, they take out the tapes themselves and treat them and leave them to dry, with good quality, shampoo and conditioner and yeah. They do the whole service themselves and then, when they're ready, they book back with me and i will put their tape ins again and that way it helps them to keep the cost down and they do have a little bit to say in their own hair. You know care method too, like i don't like putting these things in the same day, you take them out. I just don't think that that's really good for the hair. I think it's nice to give it a little bit of a break, so we have worked around each side and we are coming around to the back now, where i'm going to put in two more tapes and then underneath i'm going to use my last few tapes To kind of get the nape of the neck area, because it's a little thicker than people think with the density of hair, which can show through tapes and i'm just going to mention right now before i even forget at the end, what i should have done was Thin out the underneath of the hair a little bit more because you can see a tiny bit of a line when the hair is just straight and sitting there, you can see where some of the black ends and the blonde begins. I don't like that look. So i should have thinned out or texturized a little bit more underneath. I think it was perfectly texturized up on top, but underneath could have used a little bit more, but that's just me being a perfectionist. Sorry guys, a lot of people ask me how much i charge for my tape ins i charge about like a hundred dollars 115, depending on how many packs of hair they bring to me for application only, but i do include the cost of the cut and blending That, in with it, i feel, like that's a really fair pricing point for the area that i live in. Some people charge a lot more than that, but i'd rather just charge less and have my clients, you know, come to me whenever they can afford it and that usually ends up being more often if they can afford a lower price. For something like this. I do want them to take care of their hair, because extensions can go very easily wrong and if you don't take good care of them and you're, not high maintenance with them, then you're going to end up getting more damage than you bargained for. So i personally feel like having a lower price point for applying tapes because it only takes like 30 to 40 minutes. I personally think that that's a good way to do business when you're doing tape ins, because they don't really take that much effort. It'S just being tedious and being clean with your sections and knowing how to put them in now that i've finished up with the sides in the back. I am going up to the front and i'm taking my last sandwich, which is two pieces of tape that become one piece, i'm taking my last sandwich and i'm cutting in half to make two teeny tiny sandwiches that go in the front and what that's going to Do is give her almost like a little bit of a money piece look and it's going to bring that little bit of brightness and lightness to the front and also because of the way that the hairline is formed. There'S going to be one kind of heavy piece hanging at the front: that's going to be disconnected from everything else, so this is a really good way of kind of reconnecting that piece to everything else and adding a little bit of brightness. So here i am just snipping that piece in half, and i will do that with the other one as well and i'll put in one side, and you won't see the other side being put in just because i cut that out, because you're not going to be Able to see it at all, but here it is here - is a bit of a close-up. I am doing a slight diagonal back section for this, so that the little piece of hair wants to fall a little bit more forward. Some people wouldn't do this and it's totally okay, i find that tapes are very customizable and you can make up your own patterns or you can follow someone else's patterns. There'S no one right way to do this, there's like a whole bunch of ways. So if you have another way like i'd love to know what that is, because i'm always looking forward to new ways to do things - and maybe there is a better way to do this front piece. But this is just how i do it for the time being. So, as i'm done this front piece, i'm going to do the other one on the side, like i told you before, but you're not going to see it we're just going to see the big reveal in a moment and again, just letting you guys know it is High contrast, so it is a very specific look. Please be kind in the comments um. This is something that might not be your style. I think it's super cool and i think it's a lot of fun, but this is a really good way of putting in extensions of a fun color or a bright color. That will give that client, the ombre balayage look which they, you know everyone's really going for right. Now you don't even have to go black to white. You can do any color combo you want. I hope you enjoyed my video remember to like and subscribe below thanks. So much you guys have a great day.

Comments
H0202: I really like this look! I have black hair and just did the Japanese hair straightening so I've been looking for ways to lighten my hair without actually bleaching it and this seems like a great option
Anabel Perez: I love this look .you did a amazing job.
saskia valencia: you can get blonde without dying your hair? amazing!!! I love it
loftin01: This install came out amazing.
C: Well I think is GREAT! I am a hairstylist and I have brown dyed hair and I want extensions to create an ombré look, so THANK YOU
Millsy Dills: I love it! Looks good xx
Jennifer Adams: My hair got messed up the last time I bleached it so I'm going to try tape ins instead.
Eman Muhammad: Wonderful job ♥️
K Weaver: Beautiful
Trevor Clabough: Looks awesome!
Abby Lin: How many packs did you use??
A C: This is amazing!!! Be my stylist lol??
Dcelienofficieel Benz: Like your videos do you have a video from darkest bromw hair 2 dark as brown hair
Leyla Reyes: Nice
Corrissa Garza: Gorgeous! Love this video! You seem like such a sweetie! Xoxo.