*Detailed* How To Install Tape In Extensions On Yourself | Curls Queen Hair
- Posted on 26 January, 2022
- Microlink Hair Extensions
- By Anonymous
Products Used :
Hair Gripper: https://amzn.to/3KypuP7
Chi Silk Infusion: https://amzn.to/38DjAPK
Chi Infra Treatment: https://amzn.to/38GcOJ6
Babyliss Pro Flat Iron: https://amzn.to/3F3CSd1
Hair info:
https://www.curlsqueen.com/178-ti015-1...
Use code CQJA for $$$ off
Thank y’all so much for watching! Feel free to comment any content/videos you guys want to see from me down below! And remember, God is love. Whoever lives in love lives in God, and God in them. His love endures forever.
————————————————————
Let’s get to 20,000 subs !
——————————————————
Business Inquiries
Subject: YOUTUBE
——————————————————
Keep up with me:
IG- janiaaliyah https://www.instagram.com/janiaaliyah
Tiktok: janiaaliyah
My Podcast: https://shepraysfirstpodcast.buzzsprou...
———————————————————
Subscriber Count (at the time of filming): 15,800
——————————————————————
FAQ about me:
Name: Jania
Age: 20
Birthday: December
Camera: Canon G7x Mark II/ Sony ZV-1
Editing Software: Final Cut Pro
————————————————————-
Thematic BG Music I Use:
Music by Clueless Kit - Rooftop - https://thmatc.co/?l=080E7A10
Music by Mark Generous - Luscious - https://thmatc.co/?l=82912ECC
Music by Mark Generous - Chase The Sun - https://thmatc.co/?l=059C2FE1
Cody G- Aight
Music by Mr. Jello - Wild Willow - https://thmatc.co/?l=7D989046
Music by Mr. Jello - Yes No Maybe - https://thmatc.co/?l=1E714891
Music by 8thDimensions - Cruisin - https://thmatc.co/?l=4493AD0D
Music by SkeetOnTheBeat - Nostalgia - https://thmatc.co/?l=FA1009E9
Music by Mr. Chase - Wild Cherry - https://thmatc.co/?l=9B36F039
Music by Mr. Thibs - Ayesha (Freestyle) [feat. Payton Bowdry] - https://thmatc.co/?l=FD969475
Music by Kabwasa - Boardwalk - https://thmatc.co/?l=C15148DA
Music by Kabwasa - Whole Lotta Love - https://thmatc.co/?l=8B78DB7F
Music by Ebony Loren - Mine - https://thmatc.co/?l=029E8CB6
Music by Mr. Jello - Slow Down - https://thmatc.co/?l=B7C5A17C
Music by Mark Generous - That One Morning - https://thmatc.co/?l=B48CCB08
Music by Mark Generous - Meganne - https://thmatc.co/?l=BE3A3D01
Music by Mark Generous - Orange And Pomegranate - https://thmatc.co/?l=7F2B5124
Music by frumhere, kevatta - warm feeling - https://thmatc.co/?l=1C55A855
Music by Goosetaf - Bumblebee - https://thmatc.co/?l=3E5AC0A5
Music by Mark Generous - As I Got Ready - https://thmatc.co/?l=AEFDDFAD
Music by Naomi - If Love is the Answer - https://thmatc.co/?l=58F69BF3
Music by Dylan Rockoff - Around You (O Christmas Tree) - https://thmatc.co/?l=B62D7098
Music by Eila - Lavender Dreams - https://thmatc.co/?l=49777D5A
Music by Mr. Jello - Passion Fruit - https://thmatc.co/?l=8D8CCBF4
Music by ninjoi. - Deck the Halls - https://thmatc.co/?l=F773B69B
Music by Mr. Jello - Christmas Morning - https://thmatc.co/?l=FA77142A
FTC Legal Disclaimer - Some links found in the description box of my videos may be affiliate links, meaning I will make commission on sales you make through my link. This is at no extra cost to you to use my links/codes, it's just one more way to support me and my channel! :)
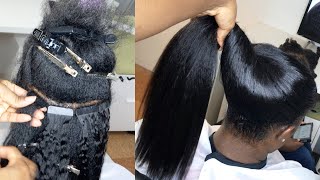
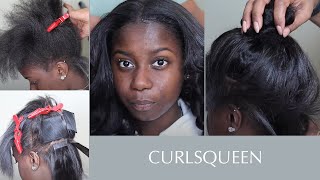
Is what's up beautiful people and welcome back to another video, so y'all as y'all can see my hair is in a little bun. I typically don't even like wear my hair straight, but today sorry, i'm trying to fix my mirror y'all. We are doing another tape in extensions, diy tape and extensions little tutorial at home, and so i'm gon na be showing y'all how i install these tape and extensions that were sent to me by curls clean hair. Let me go ahead and show you all the bag and all that good stuff, so here's a little baggie and so for details on the hair. I have three bundles and i believe these are 18 inches honestly yeah, three bundles of 18 inch and i think each one comes with. I want to say 20, but just to be sure, check the description box because i don't know exactly how many come in each bundle and then they sent me some other useful tools or whatever for styling my hair. And so i have some little clips. Definitely going to be using this today as well as a brush, a comb and then some walker tape. So with that being said, we can go ahead and get into the style and just for a nice little tip and to make your parting easier. I went ahead and ordered some of these off amazon, and these are like some little velcro like strips that you can put on your hair to kind of hold like some flyaways up and stuff as we're going through doing this hairstyle. And so i'm going to be using these without throughout the style and i'm going to have a voiceover, so i can be talking y'all through exactly what i'm doing this time. So hopefully, y'all are able to do this at home because it sounds very, very cute, looks very, very natural, but without further ado, let's get into it all right. So, first things. First, everybody i 100 recommend you start off on straight: silk, pressed hair or like if your hair is relaxed just start off on straight hair. If your tape ins are going to be straight because it makes the style so much easier and saves you a lot of time, and so if you guys need a silk brush tutorial, i have one posted on my channel, and so basically, what i'm doing here is Essentially, i'm parting off my first section of leave out, and so, as you guys can see, what i'm parting off is somewhat of like a half circle, just on the top of my head, and that is supposed to cover where i would potentially put a side part And a middle part, and so then i'm going to go through on my sides and i'm going to part off like a section of around my edges for both sides. And this part needs to be thick enough to the point where it should cover the tape and extension. So if you want to test to see how thick or thin it looks, put your comb behind it and pull it up like a little ponytail and hopefully that part is thick enough to cover at least the comb and then that's how you know it'll be thick Enough to cover your tape and extensions, and now i'm going through and i'm doing the same thing in the back and the back is a tad bit easier. But i also wanted to make sure i did leave enough out, because on that part, i really can't see if one of my tape ins are showing, which is why i was a little more generous with the back. But it's okay, if you guys know, don't want to leave too much in the back out, because you won't have to really worry about trying to blend that one too much unless you're pulling your hair up, because it's in the back and the extensions will be covering It the whole time and so basically to go ahead and separate that off. I did a little side cornrow going across my head just to keep that section off. But if you guys really wanted to, you could just use the velcro strips to cover that up or you could put it into a little like low ponytail and then put the velcro strips over it. If you don't want to do this whole braid thing. Okay, you guys, and so now it's time to go ahead and do our little first tape in and so, as you guys can see. The way i kept my hair up is with the little clip because it was easy to kind of slide and remove hair. Whenever i needed to - and i wasn't really fighting with a ponytail holder but okay y'all - this is high key, the most important part of this entire video. You need some type of view to the back of your head, so i don't know where you guys. Do your hair, but, for example, i was in my room and so what i used is i facetime myself on my phone put my phone behind me and like was staring at my ipad. So that way i can see the back of my head and so the another way you could do this without the iphone and ipad is, you could use one mirror in front of you and then also being your bathroom with another mirror behind you. So that way, you have a good idea of you know what's going on behind your head and when you're parting, because it can be hard to see, but you guys definitely need to be able to see, but also another way. If you very high tech, when it comes to hair and have a good feel around your head, you could potentially do this, but you just it's probably going to take longer because you can't see so yeah and so now it's time to go ahead with our first Tape in, and so i went ahead and removed the little cover thing for the tape and i'm showing you guys in real time, so i can get a good idea of what i'm doing, and so basically i just get the tape in and paste it on. My hair, while it's still in a ponytail and a key thing when you guys are doing tape, ins is try to not put it too too close to your scalp like leave. Some hair in between, where you apply the tape in and where, like your actual scalp, is because your hair needs to be able to freely move up and down when you're, putting in a ponytail when you're styling it and stuff like that. And so then, what i do is i go through and kind of part briefly with the comb, and so when i'm parting, i'm literally just trying to part and grab any hair. That is not stuck on the tape, and so that way the other piece of tape can stick properly, and so you guys can see when i grab the other piece of tape. I literally just press it on top of the first piece and i kind of like press down with my fingers. You don't need to seal it with a flat iron or anything like that. Literally, this tape sticks just fine and it's very very like in there. So i literally just pressed with my fingers, and that was how i did it, and so for the pattern of applying the tape ends. You guys will see that towards the back, it's okay to do them like very horizontal, and just for, i guess, efficiency purposes. I had a very, very full set of tapings in my head, which i think was completely unnecessary. So when you're applying your tape ins, i definitely recommend like applying one raw tape ends and then parting off, like just one row of hair and then skipping a row and then applying more tape ends and then skip another row and that will still kind of get. You the same nice, natural look, and so another thing when applying the tape ends is, if you have trouble, not doing it close to your root, as you guys can see right here, i kind of just put a finger over my like scalp, where i parted it And then applied the tape in on top of that finger, and so that really helped me throughout to not get them close to my root, and so that's one thing that would help you guys as well. If you trust me, if you want me, if you need me, if you trust me, okay, and so as we move towards the front of my head, you guys will notice that i start applying. The tape ends at somewhat of an angle versus like just plain old horizontal, like i did in the back of my hair, and this is very, very important because you have to kind of allow the tape ends to move in an upward motion for your ponytail and Your tapings cannot do that if, in the front of your hair is horizontal like, for example, just imagine you trying to pull the tape ends up. You could only pull them up. One way, which would be a super duper high ponytail on the top of your head, and so, if you're looking to get those natural like ponytails, going like just straight to the back or a little messy bun, then you need to keep your tape ends at an Angle once you move towards the front of your head, and so a good example would be looking at this one. If i wanted to pull this one in a ponytail, you can just look at it going like flipping it straight back and that will literally go into a ponytail perfectly and also as you're moving towards the front of your head, be mindful of the amount of hair That you left out around your edges and as you're going through, make sure that that amount of hair is okay to cover the tape bands that your implant, that you're applying in those spots and so finally we're at the top of my head. And, as you guys can see, i'm literally just applying tape and extensions right behind my huge section of leave out, and so just as some information for when i got to the front slash top of my head, i did leave out a lot more hair. Under these tape ends like, for example, how i told you guys kind of skip a row and do tape ins? I left thicker rows in between only because i did not want it to be like a humpty, dumpty type thing at the top of my head. I didn't want to look too too thick. I wanted it to look very, very natural and so feel free to leave out more hair as you move to the top of your head, as well as like your leave out, because the thing is, i'm going to show you guys what you're gon na have to Work around that leave out as well so yeah, okay! So now we're finally going around a little perimeter and doing these edges. So i'm taking out my leave out we're going to pay attention more to the back later, but right now we're really focused on the sides, and this part is very, very important because i'm going to show you guys how i kind of finesse the tape in so That way, i'm able to get a ponytail so first things. First, i of course just went through and straightened and y'all when i tell y'all this light, yaki texture blends so good with my hair, like i was amazed first of all, but anyways you guys. This part is very, very important because, like if you don't get this tape in right, i'm sorry, but your hair is not going into a ponytail and so, like i told y'all earlier, it's key to part and angle, and so y'all see this little diagonal angle that I parted in my head: that's where i'm going to apply the tape in, but one thing that i messed up on that y'all. Definitely i want to help you all out with is. I definitely did not leave out enough in front of that tape in so i had to end up going back later and removing that one and moving it back a lot more. So that way like i have more hair to cover it, because think is, if you don't you're, going to see a little shiny thing reflecting under your ponytail, so just make sure you have enough hair in front of that to cover it up, but other than that. The way i applied it at that angle works fine and it actually gives you a little more coverage for the leave out on top of it, and one more thing guys um just before we get into this huge leave out section is when you apply, the tape Ends around your edges put a little more hair in between the tape ends, and i say this because if you don't it's going to be more tape than hair and it's going to kind of be a little harder to get off. It'S going to take a little longer, so try your best to put as much hair that can fit between both of those tape ends between it. So that way, it's a little easier and it slides right off when it's time to get off, and so now we're moving on to the big leaving section on top of my head, and so the first thing i did just to kind of see what the layout Was looking like it's just combed my hair over the rest of the hair, it's not giving what it's supposed to give, but we're gon na fix it. So, as y'all can see, my hair needs a little more coverage, and this is this part is very, very key to navigating where you put the tape ends. So essentially, what i did was i parted off, where my potential side part would go on that side and then part it off one part over and that's where i'm going to put the tape in and the thing is as well, you can also cut tape ends. So that small piece that i really just put there, i just cut one tape in in half and that's what i'm applying right there and that leaves room for more versatility and everything and also make sure you guys definitely leave some room like between the scalp. For this one here, because these parts are going to be very hard to navigate when you put it into a ponytail, so just make sure you leave like some room for it to move. So the next thing i did is now, since i already know where my middle part is going to be i'm going to part in between that middle part. So, basically, halfway between the middle part and where the side part will be i'm parting off and that's where i'm going to put my next section of tape ends and that's so we have coverage in that area as well and make sure you guys are actually parting Off between those parts - and the reason is so that way, i'm able to flip you know flip between the middle and flip between a side part and still have equal coverage from my tape ends, and so look in literally the spot where i parted it that or The spot, where i place the tape ends, i will probably never part my hair like that, because i either like a deep side, part or a middle middle. So with that being said, hopefully y'all kind of get. What i'm saying with that and everybody likes to part their hair differently, so just figure out what works with you, but use this method when you apply your tape ends, and so now that we finished doing what we're supposed to do on this side, i have to Go through and do the exact same thing on the other side, and so y'all can see me right now, parting in between the middle and the side part, and that's literally, how you're going to get this cute flat.
Comments
annifo: Thank you!!! My stylist doesn’t do these but I want them SO bad for some summer pics—people in Houston that do them are charging WAY too much, even if I supply the hair so I’m definitely gonna try this myself. They look great on you! And with your great parting methods, I truly think I can pull it off! You + Janay Mickles = A beautiful tape in application for me!
LP: i love the braids idea; makes everything more organized! thanks
boatis23: I am going to try this soon. Thank you so much! ❤️
Valencia Walker: I’m so ready to try on relaxed hair. I wondered if you could braid your hair . Thanks for going through the process . New sub.
Glenda Buffington: You did a great job looks good I’m scared to do this to my hair cause I would not know how to remove them and I might damage my hair
Summers Beauty World: New subbie that came from tiktok love it! I can’t wait and I want to try it
Imani Kimm: How long does this last? And does it get lose when you sweat, shower, etc.
CurlsQueenofficial: You are really talented, and so pretty no matter with or without our hair
Faith Martinez: This tutorial is great! Another way to see the back of you head is if you have and apple watch go to camera remote and it mirrors the camera and you can zoom in and out on your watch
billiebillie: you're so pretty! hair came out amazing!!
BrittanyPriscillaK: you have the best video for how to do tape ins, thank you
Sabrina C: Very helpful!!
Stella Marshall: Yessssss u did that great description of how to flip the front into ponytail
My Google: What is the wide black thing you used to help keep your hair separated? That looks super helpful
Lifeisbeautiful: Thanks so much luv I’m gonna try it❤️
Callida Lucan: Looks so natural! Did you use all 3 bundles?
Peace of mind: New subbie here!!!!! You’ve been saving me soooo much dollars!!!
Nadine Y.: At 8:04, the horizontal and the angled tapes meet. At that stage, how do you get towards the crown? Do you continue towards your crown at an angle or do you do go back to doing horizontal? Idk if I’m making sense!
Originally Azia Marie: Did you use all bundles in your hair? I ordered mine, ready to join the tape in team!
Domo Loves: Thank you that was very detailed. Other video be cheating. I’m trying to see how to part it.
Terriana Barnes: Love this video… thank u
elaina: Amazing video! I would love to do this for my prom! I was thinking about doing this style but half up half down if i can do that..? And also i play softball so i wear a helemt and work out can i still have this hairstyle?
Life with Leah: DO a tutorial how too take them out
Aneisha Evans: How long did it take for them to ship?
Kk: You look amazing I just wanted to ask if I can put synthetic hair tape in or microlink extensions or is not gonna look good
Naomi Ononuga: What happens when your hair gets wet?
Precious benz: How many pieces did u purchase for the tape ins?
Sharleen Brazile: What did you use on your edges??
Dashlintheceo: Sis that’s your hair periodtttt
Khaliyah Liyah: How many bundles did you use? My head is small so idk if I should just use one bundle of tape ins
Sheena D: How long did it take to ship to you?
Janaina Rezende: Omg the idea of FaceTime yourself it’s brilliant
Allaboutm.e TV: Did you use all 3 bundles?
Afua Ahenkora: Loved it! Please what camera did you record this with ?
MsMusic902: Love these. How do they hold up with sweat
Ocho Tutorials: Do these knot up easily?
Cennedy Elexis: Found you on tik tok so cute sis!
Christial Johnson: Can I maintain this style on natural4C hair if I workout regularly?
SincerelyAubria: New subbing here from TikTok ✨
PRITTIBABESHUSTLE: The thing is this is cute
Bianca Christina: Can you reuse the tape in’s
Indian Ego: Whats the two black grip things your using to help not pick up any hair you don't need
Shaye Micole: Giiiiiiiirl I saw a short of this video and I couldn’t find you then boom today you pop up on my home page Heyyyyyy lol I love this
Alexa Blake: What flat iron is that?
K J: You'll be better off getting clip ins from the natural hair oil and sweat that just seems like a disaster
ANTOINETTE ELEAN: I really wanna know if they last 6 months
Ky Nicole: Girl this is cute asf
Ariell Rodriguez: FaceTiming your self mad funny I never thought about that imma try it
Jessica Manzana: So basically buying 1 of the glam set would be a full head ?
Shan L: You got 18 inches but did you get a bundle or natural full set??
Jade Blizzard: Do you think you could bleach these and dye them
Mary alice Jones:
Christen: What’s the shipping like?
Shia Nichelle: What texture is this?
Delovely Day: nice vlog new sub⚘
JustGoodVibez24: Nice
DREAM MUNECA: Question love do u know why elfin hair post this video on their account and page. I literally wanna order their hair because I saw your video
Alexx Y: Wow
Life with Leah: Do a clip in video too❤️
Chrishelle Steward: What’s the song playing in the background?
Mareka Brooks: U said ur gonna do a voice over - I thought u said I’m gonna have a BOY OVER!! Lol!! . I was like “What?!!” A boy n your room? Lol!!! I’m just tickled!!
babygirlsimone5: 0:03 you can't be serious
K J: If you sweat that tape seems like it will slip off like glued on hair
Kay 2Tymezz: The hair is nice and all but the shipping is absolutely ridiculous it shouldn’t take almost 3 weeks for one bundle of hair. Just my opinion
At this moment: u so pretty