Beaded Wefts By On Stage Hair Extensions
- Posted on 13 April, 2019
- Microlink Hair Extensions
- By Anonymous
This video features the On Stage Hair Extension Wefts and the features that make these wefts unique to the industry, In addition, there is a short tutorial on how to apply the wefts for an even better understanding of this exciting new extension product.
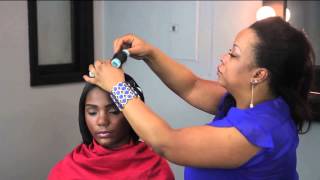
Hey Bernard with onstage hair extensions: I want to show you a unique left. It'S a flat left better than any other weft I've ever seen. I know we've heard of these hand-tied wefts that are supposed to be very small. They have their drawbacks. You can't cut the ends because the unravel we've got other types of machine made weft with returned hair when you put hair into a weft it has to doesn't have to, but apparently for a long time, people thought it had to turn back so that you could Sew it together at the top, and it would end up kind of thick well. What I have that I'm going to show you here in a second is a flat left that is flatter. Then hand-tied weft or machine made weft and then we've got little pockets on the backside so that you can quickly put them in with the links that we use for our link method. Also, let's go a little closer and see how that works. So since this is like no other weft you've, probably ever seen before, I want to cover both sides of the weft, I'm going to turn these around in a minute, show you the back side and then also show how they go on a mannequin head soon. These are both the exact same color, single plus density here, which is 60 % of this density here, which we call our double density. So we have a double density and a single plus that you can order in 10, inch 14 inch, 18 inch and 22 inch and we've made other videos for the other technique called our private length. The individual strands and all the same rules apply. You can get it in all the same colors as the coloring video you can get it in all the same textures and all of the same lengths. The difference is it's just a weft, so densities colors lengths textures apply on both sides of the textures or techniques that we do so I turned this one around, so you could see the pockets on the backside. Each one of these sticks and threader loops are all going to be gone when they're put in, but what we've done is we've provided a stick in every third loop on the ends. We put them a little closer together. You are welcome to put them closer together or further apart, but what this does is it's gets a lot of the steps that you've seen all over the internet right now. People are talking about different techniques with the word natural or waterfall. In them all these different text techniques out there provide or take the use of a string that kind of goes between the links, and I don't know what the purpose of that string is to me. If you're going to tie to that string, you might as well put another link there. So what I've done is I put a pocket all right next to each other, so that you can put as many links as you think that it needs and you can have it set up ahead of time, I'm in every fourth hole right now, so I'm skipping To little pockets in between each one of these sticks with them a little closer at the ends, let's see how it works on a mannequin head. So I'm going to use a few of these velcro strips to hold some of the flyaways down. I like to kind of double them up at the bottom and the ones I use at the top are actually going to hold the hair in place so depending on the size of the head. I probably won't cut the ends off here, but I want you to know you can cut this anywhere and it won't unravel from the end. So the first thing I'm going to do is try to figure out roughly where I would put this generally on a full head of these. I would put two tracks, but you can buy one 12-inch wide in a pack at a time, and it comes with this. Many loops in it every fourth loop and then you can decide to buy more loops if you want to put more or take some out, if you think it's too many totally up to you, I'm going to position the widest part of the loop just under the Part line because I'm gon na be pulling hair through that loop with the tail comb. So where would I want to put it here a little bit away from that front, hairline and then come around like this? It doesn't matter if it goes too far over there because I'll end up cutting some of it off later, so the trick is trying to hold that in place with one hand or just kind of letting it fall and coming back and getting it later. I'M gon na grab a velcro strip like this put it right even with the part line, and then what I'll do is at some point just slide it up a little and what it'll do is it'll grip, the flyaway hair, but it'll also reveal what I need Here and I'll see, if I can turn this, so you can see I'm doing all the way around. So you see, I used two velcro strips at the bottom to kind of hold that hair down, as I pull hairs through it'll help comb and separate the hair as it comes through. So here I'm gon na do this one more time in this area and if I need to lift it a little, I can kind of push it up, and this gives you an idea of what it looks like all the way around too far here, but I'll End up cutting a little off. I made a mistake one time and I attached each side and worked to the middle, and then it had a little buckle in the middle. So it's best to start at one side, work all the way around and then cut off what you don't need, so it'll be even with the other side. So, let's start applying just a little bit, so you can kind of see how this works so eat through each one of these little threader loops. I'M gon na pull a little bit of hair like this, and I can do just one at a time or quite a few, but just to kind of show you what's going on. I'M just gon na. Do those two right here at first and then show you after the hair is through the loop not having hair, in your hand, is the most important thing. So what happens is I'll? Try to separate the hair from the stick with my hand like this and then, as I pull remember, that little link right there. I want to make sure that gets pushed up, so I'm pulling the hair through that link and I like to transition my thumb to my middle finger so that when I go to grab this link here, the most important thing is natural fall. And then I can put it where I want, so I can push it up till it feels really tight, but I think that might be painful, so I'll pull it down a tiny bit for natural flow, give it a good squeeze and then that one is in So if I had hair pulled through every single loop, I could just roll through here really quickly, but I'm just want to do the first couple very slow, so you can kind of see what's going on grab that link. I just want to show you that it's movable push it as high as I'd like I'm gon na come down a little, give a good squeeze, and then all of this hair can just kind of float right over the top. It is so flat to the head. It'S crazy how comfortable and easy this is: let's pull a few more through and just keep on going. So I noticed in the package that this loop was kind of folded over a little bit. So what I did, I just opened it up a little grab the hair in that loop and pull it through. The main thing is that you just get enough hair coming through each loop to support the weight of. What'S going on in that little section, just doing a few at a time I'm gon na work, I'm gon na go into this next one again, no hair, in my hand, pull it through like this grab. This link bring it up; squeeze it grab this next. Stick pull it through grab the link squeeze. It really looks a little too easy to be true huh. It is so crazy. It'S already set up, so you don't have to thread any needles. You don't have to have links on a big threader loop around your wrist. As it's already been done at the factory for you, I probably had a little too much hair on that one. You saw how it was a little hard to pull through it'll. Let you know if you have a little too much hair it just won't come through. Then you might have to go back and take a little bit of hair out of that section. So what I'm gon na do is cut off this last little section. You can cut it just about anywhere. I think the most important thing about cutting the end is after you've cut. It is to kind of round that corner, so it's not sharp and hurting or digging into a client's head. So I cut that corner off and I believe we've got it just about right. Might be a little too close to the front hairline, it's a mannequin, she won't mind, but on a real client you can cut it anywhere, get it just perfect. Pull these loops out, put them back where you want them, and then these will be the last two that I'll apply. I'M gon na pull just enough hair through here to support the weight of this end and then another one here. What I did was, I put two of them a little closer together here at this end, and I did the same thing on the other end and I'm paying a little bit more attention saying: let's get enough hair through this loop because with wefts the ends are Usually the trouble spots and that's usually where it first comes loose because a person doesn't attach enough hair to the left right there in that section. So I know I've got a good bit of hair there. My little sticks are hidden underneath there. Usually, if I just push my hand in like that they'll kind of reveal themselves and what I'll do is just get all the hair out of my hand, just have the stick, pull that threader loop through look for the link, I can feel it. I don't have to see it grab that link turn it close to the head pick it up like I was been doing all the way through give it a good press, and I'm going to do this one more time and we'll be finished. With this whole weft. Most people would probably use two of these wefts around a full head for a full head of extensions, but you are welcome to use one just to add a little thickness, two or three to do a full head and there you have it. That'S one full flat. Weft the flattest weft you're ever going to see on a person's head.
Comments
HairMaifaExtensions: This was an amazing video! The video was clear and very detailed information. I legit caught the method within 2mins of the demonstrations. This just took the extra parting out of it which saves time can’t wait to receive my kit.
K Love: Absolutely AMAZING. You do a wonderful JOB in your videos. Thank you!!! Very exciting what you have created! I have always wanted to try extensions, permanent, but I have such a sensitive scalp hard for me to wear ponytails for more than 1-2 hours or even sunglasses on my head, that is usually 15 minutes and then it becomes painful /annoying. I am looking forward to trying these, they absolutely look easy and won't cause me to much pain in my scalp. Have you had clients with sensitive scalps and what did they have to say? Thanks!
The Casile Group: Ok now I get it! Brilliant!!!
Maggie Aramoon: how do you remove it ? and redo it
MaryAnn Knudsen: Where do we order