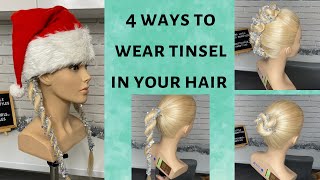
Hair Tinsel Extensions [3 Ways To Add Tinsel To Your Hairstyle]
- Posted on 07 April, 2022
- Microlink Hair Extensions
- By Anonymous
The Hair Tinsel Trend has made a comeback and I’m here to not only show you the traditional way, but a longer lasting way. As a matter of fact, tinsel can last up to 2 months in your hairstyle. Add it one by one or add a cluster for some extra shine. Let me know in the comments which is going to be your go to application.
Using all @donnabellahair
Tinsel
Silicone Beads
Loop Tool
Lux Tool
Single Sided Tape
Shop for tinsel here:
https://donnabellahair.com/discount/Mi...
Use coupon code “Mirella” to save
For more education visit my website
Follow me on Instagram
https://www.instagram.com/mirellamanel...
Follow my Facebook Page:
https://www.facebook.com/MirellaManell...
Join me on TIKTOK
https://www.tiktok.com/@mirellamanelli...?
Learn with me!
https://mirellamanelli.com/online-hair...
Listen to my podcast!
https://mirellamanelli.com/hairbnb/
Book an appointment or shop at my salon
Shop all my favorite foils and color tools
https://framar.com/?rfsn=5729303.eb090...
Hair painting board by Cooboard:
https://cooboardtools.com?aff=21
You know you want that extra big ass color brush
https://zerotimesystem-com.3dcartstore...
Malibu CPR, DDL and color correction tools
https://malibuc.com/shop/rebelfemme
Use code MIRELLA to save 10% off your Hair Extension purchase: https://donnabellahair.com/discount/Mi...
Buy me a taco! I love tacos!
https://www.paypal.com/biz/fund?id=57J...
What'S up and welcome back to my youtube channel today, i'm so excited because i'm going to be talking about the different ways you can add hair tinsel onto yourself or onto your clients, because tinsel has made a huge comeback, i'm even more excited because donna bella hair, Just launched their own hair tinsel on their website, so at the very end of the video i'm going to share how you can get a hold of your own and then hopefully, you can also find out which way. The best method is good for you. But before we get started make sure you hit that subscribe button and turn on all notifications, so you don't miss a tutorial. Now, let's go ahead and get started so first, let's talk about the six different colors that donna bella hair tinsel just launched. So the first one is the colorful one. It has an array of different colors. It looks super beautiful and looks great on literally almost anybody's hair, color and then, of course, the silver one super shiny, shiny, then plum, violet, pink, which almost kind of looks like a corally, pink and finally, blue tinsel is just such a fun way. To add a little shimmer or sparkle for a special occasion, or just because now there's lots of different ways that you can install them, which is exactly why i'm making this video but we're going to start off with the kind of the easiest ones which is doing It on yourself, which this method is only going to last you about two to three days. If you want to learn how to do some other methods that can last up to two months and make sure you keep watching this video okay. So if you're going to install these on yourself, you're simply going to take a singular tinsel of you're the color of your choice, so i just went ahead and picked this plum one. I thought it was super cute and you're gon na make a slip knot. So the way you make a slip knot is you're gon na. Take your tinsel and split it in half and it's gon na be really hard to see, because these are so tiny but you're, basically going to criss-cross them and then you're going to stick your fingers right on through that loop and pull on the string. One of the strings on the other side, and now we got a little slip knot and basically, what this is going to allow you to do is pull on one side of the string, so you can tighten it. So that's like the whole point. So that way, when we get ready to install it on ourselves, you can get it really nice and close to the root. Another thing you're, probably going to want to have on hand, are just some little baby clips. So that way it can be. Like a second hand for you - and this is also a really good technique, if you want to put it like right on your part line and you want it super visible, but again these only last about two to three days. If you install them this way, so i'm going to show you how to do this method on this mannequin. So you can get really up close and you're going to be able to see the contrast between the blonde hair and this magenta tinsel. So the first thing you're gon na do is you're gon na isolate out just a few strands of hair, literally like five strands, so nothing super big, i'm gon na put this clip here. Just to help me out a little later and all you're going to do is take that hair right on through that loop and you're, going to get the tinsel pretty close to the root there. And this is where i like to use this hair clip just to give me an extra set of hands, and since you have this slip knot the way it's designed is you can pull it on one side, so it can go all the way up to the Root area and you can tie a knot once you have that done, you're simply going to tie another knot, and then this is where i would incorporate the hair and you're going to tie a knot on one side with the hair in just the tensile and then Do the other side and then do two more knots here just for security with just the tinsel and voila. Now we have tinsel installed and you can do as many pieces as you like and put them right on the hairline. So, like i mentioned, the slipknot technique is only going to last about two to three days, but you can put them right on the hairline and they look super cute and it's perfect for just kind of like a one night special occasion kind of thing. But if you want to make them last even a little bit longer, these are some of my favorite techniques. I love using silicone beads, in addition to the tinsel - and this is how you do it you're, simply going to take a silicone bead that matches closely to your root color and then tie honestly as many pieces as you like onto that bead. I would probably stick to maybe one to three pieces of tinsel per silicone bead, because you do want to allow for enough room for the natural hair to slip through. It. Just make sure that when you add in the pieces of tinsel to the silicone bead you're going to tie just two knots so that way the tinsel is not going to go anywhere. Basically, the only way that these can be installed is with a loop tool and the lux tool, and in order to get them removed, you need the lux tool to open the bead up. So that way you can release it, which is why these last so long. So let me go ahead and show you how that's done so, you're simply going to take your loop tool already fitted with your bead right here and i'm just going to select a little bit of hair. Now. Usually i like to put these underneath because they are with a bead, so you don't want the bead to be visible, but i'm just going to show you on the top here, so you can see all of these methods side by side. So i looped the hair through this loop tool and now i'm just going to guide that bead right on up and now the bead is on the hair. Now i usually recommend the silicone beads, because there's silicone inside of that bead to help protect the hair. Since that's the only thing living inside of that bead and then you're just going to guide it up close turn your luxe tool. So it's very comfortable and not too close to the root, but close enough and then you're going to secure it three times once in the middle and once on each side. Now you can already see we were able to put in three strands here. So it looks like six strands in one, which is why a lot of people prefer this method over the individual slip. Knot technique. The next method i'm going to show you is how to custom, make your own tinsel tape. Ins now tape ins are still super popular and what better way than to add some tinsel to your tapes? Now you can actually add these to any tape and extension. But if you wanted to make your own just simply purchase the single sided tape and then add each tinsel on to one of the side of the tapes and then just basically sandwich it right onto another single sided tape and voila. You made in your own tape and extension, so let me go ahead and show you how to install that now in order to get your tape in installed, you're going to make sure you have a nice clean section and i'm actually going to isolate out my section. I want it really paper thin because we already added in all of that tinsel there. So i want to make sure that this is going to stick beautifully and seamlessly simply take your tape that you made and sandwich that right on down and then you're going to take your single sided tape and sandwich that right on top and make sure you press Down in the center and on the sides, and now you have your own custom tape in tinsel now, there are lots of creative ways on how you can install tinsel, but these are just some of the most favorite methods that i've run into. You can also explore using keratin bonds, weaving them into your hybrid wefts and even adding them into some braided hairstyles. Now these six different shades that donabella carries, comes with 600 strands per pack and they are 120 centimeters long making them super customizable for any lengths. Just keep in mind, you want to use really low heat when curling tinsel. Let me know in the comments down below what your favorite method was and which one you're going to try to learn more about everything, donna, bella, hair and all the tools and tinsel that i used today be sure to head on over to donabellahair.com and don't forget To use your coupon code marella to save 10 on your purchase, so i really hope you enjoyed this hair tutorial and if you did, please give this video a thumbs up, make sure to subscribe and be sure to follow me on all my other social channels. Like instagram, facebook and tick tock, all under marilla minnelli, and if you want free education, sent right to your inbox, be sure to head on over to marillamanelli.com and sign up for my newsletter. If you enjoy listening to podcasts, be sure to check out hairbnb, it's a podcast for hairstylists, just like used to simplify their hair beauty and their business goals and finally be sure to check out my other hair tutorials right here on this channel. And i will see you next time.


Comments
Eva: I liked the second one. I'm curious, what would be the best way to remove each of them?
Mary Madison: ❤️ Hermosa eleccion 4.FO/Elizeid de mejor 1 (elecciones ) 9.9/10 2 ( culturales ) 9.7/10 Son unos de los mejores conciertos , no-puede-ir-pero-de-tan-solo verlos desde pantalla,, se que estuvo Sorprendente .
Millie E: Can’t wait love your channel!! ☀️
Yvette Valdez: Can you trone clip in hair extensions to sow in extensions? I want to make my own sow in hair extensions
Azzeddine Nada: I like it and I love your Channel so so much because you are bautiful
yasmeen azem: ممكن اسم الذي تستدخدمي لو سمحتي؟؟
Meg: Oh just get on with it