Partial Sew In Weave Tutorial In Detail!
- Posted on 02 January, 2017
- Sew-In Hair Extensions
- By Anonymous
Hair Used: 3 1/2 Bundles Of 22 Inches of MrsRutters Luxury Body Wave Hair Extensions http://www.MrsRutters.com
For all the products I used for this partial sew in weave tutorial click here --- https://goo.gl/ZlHhhl
PARTIAL SEW IN HAIR STYLING PRODUCTS
Edge Control - Hicks Pomade https://goo.gl/MCKplN
Heat Protectant - Garnier Fructis http://amzn.to/2iyvNWr
Tapered Curling Wand (Remington) http://amzn.to/2hILXwq
Flat Iron - Titanium Babyliss Hair Straightner http://amzn.to/2hig6St
Hair Spray - Garnier Fructis Flexible Control http://amzn.to/2ilEuUS
Weaving Net http://amzn.to/2iyAJLd
Hair Cutting Shears https://goo.gl/H1g0jq
Nylon Sewing Thread http://amzn.to/2i99d7K
Curved Weaving Needles http://amzn.to/2i1zFSM
Braiding Hair https://goo.gl/VTqkML
Duck Bill Clips http://amzn.to/2iyIY9W
Wide Tooth Comb https://goo.gl/kcNUHm
Rat Tail Comb https://goo.gl/YlPrQ5
WEBSITE --- http://www.MrsRutters.com
FACEBOOK --- http://www.facebook.com/MrsRutters
INSTAGRAM --- http://www.instagram.com/MrsRutters
SUBSCRIBE TO OUR EMAIL LIST FOR NEW VIDEOS & EXCLUSIVE OFFERS!
http://www.MrsRutters.com/Subscribe
Buy My Books, DVDs, and T-Shirts Visit
Website http://www.howtoblackhair.com
Personal Instagram: http://www.instagram.com/breannarutter...
Thanks For Watching!
DISCLAIMER: All suggestions, tips, prizes, techniques and advice given are for informational purposes only and should be used at your discretion and best judgment. I highly recommend conducting strand tests when trying or using new products, hair appliances and product mixes. I am not responsible or liable for adverse or undesirable effects including hair loss, hair breakage or other hair/scalp/skin/body damage as a direct or indirect result of the suggestions, tips, prizes, techniques and/or advice given.
FTC: I am not representing, being paid by, or endorsing any of the product brands in this video & I purchased everything with my own money - UNLESS OTHERWISE STATED in video/blog content. There are links to products that might be helpful based on the content of this video/blog. Each of your purchases via our Amazon affiliate links supports our cause at no additional cost to you.
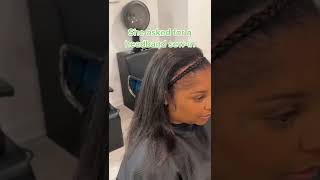
Hello, ladies, this is Brianna from Miss writers, calm and for this look I want to show you how to achieve the sad part selling and as a plus, I'm going to also teach you how to achieve this. Girl-Next-Door, beautiful curly look make sure you braid your braids out for your braid pattern base and for my braids I have all of them going a way. For my part, every two braids join to form one, and I only have leave out at the front sides of my hairline and, at my part, this braid you see here is where the leave out will be on this side of my head and on the other Side, I'm pointing to show you where the rest of the hair is left out. I only have hair left out at the front and at my part, and as you can see, this is how your braids should look now. This is how my braid looks at the very back, because this is going to help you effectively sew down your hair extensions at the nape of your neck. As you can see, all of my braids have been stitched down and I will demonstrate on the last braid how to do so. So you want to fold it up in between the two braids and then you want to put the needle through both cornrow braids and they round your phony braids wrap the thread around the needle twice and pull through to creating line. This is the stitching technique. You will be using throughout the entire process now as a plus. I want you to make sure that you thread a bunch of needles and threads and that's because you're going to continue to use it throughout the process. I don't want you to have to stop and reload one needle at a time that's going to slow you down so prepare anywhere from about 10 to 15 needles, while you're doing this entire installation process now you're just going to cut off the meal and we finished Stitching down our braid pattern base now it's time to sew down the weaving net, your weaving net is crucial in giving you added strength to your hair. This is going to prevent you from having weak spots in your hair when you're stitching down your hair extensions, and this is also great for those who have very fragile or thin hair to begin with. So what we're going to do is we're going to stitch it going around in this section. As you can see here, you first want to stitch around where you leave out will be so first we're going to insert the needle at the very beginning of that braid and you're, going to do the same looping and stitching technique when you're stitching down the weaving Net to your braids - and you guessed it you're also going to use the same technique when you're stitching down your extensions. Now, when you're stitching through your braid, you only want to stitch at the very top of your cornrow braid, don't stitch too far down, because you want to stitch as close to that braid as possible, so that when you're sewing your last extension, it's as close to Your leave out as you possibly keep it so far. This is how it should look until you finish stitching all the way around and, as you can see here, this is how it should look now, it's time to stitch along the side. That'S why you have to make sure that, in order to make your extensions lay very flat, you have a break that's going around the size of your head, as well as all the way around the neck. So that way, you don't have much lift near the sides or the back of your head, so when you're stitching make sure that you're not stitching too close, but not too far apart and also you want to stretch the neck as you put your needle through the Net and under your braid and stitching now, this is how one side looks after I stitched it down, and this is how this side looks that you just saw now it's time to stitch the very back, and I wanted to make sure to show you how to Do this part, because, even though it seems like you're doing the exact same thing in the front, it's actually a little bit different every time, you're getting ready to make a stitch. You always want to stretch your weaving net first and then you want to put the needle through the net and around the braid, so you're still doing the same stitching technique which are making sure that you're gathering the neck and stretching it and pulling it together. So that way it contours at the back of your head. If you don't do this stretching technique before you begin stitching, it's going to make it look like your net is lifted in the back, and you don't want that so continue to pull stretch and then stitch to finish sewing down your weaving net. You now that we finished selling the weaving net and we've trimmed off the rest. This is how beautiful the foundation looks. It is very neat and tight so that our extensions will be stitched down a lot of sleep and after stitching down one bundle. This is how it looks so because we have a side part. You want your bundles to start the slant in that direction, so that there's even distribution. Now. This is how flat it looks, because we have that braid going around the back of our head and I'm just going to show you how far apart your web song and now this is the second bundle that I have stitched down and I'm going to spin around. Just to show you how full it looks, but we're going to add another bundle on top of this. So, as you can see here, I stopped for a moment because I'm going to show you how to do the fold-over method, this method is extremely useful and giving you so much like out of your hair extensions. The reason why I say that is because this is going to allow you to continue to reuse your hair for as much as you can the mists, rutter's hair extensions, typically last at least two years, so with great care. It'S going to last a lot longer. Of course, and if you don't cut their hair extensions, it's going to give you longevity when you want to reuse them again. So when doing the fold-over method, you just fold it into the opposite direction. Just as you see here, and you continue stitching with the same stitching technique that you've learned throughout the entire process, we are all sewn down. Ladies and in my head, I have installed three bundles in one quarter: bundle of 22 inches of the Miss writers, love featuring urgent hair extensions. If your hair is darker than mine, then feel free to color your bundles. Now we're going to go ahead and straighten out our hair so that we can have that seamless, flip and always use the heat protectant to protect the health of your hair, to prevent thinning and also to prevent heat damage. So with just a little bit you're going to put it on your hair and you're also going to comb through your section of hair, so that it's believable thing I like to then go ahead behind that light to come with a small tooth comb. So I can further detangle my hair because I have thick but fine hair. What works best for me is pulling on my ends as I straighten it. Instead of doing the comb chase now check this out with just one pass of the Flatiron. You can see how seamlessly my hair blends with the mrs. rutter's hair extensions now that we're done straightening out our leave out is time to further define the side part right before we begin adding styling products. Also, I suggest that you use a smaller tooth comb to further comb out your hair so that it's very flat and smooth before you add any products to your hair. You now, ladies look at how seamless this blend looks. Your eyes are not deceiving you trusting this hair blends so well with african-american hair now it's time for some edge control, because it's time to really make the side part come to life. So what you want to do is grab a little bit of your edge control and I like to put it on the back of my fingers, so I can direct it exactly where I want it to be, and what I want you to do is lightly apply. It to the edges of your hairline first now you're going to use your comb to further blend and to move the products into your hair. You can get as creative as you want to do at this part. You can add some swirls or swoops. You know something like some ocean waves that I got going on here. You can do whatever you want to bring such a creative look to your hair when wearing your side, part selling. Now we're going to start doing the other side, and one thing that I want to mention is that using a small tooth comb is completely optional. A lot of you, ladies, like to use a toothbrush, and I occasionally like to use a toothbrush as well just for doing my edges, not for my team's, but you can use a brush, a actual boar, bristle brush or a tooth brush. If you prefer, and sometimes I like to use a comb or a brush, it just depends. But for this look I really like the way the comb is making my additional now one extra tip that really ties in the look and makes it look very, very sleek. It'S actually putting edge control on your part. This is going to make the front of your hairline match the way that your part actually looks, and you want to make sure that you fully smooth this product into your hair, so use the back of the comb. Your hands and the teeth of the comb to smooth it in. Ladies that you can see the hair is so gorgeous in the edge control really tied in the look. So now really quickly. I'M just going to show you how to put some curls in your hair and you can use any styling tool. You like I happen to be using a tapered, curling wand. Now, when wrapping your hair around the wine make sure you do it very flatly for these curls now hold it with a duckbill clip just sew it close, and then, when you're done, you remove audio clips and you're going to gently finger detangle your curls. Now you want to grab a large section of your curls and you're, going to start kind of rubbing them together and smoothing them out so that it can form one big, coil and you're going to do this on multiple sections throughout your entire head to spray with Hairspray, so, as you can see, ladies, it was so effortless achieving that girl next door, her beautiful hairstyle and while our ladies are beautiful so in hairstyle, is completely finished, using mrs. rutter's hair extensions for Miss reuters.com. So if you enjoyed this tutorial, make sure to subscribe for more and until next time see you in another video
Comments
Breanna Rutter: YouTube hasn't been showing you my new tutorials lately??? Make sure to subscribe and click the bell icon bnext to my subscribe button to get notified when I post new videos!
Innately Dramatic: Wow!!! You made it look so easy! I'm 45 and live with Systemic Lupus. I'm not sure if I could last with arms up that long to do this, but I really enjoyed learning how it's done ✅ Thank you
Danielle Ajose: This was so helpful, i'm planning to do my hair with a side part next week by myself for the first time. I'm only having it in for a few days and didn't want to waste money getting it professionally done so I've been searching for a tutorial and this was excellent. This is so useful and in the perfect amount of detail. Thank you!!!!
Kai Smith: I love this! This is actually my new favorite tutorial, do your thang!
Crystal Alston: Beatiful! Love your work have watched you for some time the way you take time to explain everything. K eep doing what you do to teach woman and men hair care. I am a stylist been out the Biz for a bit getting my groove back thanks to you and others
Shantaye Unique: Beautiful hairstyle Breanna, along with a great tutorial. keep it up... You're a very talented stylist and I'll continue to enjoy your tutorials ✔
denzel bostic: I have to say that I love you tutorials. All the hairstyles I know I've learned from you. Keep it up
§øŃäŤůŘåŁŁý: You slayed this to perfection!!!
Ariel Valentine: You should do a video on taking care of natural hair underneath sew ins
Família Leal: ficou lindo
Gina Benton-Dempsey: omg! gorgeous! I want to learn how to do my own hair with a middle part
Walesha Bron: Love it!
Apr Wood: Your are amazing ,. The way your present your tutorials are so detailed and professional . You are beautiful also . God bless you Bree bree;)
Mysia Stapleton: Girl I just gave you a standing ovation....wow, it's beautiful!!!
Vettmail: Great job but I think it looked more natural before the edge control. When I see really slick edges with bone straight hair, it makes me automatically think "weave". But gorgeous nonetheless.
lovejesus12012: Hey girl! I'm looking forward to seeing more relaxed hair tutorials
Maisha Warner: this was the best tutorial thus far. u answered all the questions i had all in this video. thanks
Shatya Boyd: This inspired me to do my own sew in. Style and everything
D A: Oh my God, i have been looking at some tutorials of what some people go thru. And i thought my hair was aweful to control (latina) but this takes the cake. This is crazy. I don’t think i would do all this. Props to u girls.
Filicia Allen: Love your nails.. they are beautiful and on point. Great job on the hair too!
Miranda Clock: Hey darlin! Is this something they might teach you in cosmetology? Or something you've taught yourself?
Good GOD: i have to say it you look gorgeous and classy. Thanks for sharing your knowledge with us. i am always happy watching your videos
Lady Q Creative Designs: Beautiful ❤️ You look like Brandy. Awesome tutorial
Rain: looks like alo of work , thanks for the steps by step
Peggy D: Love those nails ms lady their flame and colorful i like colors a lot too
NBA youngboy 2020 we all will die: I want to try to do my own sew in, can you tell me how long do the thread have to be? I tried it before but I just got frustrated because I couldn't keep my tread from gettin tangled and breaking.
Shalaywah: I love this hair I can't wait to purchase it.
Chelsea Pavone: You're absolutely beautiful!
Karen Perry: Great video!! What kind of edge control are you using?
YaYa: I've never done a sew in weave but I'm told it's a really good protective style for thin fragile hair. My hair is getting stronger and I don't want to do anything to ruin it. Also do you think it's advisable for me to add braid in hair for extra support for my hair? What's your suggestion? Thanks so much!
Janice Wilson: I love your video's and have bought your products. Can you do a partial weave. My hair is coming out on the top and along the crown. I have long hair on the sides that will no longer cover it. I tried to do a partial weave using a net and leaving my other hair out. It was a disaster because I did not know how to "close it."
aeliciadelovely: Girl I wish you were local to slay my hair!!!! Looks gorgeous
Tatiana Esteves: Amei
Beverly Craven: You always slay! Love your videos!!
Soulsusta H: Beautiful!
tiara pete: I love this hairstyle. Breanna you are very beautiful and talented. Thanks for the video
Duneshia Myers: I love to watch ur tutorial's ur so good
Loveth Love: very good, you really did well
Julie's Braids & Beauty: hi it would have been nice if you had shown how you laid the first track..did you take it up to your ear or temple area?
Tracy Carrazana: Great job!! not many ppl can do their own hair beautiful
Braa: Love the hair
sara: This was so satisfactory to watch
Doris Yeboah: Great video! Do you still relax your leave out?
DeDe Shep: Great Teacher!
Trish #braiding and #makeup: wow i love it Breanna thanks so much
Braids Wig Queen: very pretty. you did an awesome job
Tracy Carrazana: Beautiful great job
rainbowbrite621: It looks great!!!!
Ashley Terry: this looks great!
Rebekah Harrisanker: Looked good and natural before that product was added to the edges, then it just looked gunky with bald patches
Kayla Wesley: I love your style I wish I could do that to my hair
Z. Bankroll: you are the best! I can not wait to shop with you. plz don't ever stop doing videos. love you and don't even kno you. your hubby is lucky needless to say
Mrs. Richey: not gonna lie when I saw the braid pattern I didn't think it would look that flat at the end good job
Shaakira Gayle: what kind of edge control did u use ?? the one your using looks great n the way it lays your hair down the one I use flakes my hair
that one black kid: she should do natural hair videos
TravelIsLove: Wish my hands were this blessed!!
CHANTAL ONESTAS: C est magnifique tank you
Asia love: Your skin flawless
nguwe looo: Very beautiful I love your style u explained well
SheSo Weird: this is really great work *sighs* well I'm natural and hair always revert back I do feel kinda down that I can't blend my hair with this type of hair
DeAna Williams: Beautiful
Tonya S: Amazing
Creatively Ms. Me with Stephanie: I love watching you,but I just have a sooo much trouble trying to braid... ugh
Ariel Valentine: How do you wash and moisturize/ oil your scalp with the weaving net ?
Amani Graham: Um I'm planing on getting my first sew in and was wondering how long does it take.
Miss Aisosa: Your nails
Love A Predelus: wow it's so beautiful I love it
Only Miriam: Brianaaaa i need your help!! How do i maintain my leave out? Please make a video about that. I love you!! Thank youuu!
Zulma Lopez: Beautiful
Aniah Warren: How long does this usually take?
Faizah Miller: Hi Mrs. Rutter i went into your hair products right, so am wondering if the price is for one single bundle. Thank you an i hope you get this
Lioness Azari'Yah Yahsharalah: Beautiful
Diy Dancer4life/cheerleader/singer/luvs to draw: this hairstyle was gorgeous! !!
iAm MadMaxs: OMG Your Hair is Beautiful!
H아날리시아: What would I do without your tutorials haha
Rebecca rozier: WOW! This tutorial is my favorite
Rose Watson: Thank u. U r AMAZING.
Kryssiana W: Love this style but I personally wouldn’t spray olive oil in the hair after styling it will make the hair oily flat & it won’t have body
Redrose Yeap: Just Awesome
Margaret Banda: I love you!!!
Hollyann Nelson: Wow I love it
Vincygal Faith: I love & want dis style so much..❤❤ Beautiful & Classy..❤❤
Deezy Dee: She slayed that
ColourBrights: ur natural hair has gotten so long! do u wear it out? and what styles do u prefer?
Nabatanzi Rose: What threads did you use ?
Taylar Mitchell: Omg your edges laid
Speechless Hair Styles: Lovely
All things Cognac: ❤️❤️❤️your edges
Trust kids Road: can you do my hair please like that❤
TheMsqueenie27: nice Job!
vivi_ etc: you slayed them edges!
Arlette Melingui: c'est magnifique comment faire pour s'en procurer c'est mèches et greffes
Marabou Mjölkchoklad: how do you brush a weave without messing it up?
ellesig18: nicely done
Joke Signature: thanks a lot for this video
who loves wwe apryl wwe apryl: i think your. the shit when it comes down to. doing. hair...can you come & do mine. please i will pay you to. come & do my hair omg im in love with this. look
kianna moore: You are soooo pretty
Sheena PhatFat: So Cute!!!
B. Renee: last time I checked, you went relaxed. if you still are I see the reason you went relaxed worked. Your hair has gotten some length now.
Rosemary Gyamfi: I love it