Googoo Hair - Tape In Extensions - Amazon Hair Extensions
- Posted on 08 November, 2021
- Tape-In Hair Extensions
- By Anonymous
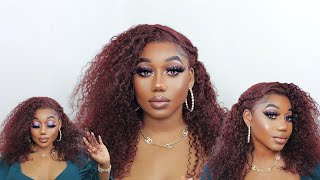
GooGoo Hair on Amazon 22” Tape In Extensions
Check out my Amazon store!
https://msha.ke/justmelsdotcom
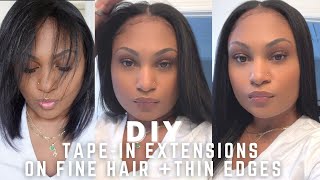
Hey guys all right today, i am here to do a tape in extension, install with you and how to style them. Today, i'm going to be using the amazon hair. This is by gugu hair. Like i said it's on amazon here is the packaging super cute on the back? It has how to care for the extensions and their contact info. I am so excited about this, so let's go ahead and open these up. I'Ll show you what comes inside so first off, i'm seeing some lashes whoa super pretty. I love that glitter background too then, we've got some information. Packets here is a little card. Has some frequently asked questions on the back and then some contact info on the inside and then here is the like, install booklet. This talks about all the extensions they have. They also have clip-ins and halo we're going to be working with tape ins today, so it has how to install how to remove how to care for all that kind of info in this packet, which is really cool. So let's hang on to that. So, let's get to the hair, i have two different shades that i'm going to be working with. I got the 22 inch. This is the ash brown to platinum blonde, and it's gon na hit me right about my waist and then i'm gon na pair that, with the light blonde highlighted golden blonde and i'm gon na sandwich one of each of these, so that they're gon na be like Mixed in, i think, that's gon na be really pretty, and this hair is like thick all the way to the end, there's no shedding very, very pretty. It is gon na make this a whole lot better. So i've unpackaged the hair and i'm going to show you what i mean by the two different colors, how i sandwich them together. So each box comes with 20 pieces of hair, which makes 10 sandwiches, so i use about four boxes, which is 40 sandwiches. So here is the tape on the back, and then you sandwich the hair like this, and this is how i'm gon na use the two different shades. So when i start, i'm gon na put the darker shade on the bottom, so that when i pull my hair up, you see the dark shade. So they're gon na go on my hair like this down here and then, when you flip up it's going to be the dark. So when i wear my hair up in a bun or a ponytail, you don't see the highlighted shade. You see the darker shade. So that's how i'm going to start and then up at the top. I put the darker shade on top instead of underneath so that if my hair, like parts in the back or something you see the darker, so we're going to go ahead and get started. A few things i do is i put a little bit extra hair in between the sandwich, you're supposed to put a very thin piece of your hair in between, and i put a little bit thicker only because i have very, very thin hair. So i'm going to go ahead, part my hair put it up. You want to go about an inch inch and a half from any hairline so that when you pull the hair up, your hair covers the tape ends. My hair is thin, so i i go a little bit further than than that, probably maybe about two inches off my hairline, so i'm gon na go ahead and section my hair and we're gon na get started. Okay, so my hair is sectioned. I do two sections. One e on each side and then i have it sectioned in the back. So this is where we're going to start our first row. I also do my tape ins in kind of a horseshoe so that i can pull my hair back on the sides, so we're gon na go ahead and get started. We'Re gon na use the lighter color on top and the darker shade on bottom. So let me show you how we do it i'm going to do this one right in the middle. You don't want it all the way up at the root. You want a little bit of a space so that it can move up and down. Then i just push it down to attach the hair and then i'm going to pull it up and those hairs that come up with it, we're gon na sandwich in there. So i just clip this piece up and then we're gon na take the dark, shade and we're gon na attach that to the bottom. I have a lot of mirrors set up so that i can see what i'm doing. Okay. So now, once those are taped, i drop the hair down, see it can move freely, i squeeze them together and then we just use a flat iron. I use it at about 340 degrees fahrenheit and we just kind of heat up the tapes a little just to give it a little bit more chance to stick better, just making sure there's no little hairs that are stuck in there, because that gets annoying. I'M just going to heat that tape up a couple, little short squeezes, and there is one tape. Now i'm going to do two more right next to it. Okay, i just wanted to show you. I did these four with the dark on top and then these with the light on the bottom or the light on the top. So when i pull it up, it's still dark. So i think we're doing good so far, so i'm gon na section another row and go ahead and keep going okay, so i have them all installed and i'm going to do some trimming. So i just use this little tool. I found at sally's it's a razor in there. I use this side. I think it's less like of a harsh line. So what i do is i just pull these side pieces forward and i'm just gon na do some face framing and then i just kind of pick some pieces to cut and try to blend okay. So now that i've cut some layers in it, i'm going to go ahead and style. It do okay, so that is them curled. With some layers. I may add some more. I just kind of over the next few days just keep an eye on it and cut them where i need them. I also do not wash it for two to three days after an install just so those tapes can really get to stick really good um, and i usually only wash my hair, like maybe once a week when i have extensions in so all right guys. I hope you like this be sure to check out google hair on amazon

Comments
Shauna Rae: So pretty