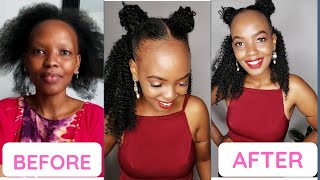
$20 Half Up Half Down With Bangs | Baddie On A Budget | Mayde Beauty Hair
Get ready to glo up! ✨ In today's video I show you how I use this $20 Mayde Beauty Hair from the beauty supply store to get this super affordable 90s inspired half up half down quickweave with bangs. Thanks for watching!
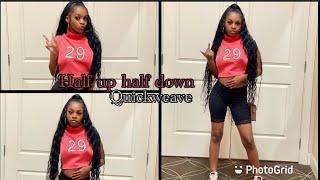
Hair Details:
Mayde Beauty Hair Blossom Bundles
Straight 10, 12, 12 + 10 in Closure
530
You’ll Need:
2 wig caps
Hair glue
Keep Up With Me ♡
IG: https://www.instagram.com/_jojomonroe/...
Tik Tok: https://vm.tiktok.com/ZMJbHJWWR/
BUSINESS INQUIRES
About Me ♡
age: 23
height: 5’9
location: virginia beach & raleigh
sign: cancer
2L law student
#quickweave #halfuphalfdown #maydebeautyhair #swoopbang #bangs
swoop bang ponytail with weave, half up half down with swoop bang, swoop bang, half up half down quickweave with swoop bang, swoop ponytail with weave on short hair, swoop bangs, swoop bang half up half down, swoop bang on natural hair, swoop ponytail with weave, how to do a swoop bang, sleek ponytail with bangs, extended ponytail with bangs, outre hair, 90supdo, 90shalfuphalfdown, affordablequickweave, affordable wigs, lace front wigs, cheap wigs, 90shair
Hey y'all, it's glow by joe back with another hair tutorial welcome to my channel. If you are new, if you are not new, welcome back thanks for watching so in this video, i'm doing another cheap, half up half down with bangs, so i just showed you all what i did in the back. I sewed my wig cap on per usual and i showed you what hair i used. It was some random hair that i picked up at the beauty supply store and i will have the name and all the information down in the description box, but the color is 5 30. It'S like this really pretty burgundy, color and the hair is 12 inches. So i'm doing what i always do with my quick weaves. You know i like to hold the track up to the back of my head and measure it out, and then i apply the glue and i'm just gluing the tracks from ear to ear and i'll be doing that all the way up until i get to the Part that i made for the ponytail yogic yogic yogic yoga down too much is okay. So now i'm done gluing all the tracks to the back of my head. So now i'm gon na go ahead and start slicking up my ponytail and i'm using my absolute favorite edge control. This is the sweetie kiss edge fixer and the scent is sweet lychee. This is my favorite edge control. It works really well for me. So that's literally all i'm using i'm just applying the edge control to my hair and i'm going to brush it up and after that, i'm going to come back in with my got to be glue free spray. Now, for slicking up your ponytail, you do not want to use a water-based gel because that will make your hair curl up. So if you're going for a straight look, you want to stick to edge control so that you're just slicking up your hair you're, not getting it wet or anything like that. And when you go in to use your got to be glue free spray. You'Re. More than welcome to use a blow dryer to brush your hair straight, however, i'm just going to go ahead and tie my silk scarf on my head to let everything settle down while i apply the ponytail is, is now when you're braiding your hair, to prepare to Install the ponytail, you can add, hair to your ponytail to make it longer. However, since this is a short half up, half down my ponytail is going to be very short, so i'm just using my natural hair. Now, i'm using a rubber band to secure the bundle to my braid. This is how i always do my ponytails. Some people use glue or thread, but i prefer to use a rubber band. That'S the easiest way for me to do it, so i'm starting pretty high up on my braid because, like i said this is going to be a short ponytail and when you're using your natural hair, it's easy for the ponytail to slip out. If you start too far down so when i'm using a natural, my natural hair in the braid, i start wrapping further up the braid, where it's thicker, so i'm wrapping the track very tight, just to make sure it stays in place, and i have two other videos On this method as well, but i'm showing you all again here - i'm just going to be wrapping the bundle all the way up to the top of the braid and when you are wrapping your bundle up. The braid try to wrap as closely together as possible. Just to make it more secure right right, cruising cruising right! Excuse me now that i've reached the end of my braid, i'm going to take a piece from the ponytail to wrap around the base of the ponytail and when you're doing this, you want to make sure you're spraying it with got to be glue spray to make Sure that that band that you're wrapping around the base of the ponytail stays in place now it is time to glue the bang in place. So i'm taking this weave, wonder wrap which protects your real hair from glue and you're just going to apply that, where you're going to glue your bang down now ignore how i'm applying this right now i originally was going to apply my bang in a different way. So i'm putting on way too much, but you only need to put it on where there's going to be glue and once you put it on you're going to want to blow dry it so that it is dry before you glue the bang on. So the bundles that i bought came with a closure now you're going to want to cut the closure to the shape that you want your bang. The closure is obviously very long. You do not need the entire long piece so you're going to want to cut about a quarter of that closure off to use as your bang and you're just going to apply the glue and you're going to want to make sure you do not apply the glue In the part, because when you go to glue it down, there will be glue that is oozing through the lace part. So then, your part will no longer look like scalp, so just be very light-handed with the glue, and once you apply your bang you're going to want to tie your hair up to give it time to dry. I did not have time to do that on this video, so you're going to see me holding the bang down. While i cut my hair and things of that nature, so that it does not slip out of place, but you at home you're going to want to make sure that as soon as you glue that bang down you tie it up and give it give it a Chance to dry before you start messing with it. So now i'm cutting my bang. I am not a professional, so i have no idea what i'm doing, i'm just following the vision i had in my head. I knew what look i was going for, so i just cut it. How i thought i should so you're gon na just want to take your time with this. Do not cut off huge chunks all at once. Just take it little pieces at a time to get your desired results and i like to leave the long pieces on the end and make it shorter in the middle yogic yoga. So now this is the easy part after you're done, applying your bang and cutting it. You'Re going to go in with your flat iron to style it, and you see me here, holding my bang because, like i said i did not let it dry um to save time, filming this video but you're going to want to make sure you let it set And everything before you start styling, it there's no rush. So, like i said here, i'm just bumping my bangs under and i'm going to go in with my flat iron and bump the ends of the hair, and you can bump it as much as you want to. Like i explained later on in the video, i have my flat iron on 300 degrees, and i go back in later on with my smaller flat iron and bump it even more hey y'all. So i'm back because i forgot to film an outro. So this is a few days later. My bangs are now dry. It did not take three days for them to dry, but this is what it looks like completely finished. I bumped the hair under which i really love um. I definitely wouldn't mind if i even cut this hair to make it shorter, but i like the length that it is right now, so this is how it looks like with the ends bumped. I didn't do anything special. I just took my flat iron and it was on 300 degrees i feel like i could have even put it up higher, but just to be safe. It was on 300 degrees, and i just bumped them just like this, and i think it's holding really well like. I said it's been um a few days since i did the style and i think it came out really cute. So let me know what you all think down below don't forget to like comment and subscribe. If you enjoyed the video and let me know what other looks you would like to see me do on my channel. So thank you for watching and i'll see you in my next video bye.
Comments
Bridgett Spence: you’re really putting a college student on with these baddie on a budget videos!
Kayla Monét: This came out soo good! I just found your channel
Michaela Poppins: So pretty !!! LOVE BADDIE ON A BUDGET!!
Viv A: So talented !!
Deacon Dave Larrabee: GREAT. TUTORIAL! GREAT WARNINGS & PRO TIPS ! ✊
Briana Pernell: Girl this is bomb!!
Kayla McCain: ❣luv this look....so cute!
Alasia Brousseau: I LOVE your tutorials more please sooo helpful
Deacon Dave Larrabee: THAT DEADLY " DON'T EVEN THINNNK OF FFING W/ ME" LOOK 9N HER FACE WHEN SHE'S WRAPPING THE BRAID ! !
Marie-Clemence Shabani: Love love love your videos so much.
shaiqunna jones: Can you do a swoop bang and back ponytail
Sasha Logan: It’s the playlist for me
Erica: I want to try this. Do you think I could glue the closure further back towards the ponytail?
Hannah Narine: Lol im doing this on my natural hair so
Galure Beauty: Girl you onto something I never would did the bang like this
PRETTYASSP: Found ya channel on accident glad I did and deets on the song please sis!
CRP Wifey: That color Is beautiful
Deacon Dave Larrabee: EXCELLENT. ●☆•
Camille Perkins: Ok now cause I keep coming across your channel, this is the THIRD TIME lol lemme find out you got all the looks
MoonHoney Mami:
myfergz: Awesome.can i have the name of the song
Whiskey On Ice: Not the closure as the bayyyyang
Mrs Frazier: Cute
BossyB: Song?