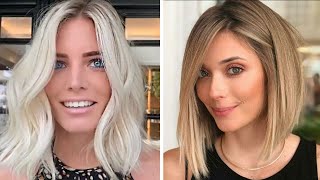
Precision Blunt Bob Haircut Tutorial | Scissor Cutting Skills | Womens Bob Hairstyles
- Posted on 28 April, 2021
- Bob Hairstyles
- By Anonymous
How to: Precision Blunt Bob Haircut tutorial
Scissor Cutting Skills | Cutting tips & techniques | Womens bob hairstyles
*Giving is hold forever*
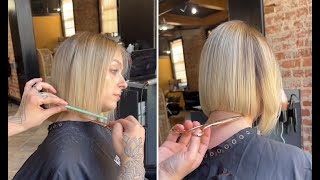
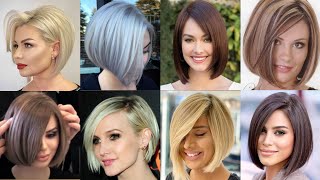
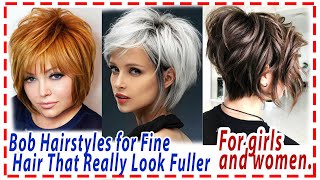
So this is anastasia, hi, anastasia. So with this particular haircut, we section off diagonal forward sections and then we continue mirroring the diagonal forward all the way through, as i'm cutting, please ask as many questions as possible. Okay, but the key is to keep your section super super clean and then we're going to begin to commence around the very nape area. So it's going to keep that a little bit tighter, okay, look down for us, okay, so this is the length now i've got to keep in mind, have a look. She has one of those hair lines. That kind of jumps. Can you see how that grows? In always be mindful of that, but what i'm going to do, i'm going to i'm going to cut the the guideline first and then i can address that a little bit later, but you can already see how it's allowing this hair to jump, maybe just through in Here, i'm going to just begin with taking a little bit of that away just so it allows the hair to flatten so that i can cut it precisely because if i cut it now and then i cut this away later well, it's going to look longer because The hair is actually jumping at the moment, but you've got to know exactly where to cut the hair off and where to leave it, because what we don't want is a lot of hair on the neck. But we also don't want to use the clippers in this case, because i don't want it to look too uh manly so to speak. I don't want it to look like a shave, so by using the scissors flat on the skin, allows me to make it look very, very natural, but also keeping that a lot flatter. You can already see that's sitting a lot flatter for me. Okay, so let's put a little bit of h2o because i already put all the products in - i don't need to put a whole bunch of product in - and this is all about small sections and working very precise you're, going to learn and see a lot of tips And tricks because with bobs they're, not the easiest to cut to make them perfect, but you also want to make sure that it's balanced and precise so keeping the hair at natural form. You can do two things here. Some people bend the head forward and they cut it slightly around. You could definitely do that. In fact, why don't i do that? So i can show you okay, so we pull all that flat zero elevation because she's looking down, we can actually work it into this. Slight arch, so when she puts her head back up you're going to see that it's going to sit straight, okay, zero elevation, so we're using the comb not using our fingers all right now before i do anything, i just want to comment one more time check it Visually and technically so just going back in here and cutting a little bit more on this side, so it's perfectly balanced and you're going to constantly check for balance the whole way through this is all about balance. Now put your head like look at it from the front: put your head back up just slightly up and you'll start to see how it's a lot more square and now with a slight arch. Okay, so just want to check for balance. I feel like it's still a little bit longer here, so you're being visual and technical, especially around the hairline, because you can cut the hairline perfectly symmetric. But if, if there's movement, there you've got to be visual, so it sits symmetric even when she does it at home with her movement. Okay. So before i move on, you can see there's a little bit of hair through here, we're just going to keep the scissors flat on the skin and eliminate any of that fluff. Just so it's nice and clean and pristine as we continue working this heka and guys. Please i would love if you could ask as many questions as possible. Okay, because questions are just it makes this whole education. So much more interesting and i'd love to answer any questions that you guys might have. There'S no such thing as a bad question. So go ahead, shoot away and as we progress on, please ask as many questions as possible. Why use the comb for zero elevation instead of fingers very good question? Thank you. When you hold your fingers, you're elevating the hair elevation equals graduation. So if i cut it with my fingers and blow dry, you're gon na get so much graduation, but the lower the elevation, the zero, the graduation so as flat to the skin as possible is key in this area. Good question they're the kind of questions that i absolutely love: okay, so that's kind of cool. I quite like that, but you head up now keep in mind there's a little bit of movement there. I quite like the way that's sitting and i'm allowing for that. Little bit jump just again get visual. This is probably the most important. The other most important thing as well is the center parting. This is so important we spent about. You know three minutes four minutes getting that perfectly right, because if the sensor parting is offset - and you know i am gon na say this - when i had the consultation with anastasia - that she had it off center, she wears it off center and there was a few Longer pieces hanging over actually come and see it hold that mirror for me. So when i comb this have a look see these longer pieces that hung over the hung over the baseline. So that was because it wasn't cut in the center. If she, if we cut it in the center and then she can wear it on natural or either side, you won't get this overhang. So very, very, very important. Make sure you work the center parting perfectly in the center and then you work small section by section. Okay, so next section i take half an inch, we're taking very small and skinny sections, because we want this to be precise, it's a precision haircut, it's not one of those haircuts that you just rush. You take your time. You get the section balance, you get the technique balanced and it will save you time in the long run, trying to fix it up and believe me when there's a bob that is not balanced, you could see it right away, so you want to make sure the Balance is there on both sides. Okay, so same thing, diagonal forward sections, so we're working with the shape of the head, making sure that it's the same on both sides. A little bit sorry actually come from here, get comfortable with your sectioning so that it's going to be the same on both sides and you might have to wet down the hair. As you continue section by section. That'S totally fine just keep the hair moist so that it's at the same uh distribution all the way through all right, so i'm going to wet this down now, let's have that. Thank you a little bit of h2o and make sure you comb it from the roots. All the way down, so the hair is actually responding at natural form. Any questions so far. No, are we good ash? Okay, have a look at the back ash. So can you see how you can see that we can see the guideline here? You can see the guideline, so everything should be combed flat. If you can't see the guideline, your section is too big. So now we're going to sit at natural fall, you can see her head is at natural fall and we're going to keep cutting exactly on that same guideline. Okay, people say: how short do you take it richard? How long do you leave it? Well, that's between you and your client. It all depends on what the end goal is. Keep in mind head jumps slightly when it's dry. So if you've had a consultation, we said we'll cut about an inch off, which is what i'm doing, and that will be all the way around another good tip, guys very, very important before i started with her in our consultation, i put my finger here and i Make sure there's no little bumps on the skin, because sometimes you'll have a little mole at the same color of her skin and if we're not careful with the scissors, we can actually cut into it. So you want to make sure that there's nothing that's being raised. Above on the skin, okay, so it's very good important to check that through okay. So what we do we check for balance check each section before you move on and check by using your two fingers like that: okay and look away it's good to look away, because when you look at something for so long, you can actually lose focus. So what i'm doing now, i'm using two fingers and i'm closing my eyes to make sure that both sides are good and they are this side just want to make sure it's exactly right. Cool next section, it's simple, but it's disciplined that you need to apply that discipline sections shouldn't be too big sections should be really really small. Now i tell you when you do this, what a difference it makes when you take your small sections, you follow the guideline. You use zero elevation. The bob, when cut properly, can look absolutely stunning stunning. It'S a classic shape. It'S not going anywhere. Like i said in the beginning, it's been around since the day of cleopatra, so the bob is a classic shape and when cut properly it can look so so good and listen, there's so many different ways of cutting it. Some people might do it in a different way. Respect to you, i'm not here to dictate what's right or what's wrong, i'm here to share with you one way of doing it and the way i was taught and the way i teach it and you know, there's different bobs there's something called a box bob as A natural bob classic bob, you know a box bob is when everything's pulled square and square, so you've got corners within the shape, but in this case we're going to follow the squareness of it, but still keep it natural. So it's going to be in between both. So again, everything is combed flat as we get higher, we will start leaving it a touch. I might start leaving a touch longer because of the way the hair dries. I don't want there to be graduation, so by from about this point onwards, where the hair begins to jump, i might leave it a little bit longer just so when it's dry, it sits beautifully i'll just show you. I did this yeah this morning, just quickly ash can i have the camera, so you could see here how this is just pre-cut, but how it sits over the ear. Quite straight and perfect, i haven't finished this haircut. I just did a quick blow dry on one side to show you that's the goal here. The goal is to keep this exactly square, where the trick is is where the ear is right because of the ear normally elevates, and it leaves a little hole through in here. We want that to sit perfectly square even when it's dry, so that whenever you swing and move it, it's still got that solidness to the shape okay. So let's carry on with anastasia's hair, so everything is combed naturally and another good tip as well. These old tips that i i've learned over the years that has helped me as you get higher. You start using the wide end of the comb on the roots, but i'll show you that, as we progress on so flat on the skin and we cut that into a beautiful precision bob, i haven't honestly cut a precision bob like this for a while. So i'm really excited to be able to do this on anastasia's hair. Do you have any advice for cutting the initial sections on young clients who have an indent in the center of their neck? You approach her. The same she's got an indention here on on the side of her neck, see how it goes in here. It goes in and comes out, that's kind of normal for different necks. Some people have it in the middle, like she said, just follow the guideline follow the guideline. All the way through and you'll be fine, no matter what way the neck sits, be confident with your guideline and follow it through great question: zero elevation. You can see how i'm using the comb using the scissors holding it there and following through. Can you see that now i just check for balance again pull my fingers down and now it's repetitive, but it's done in a way to give you that precision and you're checking it technically and you're, checking it visually you're doing both as you progress water, please and You can see, i'm actually dampening the hair down and later i'm going to show you the key to blow drying, it's all about the blow dry as well. The way you blow all that frosting the way you blow dry, the hair and what brush you use is so so important. So i want you guys to stick around as we progress on, so you could see the whole haircut being done. Okay, so by the way later, if for those that you know can't see or if there's something you want to see or check again or share it with a friend, joyco will be posting this later again on their ig tv and you'll be able to see it Here again on facebook, so stay stay up to date with all the education that we're doing. If you go to joyco.com pro education, you will see so many cool educational videos of mine of the whole team doing coloring. I do mostly cutting and styling. So i guess you know, invest in yourself during this time and uh be exposed to some of the. I think, some of the best education that's free and out there, okay out there i mean by out there, for you not out, there's in crazy education. It'S all relevant, the key behind you know the the education that we do at joyco is. We always think about you, the local hairdresser, the local seller, so the looks that we work on are very wearable. I like to use the word commercial people don't like to use that word, but commercial only means something very popular, so sort of, like the looks that we showed you earlier when we started so i'm gon na continue the same thing now watch what i'm gon na Do here i'm using the wide end of the comb? Okay for the roots, so look we comb it with the roots. So i'm not forcing here the hair, everything's combed with the wide end, okay and then i'm going to use the fine end from mid lengths to ends okay. So now we go from here. Okay, only use the fine end and look we just cut that all the way on the skin. Precision fine end. Fine, we don't touch the roots. The roots have already been combed, that's a very good tip, because hair not naturally wants to jump from the roots. If you force it down, okay, you can use your finger on the skin. What kind of comb are you in ys park home? You can get that at the wires park store, i'm sure, i'm not sure if you can get on amazon, but i'll leave that with you guys where you get it from. But these are great combs they're long when you're using a long term in the beginning. It does feel uncomfortable if you're not used to it, but when you're used to it it's fantastic, okay. So let's have a look at that again. Checking it technically, don't just check it visually, because it's deceiving when the hair is wet check. It technically make sure you're happy with the balance. If there's something that's a little bit off, just go back in the same way that you cut it and check you know it's. I always use this example guys what makes a great dress. What makes a great suit is one that's bespoke to someone's body when it's tailored to their body. It looks so more looks so much better and much more expensive. Well, that's what we've got to do with hair. We'Ve got to be very precise and tailor it to the neck. Tailor it to the head: shape, tailor it to the hair type, the face shape. Everything'S got to be tailored to the individual that you're working on and that's what makes a haircut a color look. So on trend and so tasteful, it's that suitability factor so you're constantly checking what you're doing from a technical point of view. But you're also checking how it's working on the client that you're working on, because suitability is everything you could do a great little precision haircut. But if it's not suiting the individual that you're working on i'm afraid it's not a great haircut or color, so that suitability factor is important as we get to the front, i'm twisting the hair away and off the face so she's comfortable. So there's no wet hair on her face like so, okay gon na do the exact same thing on the other side. So, working from this angle, all the way around until we get to the hairline come on up here, ashley, so you're, just working that all the way down to here now before i clip this away, i want to make sure that we are happy with both sides. So what i do i almost comb it away like a ponytail opposite direction and just check the balance of the section. I think that's just as important as well as you're working. This haircut obviously see how the hair is dry around the front. We can address that. No problem that looks good from the front as well. That is great, okay, so come over ash in the front and the back will someone extremely cut along the same lines using the same technique? Yeah yeah, i guess the question is: is the bob the best haircut for that person with thick thick hair? So i think it comes down to consultation, there's ways of layering the the hair underneath to remove weight, which is a whole nother, complete different haircut. But there are ways to make thick hair look really really nice around the sides and the top. But you know you've got to compromise slightly in some areas because a bob doesn't remove weight. A bob is just a classic one length above the shoulder. So all the hair is still there and you don't want to slice out the hair. Now. Can you layer a bob, absolutely layering. Bobs are very, very nice, and i've done that numerous times. I just want to take it a little bit higher here ash just so. I want it's the same on the other side. I want to give myself enough of a guideline in front of the ear, so just going back in i'm going to comb that again take your time with the sectioning. This is not a matter of you know, rushing if you do it properly. The first time around. I promise you, you guys, will save so much time in the long run, if you can show them some of the pictures ash, because a lot of people have just joined in now, so i might just show them a couple of pictures and what size comb are You using um, i'm using the lancome, have a look at these pictures for a second okay, so i'm just using the lancome guys. It'S i don't know how many inches scissors sorry scissors, i'm using six and uh six and a half inch scissors, mitsu tiny people always ask me: what's mr tiny scissors, so this is one of the bobs that i love when kim kardashian had it. This is another one with a bit of a bang. This is bella hadid, with a beautiful bob. Bobs are so on trend and work on all face shapes depending on how long you leave it with a round face shape. I wouldn't do it on chin level. I would leave it much longer because it elongates the face. Look at this cute bob gorgeous bob with a bang, but the bob is still there and that's that's what we're going for today, a bob without the bang. This is a much shorter version of the bob with a strong bang, but again a beautiful bob. So it goes to show how bob can be worn in so many different ways, depending on that suitability factor. Okay, so come back so we're going to use the wide end of the comb. Remember as we go along and what i might start doing now is leave it just slightly longer slightly longer so and the reason why we leave it longer so when it dries, it sits beautifully. So i'm just going to leave it a touch longer here, because when it's dry, it's going to jump and what you don't want to get is too much graduation. You want the top layers to sit over slightly, so it's precise all the way through okay, so everything's combed flat, and we just leave it slightly longer, and so it sits the same on both sides of the neck area. Okay, again here everything's combed flat. It'S a precision haircut people might say, can you can you um point cut? You can point cut, but i think that's cheating when you're doing a precision haircut in this case, especially when you're teaching it. I think it's important for people to learn the precision of blunt cutting, especially with a bob again when you're qualified. You can point you can do what you like. There'S no rules, but i feel like, as you work and teach it's important to learn the bob with the classic approach. Do me a favor if you could just hold this side of the mask you just hold it there. Thank you and just keep your head. Like straight up yep, you got it. Thank you always be careful with the masks now around. The ear is where you need to be super. Careful and i'll. Show you what i mean okay now as we get to the ear because of the ear the way it jumps you've got to allow for that tension, so combing that forward. Okay, it's kind of hard with the mask, but let me see what i can do here. Okay, so you're using your fingers you're using the comb. In fact, you know what i might do. I might just tuck it behind for now, because that's giving me more um over direction, which gives me more length, okay and then we're just gon na work that flat all right and then just allow that to be a little bit longer there cool and then, as We get in front of the ear head straight at natural. If you want to use your fingers just around here. That'S totally fine tap tap cut all right now. What i want to do just make sure that it's kind of the same, let's see yeah, see how it's kind of a there's a little bit more of a length there, because we've tapped around the ear put your head straight up cool! I'M happy with that! Now, let's do the same around the other side, so let me just explain what i just did. Everything was flat. If you just cut this straight and flat, you can see it's a bit longer through in there. That'S purpose, i tap it on top of the ear. I tap on the bottom of the ear and then i cut it across so that when it's dry it ends up looking straight all the way through even around the ear. If you didn't tap and tap and you just cut it across and then blow dry. What happens is you get a little hole through in here? We don't want that. We want that kind of laser precision cut all the way through and that's why i've kept the manic mannequin here just to show you so gon na. Do the exact same thing on the other side, you can put that back on yeah for now. Thank you and just pull the hair up guys. It is a little tricky with the masks but hey. It is what it is uh and we're just gon na make sure that we we work around it to work this haircut, so it sits perfectly on no matter who we're cutting so again, leaving it slightly longer and checking for balance all the way through. Why isn't her head angled forward anymore, because now we're working at natural fall? The only time i wanted to angle the hair is the first one or two sections, but now we want the hair to sit in a precision bob. So head position is everything: okay, there's a lot of things that you've got to keep in mind when you're working, a bob head position is one of them. You know the technique. Checking for balance is another one. So keeping the head at natural fall is your best bet to keep the hair uh clean in terms of the precision around the perimeter: um, okay! So turning this flat here, all right and i'm just move that if you can sorry guys just leave that mask on that side. Thank you! So much! Okay! So we're working a little bit longer through in here and out now, as we get to the ear and in front of the ear - and you know, different different ears are going to be different. Some are more aggressive than others. You'Ve just got to make sure you tap around the ear. Have a look so i'll use my fingers, i'm going to tap here, tap there and just cut that across, so that when i comb it now you see how see how it's a little bit longer. So i pulled down, can you see, can you see how this this little hair, there's hair there that will, as that builds you'll, see more and more hair, and then we can just cut that off when it's dry? Okay, let me just check for balance, because i feel like on the right side, which i'm right it's a little bit longer and around behind the ear. So you want to check for balance. You can see i'm checking for balance. This haircut is all about checking for balance as well, so just going to go back in and go a little bit shorter, all right when you're checking for balance be very, very precise, don't rush and just go a little bit shorter better to do it bit by Bit than go too short, too quick, okay, because you don't want the hair to look too long on one side, you want it to be exactly balanced on both sides, all right. Let'S do the next section come over, so we're going to mirror the exact same section. There'S nothing tricky here. What i do want to do is just dampen down the hair. Slightly again now i did use luster lock all the way through in the beginning, so i don't want to keep putting more and more luster lock on top, because she has fine hair lust, a lot when you put too much of anything, but especially with luster lock. It can make the hair a little shiny and i don't want too much grease or shine in the hair, so i'm just using water. We'Ve also got joyful as a product in here as well. It'S a great little delay that swells the texture of the hair. One of my favorites for these kind of haircuts, so working from crown to the recession. So it's like a horseshoe section. Sorry and look i section off with the wide end of the comb and then i flip my comb and i use the fine end to clip and comb the hair away, and that makes my work super clean. I want to encourage you guys, everyone watching. You know some of you, i'm sure already do this, but some of you probably don't always keep your work. Super super clean. It looks so much more professional. It also allows people to learn from you a lot more and from a client point of view. It shows that you know what you're doing, rather than having a sexual messy clip and you're just picking up hair be um, be precise, even with the way you section off. The hair. Clean sections are happy sections, so the more your sections are balanced and cleaned. The more you're setting yourself up for an incredible haircut is it the same technique for someone with curly hair, obviously exactly it will jump a lot with curly hair, what you know, how i'm keeping it slightly longer with the top layers with curly hair. I keep it even longer the top layer so when it jumps and dries, it sits in a balanced way because exactly what they said, hair likes to jump plus another thing for curly hair. Again, these are good tips guys. Another thing i would say for curly hair use the wide end of the comb. Don'T use the fine end because you want to allow the hair to breathe. So that's another thing probably use your fingers as well um. If you want to work with curly hair, i would because curly hair is uncontrollable, sometimes, depending on how aggressive uh it is. So you could use your fingers and work the same approach, but you can see the hair's dry, so i just kind of put more moisture in it. Precision haircuts require the hair to be wet. Otherwise, what happens is the top layer will jump because of the volume that the roots have you want to keep it as damp as possible, no not drenched but damp so that the tension, the distribution, everything is exactly the same all the way through. Okay, are you saying that the section behind the ear should be a bit longer? Is this to prevent a hole, so the section on top of the ear should be a little bit longer to prevent the hole, not so much behind it here, because there's no elevation because look come come from me ash. Can you see how the hair is flat here, but it elevates slightly here because it's got nowhere to sit but on the ear. So if i cut that across when it's dry, it's going to jump so much and leave a hole because of the elevation of the ear, if you had no ear, would be no problem. But humans have ears. So you've got to tap on top tap on bottom and then cut and you'll get this longer piece here. But when it's completely dry, that's when you cut that off. So it's sitting pristine and with precision once the hair is completely dry because there's no more jumping. That'S going to take place. Does that make sense? I hope i've answered that correctly again, using the wide end on the roots, and now the fine end on from um the occipital and below okay, you can see how it's a little bit longer. I can see i've left it slightly longer, i'm going to cut it on that slight longer, so it gives me that bit more length for when the hair is dry to sit in a really precise way and you'll see when it's dry. Why i'm doing this? Now? Some of you are like: oh man, just cut it cut it on the guide. Well, i could do that as well, but in this case by leaving it slightly longer, it's going to allow the hair to sit clean in a very clean way when it's completely dry. Okay, keep it flat on the skin for now behind the neck, okay and you're. Working with that same guideline, okay, combing, that flat to see what you've created make sure it's flat. That'S! This is why i checked the skin as well before okay, so this is around where the ear is so just leaving that slightly longer as well and now over the ear. The reason why she said behind the ears, because i'm taking the section on top of the back, so it's not the section behind the ear, it's the section above the ear, but that's that's a good point that she pointed out, but he or she we've asked that Question: okay, so you can see where the guide is. Where the guide is tap, tap, cut, cut, cut, look a bit longer: it's okay, don't be bothered by that wait till it's dry. Then you cut that off. Have that discipline and understanding of why we do what we do, there's always a reason behind what the what you're doing? What are you doing? Why are you doing it as an educator? There'S some educators watching me if you can answer those three questions with everything that you do, what you're doing, why you're doing it, how you're doing it? So if you get stuck with not knowing what to say - or you got nothing else to say what are you doing, why are you doing it? How are you doing it? Those three questions should always be answered: every step of the haircut and guess who's going to learn the most you as an educator, because you've now got to answer what i'm doing. Why am i doing that? How am i doing it and as you're teaching others believe me you're teaching yourself it's funny. It'S amazing someone encourage those people out there. If you get a chance to teach others do it within your salon. You can take that mask off. From that one side. Sorry man, it's too we got to keep it on, but we got to work with around the haircut, so just working everything flat around the skin. First begin from that extra millimeter that we have there. Thank you for the tips. I never tap, but you have taught me something today. Ah, thank you. That'S very nice of you, it's about learning from each other. You know, and i'm sure if i was watching you cut here, i'll, be learning a few things as well and that's what our industry should be all about: learning from each other, never too good to teach never too good to learn. Let'S be a people that are hungry and passionate to grow as hairdressers, that's how we all learn and become better okay, you can put the let me just check the balance first, so i'm just checking for balance on both sides. That feels really good around the ear. I'M not so bothered right now, because i know i've left it longer behind the e. I am i'm very concerned making sure it's perfect yep and from there perfect cool, i'm very happy so far with the way it's sitting i feel like it might be just come over here. I felt something here. So, let's have a look, maybe i'm wrong, but i felt like it's a little bit longer just in here. So what's the difference between a box bob and a nut, see i'm going naturally around the skin box bob will be pulled up and out and cut square. Okay, so you just want to make sure it's the it's pulled out slightly, i'm actually working on the skin and traveling around okay, next section we're almost there, but it's about taking small sections and working with the same guideline in a precision way. You wait till you see the end result with this. It'S going to look so so good and you'll see the difference. The the approach actually makes by taking small sections tapping around the ear flat on the skin. All of these little tips is what makes a bob very precise right now, i'm going to continue with one side again use the wide end of the comb on the roots, all right. Let'S continue working with this side and then working with my scissors and working that square as we travel around the neckline. Now we've got to be careful around the ears, so now we can probably use our comb because there's more hair. Now i just put the scissors underneath i drag that down like so tap tap. Okay, next section i'm going to comb this all down, see if it's too much hair or not. We can literally, if you can't see the guideline, it's too much hair, so we're using the wide end of the comb allowing for that crown to jump all right around the front. There'S no crown we can just comb that and use see, have a look at the tension on top. It'S not forced through in here i've just scraped it with the wide end of the comb around. Here we use the fine end of the cone. Okay, let's start with the back first, we can come around actually the back. It'S so satisfying cutting a bob, a precision bob. You want to leave it a little. If you want to angle it slightly, you can around the front always looking from the front making sure we're happy with the way it's sitting and the length look. That way for me, look at the mirror ash! Look in the mirror for me just making sure the angle is also really nicely sitting there, so you could see that slightly squarer there, which i like. I would rather leave it like that for now and then dry it off and have a look. We can always cut hair off. I can't put hair on that's all okay, so just going to make sure that you're happy with the line around the front, keep the elevation as low as possible use my comb as the guide cool all right. Let'S do the other side so going to do this in two to three sections. If you want to come around any questions guys, when are you giving us a beautiful natural inversion, i bet that's the same person that asked me last time soon soon, maybe the next time i cut, i will do maybe an inversion which is a very, very classic And popular haircut that actually not many people know about so maybe the next time i have time. I could do something a little bit longer where we do it like an inversion. It'S a beautifully layered haircut, okay, so just dabbing the hair down and making sure it's the same length on both sides. Okay, and that's the trick, it's easier to do on one side, but then you've got to make sure you do it on both sides. Now, with the back comb, everything back another thing as well, sometimes people only come back from the crown and below, but then some clients push all their hair back and what you do sometimes is you get longer length hanging over, so you want to go further back Here, maybe to the top of the head and pull that back and cut that across so there's no length, that's hanging over that's one thing that i think is probably one of the biggest mistakes for any bob is when, when the hair is not cut in the Middle or when it's not cut further, it's not pulled back enough far enough and you start getting hair, that's hanging over the bob. It takes away from that that beautiful laser finish that you want. Why aren't you pulling the hair back at the crown? I am it's coming back, it's coming back. I just actually talked about that. Okay, so everything's cut here that little bit longer and if you want to judge it, do this on the skin flat. It make it so flat on the skin that you can see the actual line here so really flat and just cut that literally beautifully and cleanly. All the way through everything's become square kind of that natural fall and left a little longer. Okay, i'm gon na check for balance. Don'T just check again, don't just check technic uh visually check technically, and this line when it's dry will be cleaned again. So it's sitting perfectly all right so around here you can see where the guide is around the front where the guide is around the back. You see that so, let's just tap tap amy said very beautiful haircut. I'Ve always been a little intimidated to do this cut. Love over the ear tips. Thank you, you're. Welcome. Thank you for that beautiful compliment and guys it's about practice. Practice makes perfect the more you practice, a haircut, the more confident you're going to be, and you know we all remember the first time we picked up scissors cutting a human being's hair. We were nervous right, but the more we do it. We don't even think about it, so it's the same with anything, the more you do, something the easier it's going to become something's only hard, because you haven't practiced it and that could be with anything you know. Some hairdressers are scared of doing hair up. Some hairdressers are scared of doing precision haircuts. Some hairdressers are scared of doing longer, haircuts, shorter haircuts, let's kind of tackle each area of hairdressing. Some of you specialize. I specialize. I don't do color, but that's that was my decision. I'M not scared of it. I just i love cutting hair and i prefer focusing on something and doing it more often because the more you do something the better you become at something. So you know for those that find precision a little bit more difficult or challenging. Let me just encourage you, get a head block and just practice practice practice practice. Is that break? Are you good? Are you good, okay, cool? Thank you all right, so coming back here, cutting that anything that hangs over the guide we cut it. I was working in the tonian guy academy for many years and i would have to teach this on stage and have the teacher in the class. So when you teach something so often you become really really good at it, not to say i'm very good at it. But i kind of know how to do it, hopefully i'll be good at that and i'm sure i'll look good, i'm just trying to make you nervous. Why did you top the hair before cutting the side? Why did i what was that sorry tap the hair before cutting this side? So what i'm doing now? You mean uh for those who just join. I have explained that a few times, but i'll do it again, because where the ear is you've got to allow for the for the jump, so you tap it there, you tap it there. It pulls up the hair and then you cut it across. If i didn't do that, see how it's longer there, if i didn't do that, when it's dry you'll get a little hole, that's probably why you get holes there because of the ear, because it elevates the hair and it kind of jumps when it's dry, leaving it Slightly longer then blow drying and then executing will give you much more of a precise shape, so it's square all the way around, even on top of the ear, okay cool. I hope i answered that. Thank you for the questions. Guys just want to make sure that this is perfectly balanced. So what i want to do is just clip this away for now and just check for balance check it technically check in the mirror, make sure you're happy with both sides close your eyes. If you have to because when you look at something for so long, you lose focus so by me. Closing my eyes or looking away and pulling it down, allows me to feel what side is longer. That'S another good tip guys to practice and as hairdressers you will naturally start to understand which side is longer simply by feeling it not just by looking at it, and you can see i'm damping the hair down. If i didn't damp the hair down, it would affect my haircut. Why? Because, when the hair is dry, creates more volume and because i'm using my comb, i'm not forcing the hair to to be pulled down with tension. You'Ve got to allow for that hair to be damp on both sides from roots to ends. Then i use my fine end on the root. This is another good tip for you guys. You should try this. I won't do it today, but you should try it another way of keeping the hair. Precise is the very very, very last section, maybe half an inch or an inch, don't cut it. That'S what i did here i didn't cut. You can see that the top layer i haven't cut it. I'Ve left it longer, it's nice to blow dry everything down and then just cut that, so the top layer sits on top perfectly over the bob. That'S another good tip as well so come over here. For me, ashley see where the crown is a lot of people end up pulling that that way and pulling it that way and end up cutting it right. What i recommend is you pull it back in case the client likes to pull it back, and that way you got not going to have any little hairs hanging over the the baseline of the bob and look i'm using the the wide end of the comb, because I'M not forcing the hair all right and now i'm going to use the fine end of the comb and pulling that flat and down. So i can actually have a look at what needs to be cut here. Okay, our last section before we start blow drying, everything's pulled up and out, looks cut square use, your scissors and your comb, everything flat on the skin and then worked square as well. Here this style looks amazing. Thank you. So much for teaching you're welcome. It'S a classic bob, but so popular and there's there's tricks to make it sit in a nice clean balance. Where, hopefully, you know when we, when we go through this completely, you will learn a few little tips and tricks that you can actually apply in the salon and that's what education should be all about. Education, for me, is about creating looks that are going to be salon friendly, not something that's just too crazy that you can't apply in the salon. So working this simple classic technique, i think, is going to be give you an opportunity to be able to recreate that in the salon love the tip about leaving the top till it's dry right. That'S a good one! Isn'T it? Okay? Let'S have a look at the actual guideline now with the front look when i comb that it's a little bit longer around the ear, it's fine tip tap, pulling that up and out. Let'S have a look, i think it's. I always leave it longer. On the second side, because i can always go shorter um, let me just check that yep, you can see it's longer there, it's easily fixed, that's a bit longer there a little bit longer there. I always like to leave it longer on the second side, because if not, i've got to cut that whole side again and it starts from just behind the ear. So we go back in here, you can see it actually. Okay, now we go over the ear there. We go in front of the ear. What is the major change in your way to cut and texturize hair between london and miami weather? Nothing, really. I still approach hair the same. Maybe i kind of recommend different products because of the weather, but the approach is still the same. Um with layers with layers like someone's, got thick hair i'd, be more conscious of leaving layers longer, not shorter, because layers go really like in the heat expand. Let'S just say they expand so by having longer layers, it allows the hair to sit flatter okay. So it's still a little bit longer in here, okay, tap around the ear. Why don't you have to suction again when cutting it shorter? Because it's longer i have sectioned off the hair. So i don't understand that question. What was the question? Sorry? Can you ask that question again? Why don't i pre-section you mean maybe pre-section, i'm not sure what section what the heck, i don't know. I have i've taken small, really small sections all the way through for those who've been following and you'll see that you know that's what's helped me see my guideline a lot better right around the front. It'S just like a half a centimeter longer just about here. So i'm going to come through in here use my fingers and just slightly elevate the angle a little bit more in here and through in here and another way to check the balance. I'Ll show you and just make sure over. The ear is a little bit longer. Yep cool now, let's check the front, always check balance from the front and from the back close your eyes. The reason why i get them to close the eyes is so that i'm not so in their face and in their space, so it's not as threatening okay. So from about here it needs to be a little bit shorter, so going in this is precision, so you want to take your time. You don't want to go too short, too quick. You want to do it bit by bit, it's like when you're cooking and you finish the meal and it needs some salt or you need some herbs. You don't put too much too quick. You add a little bit, you taste it you make sure it's perfect and then continue on same with cutting when you're getting balanced. Do it bit by bit. So it's exactly perfect, because if you don't you end up cutting one side too short, then you're gon na have to do the whole thing again on the one side. So close your eyes. For me, it feels good, so she was saying if it's longer on the last side, why don't you section again? Oh because i don't need to it's only the top layer, it's only the top layer that we're actually detailing and there's not much hair here. So there's not much hair, so i can do it all in one section. A good question, thanks for asking that question again. If it was a lot of hair i would have to re-section off, but because there's not as much hair we can. We can just do it all in once. Look how transparent the hair is here, there's not much hair here, so we just go through and we cut that little bit off. Okay. Now, let's check that. Look at that perfect, perfect! Look at this ash bring it bring it over. Look when i pull it forward. See that point guys, that's what you should be looking for. Let me see that one little hair there, oh that hair's come out. I was like that. That'S not did you see the point here, that's what you're meant to get a nice little point around the front and that's when you know it's balanced. Okay. How long do we have left ash five minutes? Oh my gosh, okay, oh wow, huh, okay, guys! So i am gon na blow dry. This, let me tell you the secret. The secret is to use a denman brush a denman brush, not a round brush, i'm going to blow dry with a denman brush. The reason being is the tension on the denman will be the same. Each section with a round brush you'd be forced because if you force some sections more than others, it's going to stretch out the hail a bit more, but by using a denman, allows you to create even tension and even volume. All the way through when this is completely dry, i'm gon na go in and just sharpen the very edges like i've done here. I blow dry everything, and then i clean it up by just using my finger, my comb and dusting all the edges. So it's pristine and perfect towards the end. Sorry, i didn't have time to style it, but please go back to our facebook page and you'll, see pictures, but also on joyco's, instagram page, where you'll see the whole step-by-step and the finished results as well. Well, thank you. I hope this has been helpful. I hope you've learned a few little things. Don'T forget when using those techniques to create this bob. When finishing remember, it's important use a denman brush, so so important, i'm going to carry on using this demon brush and the products i've used so far is the joyful volumizer and the kpak luster lock. This is a fantastic product to swell the hair without making it crunchy or anything. It gives it that soft beautiful volume for bobs have a lovely tuesday, guys god bless and we'll see you guys very very soon. Thank you.
Comments
💜Tea143💜: Thank you...very good teaching...I took it in
HeadHome: Love your videos but wish you could credit the original author
enigma ian: video blow dry?
Christine Dent: Very drawn out not precise enough in the first instance too much time wasted
roger santiago: that poor manly-woman. lol