Horizontal Graduation Bob Haircut On Curly Hair | Textured Bob Haircut Step By Step
- Posted on 01 May, 2020
- Bob Hairstyles
- By Anonymous
Horizontal Graduation Bob Haircut on Curly Hair
How to Textured Bob Haircut Step by step
Layered Bob Haircut on Curly Hair
Curly Bob Haircut step by step
*Giving is hold forever*
*********************************
Thanks for Watching!!
Please like, comment and share!
#GraduationBob #TexturedBob #BobHaircut #CurlyBob
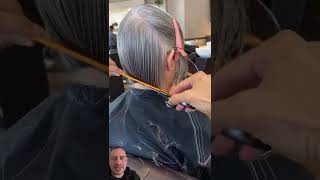
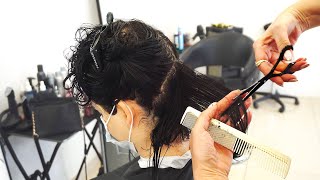
Hello: everyone, my name, is Rene kadar, the global artistic director of texture. Here with Aveda I've been in that position for about since January, and then my good friend Kelly asked me to do a haircut for hairbrained life. So I'm going to be showing you something that I learned from my mentor about seven years ago. Lina arose Oh, which is horizontal graduation. It'S a really simple technique. It rocked my world if done well, it can work for so many of your curly clients. I predominantly cut wet, and so I'm going to show you guys a wet haircut today. My doll head is an amber from pivot point and I'll be using just to go over my tools, I'll be using a blow dryer with the diffuser, and then I just have my comb and my scissors and five clips and that's all I'm using today and so Go go through. This is what hello everybody, and, just so you know hi from Hong Kong Kong. I am going to do my best, I'm here solo because we are social distancing, so I'm gon na do my best to do this haircut and try to pay attention to questions. If I miss your question, please just keep reposting the question. I'M sure I'm gon na look over them and I'm gon na see it. But thank you again for joining me today, so this is kind of what the doll head looks like when she starts just what I wanted to show you guys that and then I already have my doll, pre sectioned, so how you would section for this haircut in Particular when you're doing with curly hair, sometimes it can feel a little overwhelming, because it's it can be a lot in volume right. So I like to break down the haircut I'm going to be starting in the back with this horizontal graduation, how I park her hair. I parted straight down the center and then I do a radial party kind of from the top of her head to the drop back crown right about here and then I do my rounds. My circle, the diameter of my circle, is where the hair rounds away. So that's kind of how big I usually do my circle here. I'M gon na do a lot more roundness to get volume, but in the back, that's where I'm going to show you that horizontal graduation and in the front, I'm gon na, add a little bit of a fringe just so we can switch up her look right. A bit I'm going to take her short because, as you can see, she's not that long to start with, and if I kept it too long, you wouldn't see as much of the impact of the cut. So I just wanted to make sure that you guys get the most of this as you can so hi everybody joining me from people joining me from Nebraska from Italy. It'S amazing and I I'm trying to get used to technology all right, so we're gon na start in the back of this haircut for horizontal graduation. All that essentially means is that you're keeping your partings as you're moving up pretty much horizontal, also your fingers. Sometimes it's graduation you're holding your fingers at 45 degrees. Your partings look like they're going to build for 45 degrees, but this is going to stay more horizontal. The reason being is because curly hair kind of exaggerated s', whatever haircut you're doing you, can cut a one length line on a curly, client and it'll creep up when it's finished and let's try and look like a very subtle graduation. That'S what we're going for a subtle graduation that has a whole lot of impact, so starting in the back, I dropped my two sections and I'm just going to moisten her back down. Once I find my spray bottle, I know that for many people, dry cutting is kind of the move for curly hair, but for me uh I've been doing curly hair for a long time, so things such as shrinkage and things like that aren't, I feel like I - Can navigate around that pretty well, and so I like to cut things with keep it all consistent, build like one brick at a time. So I put my clients head down. I'M gon na start my first section here, so it's not completely horizontal, but it's also not completely at a 45 right. So little thicker in the middle coming down thinner here and a key to this, also is just how I'm holding my fingers so for the first section, you're going to hold at zero degrees, as in you, are going to be as close to her neck as possible, And you're gon na cut straight, so I'm gon na cut her here. I hope that you are, you guys, aren't able to see so. I'M gon na cut her straight right here. When I comb, I make sure that my combing is consistent. I am using the fine teeth of my comb. We are going short and I, like I mean I'm going to want consistent tension for this, so I'm gon na use the skinnier teeth on my comb right. So once I'm done, I check for balance, pull it straight down, feels good kind of see where that's landing. I like, where that length is landing at the resting length. So now I go again. I mimic the first parting that I've done and my next one and when you're when you're cutting a precision haircut, whether on straight hair or curly hair. You always want to make sure that your partings are visible to you and they're neat and balanced consistent on both sides. When you put in the work to do the hairdressing methodically and neatly, it shows in your work. So my next section now I'm going to graduate horizontally what that means is that I am going to comb the hair down right, but in the center I'm going to lift just a little I'm going to elevate just a little bit. My fingers are still horizontal. My partings are somewhat horizontal and I'm just gon na lift in the center just a little and as I come down to the side, I'm going to reduce my graduation, I'm gon na work down to zero degrees again so here in the center I hold up just A little and as I come down the side I reduce, I gradually reduce the amount I'm holding up so by the time I get to the corner right here, I'm pressed up against her skin. I do the same. On the other side, I gradually move down until at my last section, the back of my fingers are touching her skin and then again I checked for balance a little longer on this side, so I come back in make sure I'm balanced as I go here. We go so what that's done is this feels like a one length, because we worked down to zero degrees again and here I'm starting to build a little bit of graduation. Just by elevating my next section, I mimic this parting again. I make sure that I'm balanced on both sides. I also want to make sure that my subsections are small enough, so that I can see my guide through the subsection through the hair. So if it, if I took a subsection that was too big, I wouldn't be able to see my guide underneath. I wouldn't know where I was cutting from so now in the center. Again, I'm going to elevate just a little bit more than I did. The last time remember, the first section was at zero right on the skin, the second section elevated just a little, and then I worked back down to zero elevation here, I'm elevating just a little bit more and again, I'm gon na work back down to that zero Elevation, so I'm here I can see my guide I cut to my guide. I don't want my fingers to go over my guide because I want to see my dad, so I bring my fingers down to just about where my guide is and that's I cut right at my guide, not below my guide, obviously not above right at my dad. So I want to make sure that I'm elevating and slowly decreasing elevation as I go to control that I usually don't cut past. My second knuckle, because I want to take it a little at a time to make sure that I'm having full control of where this graduation and decreasing their graduation is going to be and as I work through, I check for balance every time. So here we go. I do it again until I work up until I complete the back I'm here now. As you see, my subsections are getting a little steeper the further that I go up, because the heads rounding away from me right so same idea, so I'm gon na increase. My elevation here see my fingers are horizontal. I'M not pointed this way to create traditional graduation. I'M horizontal I'm elevating just a little more than I did in my last section and just like the times before. As I move down, I am decreasing my elevation. Also as I move up the hair. I am now using the wider tooth of my comb, so usually when I am building my baseline, that first line I like to use the finer teeth of the comb, because I I feel more in control. I have my maximum tension and I feel, like I get things just a little bit more precise there. As I move up the hair, I want to get a little looser, give it more room to breathe and live, so I use the wider teeth of my comb. All right, so I'm here I'm back at my second-to-last section. I don't want to work on sections that are too big. I want to maintain as much balance and control as I can, and I also want to make sure that I can see my guide every time. I move a same idea again. I am elevating just a little bit more than last time. My fingers are being held horizontally and I cut, and then I decrease elevation as I move towards her ear and by the time I get towards her ear. I want to be back at zero elevation right and I'm working that down gradually. You don't want to take big steps to that. You want it to be gradual, so here I am working down gradually to zero elevation. Here I am now at zero. I have one last section and I think that you guys can see here's my baseline and here is this graduation building, I'm going to show you the profile as soon as I'm done at the back. This is my last section on the back and then we'll move there moisten our back down, keep the plane nice and even right. So here I elevate fingers still horizontal, I'm elevating a little bit more than last time, using the wide teeth of my comb and as I'm moving towards her ear, I am gradually decreasing my elevation to get it back to zero elevation. What is zero elevation? That is me pressed up against her neck and I have no elevation going. I'M pressed up against her skin my fingers right, so I'm back at zero and now here same thing, kind of return to that elevation that I was at and sometimes like when you're. Just now, starting out like doing this haircut figuring out that elevation that you were at formerly uh just before on the on a different side, because our body positions are a little different based on where we're cutting you're gon na have to keep checking for balance. As you go so here by the time I come to the ear, I want to be at zero elevation. What is your elevation? That is me on the clients skin now earlier you can are able to see, but here I have my baseline and you can see that graduation building and it's a real subtle, graduation. I, what I like about horizontal graduation is that I can determine how much graduation I want in this hair just by elevation not going too strong, because sometimes I feel like if it's too graduated, it can kind of look a little older. I'M gon na go through and let's try to see if there were questions coming up hi from New York, awesome Naples all over this is amazing: great yeah we're gon na move on to the sides. We'Ve done the back now we're gon na move on to the sides trying to adjust the lighting here so make sure that you guys can see cool so now on the side. You want to follow this kind of graduation and kind of moving it down to zero degrees of elevation, same kind of concept. I'M going to show you the sectioning that I'm gon na take Florida high from Croatia, okay. So now from here, I want to take horizontal sections again. What I mean by that is this there. It is that's going to be my first section here. It'S horizontal is coming down towards her face here right, so that's my point that I'm working at I'm gon na put my clients head back up straight, because I don't want this front line to jump up. I want it to be consistent. If anything, I wanted to actually slow it down a little bit because curly hair likes to jump, and I don't want it to look too rounded in the front I kind of wanted to come down. So I hold his hair down my initial cut. I'M going to hold down at 0 degrees of elevation, bring this hair to me here. There we go and that's my baseline right there now. My next section is going to stay horizontal this time. What I'm going to do is I'm going to elevate from right here and then I'm going to work back down to my zero degrees of elevation, similar to what we did in the back, so I'm gon na elevate and when you're combing a section of hair. You want to make sure that your comb is mimicking whatever your parting is doing that helps. You also be consistent and be a little bit more precise, because our body position is different from side to side, and so another good way to work in that balance is making sure that your comb is been making the party that you know that you can control That you know it's balanced right so now here as I move down towards the face, I'm working towards that zero elevation. So here we go again and this hair is not going to reach just because of how my doll head is, but I'm going to make sure elevate, bring down my elevation a little bit in the corner. So I cut that and that's that that's one side. So you can see my graduation building man a little bit of graduation. That'S connecting that and I have my through line here. I'M gon na work on the other side uh my lace sheet. My the length of my shears is a five and they're from elevate hair. Shoutout to elevate hair, I forget what brand elevates using, but you can go on elevate, hair, calm and you can purchase this year's that they're selling. It'S a really beautiful pair of scissors made from Japan now here again, I'm keeping things a little bit more horizontal towards the face, so horizontal just means this is horizontal, relatively horizontal to the floor. So if the floor is like this parting is also like. This diagonal would be more coming down on the side perpendicular to the floor, so this is more horizontal. Now again, I'm gon na comb all of this down and I'm going to cut at 0 degrees elevation 0 degrees elevation again for those of you who are just not tuning in is when I am pressed against my clients skin. That means I'm not lifting up at all, I'm all the way down on her skin. Then I'm gon na come in the front. When I put that first section, I'm gon na come in the front, I'm gon na look at my client straight on and I'm gon na check the balance in the front make sure I'm in a good spot. I'M gon na mimic my last parting into my next. Now, here for this one, what I'm gon na do is I'm going to elevate just a little as I'm to the center and as I get towards your face, I'm gon na decrease elevation to zero. So I'm up here and as I work towards her face, I gradually move down to zero degrees of elevation. There we go now her hair in the front may not reach, but I'm going to use this last section just to make sure I have everything. So here I'm here nothing to cut I'm here. I think it could and I come all the way down. I got something just a cutting in the front now, while I'm here, I'm gon na cut her fringe. Now, before I drop this radio party, I'm gon na cut her fringe and I'm gon na show you what that slit. Hello from Greece. I love curly hair to valaria, just trying to make sure that you guys are able to see this haircut as I work through. All right so now the next section is gon na, be my clients fringe now. Curly fringes, especially cutting wet, can be a little scary for some because it can shrink a lot and what you don't want to do is cut a fringe way too short. So Curly's you're gon na cut long. So what I'm gon na do is I'm going to create my triangular section here. That'S gon na be in the front. That'S gon na end at her recession area here and I'm gon na do the same on the other side. To her recession area there that way, now I'm going to start building this French. Why don't you just see this party right there for the French cool hello from Texas? Great, your kids have curly hair Christina. This is wonderful, then, for you, okay! So now, within this section, I'm making a horizontal parting right, which means horizontal to the floor, not perpendicular to the floor and what I'm gon na do it's kind of comb the hair and see where it falls kind of want her bangs to be at the bridge Of her nose right here, so I'm going to come down and kind of pop it up see where it's falling and I'm gon na cut the center. And as I move out, I'm going to add length by pointing my fingers down so that she's shorter here and kind of longer through here I'm going to do the same on the other side, so you're able to see. I want to keep some length, so I want to angle my fingers. I don't want to keep them horizontal and I'm bringing the hair sorry for the New York sounds in the background right now. I also like to put a little bit of graduation into a bang as well and again, I'm going to use horizontal graduation to do that. Here'S my horizontal party, I'm going to keep my fingers horizontal and I'm just gon na elevate just a little in the center and as I move towards the corners, I'm going to go back down to zero elevation. So here I am, I'm elevating just a little bit off of her face and then I'm going to work my way gradually back down to zero elevation. Zero elevation means my hand is as close to her face as possible, so I'm elevating highest in the middle and decreasing elevation. Slowly as I get to the corner and there's that last one going that hair all the way down, i elevate just a little bit more and as I move out, I drop elevation and I get a little closer to her face until when I'm at the corner. I'M fully on her face same thing, work down to zero elevation and there is her fringe. Now, I'm gon na connect her fringe by just holding up the hair and kind of cutting. I hold it up. I fold my scissors kind of diagonally and I felt like that. Sometimes I don't like to do it in my fingers, because this can jump a lot and I don't want to cut that corner off. So for this just connecting that I'll do with my shears freaking. Bringing that connection name, I'm going to do the same on the other side. Just so that you're able to see, see, there's a difference between here and it looks like it just cuts off and then there's some length here. I want to marry those two things, so I just hold the hair and I freehand it, but I don't want to cut my corner off. I still want her to have the length here all right, so what you can see is that graduation building in the front - and now she has a little bit of a fringe and she's - got a little graduation in her fringe too so great for clients who have Curly hair, but it's also fine and they want it to be big. You put a little graduation in the bang and, as you can see, it keeps a bang up, so it's not so stagnant on the face. It gives them a little something a little bit more volume now we're going to tackle this radial parting, how I like the tackle Israel? Well, it depends on my client. I do this a number of ways. Most of my curly hair haircuts is done similar to this. This is kind of a parting and anybody who's seen my facebook live and back way back in February. This is going to look very familiar because this is how I part curly hair all the time right, but the center. The center is where I make make the magic happen, so I for this center section, I am going to part this circle down the center. You try to put her down so you're able to see what I'm doing as I'm working through I'm gon na cut her down the center part her down the center, and I'm going to clip this half of my circle away for this hat. I just want her to be round, so what I'm going to end up doing is I'm going to take PI sections from here, so I'm going to PI, so this is going to be the top of my. This is the point and I'm working everything from that point right there. So I'm going to start from that point make a section from that same point. Make another section just like pi cuts right. So I start from here trying to adjust the light. I'M gon na make sure that you guys can see. Okay, that's a little better, okay! So now for this, I want roundness right. I'M gon na hold all of this up right here and connect it to the bang. So I see the length of the bang the fringe that I cut right here and I'm going to connect it to that, so I'm gon na comb it hold it up and connect it to that length. That was in my fringe and as I work around I'm going to connect it to the point that I have in the back. I'M gon na show you how you do that. I just want you to be able to see it on your end. What I'm doing here so when you have this PI section here so here was my radio section right here right. That was the original section. This was the first section that I've taken right. So it looks like that little pi section right there. These two points right here where the fringes and where this pi ends in the back have two points and what I've already cut. That'S what I'm joining. So when I start here I'm joining here and as I move around I'm moving around the head, I want to make sure that this length and this length is matching up in the back. So I'm gon na do that again in my next section. So in my next section I start from here from that same point, and I cut me a nice, another slice. The pie - and I remember this point up here - should connect to the fringe and the point in the back should connect to what I've cut in the back put her back down, and my elevation is 90 because this I'm cutting round. I want her to have as much volume as possible because my personal aesthetic is big hair and I've consulted with my client, and she agrees so now Here I am joining the back with the roundness that I'm cutting on the front. This is my last section on this half of my radio party and now I'm holding this hair fully up 90 degrees perpendicular from the head book holding that up coming around and connecting it to the back. So what you'll see is that lengths that you cut and the link that you cut from the beginning and you're gon na have this a little bit of length in the center there you're gon na cut that length off, so it all sings the same song. That'S how you're connecting them and there I've just created roundness on top of my horizontal graduation and now for the other side, I'm going to cut it the same way that I cut the other. I made three pi sections on the top, so here's my first one. Try to bend her head towards you, so you could see. So I start from that point right there and I make my first PI section and if you're working with textured clients - and they start to tangle, just use your fingers to separate the hair, no need to stop and comb through it. The nature of the hair is that it gets tangled because it's karlie kind of folds over on itself and your fingers are a great way to detangle. Using a comb can sometimes be time-consuming and a little challenging for you and your client using your fingers of the best name. So remember these two points, so this point has to connect to my fringe and at this point here has to connect to what I've cut in the back. So I'm going to start, I'm gon na elevate the front to make sure that it's connecting to my fringe. I'M going to come around holding up the same elevation, making sure that it's connecting in the back and in my just a note my hand position is it varies, and just I want to make sure that my wrists feel comfortable, however, makes my wrist feel comfortable. Is generally how I hold, but I want to make sure that my can what's consistent is my tension, because I want my haircut to be precise. I want to make sure that all the partings, my tension, all of those things, are consistent. All of those things is what aids in precision right so now again, I'm gon na hold up even more connect. This to my fringe, I see my guide. Look, my guide being what I cut previously. I'M gon na cut right to my guide. I'M gon na come around the head because now I'm creating roundness at the top and I'm gon na connect with them back here last section on the top right uh. If us Suzie, you're saying that you would love to see it done on a longer this same haircut, I do do on someone. I did it in a live February 19th on Facebook by this archive, and you can go back and watch it same haircut. Just on a longer longer head of hair, all right - here's my last section and then I'm gon na check for balance in the center here, make sure that both same thing happening on both sides. And here it is there. She is so created some horizontal graduation and then up here, surrounded so that she has volume. I did give her a little bit of graduation in her fringe just so she can maintain volume and then side profile. You see the graduation and then the roundness. That'S up here right so now I'm going to add a little bit of product. This is the beta's leave in neutral NH conditioner, it's one of my favorites. It has a natural heat protectant in it of san ginger, so just really nourishing and replenishing for your clients, especially for Curly's. So I'm pushing her back down. I use the B curly style prep as well, because it gives me a little slip to my product. Don'T know if you guys were able to see that put quite a bit of that in there. I usually don't like really heavy creams. I, like Joe leis or jellies foam, sets just to keep things light and also like. I don't want things to weigh down too much, because again I like volume all right, then for every curling woman a little bit of oil to finish so this is the nutria punish multi-use oil and I usually just crunch that into the hair to add shine. Usually I'll also add like a man, cyclic pomade, which is what a beta availeth operate as the men's, a good comment, but it's a jelly. It'S like a gel, that's really loose, there's that and now to try it. How I got my clients in salon with a hairstyle like this I'll, usually have them sit back and I over the I let have them rest their head on the back of the chair kind of like this. So there's a scoot all the way down. They rest their head on the back of the chair, and so I can get volume into all of this. I'M not going to dry it all the way. I think that will be kind of boring to watch dry. If you guys have any questions right now. This would be a great time now what products I use so in general for curly, I like to make sure that I'm losing things with light like oils and something that would seal it and something like an actual moisture. So I use the neutral finish: a business mint, replenish leave-in conditioner. I use the beta key curly style crap. That gives me a lot of slip and the multi-use oil every curly girl should be fitted with an oil. What'S connected to the hood dryer, what's connected to the dryer is a sock diffuser so that I can have high heat and high air. How long have I been doing hair so I have been doing hair since I was 9 years old, but in salon I've been doing hair for over 10 years. Thank you for joining me from the UK right. So this is a socket user again for the person who's asking this sock diffuser is made from a company called YS part. It'S Japanese! You can get it on Amazon, it's like $ 40. I trained with new Carozza in the city Soho and he trains this custom. So I have a very soon kind of upbringing with it. What I said in the beginning of this is that this haircut was taught to me by one of my mentors Lena thank you for joining from Spain and from Arkansas a shout out y'all I tried here. I come here in the city in Soho. Ah, thank you Susie. I appreciate you all right, so he or she is let's see if I can turn the camera around just trying to get it. So the light isn't as overexposed. So you guys can see watching from Northern Ireland whoa hello. I live in that hand in the city and I work in Soho. Here we go, and here she is everybody, so she's got a lot of roundness on top looks very round towards her face. But here is that horizontal graduation that's happening here, which i think is just a more modern take on the graduation and then what I usually do is. I would go through and just see any places where I want to adjust when it's dry, and I do that. There you have them there, you go so what we did was horizontal graduation in the back, and then we put a little horizontal graduation in our bank too, which is nice because then it helps the client have a little something to keep up to have body in Her fringe and it doesn't all feel like it's falling flat. That'S what gives that whole appearance of roundness in the front too, just to give her a little something up here. Thank you guys for joining me. I appreciate you so much someone asked if I always blow-dry this style. Um, usually it depends. Sometimes I don't blow dry. Sometimes I put in a set like a two strand twist or a flat twist, and I put my client under the hood higher and then I release it then, and some clients just like a washing go. So they just like a little bit of product and they like to go, but that also depends on the weather. I live in New York, and so sometimes people just want to be a hundred percent dry, in which case in salon, if I am going to diffuse or if I am going to set under a hood dryer for any kind of release, I want to make sure That my client is a hundred percent dry. Thank you so much everybody for joining me. I'M going to sign off I work with the Veda. I have a lot of education up on a Veda. If you want to check me out and then my Instagram, if you want to check me out there and you want to continue to be learning there, it is Renee SRH. So again my Instagram is at Renee s are H, so let's continue the learning there. Thanks for joining me, bye
Comments
sandi Labine: I loved this cut. It's so nice to see someone who understands curly!
rick barrientos: Great class its good to learn from someone who understands curls and knows how to approach the work. Learned a great deal today
Alyssa Lala: Learned a lot about elevation and tension thank u xoxo ! Cutting my hair at home !
Roxanne Tomlin: This is a Paul Micheal hair cut , I learned it 30 years ago. We were taught to cut the elevation in a vertical over directing all sections to the center of the back of the head. Nice hair cut thank you .
Lorien Vidal: Girl, you are so knowledgeable about curly hair. WHERE do I find you?? You mentioned Facebook but your name isn't on this video I'm dying to do this on myself but not sure I can do the back in my mirror. PS - you had me at "Nick Arrojo" (longtime fan from WNTW fame) You rock
Sonia Forni: For the First time I could understantd The graduation. You are an amazing teacher. Congratulation!!! God bless you
BooknerdJebbi: Is it possible to do this with long side-swept bangs instead of short center on the face bangs?
BooknerdJebbi: finally curly hair on the head yess
coils International: Hello, does she have a channel?
Craig Niessink: sings the same song! like that:)