How To: Dutch Braids With Clip In Extensions
- Posted on 01 July, 2016
- Braids Hairstyles
- By Anonymous
We had so many requests for this hairstyle so I've recreated it for you! Don't forget to comment, like & subscribe! :) Lots of love, Lara x
Product list:
Foxy Locks 24" Luxurious Seamless Clip in Extensions in Latte Blonde (toned using purple shampoo) ~ http://www.foxylocks.com
Ultimate Detangler Brush ~ http://FoxyLocks.com
Lashes ~ Foxy Locks in style 'Perfect'- http://FoxyLocks.com
Get Social with us ♥
Lara;
IG ~ http://instagram.com/larafoxylocks
SC ~ @LaraPara1
Foxy Locks;
IG ~ ~ http://instagram.com/foxylocks.co.uk
FB ~ http://www.facebook.com/FoxyLocksExte...
TW ~ http://twitter.com/FoxyLocks
Imogen;
IG ~ http://instagram.com/imogenfoxylocks
FB ~ https://www.facebook.com/ImogenFoxyLoc...
TW ~ http://twitter.com/ImogenFoxyLocks
SC ~ @ImogenFoxy
We are here to show you Hair & Beauty tutorials!
We love using Clip In Hair extensions for our hair tutorials as they add volume & length - of course we only use Foxy Locks extensions, but you can recreate our tutorials with or without hair extensions.
We love doing new looks, so please subscribe - it's free! :D
Subscribe here ~ http://bit.ly/TxRVE1
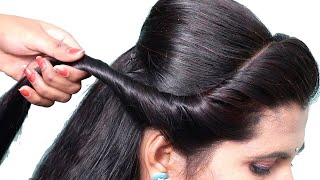
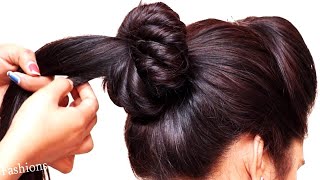
Hi everyone welcome back to the channel today, I'm going to show you how to create these gorgeous Dutch braids using your clip and extensions. This is a question that I get asked quite often, so I thought I would share this with you today and let you into a few secrets of how to create this. Look. As always, you want your hair to be tangle free, so you can do this by using your foxy locks brush and I've already styled my hair into a middle parting, ready for the braids to get really clean lines. I like to use a pintail comb, so if you start at the top of your head, where your middle parting finishes and slowly go down the back of your head right down to the nape of your neck and separate the two sections, one of the most important Parts of this tutorial is the hair oil. Now you need this to make the braid nice and sleek and keep all those flyaway hairs at bay and at the same time, it's really really good for your hair, so I'm actually treating my hair while I'm wearing the spray. That'S an added bonus now, don't be afraid to use quite a bit of product. You will find that this will help you do the braze. It will look really sleek and plus. It smells amazing once you're happy, you have enough hair oil in you can separate this section and clip it out of the way. Then we're going to come back to our pin tail comb and we're going to start making a section where your clip and extensions will go. As you can see, I've started halfway up that side section and I'm basically making it a nice neat line in a diagonal way down to the nape of my neck. So some of you may have noticed that my hair is a little bit more whiter and a shear this time around and that's because I have toned it with purple. Shampoo I've also toned my latte extensions with the shampoo and you'll see them, and it's quite a lot, a sheer and slightly purple. So normally we would clip in our extensions against your head like this, but this time we're going to do it upside down, because the hair will actually be coming from the bottom and pulling upwards into your braid. This is the 3 clip weft that I'm using here now. This will feel a little bit strange as opposed to the way you normally clip in your extensions, but you do need to do this because, obviously, as you pull up the hair into the braid, you don't want that clip pulling against your hair. This way it will lie flat to the way your hair is going to go and now we're going to make another section at the top of the hair. This is going to be for the two clip weft. You want to make sure that you don't put the clip in too close to the front of the hair or too close to the back, where the parting is. As the clips will show, this one is going to lay flat to your hair, like you would put in a normal extension once they are nice and secure. You can let down the rest of your hair and start to work on the other side, perfect. Okay! So now we have both our sections in and my hair is nice and long ready for the braids. I'M just going to clip the first section out of the way, so it doesn't interfere with the braids okay. So now we're ready to start the first braid and what you want to do is take a small section at the front of your hair and split that into three sections. And what you're going to do is take the first section underneath and pull that nice and tight and then take the front section underneath again now. The key to this is to keep going under I'm sure if you've learned how to do French braid you'll be able to do this quite simple, but you have to remember to take the sections underneath. You also need to make sure that you keep a really tight tension on this, as otherwise the sections will start to fall out, and it won't look as sleek as you would like it to look another point to make. Is that your top hand stays nice and high? This is going to be the direction that your braid will go in, so the higher your hand, the higher your braid will lie against your head, so keep pulling it nice and tightly, and you will get the hang of this of where to put your fingers and Which ones are grabbing which sections, but it does take a bit of practice and you will get our make, but you will get through it and you'll. Look amazing at the end, so keep pulling these sections in from the front there and making sure it's nice and tight and add in sections as you go. And then you just want to work down the rest of the hair. And if you can remember where we put the clip in extensions you'll see that I am following that line, that diagonal line that we first made for the three clip. And this is just covering those clip and extensions where the main bulk of the braid is going to sit. You want to make sure that all the parts of the hair are in here, including the back where the parting is just make sure you get all the little bits in there and add it into your braid. So mine taught me how to do front braids when I was about 5 on my favorite Barbie doll, so I do have to say a massive thank you to her for teaching me how to do this and being able to create this tutorial for you today. So thanks nan now we are at the end of the braid and we're just going to tie that off with a clear hair elastic, and then we will start to move on to the other side. Moving on to the other side, you take another section at the front of your hair and slip this into three then you're going to take the outside section under the middle section and then take the other outside section again under the middle section, and as you remember, Just keep the tension and keep that direction going to the back of your head. I'M just going to work down this length of the hair, and then you should have something that looks like this now. As you can see, the hair oil makes your hair, nice and shiny, and it gives that really sleek effect and it does make it a lot easier to pull through the sections when it's nice and soft. So I want to make this last today, so I'm going to finish it off with a nice extra firm holding spray. This will just make sure all those tiny little flyaway hairs or if you've got any baby hairs at the front, are just going to stay put for the rest of the day and it will just make it feel a bit more secure. And once all that's done, you will have your finished look which is like this. So as you can see, the clip and extensions are not too visible, but I've added in so much more length to my natural hair. I really hope you've enjoyed this video. If you do like it, then please like below and comment a love reading your comments, I'll try to get back to all of you, and I will see you soon in my next video bye, bye,

Comments
Kimmy Torres: finally a tutorial of braids WITH extensions and how to place them, I've been struggling with that. please do more videos like this .!!!
Missy Chrissy: Thank you so much for showing the placement of the extensions! I've been struggling with that part the most <3 PS - you're gorgeous XOXO
Ali Mae Wilson: This is so different from the other ones I have watched! I can't wait to try and see how it works!
Katherine K: This is super helpful!! my natural hair is way too fine for this type of braid, but looks super cute with the clip ins!
jennyfer castiglione: I dreamt about these braids with my Foxy Locks Extensions.You did it. Thank you Lara :-) xx
Kimmy Torres: finally a tutorial of braids WITH extensions and how to place them, I've been struggling with that. please do more videos like this .!!!
rexyandfriends: Perfect! I always put the Extension First in the back of the Head and when the braids were finished the Clips were visible! But this technique is Great thank you!❤️
Pandora's Box: Can I just say that I love you gave a shoutout to your nan! Since you basically said it I don't have to tell you how lucky you are to have someone in your life to teach you stuff like that. My mom didn't even teach me how to do a ponytail! I just turned 30 and only now attempting to curl and braid my super fine, bone straight hair, because any small attempt was disastrous! And there wasn't the all mighty YouTube when I was in school to teach me. So I went through the comments and read through the products mentioned that you wrote out, but I didn't see the oil you used. I would love to know!
Alexandra Laye: Looks lovely ❤ Miss Lara I appreciate what you and Miss Imogene do
Clinae Alexandria: You look absolutely gorgeous!I love your hair and thank you for an amazing video :)
Taradai Sooklal: Can you do this eye makeup tutorial?? It's flawless
Amber Elizabeth: gorgeous, I am love with this
504 Girl flores: super awesome! Love this tutorial
rollerdog369: Such georgous braids so talented I luv this video SO so Awesome great job.
Karina Jensen: Great video Lara!! I've just ordered my first foxy locks clip ins., also in latte.. I would like to tone mine too.. Wich purple shampoo did you use? And how long did you leave it in? Thank you :) Love from Denmark
Kelly McCaffrey: This is amazing, I am so crap at French braids though, need loads more practice. Ladies, any chance of a general hair and skin care video and fave products? One of those every few months would be amazing, I can't keep up with all the new products on the market lol xx
Miss Odelia: WOW I love it, thanks alot!
bonnybute1: this is just incredible and stunning.. dammit I must work this out and get Braiding Girls x
M yeasmin: love both of your videos
Laila Aziz: Your new light blonde hair really suits you!
Shiri Davi: Amazing hair really like it and Love you so much ❤️
Olivia Zara: I can't wait to try this
Elizabeth Magical Garden: Great video☺️✨
Paulinha Kuhnert: Amazing!!!! I love it. PK
kesa1986: Looks amazing but I could never do it
resham shah: Amazing video :) You look stunning. Unfortunately Dutch braid doesn't suit me :(
Celinenia: so pretty
Sophie Schumacher: a really nice video it helped me much (sorry my english is not good because im swiss☺)
jennica griffith: hun,you are so gorgeously beautiful! but i do have a quick question: how much does the hair cost and can i buy it off of amazon?
Kirsten Gronemeyer: what length and brand hair extensions did you use?
Olivia Zara: You are Amazing!!!!
magda stachurka: what's on your lips girl, looks so pretty ❤❤❤
Tiff Saud:
Brigitte Balbinot: Which set are you using his many grams? The first 2 pieces you put in seem equal length but in my set these two pieces are of different length ..? Plz explain? Thx :)
Jhuma PAUL: lara, you look good, with it
rachefrank: Lara, what purple shampoo have you used? xxx
Lisa ten Holt: I understand the technique but how do you see the top of your hair where you need to take the strands? I can't see that for the life of me!
Julie Benitez: So the lower the extensions it has to be upside down ??
Nayelli a: what size of expansion you used ??
Fayeob1faye: A quick question for you if you don't mind!...so, is it ok to use purple shampoo on the hair extensions please? I'm about to purchase real hair extensions but my hair is the same colour as yours & I can't get a colour match so I'm thinking to purple shampoo! TIA
Jade Savwoir: I see that you switch your hair color alot could you please make a video about your color?
bunny petite: i miss imogen i love her videos
Katya Sofia: You don't even show where exactly you clipped the upside down weft. Did you clip it below that parting you made, or above?
Shiri Davi: Hello its me again i want buy your Extensions but i need help to find the right colour
Jocelyn Martinez: your hair looks better down
tammylovesmakeup: Where is the other girl? Or is this the same girl because her face looks different?
Anthony lopez: virgooo
Julia Hayton: Doesn't look sleek it just looks greecy
j4eon: My names imogen
Flexible Dreamer: Cornrows!
pipa: wtf is this?