Seun'S No Leave Out Crochet Method On Straight Hair: Full Sew In Tutorial
- Posted on 02 June, 2017
- Braids Hairstyles
- By Anonymous
Instagram: @seunokimi
https://www.instagram.com/seunokimi/
Full sew in weave, no closure. Great for natural hair! How to do a full sew in weave on yourself with no hair left out. Very details, slow, and beginner friendly, so this can be used for beginners. My no leave out method does not require the use of a closure or an other materials except for a crochet needle and the wefted hair you use for the rest of your sew in weave
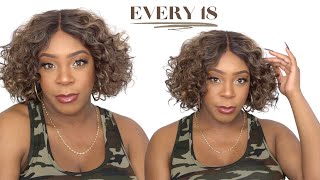
Start to finish no hair out. This method works great for people with natural hair because you do not have to worry about how to blend weave extensions with natural hair. This is a middle part sew in weave, but you can make this into a side part sew in weave. All you have to do is slightly alter the braiding pattern so that the two braids that you want to crochet onto are at wherever you want your part to be, This braiding pattern that I show in this how to video is the best braiding pattern for this type of sew in. It gives you a nice flat sew in as the end result. It gives you sort of an illusion part, however since I did not crochet along the sides, it does not give an invisible hairline. You can put this sew in weave into a high ponytail if you use some sort of headband or choose to leave out your edges. Otherwise, a low ponytail, is all you can do. This works well for me since I never really wear my hair in a ponytail, One of my favorite things about this method is that it requires no glue and the installation will not damage your hair. No more struggling with lace fronts or closures. This is an easy, simple tutorial for anyone, even beginners. This method can work with any style, inclufing a bob, curly hair, or staight hair like I have shown here.
Ali Express Rosa Queen Hair Products Co.
Coarse Yaki/ Kinky Straight Hair
18 20 20inches ( although shorter in this video because I cut it)
https://m.aliexpress.com/s/item/327969...
I did buy this hair with my own money.
Initial Review of this Hair
https://www.youtube.com/watch?v=eZrTVs...
Washing this Hair:
https://www.youtube.com/watch?v=5J5xmq...
Curling this Hair:
https://www.youtube.com/watch?v=4x9dVG...
Final Review :
https://www.youtube.com/watch?v=xJF_6k...
Hey guys, it's shown so in this tutorial I'll, be showing you how I got this here, which is a 7, is absolutely zero leave outlets and no closure either just using my MLG bop crochet method. So as you like, this video feel free to subscribe and I'll see you in the next clip okay. So the brain pattern is pretty simple, so you would part you're here in the middle and then you would braid two braids about this thickness, going straight back. As far back as you want your part to be, and then you're going to connect those two braids after you connect those two braids, you can just braid right here, straight acha, you've done like those two anchor braids that you're going to use for your crochet. It'S going to braid going down, you can make your braids, however big or small. You want. It doesn't really matter, so you braid one going all the way back and then the next brace your students facing them the next spring. I Bray like that and then you're back to your middle grades. Once I finish bringing that side, I came back over to the beginning on this side and I just braided this braid going all the way back like that and then so saw the braid going back. Like so, and then I'm not afraid going back like so it doesn't really matter how many breaks you do just do whatever works for you, the main thing that you need is for you to have two good-sized braids in the middle or wherever you want your part To be, and then you want to connect them and then everything else you just want to braid straight back, and you want to make sure that your braids along the side um go along the perimeter. You want to have a smooth perimeter just so on so yeah. This will be the best braid pattern to use for this yeah. So once you finish doing your braids, if your hair short you'll probably be good to go, but if your hair is a little bit longer like mine, what I do is I just tuck the braids in in between the cornrows, and this also helps it lay flat Too, because, like the surface is completely flat, rather than I'm just grabbing all of the parades and like braiding them into one and then like sticking up sticking them up like that, like I know, a lot of people do I just like to tuck it in of Using bobby pins and you're going to keep these bobby pins in while you're sewing, but after you're as you're sewing and as you sew down these braids, you can take the bobby pins now for the sewing part. So after you threaded your needle and tie off the bottom like that after you have your needle and thread good to go you're going to grab your hair and if it's rolled up like this unroll it for this end, so I'm going to double weft everything and That'S just to make this process go faster. It really doesn't matter to you single or double left and by double Westing on me like, instead of just sewing it on straight up like like that, I'm going to fold it halfway and then so everything on like that. So I'm going to start with this side before I start sewing, I'm just going to bobby, pin things in place just so it'll be easier for me. I don't have to worry about like do too many things at once, with trying to hold the left up and oh so, I'm just going to bobby pin so this first layer here is going to go around the perimeter, I'm going to grab the needle. So I'm just going to go under just because going through the left can weaken it over time and cause more shedding and under the braid like that, and I'm not just going to pull it through, pull it through. That'S not going to do anything. So what I'm going to do is I'm going to open up the thread like a clinic set and then loop, the needle through like that and then I'm going to do that again put the needle up through and then I'm going to loop. It again, but I'm not going to open it since there's already a loop created, so I'm just going to loop. It like that and pull it through, and then I just continue sewing and then once that the red runs out, I just cut it off, tie it like two or three times just to make sure it's extra secure and then I cut off the thread. And ideally, you want the thread to last too much longer. That was just for demonstration purposes when I just continue doing the same exact process, and it's important that for like at least this perimeter track that you are sewing under the braid, so that whenever the wind blows and you won't be able to feed the braid underneath So then, as I am approaching the back where I have those tests in braids, I am sewing onto multiple grades at once. Just so, those tucked in braids can stay in place and, as I am sewing them in place, I take out the bobby pins that were once holding them and then I just continue the same exact process as I go through and then once I reached the end Of the perimeter I just fold the left over instead of cutting it because cutting it can lead to shedding and it makes it harder to reuse and then so here I've already reached the end of a weft, and I started a new one. So double Westing makes this process go by a lot faster because, as you just saw one or like one bundle up here just like I finished it really quickly. So then, in order to continue to fill in the back, instead of going all the way up like we did for the first like row for the perimeter you're just going to go up like maybe halfway and then fold it over just to fill in that back Area so you're not going up all the way on each side, you're just going up, however much you want to and then folding it over to fill in the back and then eventually you'll just get higher and higher. So this is, after I finished two bundles and I'm currently on the third bundle, just doing the same exact thing and you're just going to continue this process until you reach the top and you're not going to sew on to those two braids that you building Street Fast because those are the breaks that you are going to use to crochet so once you have finished sewing on the left, you just cut it off and make sure to tie off the ends and that's how it looks so once you're done sewing, you will start The crocheting, the without proportion, so I went ahead and did the crochet onto one of the braids. So I'm just going to show you how I did that by crocheting onto this braid now. So what you're going to do is you're going to get your WestEd here, and you can see that I've already cut off of this WestEd here. But that's all you're going to do is cut off from being selected here, and this is the here that you will use to crochet. So once you've cut off the piece that you will use for your sewing um. This is kind of big I'm going to make it a bit smaller. I think size aside, like this. It'S pretty good! What you're going to do is you're going to grab your crochet needle because you're going to need a crochet needle for this and then, instead of going putting the crochet needles down from this way, you want to make sure that you're going up from under the braid, Because that's where the knot will sit, because with this method, you're like covering up the knot, so you don't want to make the knot come up from the top the same thing with this side, you don't want to put the crochet needle from this way. You want to put the crushing and push a needle up from underneath this way, so I'm going into how I do it, I just get the crochet needle and then I go up this way and then I get to here and then so, if you're used to Normal crochet, let me just take this out real quick, so I can tell you about this real quick. If you have crocheted you're here in the past, you know that the here comes bent like half way or you bend it yourself and you crochet it half way. But you don't want to do that whenever you're doing this method, because then you'll be your hair will only be half as long and then you'll have like a whole layer of here. That'S just a really short. So we're doing this method - you're technically you're, bending it from like the very top. So you don't lose all of that length. So whenever you're doing the hair and you put the needle up through and then you attach it from the top like that and then you pull it through so then you have this little loop here and then you're going to put your fingers through that loop and Then you're going to grab onto the shorter piece up here and put that through though you don't want to put this longer piece through the loop, because that's the piece that you want to fall over the knot, then you're just going to pull like that and there You have your knot this here, as you can tell it doesn't slip, but if you are using silkier hair, be weird that you probably will have problems with slipping which can be annoying, but with coarser hair like this, it pretty much doesn't really slip at all. I mean you every once in a while. It will flip and you'll just have to redo it. But just take note of that that if you are using soapier here, you will probably have problems with flipping yeah. It might pick up a little bit first, but just leave it and it'll come down and go into place like that. So then you're just going to continue doing the same thing over and over again, as you can tell, I didn't start from the very beginning. So I'm just going to go back and fill in that spot, I'm beginning to do the same thing using my crochet needles to go up from under, and you don't want to put the crochet needle up as diagonally as I did because, as I later realized that Just makes the not harder to cover up grabbing a piece up here from the top and then putting it in that loop, closing the latch and pulling it through. I'M grabbing that loose and say my fingers. Do it and then signing that smaller piece is a note that they're finding that smaller piece and then swing it through then you're just going to continue going through and to the back, though I've already cut off a bunch of here. So I'm just going to continue to grab from this here. You can cut it as you go just so you don't accidentally cut off too much here, but I already have this here: cut off that I'll just be taking pieces about this size to use. Okay, I'm just going to continue the loopings are here through pulling it that'll, be careful that you don't like move. It gets easy to lose um your loops and stuff and then grabbing the smaller piece, not the longer piece pulling it to tie and then letting longer till it's all over, and this here is definitely a lot easier to work with. Then the curly hair that I tried that I liked that I first used this method on this, because this here is so course. It doesn't really flip that much. It does slip a little bit. Whenever I was doing this side, it did have problems with slipping every once in a while, but for the most part it stays pretty much in place the whole time and I'm able to use pretty big chunks. So this process goes by super fast and I, like it better that you're using the same here to crochet as you used for the rest of your sewing, because I mean you could I know people don't like to waste here by cutting it off, especially since version Here can be expensive, but I do think it's better to just use the thing here so that you're completely assured that it will match. I mean it designs likes embedded here or cheaper here, Masha's here that you use for your schooling, pretty well go for it, but for me it's just easier to use the thing here that I've already used for the rest of my sewing. But you can, you can do whatever you want. Really let this here that I'm using is from is the kinky straight here some rows of clean hair products, and yes, it does work without slipping too much. I don't even remember the last time I had leave out. I haven't had worn a Solon with sleeve out in such a long time. I have been doing like other protective styling like braids too, but yeah. All of my hair has been pretty much tucked away completely for was on time, which has been really nice, and I also don't have to buy a closure. So that's also really nice, I'm still trying to learn how to use a closure. Once I learned trying to the closure - and I mastered it - I will make a tutorial on back, but for now this is like my go-to method and for this entire install I use only this much here. There left over once you're finished, feel free to go back and fill in any spaces that you may have missed. I just go back and straighten it just because I felt like it looked a little bit too poufy. Let me know if you found this video helpful and if it was helpful, feel free to subscribe. As always thank you for watching see you guys in the next video since I'm black, my hair just doesn't grow as fast, not true at all.
Comments
tinker2217: I'm a professional stylist and have never thought of doing this technique. I think you did a wonderful job. Great innovation
VictoriaLake: sis im literally about to cry..ive wanted to try soo many different types of weaves but my leave out would never work(even flat ironing it) the heat would cause heat damage...i have super 4c and mine doesnt just blend with curls. this method is dope... i wish i could pay you! great work *subscribing*
MisterTracks: I enjoyed the video! Keep it up!
Clarede Lune: I like how you’re just out here casually doing the Lord’s work!
Rhonda Major: You really are talented at this! I appreciate you. I only wear Kinky Straight because everyone...even hair stylists think it's my hair. I really don't like to wear closures or anything because I did the big chop and I am really taking care of my natural hair. This is perfect to try. Thank you so much!
Misty Blue: I did this method today with my daughter step by step and it turned out great..she loves It..she's 18 away at college and doesn't have time to deal with her leave out ..it looks so natural and she doesn't have to worry about leave out anymore..we will be trying the wavy hair next..thank you so so much!!!!!!! ❤️❤️
myrtle thomas: Girl I've been doing hair for 22 years and I do my visible part that nobody can really tell but it's done differently than yours but your way is easier and you are genius
AmericanCheeselouise: Thank you for inspiring me to do my own sew in. I tried it over the weekend and the end result was a mess. Tracks showing everywhere and I couldn't get the crocheted hair to stay in. I redid the sew in and tried again with the crochet method, having more patience this time and double knotting, and it turned out great!!!!!! So glad I don't have to go to the stylist for sew ins anymore. Thanks again!
Bushy Bashy: This is a GREAT video!!!! That's honestly a wonderful technique! I think you have perfected the invisible part!!! The hair and overall look is fabulous!!! One day im gonna try it
Theorosa Baker: You deserve so much more recognition than you get. I never knew this method! Thank you so much. How many of the weaves did you buy
Anne Wachiuri: Three years later!!!. Thank you Seun. Tried this today and it turned out great
gloria walker: I just want to say Thank You . I have been looking for years to find something like this . See I have thin hair at my crown and I can not do closures at all . I see your video and you have Mastered it it looks so real no lumps very smooth very realistic front part your video miss the Best By Far of all the ones I have seen Thank You My Sister for this Blessing that you have shared .
musiclover: FYI thank you for this video!!❤️ You can reuse the hair that was cut off the track and used as crochet again When taking this down: Take each piece out and set aside straight , gather the lose hair once done ,tie off in a ponytail 4 inches from the top of the cut pieces with an ouch less no metal hair ponytail tie Next you can wash you’re weave hair in the ponytail ,let air dry and reuse!
Doreena Rinaldi: Thank you for being so clear and concise in this demonstration you are the best I love watching your videos. God bless
Tink hix: It literally looks like your own hair. Lol. U did a great job and gave some great tips. Thank you and love your channel
Darlene Blake-Murillo: You are truly using your talents to help others! You have changed my life as I always wanted an alternate method to leave out because closure just never seemed to be something I felt looked natural enough. Your tutorials have empowered me to try to do my own weave and save lots of money and travel time. Your growing your own hair long tips were also tremendously helpful. Yes I have subscribed because your are making the world a better place. Keep up the great work Shell your are doing great things ;)
Tiffany Matthews: Thank you. This was VERY helpful. I can't wait to try it.
Shawn Plus One: I absolutely love your videos the tutorials have taught me so much. Thanks for sharing.
L Lindsey: Innovative I needed this thanks
MrsLina 313: Very detailed... I love how you showed each step and took your time to explain unlike others. Thank you so much. I tried mines today but it didn't come out as good as yours but practice makes perfect. Thanks. Many blessings to you
obyifyusa: Love your videos, so detailed. Am in the early stages of transitioning to natural and didn't know what to do with my hair but now I got ideas. So thank you and ur hair is so beautiful ❤
Frances Ukah: You are actually a God sent genius! I'm sure you've saved time and money(from not needing to buy a closure) for alot of people with this innovative fix. Just subscribed!!
Kamili Mitchell: Thank you for simplifying this method. This made it really easy to follow
Niesha Holland: I have been searching for a method like this. You are an ! Thank you so much.
M Michaud: I've done this to my hair and boy I tell you, I fooled so many people!!!
Rosa Bell: Excellent tutorial. Thanks for sharing your technique. Very nice hair.
Empress: this is beautiful work, you nailed it!!
Efia B.: Omg omg omg!!! I’m gonna rewatch this a million times!!! So talented!!❤️❤️
Carol C: Very helpful.you are a pro! Thank you!
Max MooreT: amazing! I have often wondered about trying something like this but never have, Now I know it actually works.!! I am always in support of experimenting with techniques on how to do hair.. Excellent job darling!
Tesh Mocha: This video is literally a live saver, you are extremely talented girl....thank you so much for sharing Btw new subie....uve inspired me to continue doing my own hair without fear, thanx a lot
Chelsea Uju: Best technique ever. Thank you so much
K Orellana: This was absolutely amazing will be doing this wow loved loved loved this ty so much
Preshy Maria Amaka: The hair is beautiful Seun. I have a question though, how long do you carry your sew in for maximum hair growth?
Louise Pearce: Im glad you show this method young lady I can't wait to try this thanks
Kuiona Graham: I'm so glad to see a different alternative with a sew-in. I never thought about that. Thank you for sharing.
Dabby Ogar: great job girly. I've always thought of this but haven't tried it. great job!!!
Pamela Mlobane: wow i love this method.. i will also try it on myself sometime. Really smart and looks natural at the end.
Diana Osei-Bonsu: lovely hair, keep the good job up, wish I can do this too.
Natoue Styles: Inspiring tutorial
KaShanda Johnson: i know i'm very late to this video, but FANTASTIC JOB!!! This is so simple and neat!! Question? Can you pull this up into a ponytail or bun? I've seen some sew ins and you have no choice but to keep it down. Stay blessed!!! New Subbie By the way!! Happy Holidays!!
kassjazzy: Great technique, looks really natural!
Mar C.: This is genius and looks great
Marguila Saintelus: I am going to try on my daughter’s hair, great job
Makunda Lewis: I never thought of doing it that way but it works perfectly just as any other better way
A B: Your hair is always so beautiful!
Sharona: You are amazing! Looks so great. How long will the whole sew in stay until you need to re-do it?
Angel Edikeh: This video really helped me a lot. Thanks
Marisa Rivers: When you fold the hair to crochet it in can you stretch it out and fold in half and do the invisible method?You did such a good job. It came out super cute.I love it
foeva Ro: You are a blessing . Thank you so much!!!
ThisMomLovesToSave: Hi I haven’t had a sew in since 2018 I followed your video to a t your braid pattern was great.The crochet part was a fail only because my kinky straight was to straight. So I ended having to do a full sew in thank you so much.
passion: Thanks a million. Very creative
Addesha James: This is amazing !!
Shannon Sharie: This was awesome thank you
LaDonna Sims: I love your videos. You're very sweet, patient, beautiful ❤️❤️❤️ blessings to you ❤️❤️
Terrill: Awesome video, looks great!
Marcela Morales: Hi Amazing job Seun. I have a question. How long do you keep your weave in?
Sunjiaa Mai: My hair just arrived, then within an hour I received a call from the vendor. You have encouraged me to try something new with this excellent tutorial.
Brianna Garrett: You can always get a braiding. Hair that has the same pattern. And texture and crochet that on instead so then you do not have to worry about slip also where the tracks are on the top where your starting the crochet method you can put the crochet needle in from the top of the track and pull hair through so that it can cover up those outer tracks
Jen Owens: Thanks for sharing! How many bundles total did you use for your whole head? I'm going to try that crochet method to cover up also! I struggle with closures too! Smh
Chioma I: I love this!!! I love your videos
HairObsess Club: it actually looks like your real relaxed hair. I enjoyed this video. thanks for sharing.
Trissana Watson-Lyons: Am I the only one going through all her videos? I am going to try and do my own hair using this method
Adonica Smith: Im trying to find a stylist that can do this for ne i dont put heat in my hair anymore so for 2 years i havent had a sew in (i dont like closures) this method is great i saw another method with using crochet needle to pull hair from other weft to cover part weft this seems more simple
Pretty Girl_me: I loved it
Lulu Carter: I tried this method and it worked perfectly . Thank you
L'eau est: Love this method! Is there a way to do it on a side part?
Julie Murdock: BEAUTIFUL thanks Lady.
Thirstytraveler41: That's a great tutorial. You are talented.
Eternal Happiness: Thank you for the Tutorial
Rachel G: You are a God sent! Thank you for sharing this. I’m taking engagement photos next month and hoped on YouTube for inspiration. Do you feel this method looks more natural with a middle or side part?
Rebecca Bridges: wonderful artist and thanks for detailed video
Marla k: excellent. now i can use up this human hair i have. thank you very much
strictlycam: Just subscribed. I love your channel!
redd220706: Love it! Can you do a side swoop?
Katherina A: Wow this is great thanks
Eve30: U rock girl great work
Liz C.: Omg....why stylist aren’t doing this??? This is why I haven’t had a sewin since I went natural. I don’t want no hair out or no clothes!!! Your hair came out great!
Ms Love: Fantastic!
Sandra Santos: Oi muito bem colocado
Colby Roman: Great job! I've been doing this on my guinea pigs for years. Lol! It really does look natural and if done correctly, no one can tell it's not hair growing from your head. I was hoping those lace parts would be a thing of the past because I see sooooooooo many awful ones. But I haven't been so lucky. Boo Hoo.
InHisimage: Using bobby pins is a brilliant idea!
Naturally High: This is ingenious!
YolanKy: Love this hair but it's no longer available on the site...... Love this technique.
Breed 510: Thank you,thank you,thank you. For saying the hair you use. So many times people show a style and never mention the hair. Also thank you for this technique I despise leaving my hair out.
doris dela: great! how long did that take you?
A M: Thanks boo
Rachelle StSurin: Great video! For silkier hair should I use smaller pieces?
HanBunzzz D: Hair saver !!!
ania Herhandez: Gracias especial video
Faith S: This is honestly impossible for me, like I've been trying to do one piece for hours omg
Westie Katie: A genius❤️
Kadiatou Diallo: Can I use clip ins instead of sew ins
K L: Do you have to cut the hair out or can you reuse it somehow? for the people that like new sew ins every couple of weeks.,
Floxy Ngozi: wow.....this is beautiful
Kay Kay: Girl love you for this
KandyKane: Great looks good!
Kei B: What beauty supply hair do you suggest for this ?
melanie barnes: Hi Seun what kind of hair is this and where did you buy ? thank you good stuff
christianamanda: can you do a video where you explain a multiple part sew in using this method?