How To: Stitch Braid On An Affordable Wig!! Ft. China Lace Wig
- Posted on 04 February, 2018
- Braids Hairstyles
- By Anonymous
Hello ladies and gents!! I’m super excited about this tutorial. After watching @Beautycanbraid and Chrissybales Stitch Braiding Tutorials I became so inspired to try this look on a wig. I wasn’t sure if I could do it. But, I was so excited to see that the stitch braids worked on the 360 lace wig I received from China Lace Wigs. This method is super easy and it doesn’t cause stress on your natural hair And the cool thing about the 360 Lace wig I used is that it is affordable!!Hope that you all enjoy this
website link :https://www.chinalacewig.com/
Product link: https://www.chinalacewig.com/Brazilian...
Hair deets:
Wig Type 360 Lace Frontal Wig Brazilian Virgin Hair
Wig Cap 4inch lace in the front, 2 inch lace around the wig
Style Deep Wave
Image Hair Color Natural Black
Image Hair Length 22 inch
Hair Density 200% density
Hairline Pre-plucked
Lace Color Medium Brown
Baby Hair Included on the Perimeter
Facebook: https://www.facebook.com/chinalacewig0...
instagram:https://www.instagram.com/chinalacewig...
Sweater dress deets:
http://bit.ly/2B5ZMhs (Direct link)
http://bit.ly/2kuIlUV (SheIn)
Let's Stay Connected!
Instagram: http://instagram.com/msnaturallymary
Facebook: https://www.facebook.com/mary.taylor.5...
Twitter:https://twitter.com/MaryTaylor7
Tumblr: Msnaturallymary
Pinterest:http://www.pinterest.com/marynatural/
____________________________________________________________________
➡️For business and partnership opportunities please contact [email protected]
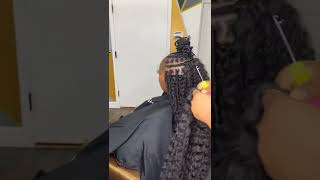
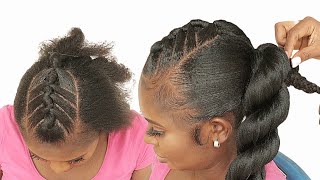
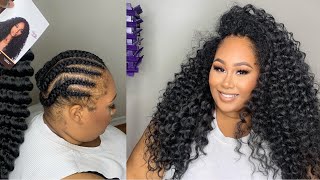
Hi guys welcome to my channel mr. natural Amir here and I'm gon na show you guys how to stitch braids thumbs up this video if you're excited go ahead and subscribe and let's get into some awesomeness. Let'S do this guy's. I'M super excited. Okay. So in case, you completely disregarded the title. This is a beginner friendly, stitch braid tutorial on a wig. Yes, this is a wig. I couldn't even believe it myself. I cannot believe how great it turned out, so I'm gon na be using a wig from China lace. Wigs this is a 360 lace, frontal, wig and guys I didn't even know what it was capable of until I tried this a look you're going to love it now before we move any further, let's get into the specs. So this is a pre plucked Brazilian virgin hair deep wave 360 unit. It does come with baby hair. As you can see, it does not come with the not bleached, but I am gon na show you guys how I went about that process. The length of this hair is in lent 22, so it's really long. The cap construction is clueless lace. It does come with three combs. Actually, four, I'm sorry. So there are three at the top and then there's one at the bottom, which is great for putting your hair up in a ponytail and there's an adjustable strap. I did not have to sew an elastic band or add additional combs. I thought I was gon na. Have to do that, but I did it, which is awesome. The density for this unit is 200, which makes for a very voluminous look. It also comes with four inches of lace in the front and two inches in the back, which creates a great deal of versatility in styling. So that's how I was able to achieve the look that I showed you guys in the beginning. So the first thing that I decided to do was bleach or not so I turned the unit over. I did spray some gossipy glue, free spray on the hair before turning it over, so that I can get the hair out of the way to ensure that none of the actual hair got dyed. Just the least. That'S all what, ladies! So, in a mixing bowl, I mixed b2 bleach powder along with 40 volume, developer and add, or permanent hair dye and color eggplant to take away the brassiness. So this is what the mixture looks like. You should make sure that your consistency is pretty thick, but not too thick. You should be able to turn the bowl over and it not go anywhere. So I'm gon na be using a plastic knife to begin my process and I'm just going to go really slow with this process. I'M gon na speed it up for you guys, but it's gon na be really slow application just make sure you're not pressing it into the lead. Just a quick tip, while we're here I'd, advise you to take the two combs that are on the top of the lace off they're not needed anyway, especially because we're gon na be doing the stocking cap method. I noticed that the area where the combs were weren't actually bleached so take those off. I left the bleach on for 30 minutes after I washed it with purple shimmering light shampoo, I'm showing you guys currently that I did take off those columns, but do it before you actually believe I made that mistake. So here are the two combs you can just put those aside and use them for something else. We won't need them, so I did start with a canvas block head in order to achieve the stitch brightening. Look it's best to do it on a canvas head. If you're doing yourself, if someone else is doing it on your head, it might be easier, but for me I felt it was better doing it on a canvas block head and it is the same measurements of my head. So you can purchase a canvas block head on Amazon. I believe that's why I got mine from and I just measured my head and made sure I got one that matched my the circumference of my head. So this is what the hairline is looking like. It looks so natural the knots look perfect, so we're gon na begin styling for this particular style. Most will be your best friend, but you can also achieve the look with jail, but I decided to go for a mousse, so I'm just going to spread some of the mousse all over the hair. Just to show you guys what the hair is looking like. Prior to actually styling and then I'm gon na show you how to stitch braids. So let's do it pretty cool right, and the best thing is that this unit is affordable, so check the description box for the link, it's pretty official yeah. So, let's get into the stitch bridging so the first thing that you want to do is begin parting, the hair, so that you can make a skinny braid in the middle of the unit. So I'm gon na just part it off and then proceed to do. My skinny buddy and I am going to apply some of the mousse, so there I have a bit of traction when I'm actually braiding after I've completed my first braid, I'm gon na add an elastic band to the end of where the hair is braided. I'M add an elastic band instead of a rubber band, because that is less damaging after you want to begin parting out your larger sections, that's gon na be beside it. That'S what we're gon na do the stitch braid I added mousse. I use a crocodile clip to get it out of the way. Add it more mousse around the area where I'm gon na begin to braid, just so that it's better for braiding and also the hair around it it's out of the way. So I'm just gon na braid really quickly and I'm gon na show you guys the finished result of what the skinny braid should look like, so that we can begin the stitch braiding for the larger sections. So I currently have six skinny braids that I created and I left five sections for my stitch: braids. Okay, so now it's time for the fun part, we're gon na begin stitch prating. So I am gon na be putting some more moose on the hair. I'M gon na part a small section off in the front and then I'm gon na begin adding elastic bands to small sections so that I have the parting, the defined parting that you guys notice in stitch braiding and then I'm gon na proceed to braid. So the first small section that you make you're gon na leave out the next section is the one that you're going to begin add an elastic band to so you want to make sure that your parts are super clean. This is really gon na make for a defined look, so I'm gon na add an elastic band after adding my moose and I'll continue this process until I get to the back, where I want the braid to end okay guys. So we've now completed the first section in preparation for our stitch. Braids. I'M gon na continue this process on all the other sections and then I'm gon na show you guys what it looks like. So this is what your hair should look like on your wig. So far I actually completed this process one day and then the next day completed the rest on my hair to begin the installation process, and I just use crocodile clips to keep the sections tamed and the hair out of the way. So, what's the next day and I'm looking like a Baldy, I was really feeling this look. I'Ve shown how I actually applied my stocking cap in another video. I will link that in the cards, but we're gon na move on to actually putting the wig on our head. It'S looking so good. I cannot wait to see how it turned out when you're doing your stocking cap. I will suggest that you make sure it's meet. My wasn't as neat as it should have been, so that did cause some problems, but I'm gon na show you how to fix it. So I'm just taking the unit off of the canvas blockhead and I'm gon na begin cutting off the least now I'll cut off the lace in the back. First, I waited until I applied the unit to my hair to actually cut the lease off in the front. So I'm just cutting the lace off and then I'll begin putting it on my head. So now that I've cut off all the lace in the back, I'm gon na begin cutting the lace in the front. So I put it on my head and I'm cutting as close as possible to the hairline and, as you can see, you can kind of see the close-up of how interesting my stocking cap looks. So I'm just gon na pull it forward. So you can see what it's looking like without any baby here or anything. The unit looks so amazing. I love how it turned out and guys disregard that powder. That'S on my nose. I did not realize it. Someone should have told me: okay, there's no one here to tell me, but I didn't realize there was powder on my nose, so just disregard that I do get it later in the video. So don't talk about me. Alright, so they're gon na keep going okay. So the next step is applying your adhesive. You can use gel, you can use actual glue, but I decide to use gossipy glue, which is a jail, so I use yellow on one side and then I use the black bottle on another side, because I really wanted to see if there was a difference. I noticed that the yellow bottle actually left some white residue and the black dried, clear, so yellow dries clear as well, but there is, if you put your fingers on it, it can kind of because of the oil show me your finger. I can kind of create some white residue, so I think the black might just be the better option, but things like the yellow dries faster, so there are pros to both but yeah the white residue. I didn't notice that when I use the yellow, so I used my blow-dryer and I put it on the cool setting and I'll out for it to just dry for maybe about 5-10 minutes, and then I pulled it forward and over the jail that was applied. Now. What I notice is that some areas still need it more jail, so feel free to just go back in at more deal. I cut off the extra hair near my ear, just so that it fit comfortably and I began to cut the extra lace that was there and I'm just gon na use the back of my wrap so cone to lay it down. So I begin manipulating my baby hair and guys it's gon na be interesting, trying to braid and use baby hair, but I really wanted some baby hair. So if you don't desire baby here - and you also didn't jack up your own stocking have like I did, you will have to worry so at this point. We'Re now braiding the hair, so you're, just gon na take the front of the hair start, beginning your braid and then adding the hair, that's in the rubber bands or I'm sorry, they laughed at us because we didn't use metal bands in this tutorial. So now I'm just fixing up my baby here and then I'm gon na continue on to the next section. Okay, so I decided I could not stand the look of that white residue anymore, so I decided to use alcohol to clean up the area. Then I decided to use my Anastasia, Beverly Hills, contour palette, to conceal the areas where the white residue still may be peeking through. So I decided to use a lighter color first and then I realized that wasn't necessarily doing the trick, and then I decided to use a darker color, and that did it. So I was so excited okay, so I'm gon na continue braiding and let you guys watch so this is a finished product. It turned out so well guys. This is my first time trying this. I watched a tutorial by Crissy, bales and another one by beauty. Can braid, I believe that is, and I was like - I have to figure out how to do this on a wig Beauty. Can brain did it on someone's actual hair and crazy bails? Did it on a lace, frontal and created a wig, and I saw this wig as one that I was gon na actually attempted on. I didn't know if it'll work or not, but it worked this China lace. Wig is awesome so right now, I'm showing you how long the hair is and then I'm gon na proceed to show you awesome styles. Oh one more thing, I wanted to show you guys what you can do with you over Bleach the knots in an area. So I have color to go. I found this at my local beauty supply store. You can just use that and there's slightly stroke it onto the baby, hair and voila. You won't be able to tell that you over bleached any areas so yeah. This is for those who are wondering how secure the unit yeah it's not gon na wear for those who are wondering what I'm wearing. I am wearing this really cute and comfortable sweater dress from chien, it's so adorable, and I love that it's a really good length. Please be sure to check the description box for all the details with this hair and my dress turn on your notifications. Subscribe, give this video a thumbs up, smash it guys we're trying to get to 100k. I will see you guys in my next video love. You guys bye

Comments
Tamarra Christmas-Stradford: It’s crazy how natural this looks! And your makeup is flawless
Paris Dixon: Mary! You did that girl!!! Love, love, luv the wig outcome and video...you outdid yourself!!! Thank you!!!
Nathalia Simone: I LOVE THIS ONEEEEE : ) !! I ABSOLUTELY LOVE this wig on you : ) !!
Bonnie Taylor-Williams: Awesome, truly beautiful!
Ona Lee Jones-NY: And this is why I love your videos. I've seen you grown so much from your earliest to now your latest. You just keep up with the times and spring past as well. You learn, recreate and educate. And I thank you for this
BeautybyMattie: Nice job Mary!! I love it.❤️
Tanaia Armstrong: This video should definitely have more likes. You did an Outstanding job
Jordann☀Sunshine: WOW Mary! It's craaaazzy how natural this looks!
tresmum: Great tutorial!!
Sharron François: This is such a great video can tell how great of a teacher you were. Wonderful job. God bless
Jstubbs68: You can do anything with these wigs!!! You are a genius!!
Abi Sola: Mary this is stunning! xxx
Demetria Scott: Another amazing video. I love it❤❤❤
Nancy Purter: Thank you Mary!!! I really like and they are affordable
Cocoa AlmondJoy: Look!!! you are going to stop getting me to buy every single unit you do a review on Mary, lol This was awesome!!! Thanks
Sweet Harp: Mary you do such a excellent job on all your wigs how did you discover you had this talent. You make want all your wigs but I can't wear them because I have long sister locks on my head.
soylabelle: Love it
Ms. Michelle Agalte: Mary you're doing so good. I'm Gonna Try the stich braid and wear a low ponytail and see how that looks on me. I have such a big head though.
Lisa Rogers: Beautiful
Dear Brave: wow!I love both of you!<3
Tracy Hill: honeeey!! U did that! awesome...I get a soo excited when I get a notification for your videos..love it!!
WrappedInEducation: Beautiful as always, but the bleaching and extra work is not my thing! Wish I were good at it. I love your videos and you were gorgeous "bald," btw.
Cassandra Johnson: Gurlll, I absolutely love it
Julia Antwi: Love your videos
Silmara Santos: gente por favor se alguém pude me presentear com uma dessasvou amar meu mega estragou
SAMUEL Blackman: Amazing on u. ✨
necole miller: love it
Erin Rideout: Love you're eye shadow
Linda Joyner: GREAT JOB BEAUTIFUL
Michelle Davis: where did you get your elastic bands
Sheri F: This makeup look tho!
Brittany Woods: Wow!! What Wig? ♀️ looks beautiful
Alexsa Anderson: I love this mary
Nathalia Simone: Mary youre soo pretty; GOO GIRLL : ) !!
Mia: Hi which cap size did u choose please
Jess: This is a wig????!!!! okay, let me watch.
seuma tavares: Uauuuu Very good Job.Very natural..Amazing this wig with braids.I hope you understand me please.Mary after you put the pink cream on the wig you paint the parts that went to blonde?
Lorraine 'black swan chronicles' Gooden: Your own hair looks even better.
Anna Mae: You better stop playing, no- you better work, just go with yo bad self, you did that!
- 𝗦𝗮𝗺𝗼𝗿𝗲 𝗩𝗶𝗿𝗮𝗹 𝗧𝗿𝗲𝗻𝗱𝘀 -:
TEMI LONDON: Woooow
Elva Hair: Hi,i sent an email to you,friend,could you please check it??❤️❤️ Elva❤️❤️
Sin Espeut: Is this free part