Great Work! How To Customize A Nice Box Braid Wig? Ft. Luvme Hair
- Posted on 28 February, 2019
- Braids Hairstyles
- By Anonymous
Great work! How to customize a nice box braid wig?
Very talented & detailed video. Easy to do. Check out!
Hairstylist: Dopeaxxpana - Bre C. ♀️
It is using Luvme Hair 8inches full lace wig straight + 2bundles top quality braid hair(High retardant fiber) to braid this wig.❤️❤️
Kindly check the product link herehttps://bit.ly/2WuAwNw
Watch Customer Honest Social Reviews: http://bit.ly/2NT2KS0
Use this coupon code"SALE20" for more discounts.
Note: Buy full lace wig straight 8", get 2 bundles braid hair for free!
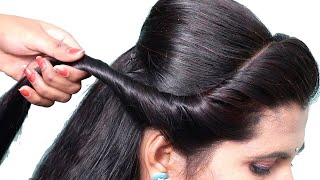
Welcome back to my channel, it should go though bath panna and today, I'm gon na share with you guys how I made my first ever braided wig, and this wig unit was sent to me by love me virgin hair. They sent me this wig and they also send me some braiding hair and I did use the black braiding hair that they sent me, but I didn't use this 27 just because I don't know, I just wanted it to be all black, oh yeah. I know this video is kind of long, but I tried to show you guys everything that I did step-by-step. So just you know bear with me so first I started out by bleaching the knots on the unit and I use this lift-up powder. Usually I use the PW and 30 volume, but I wanted to try something different. So I use this lip dub powder and I actually really really liked it so yeah, I'm just mixing the bleach in you just want to make sure you get like a cake. Batter consistency so that when you are applying the bleach to the wig unit, it's not seeping through the lace and I'm getting onto the actual strands of hair. So yeah you want to make sure that it's kind of thick as I'm applying it, I'm really applying it to the top area and I'm kind of just like patting it on there. I'M not really pushing down super hard because, like I said you don't want it to like slip through and this wig unit. I don't know if you guys can kind of see that area where the clips are was really thick, like you can't even basically see like. I don't mind explaining like there was no point in bleach in that part, because it was so thick that you wouldn't have even been able to tell that it was bleach. So I kind of only bleached the top half of this, and I also use like whatever leftover bleach I had, and I put it on the back section of the unit and so yeah that little area where the clips are, I don't know how to explain it. It'S like just imagine if there were like layers of lace where you can't like see through. So there was really no point in me bleaching that, but if it weren't like that, I would definitely try to bleach the whole unit. But I really mainly just focus on the top half, where I knew that the the wig would be parted. This unit actually took me a minute to make just because, like my schedule has been just so crazy and I have a lot going on so I'm filming in like different areas, so just bear with me like harem at school and I'm just trying to get it Done so here you guys can see that the lace is kind of tinted brown, and this is after I let it air dry, and so I'm gon na go ahead and place the unit on my canvas head and to pin it down. I'M using salon carré pins, and this is just gon na help to keep the unit in place. You want to make sure that when you pin it down, you put it down tight and you make sure that obviously like the wig is lined up with with the canvas head. Because you want to make sure that when you're braiding you're placing the braids in the correct spot, so I'm just going to go ahead and secure the pins all around the front and around the back of the canvas head. So next I'm gon na go ahead and find at the middle of this unit and I'm gon na go ahead and plug the middle. And that's just because I want the braids to fall with the middle part, and so I didn't have any to either. So I decided to just plug it with my hand, and I do like to do this first, because it makes it easier for me to part the rest of the unit. So I'm basically just taking my fingers and I'm pulling out strands of hair in the part, and you guys will see when I'm done. It opens up the part a little bit and it will help it to look more natural when you're wearing it later. So once my part is nice and plucked, I'm going to go ahead and start parting for my box, braids, obviously starting in the back just like you would do on a regular head and guys. This part literally drove me in saying you guys know as braiders. We are super particular about our parts and it was just very hard to get a straight part on this wig head, and so I ended up having to take more tee, pins and kind of pin them in areas to prevent the wig from moving and just making It like a little more snug, so I can get a better part. I'M still going to be using a shine and jam to kind of like help, define my sectioning and everything, but guys it literally drove me insane. It was so so hard. This was definitely the hardest part, so yeah, you just want to make sure you kind of like take your time with this. I did decide to do the rubber band method, and that's just because number one. This is like really sleek human hair on this wig, and I just thought it would give me a better hold and then also as far as sectioning. I knew that it would just be a lot easier to make it look nice and clean if I did use the rubber bands - and I was applying the rubber bands, I definitely put them on tighter than I would on a normal client's head, but not too tight Because I didn't want the lace to buckle up, so you want to just make sure you put them on there kind of pull it a little bit tighter and yeah. As far as sectioning like everything was just hard because it like I said it's not a natural head, and so it was really really hard to just like part this. This was definitely like, oh god like when we going insane, but you just want to make sure that you're taking the two pins and like moving them, where you need to move them so that you guys can get the best sectioning that you can possibly get. So when I do my next row above it just like, I would go on a natural hair. I try to lay those in between the row below and I know that's called like the rig method or whatever and typically going through. I would definitely like rubberband the entire head, but since I was recording - and I kind of just did a couple rows and then I'm gon na do some box braids and yeah do a couple more rows and party and box braids. So for these posterize I am using the two strand method, and this is pretty much the method I always use whenever I'm using rubber bands just because I feel like the braids move more freely and it just looks a lot better and it's easier quicker. All that good stuff so yeah to complete this, I use four packs of braiding hair, so I used two of the packs that they sent to me and then I also use two more packs of expression. The actual box writing portion of this was not super hard. You just have to make sure you're not totally really hard, obviously because it's lace - and it's not super super secure, so you just have to kind of watch your tension, but other than that I mean it's pretty much similar to writing on a natural head of hair. So once I got to the top section, I went ahead and make sure that my part was still there and I'm gon na be sectioning off baby hair, and I guess this is like definitely optional, but I think it does make it look more natural when you Kind of pull out the baby hairs, and so I'm actually not gon na be wearing these. You know myself, I'm giving it to someone that I went to school with, so I didn't like cut them or anything, but I am gon na section off some baby hairs on each side. It just in case she wants them. If not, they can definitely be plucked off or whatever it's not like, you're taking a bunch of bunch so yeah. So once I was completely done with the unit. I went ahead and only thing that I didn't do is I just because, like I didn't really see the point of that, so I didn't move say, but I am gon na dip the ends just like I normally would and so yeah guys. This is the finished. Look of the wig sorry that this portion of the clip was so dark. My lighting is like was like acting up but um. This is the finished look of the wig and I'm not gon na put it on just because, like I said, I'm giving it to someone, but hopefully I can get a picture and share it on my community tab when she tries it on and yeah, and this Was like my first time so I was actually really proud of myself. It was definitely like harder than it looks just because, like I said it, it moves around a lot, but I'm happy with the way that it turned out and so yeah. I hope you guys really enjoyed this video hope. You guys learned something make sure you guys leave a comment down below share this video and I will catch you guys next time.

Comments
SaVag3Indi: Excellent work! I love it ❤❤❤
sane bloem: Hi i love it!!! How do u secure the back when you want to put it in a high ponytail?
Adrena Hughes: I love it
Luvme Hair: It is using Luvme Hair 8inches full lace wig straight + 2bundles top quality braid hair(High retardant fiber) to braid this wig.❤️❤️ Kindly check the product link herehttps://bit.ly/2WuAwNw Use this coupon code"SALE20" for more discounts. Note: Buy full lace wig straight 8", get 2 bundles braid hair for free!
Tyiesha Thomas: Hey, did you pluck the back of the hair?
Kiyana Faulkner: Hi what bleached did you used I know you showed it but my eyes lol
Kiyana Faulkner: How come my wig hair doesn't look like that when I part