How To - Rubber Band Criss Cross Knotless Braids With Curly Ends! || Trying Viral Hairstyles!!
- Posted on 09 April, 2022
- Curly Hairstyles
- By Anonymous
#beingkimkayyy #knotlessbraids #crisscrossbraids
HEY KWEENS!
Today we are going to do the criss cross knotless braids right! have you tries this style before? Let me know in the comments section! Enjoy the video!
Don't forget to SUBSCRIBE to my channel!!
Leave a COMMENT in the comment section below!!
SHARE this video with friends and family!!
Leave a THUMBS UP for support!!
INQUIRIES:
For sponsorship & inquiries please email: [email protected]
CONNECT WITH ME:
Instagram: https://instagram.com/beingkimkayyy
HOW TO - RUBBER BAND CRISS CROSS KNOTLESS BRAIDS with CURLY ENDS! || Trying VIRAL HAIRSTYLES!!
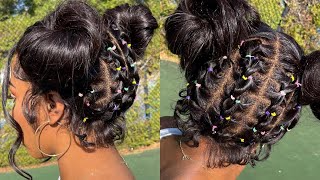
Photos helens everyone and welcome to my channel. So for this style we are going to be trying the crisscross knotless braids in the back type of style. You know it has been going viral on the internet. I really wanted to try. I know i've done this style before, but the last time i did it, i didn't do any knotless braids at the back and i didn't use any rubber bands. So this time we're going to do it right. So i am starting off by sectioning off my hair from ear to ear at the front. It'S always neater, and the experience of braiding is much better when i do it this way. After sectioning off the front of the hair, we are going to be working with the front first, i am sectioning sectioning it off in half and then on each side, i'm going to be sectioning that off in half also being sure to take out my baby hairs. This time around, because the last time i didn't take all my baby hairs, um, the elastic bands left with my edges. So i'm i'm. I don't want that to happen to me this time around, so i am starting the style off by sectioning one of the two sections on that side of my head into four sections. Now i did decide that i am going to be doing four two rows of crisscross rubber bands this time around, because i just think that it would be a lot neater and you know it would look a lot better. So sectioning off that section in four and then just putting rubber bands on each section it's kind of self-explanatory. So i don't need to sit here and explain everything to you. I am tightening the sections here, but i am making sure that i do not tighten it to the point where i'm going to lose. My edges like i want it to be neat, but i don't want my edges to go with the hairstyle this time around, because i don't know i don't want any bald spots at the front of my head. Trust me so pretty self-explanatory. I'M just putting elastic bands on each of the sections. Now when i am attaching the sections to the back, i do do a little twirl or a little coil so that the style can look a little bit neater. I didn't want the hair, the crisscross hair, to look fuzzy in any way, so i do a little twirl and then attach the section to the back of the hair. I didn't do two rubber bands at the back. I actually just attached it with one rubber band. You know the less rubber bands you use, the less tension will be on your hair. So keep that in mind when you are doing this rubber band um hairstyle. I do see a lot of persons at like all two three four rubber bands on each section, and i am not that type of person. I want a seamless takedown and if your hair is anything like mine, it is easy to get tangled easy to get coiled. So i'm just throwing that tip out there, so i am moving on to the second section now and i'm going to be showing you one more time how it is that i achieve the style. I part each of the section in fourth and i put rubber bands. I start at the front and put rubber bands on each section at the front. I am using my wax. You know to lay down the hair so that the hair can be smooth and the hair can be neat use, a wax that is compatible with your hair. I believe that this wax wasn't really compatible with my hair, because it did leave my hair with a white cast, which is a very strange. I personally would not recommend this wax what it is, what i had on hand - and i didn't know that it was going to leave a lot of white marks in my hair at the time. So i did use it this time around, but i won't be using it again. So remember i am twirling the front of the hair, the front section, i'm just giving it a little twirl. You could twist it if you want. If you want the hair to be neat that way, but i'm just doing a little twirl a little coil just so that it can be neater - and you know to me - the style will come up better this way. So after twirling it i'm just going to be. Attaching it to the back section and then adding my rubber bands, it is as simple as that. I really wanted to keep the front section really simple this time around and not do like three or four rows of crisscross this time around. I just wanted it to be a nice, simple, hairstyle that anyone can achieve so after many hours. This is what the front is looking like. I tried my best to keep it as neat as possible and i'm really liking how it turned out, and i love the fact that i left out my baby hairs this time around and yeah. It'S looking really good, really neat. I'M really pleased we are going to move on to the back section now. I did go ahead and start the style just so that i can get my mojo. I always do this. I always try to get my mojo when doing this style when doing any new style. As a matter of fact, so i did do two rows by myself, but now i'm showing you how i did the knotless braids. This is where the thread rack will come in handy. I did pre-section the hair so that it would be easier for me to do the knotless braids. I added three sections of hair to my natural hair and then i went ahead and braided it all in now. I am doing, i would say medium to jumbo sized knotless braids, so you have to determine how much hair you want to add to each section in order for it to look right. You know in order for the proportions, to look seamless and to look right. If you understand what i mean and for the ends, i am sectioning off a little piece with some rubber bands, because i wanted to curl the ends now. This is not particularly a knotless braid tutorial, but i am trying to show you guys how i went about achieving the style. I started to braid my hair without actually braiding my hair and then i added a section of the hair between my index finger and my thumb. And then i proceeded to braid one rotation and then, when i came back around because i am right handed when i came back around to my right hand, that is where i added each section of hair. So i did that three times and then i proceeded to braid the hair down. There are a lot of tutorials on youtube for you to learn how to do knotless braids. That is where i learned to do knotless braids, so you can always check out videos like that. I am planning in the future to do a video on the different types of ways you can add braiding hair to your hair, so be on a look out for that one, but for now just watch and look and learn as best as you can on how It is that i achieve these knotless braids around the back. Like i said i did, i i started to braid without actually braiding and because i am right handed, i added the hair in my right index finger and thumb hand, and then i did one rotation of braiding one or two. Whichever way you look at it and then i added more hair - and i did that three times and then i braided all the way down and remember you - can braid all the way down if you want to. But this time i wanted to add a little bit of pizzazz to the style. So i left out a little section, maybe about two or three inches of hair um left out that section added some rubber band, so it wouldn't pull out and um proceeded to continue with the style alright. So this is the hair actually 90 finished. I love the way how it turned out. I love the sectioning. I love the proportions of the hair that i used. I love the front. It was just a simple and easy style that a lot of persons can create on their own. Now, i'm tackling the ends. I combed all the ends of the hair and i added some small flexi rods to them, and then i proceeded to hot water. That section now i did not add any moose this time around. I don't think the style needed it, and this is how the style turned out. Thank you guys so much for watching do not forget to subscribe. If you have not subscribed already and give me a thumbs up. If you enjoyed this video and i'll see you in my next one bye baby, what you want to do is

Comments
Sionoss Zanrry: can I get this style kimmy