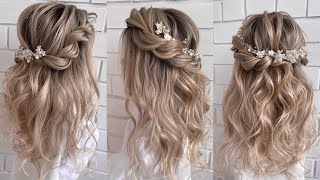
Live With Pam - Quick Braided Half Up Half Down Bridal Hairstyle With Elegant Soft Waves!
- Posted on 28 April, 2022
- Curly Hairstyles
- By Anonymous
In this weeks live tutorial, Pam will be teaching you how to create this gorgeously elegant half up half down bridal hairstyle with a gorgeous braided feature and soft waves achieved with curling tongues!
Stressed about the upcoming busy Wedding Summer Season?! Don't worry, you are in the right place! We'll help you practice your bridal hairstyling perfection with another fabulous live weekly tutorial and guide you through the correct hair preparation techniques and which hairstyling products are best to create beautiful hair - every time!
To continue learning, join our online bridal hairstyling community and continue learning how to create a variety of beautiful braids and curl textures that will perfectly compliment your hairstyle creations to give your clients some unique detail!
Links to the products used by Pam (where available):
Big Sexy Hair Play Dirty Spray Wax: https://amzn.to/3g7oVwA
Goldwell StyleSign Creative Texture Unlimitor
Hair Styling Wax in Spray: https://www.notino.co.uk/goldwell/styl...
L'Oreal Infinium Extra Strong Hair Spray: https://amzn.to/2wQ5b08
Subscribe and learn the latest wedding, bridal, prom & party hairstyles alongside timeless, classic hairstyles and vintage looks that never go out of fashion.
Visit https://www.createbeautifulhair.co.uk/... for more information on learning with Pam.
Want to master the art of bridal/wedding hair and learn with Create Beautiful Hair? There are many ways to learn with Pam: https://www.createbeautifulhair.co.uk
1. Join our Habia approved award-winning online bridal hair course, learn from home and submit work directly to Pam for assessment and feedback as you work through the models; receive as much support as you need! Complete the assessments and receive a Habia approved CPD certificate upon completion of your bridal hair training. Our SALE has begun! ***Use code SAVE200 to join this course with HALF PRICE OFF!*** Find out more at https://www.createbeautifulhair.co.uk/...
2. If you are in London or nearby, enquire into private Bridal Hair one-to-one tuition for yourself or for a salon! DM for more information on private courses!
3. Check out more of our YouTube channel for a selection of our freely available tutorials . . . like and subscribe for more information and updates, YouTube link: https://www.youtube.com/channel/UCDKUM...
4. Join us on Facebook for more tutorials and all things bridal and wedding hair!! https://www.facebook.com/createbeautif...
Whichever option you choose, please do get in touch and share your fabulous creations and suggestions on what you want to see next!
We've got it covered . . . we even have tutorials covering the curly girl technique!
Great for fans of natural unintentional ASMR!
Hairstyle tutorials include hair prep, hairstyling and hair up, blow-drying, curly girl techniques, working with different hair types, hair textures and hair lengths.
Create hair up & bridal hairstyles and become a bridal hairstylist with Pam Wrigley, UK Wedding Hairstylist of The Year!
Just SUBSCRIBE & LIKE!
Hi and welcome to tonight's tutorial, i'm pan wiggly and i am a bridal makeup, artist and hairstylist and if you've joined me before here on youtube. You'Ll know that i do lots of bridal, hair tutorials and a lot of the time they're. Inspired by either my students or by the brides that i've been working with kind of in the previous week, and today, i'm going to show you how to create this really beautiful, simple and elegant half up style that i created on one of my gorgeous brides on Saturday, janet and uh yeah, it was just a lovely, beautiful, half up half down style. Now her bridesmaids all had soft kind of textured messy buns, but she wanted a lovely half up, half down style. She had beautiful long hair and she wanted to shirt. She didn't want to kind of hide all her hair away and it was quite thick and gorgeous so i created this lovely effortless, looking style for her, so i'm going to show you today how to recreate that look. Now, it's a look that you could uh. You know would work, it works beautifully for a bride, but it would also work really well for a bridal party. So it's a very versatile hairstyle. Now, if you have any questions as we go through the tutorial, please just pop your questions into the chat box. Hello, actua, she's, just joined us here, uh just pop your questions into the chat box, and i will do my best, my absolute best to keep an eye on the chat box. But quite often i kind of get a bit caught up in the hairstyle. So i apologize now in advance. If i don't answer all your questions, but we do have an online bridal hair course as well as our live youtube tutorials. So if there's anything that you feel you know, you can't quite see close up and in detail, then we've got lots of information, curling techniques, different hair, prep techniques, working with different hair lengths, different hair types, working with different products, lots of detail on our e-learning site And you can get some information on that in our in the intro and we've got a special offer at the moment, so you can say 50 off. So if you do want to you know, if you don't want to become a bridal hair stylist, then i definitely recommend having a look at that course. But you're always it's always well. It'S always lovely to join my subscribers here on youtube. I think that's counter. John hello good evening, thank you for joining so as to say. If i miss the question, because i'm too busy doing the hairstyle, then you can always get in touch with me later, either via youtube. With our comments box and or you can join me online on our e-learning site, but let's get cracking with today's style now if you've been working with your practice head quite a lot recently, you might find that you've got quite a build up of product and you Might find it difficult to get the hair well to work with the straighteners on the hair to get it kind of really smooth and silky, but don't despair you don't have to kind of wash your practice head too often, i find what you can do if you're Finding the straighteners they're just kind of catching a little bit on the hair, then you can always use your toes to just kind of go over the hair. You could use a little bit of styling care lotion, but she's already got some styling kale lotion on this. Lady and i'm just going to go over and almost use the tongs you can see to kind of smooth the hair. Now, if you're working with a client, then i would definitely recommend using the straighteners and uh using a little bit of styling care lotion, which is this one. The silhouette product use a little bit of your styling care lotion. It'S a fabulous! It'S a kind of heat protector and as and it gets rid of flyaways and it makes the hair shiny and glossy so there's nothing not to like about that product. It'S light as well, so it works really well even on the finest hair so um you can smooth down the hair, use your straighteners if you're, if you're working with your client and smooth down the hair first and then you're, going to put a curl in the Hair, so janet didn't want her hair too curly. She just wants a soft kind of bouncy curl and at the top here, we've just got a little bit of movement. So what we're going to do to achieve this look? You could use a little spritz of your styling care lotion. I don't need to on this practice. Head she's already got quite a bit of product on there, but you could use a little bit more style and care lotion and then you're going to take. Let me just make sure you can see what i'm doing here and you're going to take the tongs which i'm still on camera to the end of the hair and we're going to roll the tongs up, the hair, nice and simple. It'S almost as if you're putting a heated roller in the hair or you are kind of doing a curly blow dry and you've got your brush that you roll up the hair with the blow dryer on there, and you might do you know you'd be rolling it Up and down the hair, if you're using a blow dryer here and a brush, but here we're kind of getting the same. Look. We don't want to hold it on too long because we don't want a massively tight curl. We don't want a big kind of ringlet. We just want. Let me just show you here. Let me just check these questions. Ah, could i do this style on the bob sorry carter's, just asked you could do this style on a ball easily? Actually, um, you just wouldn't get this amount of curl. You just have a little bit of a curve. Maybe - and you just stop here so yeah - you could do this cell with a brace coming across the back here. So you can see. We'Ve got this kind of soft curl just at the ends of the hair and at the top of the hair. Here it's just smooth and glossy, so it almost looks like you know, if you're, if you're a qualified hairdresser yeah, if you're a qualified hairdresser you'll, have do lots of blow dryers. But if you're, perhaps maybe you're a makeup artist, so maybe you're just starting working with hair and you're, not overly confident blow drying the hair, then heated rollers are a great option and also if you get a kind of maybe a slightly larger tongue, you don't want To go too much bigger: this is a 24 millimeter tongue. You could maybe go the next size up, but you but you'll find that the curls do drop, and so this kind of gives you kind of almost a curly bouncy blow-dried. Look almost it's not quite there, but it's kind of the closest you can get to it. You get lovely glossy hair and a little balance at the end, and what we're going to do next is create a braid, so i've already done one here now. I do have a um. We do have another tutorial in our live section, where i kind of created a braid on somebody who had very fine hair and she wanted a very thick chunky braid. So i've shown you how to create this very thick chunky braid. So if you look back in our kind of back catalog you'll see me create creating a braid where i'm adding extra hair to the braid as i go along because she didn't have a lot of hair at the front here. For me to create this big chunky. Braid she had some layers cut in, but she did want a thick braid. So if your lady has layers in, there is a way to get a very thick fat braid, even though the hair is short. So if you just go back through our live catalogue, you'll see that that was another style. I did on one of my brides last year. So, let's see so what we need to do here is create our a little bit of shape here at the back decide whether she wants this lady doesn't want too much height. She wants it to be quite kind of simple and effortless if she did want height here. You would need to kind of secure this with a bobby pin at the back so kind of play with your sections. If she's got highlights here, then you would need to just make sure they're all kind of lying in the right place before you secure and sometimes what i find. I'M i'm going to do this fairly quickly here, but sometimes what i find. We turn those tongs off i'll leave them there to cool down. Sometimes what i find really helps is to take a photograph of the hair just to see because you'll find even as you're going along just take a picture of the hair and it'll. It will show you any kind of bits of hair that aren't quite lying in the right place, so it can be really helpful to take photographs as you go along okay. So now, if she didn't like her ears here, you might need to be careful not to pull too much hair back. So we might want that bit down. So all these little things all go towards making creating, i should say the perfect style and i'm working with a mirror just off camera, which i find invaluable. So then you can kind of it allows you to see the hair at a bit of a distance. Alternatively, as i say or as well, it's a good idea to take little pictures and just to check that you're happy with how everything how the hair is sitting and whether she's got enough hair down over her ears. Whether she wants a little bit more back and look, this hair is lovely and smooth and glossy, and if you've seen this practice head about an hour ago, the hair looked dry and brittle, but a little bit of heat and the right product will go a long Way good evening, luisa, thank you for joining me tonight now, although this looks like a really complicated braid, just let me make sure i'm going to try and get them in even sizes. I think that's about right. It looks like quite a complicated braid because at the back it almost looks like a hair band, but it's literally just a regular braid. So i'm just going once just a regular three strand baid. Now you could here, i can tell one's a little bit thinner than the others, but we might be okay, you could here, do you know a fishtail braid that might look lovely but um janet just wanted it simple and beautiful, and that's exactly what she got. So it's just a regular braid and then we're going to start to loosen the braid. So you kind of this is the bit that can take a bit of time, so i'm just going to kind of and when i'm loosening the braid here, you're kind of pulling it from the outside edge of that section and just work. Your way gently up the braid. Now, if you find your clients, let's just check good evening, if you find your client has got very soft kind of silky hair, you can put a little bit of if you kind of did a little bit of a blow dry. First of all, with a little bit of mousse, you could use salt spray, but you could use a bit of mousse. It just gives a little bit of texture to the hair and you want to keep these. Let me just keep make sure this is just using my end of my tail comb just to make sure this braid doesn't loosen too much. So if you, if you blow down with a little bit of mousse first, if the hair is very soft and silky you'll find that first of all, it will help the curls to hold. But it will also mean that when you start to loosen out the braid like this, it won't kind of keep slipping back out of this kind of loose shape. So just work your way and take your time working your way: kind of up and down the braid to get this beautiful kind of full chunky, braid effect and then in a minute we're just going to join them both together at the back. And it's almost going to look like a little hairband at the back of the hair. Now you could, if you wanted to, if you find it quite difficult to if the hair is very thin as well as the mousse. What you could do at this stage is maybe sprinkle a little bit of texturizing powder along the braid. So when you pull out and loosen the hair, it kind of holds together a little bit. But you want to wait to kind of get to the pulling out stage. You don't want to put it in beforehand, because you won't be able to it'd be hard to separate the hair and create the braid, which is not. We don't want to create problems for ourselves. Keep an eye on here, make sure the size is is kind of, even as you work your way down the braid. You can tell this one here is a little bit fine. So take your time at the beginning and make sure that the sections of hair are evenly spaced evenly sized, i should say well, she might find you get one little thin one there. It is there - and here it is here that kind of don't quite pull out, but you know if you did find you that was a that was happening. That'S where the texturizing powder would come in really handy beautiful, checking in the mirror and when you stop and remember to take a couple of pictures, have a look make sure you're happy her ears are covered she's happy with this bit here. That'S it! So what i'm going to do now is i'm just going to pop a clip on and as long as it's kind of long enough to reach to the back of the head around here. That'S that we're gon na it's probably gon na stop around there. Then we don't need to braid any further, so this is one that i created earlier a braid here. So i'm going to bring this back and what i did on janet with janet's hair. Is i put a little bit of texturizing powder because i don't want to put a hair band here because it's going to make it kind of bit thick and a bit kind of chunky bit bulky at back. So what i did was i put a little bit of texturizing powder just at the end of the braid. I don't need to do that on my practice head though, and i just backcombed. Let me just see if i can show you here so i'm just putting a little bit of backcombing, just where i put the texturizing powder well. Well, i haven't put the texturizing powder in the practice head because if you put it in the practice head it just it's practically impossible to get out and then all i'm going to do is twist. So let me show you here so i'm going to hold the hair in my finger and thumb twist that braid, so my thumb is then flat against the head and i'm going to pop a bobby pin. I can do it at this kind of odd angle. Just get a bobby pin here and pop the bobby pin, underneath my thumb and at the back of the head, there perfect just unravel the end of that braid and then the other side we're going to get. Let'S check our questions again, yes, andrew. Thank you for that question. I do take photographs and i also make really detailed notes of the hair prep that i've done so, whether i've used mousse or which products i've used, whether they've done a blow-dry, whether i've used salt spray or which tech curling technique. I used let's bring this across here. Photographs are great because it kind of shows you the end result, but i find so if it's a person a bit of texturizing powder a bit of back combing, you don't really need texturizing powder on the practice head. Apart from the fact, it's practically impossible to get out the hair's actually quite dry on the practice head, so it backcombs usually backcombs incredibly easily. So you don't need it on the on the practice head anyway and get our little twist in the hair. Little fold bring that there, so it joins that other braid there and you've got those two kind of braids kind of butting up against each other here. So you can't see where it starts and you can't see where it begins. I'M gon na go a little bit further forward. Let me lift her up a little bit, so hopefully you can see that's it here we go a little twist hold the braid where i want it to be held here. So yes, andrew back to your question, sorry about that. So i take photographs and i do very detailed notes - and i keep a record of my of the hair with the styles that i've done so i'm trying to do this back to front. That'S it. I think i've got it right and you also want to make sure you're hiding this bobby pin. Sometimes what i do is i send the pictures to the bride. That'S better, so i'll, send the photographs to the bride and i'll keep the bride. The pictures as well myself, but i also take detailed notes - and i find that really helps. Let'S just loosen that a little bit, we don't have that dip. I think she's there she's got a gorgeous soft curl. You can recall these a little bit if you feel you need to at the back where we brought our sections back. I'D say these need a little bit of an extra bit of tlc, see if i can pop those back on and get them warm oops didn't secure that very well. When you do this, i'm going to actually stand at the right angle. So fair, that's better! Much! Better if in doubt, pop in another bobby pin, but that feels much better already, that's it and then i'm going to re-curl these little bits. Ah, look you see. That'S the wrong. Color pinner use the blonde. It'S doing a great job, but you don't want to be able to see the bobby pins at all. So let's get a nice dark bobby. Pin it's actually staying in place with the one that i put in before, but you want to make sure we don't any chances, that's better this coming down and it's really secure. Actually so you could pop the veil here or you could have the veil at the front kind of here. Yes i'll, show you a close-up of the braid, sorry carter, one second, let's just take the tongs to the end. Curl them up hold that just for a second, so you might need to re-curl the ends of the braids, so it kind of sits nicely with the rest of the hairstyle and let me bring her up a little bit. So you can see this gorgeous kind of chunky. Looking. I don't want that to go underneath there, though that's going to go on top of that. It all needs a little bit of tweaking. That'S better, so we've got a lovely kind of chunky braid. So that's the one that we've just created joins at the back and we've got our braid on the other side with a lovely kind of soft curl. This needs re curling that one and uh yeah, that's it and she's lovely. And it's quite simple. You know it's a beautiful style, as i say, for either the bride or for the bridesmaid and for lots of different hair lengths. So you could do it if she had a little short bob. You could do i'd, use a smaller tongue and i'd wave. The hair a little bit if she had a short bob, so it's kind of got it looks a little bit, maybe like a beachy way almost or you could do a soft curl, but i'd use a smaller tongue if she had very short hair like a little Short bob and then you'd do the braid and um. There you go and if you know, if you've done this style for a trial, you could maybe then try a different different idea by maybe putting a little bit of padding on creating a little bun here at the back a little soft bun. She could have a little two-in-one style if, on the wedding day, she couldn't decide whether she wanted to hair up or down. You could, i suppose, just pin this hair up, create a little messy up do somehow. But if you do this, you'd need to work with the curl. You don't want it because then, then, when she takes it out, she's got a lovely curl, so don't kind of start pulling your fingers through the curls. You can just create pick up the curls, pin them up and create a lovely kind of messy, bun and uh. You know if she, if you're doing a trial, then sometimes it's a good idea to just do something. This is a bit impromptu. This one just do a quick kind of messy bun and see if she fancies an updo instead of her hair down, i got ta say it looks a bit crazy and um. Maybe we could have would maybe spend more than 30 seconds on it if she was gon na. Have it pinned up, but you get the idea, i hope, but it's really the easy way of getting a little bum style if you're doing a trial run without having to kind of start from scratch and take it all down again. So it's always best to give your brides your clients choice. So i hope you've enjoyed tonight's tutorial and i hope you can join me again next week, i'm very busy at the moment with lots and lots of brides. So if you're, you know, if you have any styles, that your clients have asked you for. Actually it's not too bad. If you have any styles, that your clients have asked you for and you're not sure how to create it, then please just get in touch. Let'S check our ah, oh, you have to show your close-up of the braid, sorry and so yeah if you've got any styles. That you'd like to learn just drop me a note, and i am here to help. So i look forward to seeing you next time so take care and have a really good week. Okay, lots of love, bye,
Comments
Eileen Stebbins: Is it a centre part?