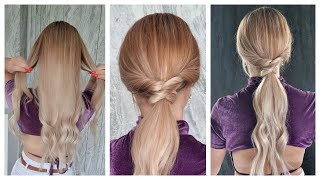
Low Curly Bun Hair Tutorial
- Posted on 25 November, 2020
- Curly Hairstyles
- By Anonymous
Low curly bun hair tutorial. Follow my step by step instructions to recreate this beautiful messy, curly low hairstyle. This loose, soft updo works great for any occasion.
Want to know what products i used? Then just click on the links below:
USA Viewers click here: https://www.amazon.com/shop/hairangels...
UK Viewers click here: https://www.amazon.co.uk/shop/hairange...
We are a participant in the Amazon Services LLC Associates Program, an affiliate program designed to provide a means for us to earn fees by linking to Amazon.co.uk and affiliated sites.
You will not pay anything extra by clicking on the link.
Hi guys today, i'm going to show you how to do this low, curly, bun hairstyle. I'Ve started with a side parting, but if you prefer a middle parting, this would work as well. Now i'm just going to take the hair from above the ear on both sides and section this off, i'm just going to twist this up and pin it out of the way until later, brush that hair into a ponytail and secure it with an elastic band. Next twist up that ponytail and just wrap it around the elastic band to form a bun use a few bobby pins around the edge of this bun to keep it secure, release that top section and just to make things a bit easier. We'Re just going to section out the front so go from the top of the head to the ears on both sides and clip this out of the way for later divide the hair at the back into two equal sections and clip the top away for later. Next, we're going to split the hair into small one-inch sections and we're going to wrap this around a curling tong, making sure that we keep the hair flat, hold it for a few seconds and release the curl. Then we're going to take the same size section next to it, but this way we're going to curl it in the opposite direction, so wrap it around the curling tong making sure the hair is flat against the barrel hold for a few seconds and release then just Work your way along the hair, until all of that section is curled, now release that top section and we're going to curl it in the exact same way. Now we're going to split up these curls, so i've just divided mine into two, so split them in half and wrap them around your finger to make sure they reform that curl shape when you've done that we're just going to start placing these curls in the middle. Where we want them so make sure you weave them in and out of each other until you're happy with the look. I'Ve used a bit of hairspray just to make sure there's no fly aways i'll pop all the products i used in the description box below so gather a section of those curls up and we're going to pin them into the top of the bun. At the back of the head and we're just going to repeat this on the other side at the top, so grab a few of those curls and pin them to the top of that bun. I'Ve done the same on the side section so gather a few bundles of curls, together, intertwine them with each other and then just pin them to the left hand, side of the bun and then the same on the hair. At the right hand, side just weave those curls together hold them to the right hand, side of the bun and secure with as many bobby pins as needed. Okay. So if your hair's long you're going to have some tail ends and all i've done is grabbed a bundle of the curls pushed them up towards the bun and then just popped. A bobby pin in leaving a few ends hanging out, release those front sections and we're going to curl everything away from the face. I'Ve left a few pieces of hair out around the hairline just to soften the look and again we're going to start placing these curls by wrapping them around each other, holding them to the right hand, side of that bun and then just pinning them to the head. Once you've got that right hand, side pinned we're going to gather up all those loose tail ends twist them towards the head and pin them to the left hand, side of the bun and then we're just going to repeat on the opposite side of the head. So once you've curled everything grab a few of those curls intertwine them with each other, bring them back to the left hand, side of the bun and secure with bobby pins gather. All of these tail ends together twist them towards the head and then pin them on the right hand, side of that bun and here's the finished. Look if you liked it, please give it a thumbs up and don't forget to subscribe for more tutorials.
Comments
Teresa Linker: I absolutely love this! And it's so simple!
Susie Hodges: Beautiful
sarah nicoll: What type of bobby pins..u shape or normal flats
TherealNae.2: Do u hve a instagram so i can send this picture to u n u show me how to do it?