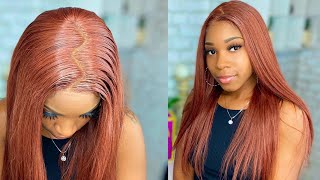
How To Do A Zigzag Part the Right Way
- Posted on 20 December, 2021
- Hair Styling
- By Anonymous
Why choose the simple, straight part we all wear everyday when you can create a stylish zigzag part with your hair that is more fun? A zigzag part is the perfect, easy way to add a little interest to an otherwise rather boring feature. Not only does it take just a few minutes to create, but will make your hairstyle stand out in the best of ways. Add it to hair worn down and use it as a feature on a playful up-do.
Young girls especially love the effect that a zigzag part creates. All that you need to do now is learn how this technique. Luckily, we lay it all out in the simple steps below.
Creating a Zigzag Part
Zigzag parts are easy enough, but the methods differ depending on your hair type. Read on to find the best way to make a zigzag part for your hair.
For Thick, Curly Kinky Hair

If you have particularly thick, curly, or kinky hair, creating a zigzag part is not as simple as running a comb down the back of the head. Working with this hair texture means going through the process section by section, but it’s a lot easier than it seems.
- Get your hands on a fine-tooth comb.
- Set comb straight on top of the head. You can use it as a guide for creating your zigzag.
- Draw a line with the comb. If you want a large zigzag, take the comb back at least an inch. For a tighter zigzag, draw a shorter part.
- Separate hair on each side of the zigzag and press down to hold it in place.
- Continue to create each section of the zigzag, alternating directions with each turn. You may need to go back at some point and re-draw the initial zig (or zag) for the most cohesive part.
- If you’re creating an up-do like pigtails, continue the zigzag part all the way down the back of the head.
- Tie your pigtails on each side and voila! You’ve got the perfect zigzag hairstyle!
For Fine Hair

Having fine hair isn’t always fun, but when it comes to creating a zigzag part, it’s the easiest hair type to work with. Simply follow these steps below.
- Draw your part using a fine-toothed comb. Rock it on your best side or in the middle.
- Next, take the comb and create a zigzag motion all along the part. Hair on either side will get gathered up along the way, so don’t worry about that.
- Once the part is drawn, use your fingers to separate the hair so it falls on either side of the part.
- Smooth hair down and you’re ready to go!
As you can see, it’s fairly easy to do if you don’t have a lot of hair or complicated curls. If your hair is straight but you’ve got a lot to work with, the technique below should be a winner.
For Straight Hair

Unless your hair is very fine, using the end tooth on the comb can leave your hair in a big mess. If your hair is straight or contains a fair amount of waves, however, you should use the steps below.
- Brush all of your hair back as best as you can, even tilting your head slightly backwards.
- Place the comb horizontally along the hairline.
- Drag the comb backwards, making quick back and forth motions.
- Using your finger, choose the spot where you want your part, either in the middle or to the side, and separate the hair using your finger.
- Underneath is a beautiful zigzag pattern that will shape and define your hairstyle.
Creating the zigzag part you’ve always dreamed of is not only easy, it’s pretty fun to do. Working with your natural hair texture will make the entire process only that much easier.

