6 Back To School Heatless Hairstyles
- Posted on 21 August, 2015
- Heatless Hairstyles
- By Anonymous
For more information on Fancy Hair extensions, go to: http://goo.gl/FEuRMf
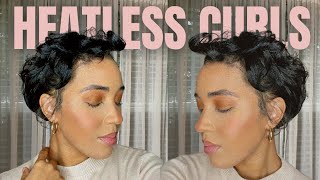
Happy Fri-YAY!!! My third back to school inspired hair tutorial is up and this one is all about ditching the heat styling tools! These hairstyles are perfect for those of you who want more heatless hairstyle ideas that are easy to create and appropriate for school. All you'll need is a bunch of small hair elastics and bobby pins :) Let me know what you thought about this video in the comments below! X
Follow me on my personal Instagram account: @nikiskyyy
Tag me with your Fancy Hair recreations on Instagram: @GetFancyHair :)
Please show me some love by liking this video and subscribing to my channel if you haven't already! Your love and support means the world to me! Love you guys! Xx
Instagram: @GetFancyHair
Twitter: @GetFancyHair
Facebook: https://www.facebook.com/GetFancyHair
Pinterest: http://www.pinterest.com/GetFancyHair
Email your Fancy Hair recreations to: [email protected]
Xoxo
Niki
Hey guys, I'm back with my third back-to-school inspired hair tutorial series for the month of August 2015. So in this tutorial I have six heatless hairstyles that are perfect for school, they're, quick and easy, and best of all they don't require any heat styling. Most of these hairstyles can be created on short, medium or long hair types and all you're going to need is a bunch of bobby pins and small hair elastics to recreate all of the looks in this tutorial. So without any further ado, if you want to see you want to see, if you want to see my six back-to-school heatless hairstyles, please keep on, I can't talk. I'Ve got six, looks to show you guys in this tutorial. So without any further ado, if you want to see how I recreated these beautiful heatless hairstyles for back-to-school, please keep watching nailed it. Okay, Nicki get yourself together for the first look, I'm going to be separating the front sections of my hair and then taking a triangular section from the top of my ear to the top of my crown area and I'm tying it off with a hair elastic. And I'm doing this on both sides to get the extra length and volume in my hair. For all six looks. I did clip in my 240 grams set of fancy hair extensions in the color hazelnut dirty blonde, because most of the hairstyles I'm going to be showing you in this tutorial, are half up half down hairstyle or hairstyles that involve me. Gathering the hair around the crown area, I concentrated all of my webs towards the nape of my neck, so as low down as possible on my head. This way, I can ensure that I have enough coverage on the top of my head to cover up any of my clip-in hair extensions. So, if you're wearing clip in hair extensions - like I am that's just a little tip for you guys to ensure that your hair styles, the flawless and you can't see any of your Webster, your hair. So what's up created my two little ponytails, I'm creating an opening. Just in front of the hair elastic and I'm pulling the ponytail through this opening, I'm going over and under the elastic and what this is going to do is made a beautiful twisted effect. I'M going to do the exact same thing on the other side and that's all there is to creating this first heatless hairstyles for back to school. For the second look, I'm tying away a triangular section of hair from the top of my ear to the back of my crown line, and this time I'm including all of the hair around my face and I'm tying it off with a hair elastic. I'M doing the exact same thing on the other side as well, once I've done that I'm taking what are the ponytails and I'm twisting it in one direction and then I'm wrapping it around itself to create a little Shenyang and then taking some bobby pins and pinning It in place after I pinned down both shin yawns, I'm just using my fingers to fluff them out a little bit and that's all I did to create this beautiful mini chignon, half updo for this next look, I'm taking two of my smallest tulip wafts and I'm Clipping them into my crown area, because I'm going to be gathering all of the hair at my crown area into a half a ponytail, I want the ponytail to have some added length and volume. So that's why I'm doing this so once I've clipped in the web's? I'M just gathering all of the hair around the crown area and then I'm tying it into a ponytail right at the top of my crown, with a small hair elastic once I've done that I'm taking my ponytail and tying another small hair elastic about two inches below The first hair elastic next I'm taking a section of hair just below of my crown area and I'm taking the section and pulling it through the center of the section that I created with the two small hair elastics. If that makes any sense at all, I'm sure you'll get the idea. Once you see what I'm doing so, as you can see, I'm creating an opening in the section I created in the first ponytail and then I'm taking these section underneath that and then pulling it through the section. I'M then taking another small hair elastic and tying the second section that is now on top with a small hair elastic after that I'm taking another small hair elastic and I'm creating another section with the ponytail that is now on top. So again, I'm tying be hair. Elastic about two inches below the top hair elastic and then I'm going ahead and creating an opening in that section and pulling through the bottom ponytail through that opening and basically just continuing to repeat the same steps over and over. Until I reach my desired look. So once I get to about the middle of the ponytail, all I did was tie both ponytails together to secure them, and then I'm gently going in and pulling out these sections of the braid to fluff it out. I'Ve got ta admit. I think this hairstyle is probably my favorite out of all these six heatless hairstyles in this tutorial. Let me know what you think after I show you what it is. So, basically, I'm starting out with the exact same ponytail that I clipped in my two clip wipes from my hair extension set in two. So I get that extra length and volume and then I'm separating the ponytail into two sections and I'm braiding a fishtail braid. For those of you who have watched a billion of my tutorials, you probably know how to fishtail braid already, but for those of you who are new to my channel I'll, give you a quick briefing on how to braid a fishtail braid. So basically, you want to start out with two sections and then you want to take a small strand from one of the sections cross it over that section and combine it with the opposite section. And then you want to do the same thing on the other side. So, for example, if I'm starting out with the left section, I'm gon na pick up a thin strand from the outside of the left section and cross it over and combine it with the right section. And then I'm going to take a small strand from the outside of the right section, cross it over the right section and combine it with the left section. So I'm just going to keep repeating these steps back and forth until I reach about the midpoint of the ponytail. So now that I'm at the midpoint of the ponytail, I'm tying off the end of the braid with a small hair elastic and then I'm going in with my fingers and you've guessed it and I'm pulling apart the fishtail braid, as I usually do to fluff it Out and make it look more interesting now this is the part that's going to make this half-up half-down fishtail braid, look super cool and trust me guys, it's so easy. So all I do is pick up a section from either side of my head and each section is only about two inches in thickness and all I'm doing is gently draping. These two sections and gathering them with the bottom of the ponytail and tying everything together with a small hair elastic this really all there is, but honestly, this small little change makes this hairstyle look so cool and so different. I absolutely love it, so this fifth look is another one of my favorites and again I'm starting out with that same ponytail that I created earlier. I'M gathering a section of hair just below my crown area about two inches in width and I'm tying all of this hair. Together with my ponytail, with a small hair elastic once I've tied that together, you'll see that I have a section in between both elastics and what I'm doing is going in and pulling out sections from this section to make it look like a big fluffy bubble. After I pulled apart the section to my liking, I'm taking another section just underneath the section I just parted and I'm tying all of this hair together again with the ponytail with a small hair elastic and then I'm going in into that section and pulling it apart. Again, to create another bubble, so basically, I'm just repeating these same steps, all the way down to the nape of my neck, and when I get to the nape of my neck, I'm going to show you the next steps. Okay, now that have gotten to the final section of gathering all of the remaining loose hair at the nape of the neck, with my ponytail and I'm creating another section and pulling out that section to create my last bubble that incorporates the loose hair after I've done. That I'm going into my ponytail and I'm just doing the exact same thing, but I'm not combining any hair into the ponytail. So I'm tying a another hair elastic about a couple inches down from the last hair elastic I tied and then pulling out that section to create another bubble. So I keep doing this until I get to the bottom of the ponytail or to whatever length you want to achieve the look that you're going for and once you're done, you're gon na have this beautiful fluffy bubble, ponytail or faux hog. This is super easy and I think it's so cute for school. For the sixth and final Heelys hair saw I'm starting off with the exact same ponytail, as I did with the previous couple of hairstyles. So what I'm doing is creating an opening, just above the hair elastic and I'm pulling the ponytail through the underside of the opening and out through the top, but I'm only pulling the ponytail out a couple inches to create like a little bun. This bond has a billion names and one of them is the Topsy tail. So once I've done that, I'm going to spread it out a little bit and bobby pin these sides of the bun to my head. Now I'm gathering a section of hair just below my crown area and I'm tying all this hair, including the ponytail from the first Topsy tail and I'm tying all this hair together with a small hair elastic after I've tied all that hair together, I'm creating another opening. Just above that, hair elastic and I'm doing another Topsy tail bun. So I'm taking the ponytail, I'm pulling it through the underside of the opening and out from the top, and I'm only pulling it through a couple inches to create a little bun and then pinning down the sides of the bond to my head. So I'm going to keep repeating these steps until I reach the nape of my neck and that's all there is to creating this beautiful Topsy tail ponytail, it's so different and I guarantee you you're gon na get a ton of compliments for it in school. Alright, my love so that wraps up my third back-to-school tutorial for the month of August. I'Ve got one more for you on the way and I'm confident that by the end of the month, you're going to be a pro at styling, your hair and you're gon na be able to rock a new hairstyle every single day of the week. Please let me know which hairstyle in today's tutorial was your favorite in the comments below, and let me know what you thought about this video. If you liked this video, please give it a thumbs up and be sure to subscribe to my youtube channel. If you haven't already thank you so much for watching, I love you guys and I'll see you in my next video


Comments
PalemoonTwilight: My fave was the 5th style bubble ponytail/fauxhawk. Thanks for sharing your ideas with us!
Invisabella: These are so unique and I love that they are heatless!! Much love xo
MimApril: I love to have my hair down so this video really helped me I feel like where I live we dont put so much effort for going to school, I wish I had to go to an American high school.. in my opinion, canada and the us are two of the countries where you can express yourself the best! :') I dont know if you get what I mean ahaha, however the hairstyles were all beautiful ❤
Fancy Hair: Hey guys! Here's another back to school tutorial as I promised! Hopefully I can get one more up for you guys before September *crosses fingers*!!! Let me know what you think about this one and which look is your fave :) Xx
Kaiya Cicchini: thank you so much! your video really helped me a lot. subbed!! :D
asia channel: I just received my fancy hair extensions right now they are so thick and soft thank you so much can't wait for school to start :D
Bray Nicole: I love all of these
Biri Rangel: Omg!!!!!! I love your hair so much ❤️
esmiflowers: Subbed so quick! Thank youuu!
Gesika Hilliana: i love the bubble ponytail ♡
Tae Sky: My favourite hairstyles are the 4 & 6
Fernanda Moraes: The n. 2 is perfect!!!! :3
Sonali Manka: Yay! Congrats on 11k subbies!!!
E M: They are all look pretty i don't know why you don't have more views love you❤️
Grace Bailey: These looks are SUPER cute!!!
zoyalife: Hey, what is the opening music you used? Your hair is sooo beautiful I am so jealous!
Stephanie Araya: I liked them all, You hair wizard,
Gesika Hilliana: i love the topsy tail too ♡♡
Alicia Oscarsson: Her hair is goals
juliettaloves.less.than.3: The bubble ponytail made me jump. I wanna do that on my red hair and make fireballs :D
Lana: So cool love all of them
Tasneem Hasan: Can you do a tattoo tag ?
Keisha Furlong: My school dosen't allow hair that isn't tied up...:'(
fabulous bunneh: I'm SOO doing this for school
Amaya Rivers: my favorite is the topsy tail I have it on
April Cummins: What hair brush was you using in this video?
Dezi Good: I can't believe you only have 2 thousand views you need millions you wonderful
yanibel de Durán Jesús te ama: megustaron los 2 últimos
yanibel de Durán Jesús te ama: megustaron los 2 últimos
Stacia Nowaczyk: Not trying to hate but is anyone else hating the mini half up half down bun trend again NOT HATING I LOVE HER HAIR AND HER HAIRSTYLES
MsRazno: What's with a duck face?!
kacie reyes: 2 comment