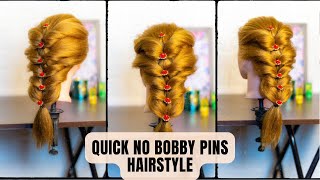
Half Up-Do With Hidden Bobby Pins
half up-do with hidden bobby pins. straight medium/long length.
Now, what we're doing today is I'm starting with day two hairs. So I washed it yesterday and I put a little bit of dry shampoo in this morning and I just gave it a little brush, but as you can see, it's not really something I can go to work with. So what I'm going to do is I'm going to just do a half up and then straighten the ends just to take away the kind of scraggly net that I get with my hair cuz, it's a little bit thin so start by just separating the front bit Out like that and going to do a little bit of a tease just a little bit and just because, in order to an event today - and I want my hair to just be a little bit nicer, so taking a little bit, I'm just going to do two Sections here and just a little tease just to give it a bit more volume, okay and then we just smooth out top that's going to look like I've teased it. So you could see I've just got that sort of crown that you have hair here and that's all life teased and I'm going to just take it make sure it smells and then give it a little bit of a push up there. I'M sure I like the sort of position of it before I pin I'm using bobby pins. I put them in with the Ricci side down so because I'm trying to hold better. Let'S do this. Mine is 4 pin 2 on each side. It doesn't really matter what these pants look like a good idea across them over just because they do tend to hold better it's across them, a little loop that last one in yes, there are old aircraft, but it's pretty secure, they're great, and then I am going To take each front section and just cross them over those bobby pins to hide them, it gives a really nice finish to the hairdo when you don't like to my part straight before you live love these cones, the little part maker for lack of a better word At the bottom, okay, so you want it to be smooth before you bring it around, avoid any bumps, just laying it over the cross, those bobby pins, they're sitting in or pushing it back in towards those other pins, and then we'll do one on this side. So taking all of the tears, I have a little bit left here amid sighs, clearly because the PERT this side, so I'm only doing one pull back on this edge, but I got to make sure it's a good one that looks okay there and then, on top Of those other ends there and then the last one is just a second one. From this side it gives a nice sort of crossover effect when they do that looks quite finished. I'Ll just see wearing a foot this one so here kind of one side and on the other side and the other side there a lot better right and looking ok. So I think for the top that pretty much done, I'm just going to straighten the bottom bit. A little I've got a 3/4 of an inch straightener here, but I had plugged in turned up real top. I only use this sort of 3/4 of full strength. I know that every straighteners different it really depends on your hair. Yes, it's about 3/4. If you can see the dial there to take little sections and straighten straighten them all the way down, she's getting nice history. For me, i lucky: I only need to really straighten ball them, because the top of my hair is already pretty straight. So that's all I'm doing here - I'm not worrying about getting too close to the root working. My way around my head and the way that I sort of make sure that I'm staying on top of it not doing the same bit twice, because that will cause heat damage. Is I just make sure that I'm sipping the parts that are done back behind my shoulder? So you feel if you do the same bed twice it's just I like to do whatever I can to try to save my hair. If you bleach it blonde fall whatever. I can do to sort of preserve. You can see, there's some broken bits there. Great okay, click straighten, take a look got those short bit, but maybe I'll just do them again, just to make sure okay there we have it. So it's a pin straight half up that is done on day, two hair and suitable for work suitable for an event. Thanks for joining me, don't forget to subscribe. I really appreciate it have a good day.

Comments
Liz Sanchez: Simple and very adequate for work or any day day. Thank you!
Tamara Morton: Thanks for sharing this. You did a great job on the back. I hope I can do the same. Eventually. I'm sure it took some practice to get it to look this good.
Marasm835: this is the exact hairstyle I was looking for, thank you so much.
Jess Cox: Really simple but pretty! Love it! Thanks for sharing.
Erika Ama: Beautiful look, thanks for the inspiration
Sarah Witter: This is gorgeous! Definitely going to try!
Eileen Wrightson: Please do more videos like this. Very nice, great instructions and beautiful result.
Alana Jorgensen: This is super cute! If your hair was curly on the bottom it would look just like Kate Middleton
MSUSPARTANS 1995: That is so pretty from the front and back!!
Sarah Melton: Very pretty!
Ashley Dudek: You are the sweetest! Thank you!!
Straight To The Point: Really cool thanks for sharing
Natalie N: You dont open bobby pins. That is why they are designed like they are.
SHERRY Dropauer: Great job
Sonali Basa: Look artistic
PRIYANKA SHARMA: Looking gorgeous
Margie Olortegui: I admire do ladies who made the groom to look amazing
Tuhina Paul: Love your red jacket ..please share the link
Jan: Very cute
Lea Yu: Wow!
R R: You know better than to use your teeth to open bobby-pins.
PxiSlee_StUdy: Nice
Iqrar Hussain: fab
priya varma: Nice
chhaya kumari: Wow...
Shar Roon: Part maker is called rat tail fyi.
Spookylady: You remind me a little bit of Kim Cattral...
Karl-Heinz Redepenning: Mm