Jumbo Braid Pony Tail W/ Braiding Hair | No Hair Pins | Jay Marie
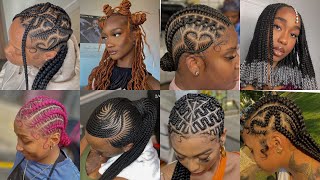
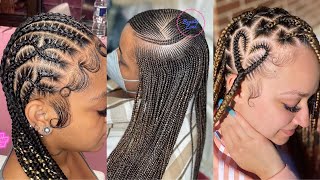
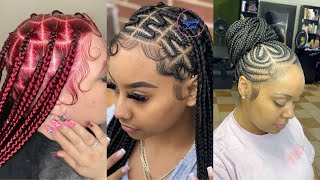
Hi guys it's j marie and i am back with another video today, i'm going to be showing you guys how to achieve my braid ponytail look, so i'm going to just start off with freshly blow-dried and washed hair. Yes, my ends are a little bit raggedy, but we are not here for that. First things: first, i'm going to take my white to comb and i'm just going to brush my hair into a ponytail, just placing it where i want the braid to be on my head here, i'm just using my detangler brush and i'm just kind of molding it Into a little bun now that my hair is in a little bun, i'm going to go into my eco styler gel and just take it and place it around my edges just to lay everything down, because after this we're going to take a brush and we're going To get to molding and laying the hair down, as you can see me doing in the video right now so here, i'm just kind of molding, my hair and i'm going in between my heart brush and my very soft bristle brush the soft bristle brush just kind Of lays everything down the hard one, just kind of molds it and manipulates it in a sense. So you see me just going back and forth with those two brushes now that my hair is tucked away, i'm going in with my edge toothbrush and just separating my edges from the rest of my hair. Now that everything is placed where i want it to be, i'm just making sure that everything is nice and laid. So here i'm gon na go in with my edge booster edge control and just kind of put a little bit all over like the hair, just to kind of make sure everything is laying down. And here i'm going in with the saw, bristle brush and just kind of making sure that everything is still laid, so let's tap into this braid okay, so i'm using the expressions jumbo braid hair and the color 1b. So the hair is very, very long. It'S 40 inches, as you can see, i'm having fun with it. So now i'm going to take the rubber band, that's already placed on the hair and wrap it around my ponytail after wrapping it, i'm just trying to make sure that the placement is correct. So here i'm on doing the braid that was already there when i bought the hair because i'm going to go ahead and start separating my hair into three pieces so that it can tie into the braid i'll show you guys how i do that soon. So after separating both my hair and the braiding hair into three pieces, i just kind of take my brush in a little bit of eco, styler, gel and just kind of lay it on my hair and brush the braiding hair and my hair together and then pin It just for placement purposes in here i'm taking a little strand of hair, because i'm going to use that at the end, to wrap around the braid. But as you can see, i'm going around to each piece and i'm just kind of brushing through and then pinning afterwards, because it helps with neatness, because this can get a little messy. All of my sections are pinned i'm just going to take the pieces and kind of pull them to the back, because when i start braiding i'm going to braid from the bag. But here i am still trying to get everything you don't need, because this is going to get a little hard for beginners, i'm not going to lie. It took me a while. So honestly and truly i wouldn't suggest getting super super long hair. You can get like a regular pack of braiding hair and a decent size length. This was super long, but i'm used to doing it now and i know that it takes a little bit time a little bit more time and practice as you go, but definitely start with shorter hair. If need be. If not, you can do long and just follow along with my video. All of my sections are pinned and pulled to the back, as you can see, i'm happy about that. So i'm taking some bobby pins they're not going to be there the whole time. So i'm taking them and i'm just putting them between the braiding hair and my hair, so just pinning the hair down. Just because i'm about to begin braiding and that extra little piece of hair, you can kind of just tuck it away because it can't get stuck in effect when you're trying to breathe, because you are braiding from the back. And you can't really see that well. But here i am just trying to get the pieces situated in my fingers because i'm about to begin braiding, okay, it took us a while to get a little bit situated, but here we are finally getting the arms and hands positioned to braid from the back. So i'm taking each piece - and i'm just kind of you, know, braiding and making sure that i'm tucking my real hair um this it doesn't have to be super neat as you're doing a braid. You can always correct afterwards and that's the good part about you know the braid, because it looks good after the effect and you can always correct your um mistakes. Like i said earlier, you don't have to get the long hair. As you can see, it can get a little bit messy, but you can just you know, dug it out and push through it like. I did because the hard part is the beginning, where you're trying to tuck your hair um with the braiding hair and just braid, but once you get past that point, all you have to do is just braid the braiding hair. Once your hair stops - and it becomes a little bit more simple now that the hard part is over we're just looking at the braid as a little piece, i just popped it off. It'S just braiding here um here i am taking out the bobby pins because i'm done with the braid - and here i am just kind of you - know - cleaning up a little bit because i did mess up like this slick. Part of my hair um that we slicked at the beginning of the video, but it's okay like i said you can fix all of your mistakes at the end. This is one of the final steps um, so you can take that piece that we separated at the beginning and just wrap it around the base of your braid just to hide um, not even too high, necessarily just to kind of make it look a little bit. Seamless in a sense but yeah, that's what i'm doing just wrapping the hair around it's super long. So you don't need a thick piece, because it's a lot of hair. It'S long and it'll cover. Now i'm going in with my got to be glued free spray and i'm just spraying um that little piece that i'm wrapping around just because i want it to stick, i don't want it to unravel, i don't want it to come loose, so just this is just For like safety precautions in a sense, so so now that the little piece is finally wrapped, it took me a while, because it's so long, i'm just kind of checking the braid a little bit just making sure i don't have any like um scraggly pieces strangling along. You know looking messy or whatever you can always tuck um. Here i am going in with my eco styler gel with my edge control brush and just brushing my edges and styling them. How i prefer. I know that everyone does their baby hairs differently, so you don't have to follow how i do mine but definitely slick your edges, because it adds to the look so so now that my edges are all sleek in the front i'm going to go in the back Of the eco styler gel and just kind of brush up the pieces that fell down from me doing the braid earlier, so pretty much, i'm really complete in here. I'M just pulling the hair apart a little bit to make the braid look a little bit thicker, because i did braid it a little tight, so it made it look kind of skinny um, but this is just my preference, okay guys. This is my final and finished. Look as you guys can see, the ponytail was super easy super, cheap and affordable to achieve, but yet glamorous, if you guys love this video, give me a thumbs up comment in the section below, and i will see you guys later with more content this week, bye
Comments
JaveoneSparks: You made it seem so easy. It looks really good I’m actually gonna try tomorrow. Hopefully it’s that cute
Jaia: Just As I Am: Omg! Clipping the three sections first before starting the braid is so smart! Def using that trick next time I do my braid
Kyana Lewis: So pretty great editing as well!!!
Lana Bana: Another video?? I’m so proud of you and excited to see your channel grow. I love this style. Thanks for the tutorial! ❤️❤️❤️
Kurundi Daniels: You it look so easy! Beautiful!
Alyx Sydney: Love it sis ♥️