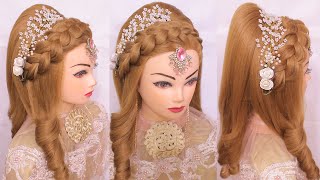
Cute Hairstyles For Long Hair - Dutch Flower Braid Tutorial
Video: Cute Hairstyles for Long Hair - Dutch Flower Braid Tutorial
Thank you guys so much for checking out my hair braid tutorial. It is my first hair video, so a big THANK YOU to my sister Mandy for being a part of the video and walking us through how to do it!! Please Please Please let her know if you think she should start her own channel...I'm trying to convince her to! :) Also, if you want more videos like this, please hit that SUBSCRIBE button, LIKE, and COMMENT. It means the world to me!!
If you like the music on this video, check out RUNAGROUND music's Youtube Channel below.
xoxo - Liz :)
Runaground:
www.youtube.com/runagroundmusic
www.facebook.com/runagroundmusic
www.twitter.com/runagroundmusic
Tags:
Hair Braid
hair braid styles
hair braiding
cute hairstyles for long hair - dutch flower braid
dutch braid
dutch flower
how to do a dutch flower braid
cute hairstyles for girls
hairstyles for long hair
hair braiding
hair for braiding
hair braid video
how to do a dutch braid
long hair updos
long hair updo
updos for long hair
cute updos
cute updos for long hair
ombre hair
braid hairstyles
easy updo hairstyles
easy updo
cute updos
haarstyles
PEINADO ; RECOGIDO EN FLOR /HAIRSTYLE COLLECTED IN BLOOM
PEINADO ; RECOGIDO EN FLOR /HAIRSTYLE COLLECTED IN BLOOM
Hey guys, thanks for checking out the channel today, I have my big fit with me today: Mandy she's, a total pro she's, a hair stylist. So she is gon na. Do a Dutch flower braid on me today and it's non red that you can do by yourself. So you need two people, your mom, a friend whomever, and they can help you out, but it's a really simple braid. It'S really quick and easy, and it just looks it's hard yeah. Well, it's hard and it looks super cool, so check out the video. Tell me what you think leave comments in the section below, if you have any questions, we'll be sure to answer them. So thank you so much for watching and we'll see you later. I, if you want to start with clean, dry hair comb, it pretty straight, and you can slightly dampen it just to keep the hair together and keep it smooth. While you are writing, you want to start with, with a side part, make sure the hair is pretty straight side parts pretty about, even with the center of the left eye or your right leg and we'll start with a small piece to the side of the part. We'Re just going to do a simple Dutch braid, just put it into three pieces. Just gon na pick up very small pieces and just like you're doing a Dutch braid down the side of the head. You just want to grab small pieces from either side and go down the side of the head like so when you are about to the eye level you're going to slowly start to turn the braid to the backside of head. Just slowly start taking pieces from the back of the head and whichever section you take, the hair from is a direction in which the grade will go so we're taking start taking the hair from more towards the back middle of the head. Your braid will start going in that direction, except let's make sure to keep it nice and tight and as you're taking small sections, make sure that there's no lumps in the section comb those through with your finger now as I'm taking this last piece over the ear. I'M going to slowly start to turn the braid towards the back of the head and take one more piece at the back of the ear, see how I'm taking pieces just straight across back of it. I'Ll take one more piece right there about City adjacent to the corner of the ear, so that when the flower is put to the side of the head, it'd be a nice swoop from the back of it. You now I'm gon na go straight across that Ridge of the hairline and I'm just picking up very small pieces on the underside of the braid underneath because you want to leave the bottom section here to be able to place the flower. So you can see, I'm just pulling the braid wherever you take care from is the direction in which the braid will go. So I'm just taking hair very small pieces from the bottom of the braid and pull in this section straight across on the top of the head, just keeping it nice and tight and combing the hair with my fingers as I go along. So I don't have anymore any tangles cuz. Those will show up as lumps on the hair when you're finished, so I'm gon na keep I'm just going straight across the hairline combing. As I go with my fingers, keeping it nice and secure and I'm just getting over to the corner, almost the corner of the left ear - and this is where I'm gon na start to turn my braids slowly taking pieces as I get to the corner. Just about the last piece on the bottom I'm going to take and then I'm going to pick up the whole section on the left side of the head over the ear and combine that into my braid. And this is where you turn you just start taking up right underneath the bottom and then pick up your other piece underneath the bottom as well, and that will turn your braid into that nice S shape the other direction. So I'm just taking up just small pieces. Just like I did before, but going into the opposite direction, just taking vertical pieces straight down, coming as I go nice and secure, and these smaller sections of hair you take the smaller your Dutch braid will be. So if you want a a fatter braid, then you want to take bigger sections. If you want a tiny araid, you want to take smaller sections, I'm taking about medium medium sections, because you're, bigger braids will not be as tight. I'M gon na keep going pulling the braids straight across the backside of the head. I'M not taking my last piece and combining it in with my braids turn her there we go once you have that that last piece secure in with the rest of the hair at this point, you're gon na start just braiding regularly and spray this again just to Keep the hair, nice and smooth so that you can grab it easier comb that through so there's no tangles you're just going to go down. This is the flower part of the braid, so we're gon na go down and braid about three passes through and stop there and then you're going to pull out just a little bit pieces of the left side of the braid. This is what makes the petals for the flower just pull those out nice and loopy, and you could only do this a few sections at a time if you braid too far down you're not going to be able to get the braids loose enough to pull those Out then, you braid down about three more passes and do the same. We'Re just gon na want to keep pulling it's okay. If you get some lumps in there because you can smooth those out when you place your flower, that's okay, no you're breaking down! So you want to make about three passes and then start pulling out from the left side. Just like that, it's okay! If you start you have some little loose, some people have more layers than others. You have some sprigs sticking out. That'S not a big deal at all. You can pin those or spray once you get everything in place and you'll the hair will get smaller as you go down and that's okay, just pull out as much as you can. This is a really neat. Look if you have highlights in your hair, it um just shows off some dimension in you know in your flower, just keep pulling and as you get down to the very bottom of the hair, it's gon na get harder to pull out. So just do the best. You can I've gotten to the very end. I'M gon na take a small ponytail holder. I wish I had a smaller one, but I don't so I'm just gon na double it and then put it in the hair. Get that as tight as possible and I'm gon na loop, her hair around the very end, and that will help secure that, so it won't be sticking out. So at this point you have a nice half, pancake, braid and you're, going to loop it around into the side of there. Just like that, show you one more time and take the braid up and loop it around. Just like a flower and just place that, where right in that middle section, where we left plenty of room for it, you just want to tuck in the middle part, just like that now you're going to take hair pins more bobby pins, I like to use bobby Pins for this same color as the hair, and you just want to start pinning - I always pinned my middle section first and that will help secure that and then you can go around and start pinning. I always like to pin right behind the pedals, I'm just going in and pushing that bobby, pin right into the hair that you want to secure, I'm just kind of feel around, and so whatever is not secure and just place. Your bobby pins see that little cotton behind it. It'S a little sprig. That'S sticking out there. Okay, it's at this point. You'Ve got everything pinned and secured, and now you can just start kind of pulling out the sides of the flower petals make him a little bit. Fuller just make sure you got everything secure before you start doing this and you can just kind of start personalizing it to the hair. You can take whatever sort of embellishment that you want. I'M gon na use this flower. It'S got a bobby, pin and stuck to it, so it's a little bit easier to place and you just put that right there in the middle and that just adds a little bit just of a centerpiece with the petals coming out. You can add anything that you want and we added a button the other day it was really cute, and but there you go, there's our Dutch flower braid and it's really easy looks hard. That'S the idea to look a lot harder than it is you
![15 Stately Single, Double & Dutch Braids for Men [2021]](https://static.hairurl.com/p/2021/12-20/845e19b8304192af37f02d6a35264330.jpg)

Comments
Valerie Sengupta: I had my beautician to do this on me several times and each time I get compliments all the time. This hairstyle looks really good with ribbon braided into it to give it a very formal look too!
blizfulmakeup: That's good to know, Anna! Let me know if practice makes perfect...I haven't tried this by myself yet! Thank you so much for watching...means so much!
Jakayla Watson: Thanks so much now I totaly know how to do a dutch flower braid!!!
Marquita Jones: That's awesome, I want to try do my daughter's long hair.
Anna Bjarnsteinsdóttir: "it is not a braid you can do by yourself" I did it by myself and it turned out pretty cool, just gonna keep practicing and I'll probably wear my hair like this on Christmas-eve :D
shttykitty: So beautiful!
blizfulmakeup: That's a great tip...thanks for watching! I'll try the moose thing next time!
LeilaLashesOut: really love the hair style! especially love Little Things in the background ;) C:
Paris Pentreath: Great hair, nice girls - I'm gonna try this one tmw :)
sweetness0995: love this...not sure how i can do it...but can try :):)
Michelle Morrow: Cute style. I might add that a small amount of moose would keep it perfect. Loved it!
Anna Bjarnsteinsdóttir: it does! I'm doing this tonight!
Carolina Sanchez: Im going to do this when i go into the hospital for my labor :D
[email protected] DelilahAreli: Hello, can anyone tell me where i can get thisdone at? I want this hairstyle for prom, thank you
oonagh1to5: love this version of little things do u know who sings it?
Haleysbubzvlog: I can do it on my cosmetology mannequin head im practicing my dream job!
Rebecca Cox: Well, I don't have the option of having help, so will be trying this on myself and will see how it turns out. I have much more hair than that, so it will be interesting. :) Wish me good luck!
Madeline Cartoscelli: Those are so nice braids
dovinesakysiu: I can do this for myself :P
Agata C: i apselutely [LUV] this hairstyle my coz had that done for her communion!!!:):):D:Dgood luck with that it looks a bit hard 2 do
eternalsenseofmind: it's not a two person braid, i can do this braid on myself :p
Jasleen Aguilar: Im Sayingggggg!!!!!!!! I did it right after I saw the video!
krissy ponder: l<3ve this...help me with my hair plleeassee!!!!
Kitty Candy: cool!
Noa Newa: I am 12 and i can do it by myself
eve: I'm just going to go and cry in a corner because my hair is short
Emily Munro: do u need super long hair ?
anahi perez: I can do it on myself
LeilaLashesOut: And Ed Sheeran!!! <3
Emma Field: I can do it myself...
lenscheenn: Sweet but i have not sooo long hair
Katie Verrill: im 12... did it myself
Catarina Maple: its 4:16 in the morning... THEIRS NO ONE 2 HELP ME !!! AHHHHHHHHHH!
Brianna Murray: Why can't you do it on yourself? I can
Retha Nails: car
Retha Nails: and they use