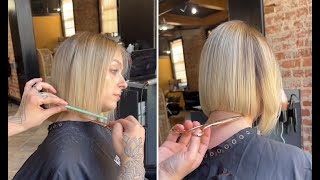
Easy Medium Shaggy Bob Haircut For Women | Layered Bob Cut | Hair Cutting Tips & Techniques
- Posted on 03 June, 2021
- Medium Hair
- By Anonymous
Easy Medium Shaggy Bob Haircut for women Tutorial Full
Layered Bob cut | Hair Cutting tips & Techniques
"I Love Haircut - I Love Hairstylist"
#ShaggyBob #LayeredBob #ShaggyHaircut #MediumBob #LayeredHaircut
Show you a really easy way to do a shag haircut today, we're going to start by working on our doll and we've cut it into four sections: the side, the back the other side and then the top. So, with these four sections, what we're going to be doing is we're going to create a shag haircut that goes with something nice and flat on top and then the lens comes longer through the bottom and the back so guys. If you want to come a little closer, what i'm going to do is i'm going to show you my first section. So my first section is this box that we have on the top, so i'm just going to be working on the box on the top okay. So you create a little square box on the top, and this is where you're going to start your first section you're going to start it in the middle of this first section as well. Now the really cool thing about this is what we're going to be. Creating is we're going to be creating the length in the front, so our fringe area or our bangs area. If you're in america is going to be created from the first section. We have so that box that you see in the middle gets divided into one center panel, okay, and this center panel is what's going to create the length in the front. So when we start this, we really have to decide what kind of length do we want to see in the front of the face from now. So if we look at it, i can start to think. Where do i want these lengths to be placed so by taking the front hair and bringing it down? I can start to decide where i want the length to sit in the front so discussing with your client the kind of lengths they want to see before you start, you can do a little check, make sure you're happy with the length you're creating and once you're Happy we can start to create a nice flat cutting angle, so this is going nice and square from the beginning on the top here. So what we're looking to do is to just create a nice flat square, cutting angle with that first section. So what we do is we bring sections from the back into the front and we're going to continue with that square cutting line so guys. Let us know where you're tuning in from let us know if you're liking, what you see don't forget to share and also, if you have any questions, please don't hesitate to ask pop them in a comment down below and we'll be more than happy to answer any Questions you have today, so what i'm doing is i'm just continuing in the same vein, so i'm taking in sections and i'm continuing to cut a nice square, cutting angle so guys i really like this technique. I think it's super easy to follow. I found it one of the easiest and best ways. One really nice thing about starting from the top is a lot of the times people kind of guesstimate, where they're going to end up at the end and by starting on the top. You really know the length you're going to end up both internally and at the front. So what i am going to do is i'm actually going to take it a little bit shorter in the front at the end, just by chipping into it, but as a general idea, i'm quite happy with this sort of length we have. I might not even have to really cut much out of it, so once we've done that, we've got our first box in the middle and we've taken one center section. What we're then going to do is we're going to pull this box to one side. Okay, what i am going to do is put in a little bit of leave-in conditioner, which helps like a priming or a cutting motion depending on which country what you call it today, i'm using a little bit of milkshake, leave-in, conditioner, and so guys you've done your First section in the middle here, you've pulled it over to one side and now we're going to start to connect it. So we come over to the widest point of the head, so we're kind of working from the middle first and then we're going to work our way towards the front hairline and then from that center section towards the back. So if we look what we've got is we've got a nice little section in the middle here just at the widest point of the head. Okay, so once we've got that first section we're using the center as a guideline and we're going to be cutting again a nice square cutting angle, so it's both square on the vertical and on the horizontal. So, no matter how you look at this, if you're looking at it from this way or from this way everything is going to be cut square now remember the center is your guideline and the most important thing about guidelines is: do not cut them so once you've Already created a guideline, you have to be very careful not to cut your guideline and it sounds quite trivial, but sometimes we do have to think about it. So again i have the center that i've cut already. I have my new hair and i'm looking to connect the sides into the bit that i've cut already and so that way we're saving our center section, we're saving our guideline and we're working forward with each section. So i find this concept. It'S a really nice easy concept, because everything is just square. Everything from both front to back from left to right is just cut nice and square across okay and we work all the way until we get to the front and once we've reached the front, we have to remember to go back and cut. The back sections is remember: we started this in the middle, so we just take the front in lifting it up and cut it in so now we've gone for something nice and square which works it's from the other side, which works to kind of create this flat. Squareness through the top we've worked from the middle forward and now we're going to be working from the middle backwards so by starting with that nice square section on top cutting a center section square and connecting it horizontally with some nice square cutting lines. So everything's really square with this haircut, and i really like that as a concept, it always looks strong as well, so there are a lot of fun to do and we're just looking again to connect that square to the center. So i think, there's always a lot of different ways to do these haircuts, and you know i think all of them have their merits. I just personally found this to be one of the quickest and the easiest ways, conceptually so for those of you that are just tuning in i'm, michael from slate. We'Ve done a center section, nice and square we've then connected across square, and what i'm going to be doing is i'm going to do the second side so again we're just going to be removing a bit of hair from the center and moving it over to one Side, we're going to put in a little bit of priming lotion to make the hair nice and soft for us a little bit of milkshake leave-in conditioner, and what i'll do is once i finish this, it's gon na be much easier for you guys to see that Top section and i'll give you a little bit of a recap before we move on to the sides. Okay, so again we have that center section as our guideline and we're coming across nice and square and so we're working from the widest points of the head and then we're moving ourselves forwards. And then once we've done the front, we'll move backwards. But it doesn't really matter where you start as long as the end result is everything is nice and square guys? Let me know if this is making sense. Let me know how you're doing give us a thumbs up if you're liking. This you know i want to hear you guys, try this and send me a picture. Let me know how easy it was for you to create as well beautiful and then the last section from the front right and so again we can start to see it all kind of coming together now so once i've worked from the center of this haircut, the Widest point of the head, excuse me forwards. I'M now going to be working to the back and what i'll do is i'll show you this sectioning in a second with my comb, because it will be a little bit easier to understand. Okay, so all we're looking to do is connect the center and go straight across so that initial guideline really gave us everything that we needed for the rest of this haircut. So if i just comb this a little bit forwards, what i'm going to do is i'm just going to grab it to try and show you guys that we started with a little box. Okay, george wanna come a little forward and just show everyone this. So we started off with a little box: okay, all the way through a little box and what we did was we took a center section, we lifted it up and we cut it square across. We then started on the widest point of the head and came across and connected both sides, afterwards horizontally working forwards, nice and square and then from the widest point. Walking back all right. Just give me a second okay great. So what we've done is we've actually created the length that we're going to have in the top and now we're going to start connecting both the sides and the back, and so how i do this is. I use the top as a guideline for the sides, so by making sure it has nice and wet so it's really easy to manage. What we're going to be doing is we're going to take a guideline from the top, which is allowing us to connect to the bottom. Now, when we connect the sides, we can either cut a cutting angle. We could lift it all the way up, which means that the ends are going to be really long. We could go down a little bit, which means it's going to be more of a layered feeling, but slightly shorter in the bottom. We can go for something flat which gives it more of a melody feel or we could even go in which then it would create graduation, but we're still looking for that shaggy feel so we're looking for something which comes out. So what we're going to do is we're going to take a tiny bit of hair from the top, so we take a one millimeter section from the top and we bring it down. This is our guideline, so this little bit of hair that i've added in is my guideline for the sides. Now, if you think about it, because the top is balanced, what happens when you use the top corners as a guideline is they're both the same on both sides? So if you use this as a guideline and use the other side as a guideline, what you have is balance at the end of it, so we're going to be bringing in the sides first, so we're just cutting this hair down so kev. We have people tuning from south africa from san francisco charlotte florida and we have one asking: where are we tuning in so i'm actually in a beautiful island called cyprus right now, we've come here to do a few classes and then i'm taking myself off to greece To do three courses and then back to london, so it's nice that the world is opening up and we're allowed to travel again a bit and teach internationally. So i'm really happy our academy is based in london but uh. I hear that you said: we've got some south africans watching, so i have to give a mention out to scar, we're doing a live webinar with scar on the 7th of june day before my birthday, so i'm very excited and we're going to be going live for. You and the live will include both lectures, hands-on, headsheets, three different looks on a doll and it's all about cutting hair, but with the bespoke cause so actually cutting the hair with a bespoke feeling in mind for your clients. So this one i'm teaching is very much a technical haircut, let's say, but it's not so much on the suitability and how we can personalize this. So we go into much more detail with that when we have our lectures so it'll be really exciting. So anyone who wants to join the webinar on the 7th of june can book the tickets at slatehead.com and we'll drop that in a link afterwards as well cool. So you can see what i'm doing is i'm connecting the lengths that we've created on top with my cutting angle, going down. So what we have is we have length to play with on the bottom, which connects from the length that we have on top and as we're working through we're using the top as a guideline. So the top is now a guideline for the rest of the haircut. So i'm wanting this to come quite nice and short in the front and generally after that it gets longer as we get to the back, because the back has more hair. So as we go further back, we get more and more hair to play with. So one thing i will teach you and something that's really important - is to remember the angle that your hands are taking when you work, because what will make one side different from the other side is when you do not have consistent cutting angles. So what i mean is, if this side you do this and then the other side you come in you'll, find that there's a difference in the haircut. It'S not balanced. So by keeping an eye on your cutting angle. In that way, you give more certainty to your balance within your haircut all right. So now what i'm going to be doing is i'm going to be moving on to the back section of this, so i'm just going to clip away the back for a bit more safety great. So what we've done is we've got that top section, which is our guideline remember, so this top bit is our guideline and what we're doing is we're connecting it as we go down so we're using the pre-cut top as a guideline for where we want to see The length in the bottom so by combing the hair out we're looking for that guideline from the top to peek out and then we're connecting it up and again so as the hairline gets lower at the bottom. So does the length of what we're cutting so the length is actually getting longer and longer as we head towards the back, because the back has more hair to play with it has more hair because the hairline is lower. I hope that's making sense to everyone guys, as always, if it is making sense, give us a thumbs up if not drop, us a comment and be happy to go over anything and everything so again coming and connecting it to that top where our guideline is and Working our way down, i have seen many of your lives and i love the way you teach awesome. Thank you. Thank you so much. It means a lot actually uh. This is our third year anniversary of doing hair brain lives, believe it or not. Three years so time flies and we have a lot of fun. So a big big love to the harebrained community for three years of monthly lives. It'S a lot of live videos. Actually so yeah, it's been a great journey from you know our company, as it was much younger and smaller back then, and how it's grown and we've done lives in different countries around the world and uh yeah. It'S been a really really amazing journey. So a big love to all the hair brain community for always watching and supporting so nice. So now we've got a little bit of the length building in the back, but we've taken the top as our guideline now. What we really want to do here is make sure that when we do the second side we have balance, and so the easiest thing, as we said, is to use the top as a guide. The way we do this is we take a section from the top and we bring it into the bottom as a guide, so by taking the hair from the top and bringing it over we're using the top as a guideline for the rest of the haircut. So something i really like it's very simple: we've done the top all nice and square we've gone across all nice and square, and what we're doing now is the hair that's falling over to the side, we're using it as a guideline to work our way across now. What i did was i stood in the back and i had my fingers like this to cut it now. The truth is that if i come across and i change my finger angle, it's quite hard to get the same consistency. So if you have my fingers down on this side, the best thing to do is to actually turn the doll around and then i'm standing in the same position so my hand position hasn't changed. You see this would be on the outside of the fingers to be on the inside, so we want to make sure that the elbow is down the elbows up, so we're keeping it consistent. So my elbow is up on this side, and so what i want to do is when i do the second side. I want to make sure that my elbow is up again. That way, it's much easier for me to keep consistency in the cutting angle. I hope that makes sense and i think that's a really good tip for everyone, because i believe balance is a very, very important part of cutting hair great. So what we're doing is we're taking that first center section again moving the hair out of the way finding the initial length that we connected it to so. The top is our guideline. We can see the pre-cut hair there yeah and then what we're looking is we're looking to have the same, cutting angle that we did on the first side and we're working our way down. Okay, so you can either work from the back to the front or the front to the back. It doesn't actually matter. I tend to alternate depending on what side i'm working on, but in this case i'm working from the center back and then i'll work forwards. So nice, small sections and again just thinking about connecting it from the top michael yeah. You know what it's funny i mean. I think i feel like a lot of hairdressers are gemini's. I keep meeting gemini's everywhere and one of the first salons i've ever worked in. I literally think like 80 or 90 percent of the starfall gemini's, so it was fine providing their rule in the same mood but uh thanks for tuning in evelyn. I know evelyn's booked on a course with us in london. So our next course in july, which is sold out. So thank you very much evelyn and we look forward to seeing you we can celebrate our birthdays together, which is always nice and fun great. So again, as we're working through maintaining the length in the bottom working. Our way up, and then the last section before we move to the front of this, so what i'll do is, when i finish this i'll, just do a little bit of a recap again for those of you that are just tuning in you just have to eight Minutes, uh, i don't say, band, have another one now sandra my birthday is today happy birthday, slimer very nice. I love it. If you were here, i'd give you a birthday haircut, but i'd. Let you choose, don't worry. I wouldn't. I wouldn't treat you like a dog. So we're moving forward now and once i finish this i'll be able to go over how we've connected both the sides with the top. So i really like this because i think it's an easy concept. I like the fact that we have something very nice and square on top coming from any angle, you look at taking this hair from the top down and then what we do is we use that first bit of hair from the top as a guideline, the more Flat you do it the more graduated. It feels the more you bring the hair out, the more layered it is in the bottom. So it's a really cool, really fun technique to work with it's looking really nice. So now we have to do the back and the back is actually the same thing that we've done so far. So what we're going to use is we're going to use the top as always as a guide. So the really cool thing is by cutting the top. First and letting the hair fall down to the sides and the back, it allows you to connect the hair with balance, so it means that the top makes the balance on both the sides and the back. Sometimes, if you start in the back or you start on one side, the balance becomes a bit harder, but starting on the top, it's always easy. So again we take a little bit of hair from the top, so a little millimeter of hair from the top, and we use that top section as a guideline to the rest of it. So the top is a guideline for the rest of the haircut. So we're going to take a nice center section, move the hair out the way and then we're going to start using the center section as our guide now here we don't actually have a guideline for the angle, so we know that we're connecting it to the top, Because we have a little bit of hair in the top, that's already cut so the top cut here is my guideline, but we don't know here if we want to do the same angle or if we want to make it longer or we want to go flatter. It'S up to you, there's different effects. The higher you go, the more layering you're going to have at the bottom, the more length the lower you go, the shorter it's going to be the more vertical you are, the more graduated it feels and the less the more length you lose. And then, if you go the other way, it is actually graduation. So here we have to decide ourselves a little bit what kind of angles we want, and that depends on what feeling you're going for what your client wants to see, what kind of hair they have? Maybe density texture, so these are the kind of things that you know you have to think about when you work, but there's a concept of these four sections and how they're then cut, i find them really easy and fun to use and by changing the cutting angle. Even a millimeter, you can actually have a real large variety of different end results, so the fun thing is doing the same haircut, but slightly changing your cutting angle will give you a new haircut and so by personalizing those little things like how flat or how heavy Or how layered you go, you can really personalize these haircuts to your clients wishes so mike. If you change the angle at the back from what you used to do, how you connect the two sides that they are already with the eye everything back, it will connect. Now, if you change your angle, a lot, it will actually cut a bit off the sides. So you know you have to be careful if you don't want that, but you have to almost look at it like two separate haircuts, then maybe the back's like a really cool flat, cutting angle and then the sides are longer you know. Maybe it feels more graduated in the back and short, but the sides end up being you know longer and and have a disconnected feel. So it really depends. You know the sky's the limit, but obviously you know having that vision of what you want to achieve from the beginning is really important and then, after that you can change it up. So if you're thinking, i want to see something, that's a little bit flatter a little bit different. I like a bit of length here. All you do is change the angle and you've got a new haircut, so i think always with these square sections, because it's all about control, you can really control what you're, building and decide yourself i find playing, though a lot especially on dolls is great, because you Know, obviously, you can have more ideas and - and you can see how different results you get so when it comes to doing your clients you're more inspired, there are more ideas, more ways of getting where you want to get to. So i found when i learned more about hairdressing. My my creativity grew because i could visualize the haircuts better that i was creating, so i think, having a practice and seeing how these things result really will help you to be more creative with your work. So at this point i'm going to bring everything back and just make sure we don't have any long bits hanging out all right so have a question from sharon. What is the living product you use on your mannequin yeah, of course cool. So let me show you so we use the milkshake leave-in conditioner, it's a really good primer when you want to soften the hair and also when you want to comb through really damaged hair. So anyone that has damaged hair - or you just want to help get a primary. Then this is a really good move, so we've done one side and what we're going to do is we're going to be working through the second side, now really nice and easy. So, bringing in the second side moving the hair away and what we're doing remember is we're bringing the top as a guideline into the bottom. So we have the top head, that's already been cut and we're connecting it in to the bottom. So, for me, these are really cool as well, because i'm going to move over, so you can see better. So the cool thing is these ones. You know they're very popular right now. Aren'T they this kind of like shaggy or malady, feel to them. They have a really really modern feel, and i really enjoy doing them in the salon a lot these days too, so having a quick way to do it. I find really helps me in a silent situation. You'Ve just got more time to chat with your client think about products and just get that basic shape in quickly so question yeah from sandra. You have the same month birthday. What should your body position be for sectioning in the back? So really i'm doing this very wrong now. What i did was i've come over to this side and i've changed my hands just because i want you to see better. So normally, when i did the first side, i was in a much more comfortable position with my elbow up coming down. You can see that when you stand your your hands, naturally kind of do what they want to. So if i want to layer with my arm up, i have this more of a layered cutting angle. It'S just much easier for me, but if i want to do graduation, it's quite difficult. So what i do is i bring my elbow down and all of a sudden, i'm graduating. So actually the body position followed by the elbow position is really important in this case, so i kind of wanted to stay on this side. While i was working keeping my elbow high but i felt like it might have been hard for everyone to see so i felt like i should change it, but now that i've said it, i want to stay on this side feel free yeah. So i think i think this is it. You know looking a lot at your elbows, but you can literally just stand wherever in your kitchen. I don't know and just put your hands in different positions and see you know, put your elbow up and be like. Okay, that's definitely more of a layered feeling for me. What if i bring my elbow down, that's that feels good like graduation. I can't really layer that feels weird and again you can work on this sort of elbow up on the out or the inside of the fingers. This one, you can see it kind of wants to go flat, it can go. Graduated layering is difficult, so you don't want to layer like that so by just by standing there and holding your fingers in different positions, you'll kind of get an understanding of what's easy, and what's not i mean we go into this stuff in really much greater detail In our classes, with our lectures and everything as well, so you know, i think, just having a good understanding. But you know people can show you these things and they can teach you. But you have to learn your own body as well, because not everyone's body is the same. You know i had a very good teacher who saw me trying to cut hair and uh and they said well. What are you doing? You'Re going to have back problems in a few years, and i said well, that's what i saw these guys in the video do and they they said. You know you can't cut like other people just because they do it. You know it's. Their bodies are different. So you've got to really feel for yourself what works for you what's comfortable. I think you know feeling comfortable with the way you stand is more important than getting a perfect angle, because you know we work hard and we bust our butts off for clients. So we need to make sure we look after ourselves as well got a new one from deborah. Are you bringing each section to the center? No, so i'm not so what i'm actually doing is i'm over directing to the previous. So we're going for something. That'S more of a square feel, so what i'm doing is i'm bringing each section to the previous at this point, but that's a really good question. Thank you for answering that asking that sandra no that's debra sandra said. Thank you for the answer before you're welcome sandra and thank you yeah. So what we're doing is we're just over directing to the previous, which means we have more of a square feeling with it. So i'm really liking the way this is coming together now, so it has that nice feel super textured super layered on top, so this is looking really nice, so it's got that kind of softish feel to it. I really like the playful bits. So what we've done is just a little recap is we've cut the top nice and square and then we've cut it across square as well. So from every angle you look at this is just nice and square we've taken one millimeter from the top from both sides. In the back and we've brought it over to the bottom, we've then used that top hair as a guideline to come across and cut a layered cutting angle. Now i've gone for something quite tight, so it's ended up quite short, if you want this longer, you can just lift it up the more you lift it up the longer the outlines get the more you go in the shorter they get the more graduated it feels And again, bringing the hair from the back and just again cutting it into your cutting angle and again, the more flat you go, the more graduated it feels the higher you go, the more length you end up on the bottom, so you could literally put all the Hair up, if you wanted to save all the outlines, that's looking really cool. What i'm going to do is i'm going to put a bit of product in and i'm going to start to dry it as well. Looking great michael, thank you very much beautiful and we have to thank gerald obviously for our three year anniversary of doing hair brain lives, so we're very grateful for the platform it's been so nice to share with everyone and when we travel internationally. It'S really nice to hear people that say: they've been shooting and watching with us as well. So really big, big love today for creating a community for us to share with other crosshair dresses cool. So i'm putting in a little bit of shaping foam now and after i've put in the shaping from i'm just gon na start to do a little bit of air drying with it. So for those of you that didn't see what i used, i've just used a little bit of shaping foam for milkshake cool. So i'm going to start to move the hair around just to get it in the kind of position. I want to see it drying in and then i'm going to grab myself a diffuser and i can start to have a little play with it as well. I'M going to move the hair into the general position. I want to see it in and i'm just going to secure it now with a little grip for a moment beautiful. So i, like the rest to have quite a loose feel to it. So i'm not going to touch it too much, but i just wanted to secure that out the way and then we're going to start to dry it for you as well, but i'm also really liking the head shape that we're getting from this. So by working inwards. We'Ve got a really nice head shape, i'm just going to grab a diffuser, so just retain this, that's great okay. So what i've done is i've added a little diffuser to my hairdryer, but what i find is, if you have what they call a sock dryer that also works really really well so so one thing i like to do is i like to use my fingers to Kind of create a little bit of movement and texture. I try and not touch the hair too much, but i just go into the roots and i just move my fingers and just by moving my fingers, it gives a little bit of movement to the hair. So i don't want to interrupt the hair too much, but i like to give it a little bit of movement: [ Applause, ], [ Applause, ]. So, and so what i'm doing here is i'm going with my fingers inside and then i'm curving, my fingers in and what this does. Is it curves the head backwards? So it's just going fingers first towards the face, turning my fingers towards myself again and then pulling to the back, and this creates that nice curvature we see cool. So what i wanted to just show you guys as a last concept as well to think about. Is it really depends on what you're thinking you want to do? You saw that we had the initial length in the front and that's how we started so. The most important thing here was deciding an initial length in the front from our first section that we took from the center, which really kind of dictated the rest of the haircut to us. And so i i really like that that first section we did really defined the haircut for us there afterwards and so starting with a really clear plan of where you want the lens to be when you start is going to really help you create this look and Again, it can be done in so many different ways. So that's why i like this, because it's very versatile it can be anything from a very tight short mallet to a really long shag. If you bring everything up so to give you a little recap as well. What i'll do is i'll just explain the sectioning, so we started off with a box in the top. We cut the first section square depending on the length we wanted in the front. We then connected across horizontally all the way to the front and the back so that initial box was cut square across and what we then did was we connected with a millimeter from a guideline from the top, so the top length came down and created the sides. We then connected now. If we had brought it up more, we would have had more length if we go down more less length and more towards vertical. We go the more of a graduated feel it has. We also did the same from the back connecting through from the back, bringing it down as a guideline and then deciding the angle. What we wanted to keep


Comments
Martin Adams: Your explanation of choice of cutting angles , demonstrated via different hand angles was enormously helpful. Brilliant. Can’t thank you enough ! It gave me an immediate insight into cutting angles and their potential outcomes. Your an excellent teacher ! Many thanks ✅
Лилия Черенкова: Стрижки прекрасные,универсальные,модные,о таких я мечтала в детстве.
Bonnie Cothran: I love your teaching method. Thank you.
T K: Love this look..it reminds me of the gypsy shag of years ago...nice job!!!
Zamarys Escobar: Saludos desde Cuba muchísimas bendiciones
Taslima Karim1993: Nice hair cut
Debby Marler: Like to see it with a side part
Shanta Shetty: V well cut beautiful
Lourdes Flamenco: Hola de México
Rose Lopez: What happens if a person has thin hair
Lussy Trisna: Gbu
sarahlopez: Does anyone know his Instagram?
narges ladani: Where is your hair salon?