5 Minute Hairstyles For Shoulder Length Hair
- Posted on 14 June, 2018
- Medium Hair
- By Anonymous
♥ instagram - https://www.instagram.com/emilyyorland...
♥ facebook - https://www.facebook.com/EmilyOrlando...
♥ snapchat - em.catherine
♥ twitter - https://twitter.com/emilyyorlando
S U B S C R I B E ⇨ https://www.youtube.com/channel/UCKYD...
B U S I N E S S I N Q U I R I E S ⇨ [email protected]
---------------------------------------------------------------------------------------------
D I S C O U N T C O D E S:
SIGMA BRUSHES:
Want to grab some of my favorite Sigma Brushes?
USE CODE -EMILY- AT CHECKOUT
Click the link: http://sigma-beauty.7eer.net/c/372445...
DOLL 10:
use code EMILYDOLL25
for 25% off any purchase!
LOVING TAN
USE CODE emilyyorlando FOR FREE MITT WITH MOUSSE PURCHASE
FELLO EYE WEAR ⇨
use the code ‘emilyyorlando’ for 15% off your purchase!
L'ANGE ⇨
use code 'now30' for 30% off your purchase
—————————————————————————————————————
LIP INJECTIONS VLOG: https://youtu.be/YJe7L1mxarI
BEAUTY ROOM TOUR: https://youtu.be/QL6tpQlcdmw
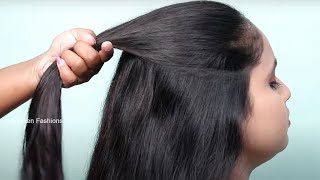
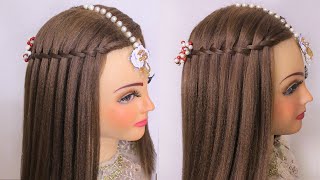
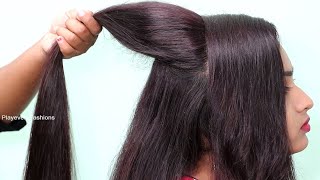
Hey guys and welcome back to my channel so for today's video, I'm going to show you three super easy hairstyles that take about five minutes each and work really well. If your hair is shoulder length, obviously these looks can work with any hair lengths. But definitely if you have shoulder like these will definitely work for you and, as you can see, my hair is already has a little bit of a wave to it. While you don't need to have the wave to it, I highly recommend it because it adds a little something to these looks. These are more summer inspired hairstyles, so I definitely recommend doing just the cute little beach wave before you start. These look so look number one is super simple, and this is definitely a favorite go-to, so part your hair. Any way that you want to have a parted, mine's already parted in the way that I typically do next you're gon na. Take your hair and split it. Pretty close to Center, as if you were gon na, do pigtails, but what you're going to do is take each side and cross them over with each other. So you can see like that, take one side and basically create almost like a small little knot. So now your hair is interwoven with itself and just pull it and you're going to take each end and tie it together with a little elastic. So this is basically creating a low ponytail, but adding a little bit of a more of a style to it. Once that's all taken care of, I already have some pieces that are falling out, but I actually want to take a few more out, because I want this to be really messy. So I take about three sections on each side and just pull little pieces of hair out so that it's really messy and bohemian looking you can decide how messy you want it to be, because this can be honestly really put together and clean. But I think the more bohemian it gets the cuter it gets, and that is literally all you do so really it's super simple. I mean it just involves creating a knot with your hair, but this is definitely a quick favorite because it really takes me five minutes and if I curled my hair the day before and it's still wavy the next day, it allows me to style it really fast And head out the door style number two is super simple: all you're going to need is a couple rubber bands. So what I'm going to do is take my hair. You can leave it parted. The way that you want it, but we are going to be creating sort of a half updo and with this little ponytail section we're going to create a bun, but we're not going to pull it all the way through we're going to leave a little bit out. So that we can kind of mess with it a little bit and now I'm going to kind of pull up here to create a little bit of volume and a little bit of messiness. So we have a cute little updo with a bun in the back and what we're going to do is take a section of the hair, a pretty good-sized section and we're going to just create a nice little braid you and once I get towards the end. You'Re gon na take another elastic and just tie this off nice and tight in I'm, going to now start pulling apart the braid to make it look, fuller and thicker. This is optional, but I definitely recommend it just adds something really nice to the hairstyle. So once we have that going for us on that side, I'm just going to take some little flyaways from the front, because I just like summer hairstyles to be a little Messier and less put together and that's how easy that one is. You can just see it. The braid adds a little something extra than just doing a bun, and you can definitely add more than one braid. I like to make sure that the braids are asymmetrical. So if you're gon na do one on one side, then don't do anything on the other or, if you'd like to do braids on both at least do two on one and one on another. It'S totally up to you, but I think asymmetrical looks at the best. So this last and final hairstyle is definitely probably my favorite of all of them and it's so easy to do, but it's just a little twist on something you probably already have tried with your hair. So I'm going to take my hair and pull it back. It doesn't matter how it's parted, but I'm only gon na take a section of hair from here to here. Let the hair pretty close down to the middle. When we do this - and I like to take pretty thick section of hair and we're gon na - create basically a faux braid, so I'm gon na twist it together and keep it just like that, and then take my next section. Take this piece, and I'm gon na overlap it on to that middle piece and on this side do the same thing overlap it with the section next to it. So we have a nice kind of faux mohawk braid going on, but so much easier than creating a french braid. Now, at this point, I'm going to actually take a regular ponytail and I'm gon na create a bun, but I'm not gon na pull it all the way through. This allows us to make it Messier and pull it apart, a little better. So, as you can see, I've got this huge button up top here and I'm going to start kind of pulling these pieces out to create that poufiness there any piece. That'S still sticking out from this bun that we didn't pull through, I'm just going to wrap around the ponytail and then grab a section of this bun. Then I'm gon na take a bobby, pin and pin it right into the base of the button so that the bobby pin can be hidden and I'm going to take the end of this section. Taking the ends of all these, so that we can wrap it into the base and I'm pinning the bobby pin again into the base of the bun to hide it any little cookies or flyaways. We'Re just gon na pin it into that base to keep them hidden, and then you can kind of pull it apart. A little, and now our hair is nice and out of our face, but super cute and stylish for summertime, alright guys. So that's it. For my three super easy summer hairstyles, I hope you enjoyed if you like, hair tutorial videos, definitely give this video a big thumbs up. Thank you guys so much for watching and as always, if you're not already subscribed make sure to hit that button down below, because it would make my day and if you would like to be notified every time I upload a new video, then don't forget to hit That little Bell icon next to my subscribe button. Thank you guys. So much for watching and I'll see you next time.
Comments
Areej Faisal: I kind of make these hairstyles everyday
Paige Schoenherr: Love Love Love ❤️
Mallerlyn: love :)
Kurani zmontijo: Boho Style So cute & messy
Audrey S.: ❤️