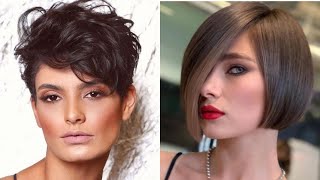
Short Shaggy Pixie Haircut For Women | Short Layered Cuts & Styles Tips & Techniques
Learn How to cut Short Shaggy Cuts & Styles. A shaggy pixie cut is a very short haircut created with textured and choppy layers.
"I Love Haircut - I Love Hairstylist"
Okay, yeah, probably this is gon na, be my last live on a mannequin. I'M gon na be going back to real models which would be kind of nice, but uh. We just thought we'll do a cheeky little um, facebook, instagram, live and uh. You know give you some inspiration of what uh edge academy has all been about uh. This is a brand new haircut. I'Ve been working on um, you know we haven't launched the ladies collection this year, but i wanted to do something a little bit different. I'Ve been playing around in the academy, uh believe it or not. We'Ve been pretty busy with classes. Thank the lord uh we've heard, we've been pretty busy, we've had um a lot of in salon classes, a lot of in-person classes and our class classes recently have been sold out uh every single month, uh going from one day two days and three days, education here At the academy, so uh things are picking up for the education side. We'Ve also got plans of traveling out of state, so we've got uh an opportunity to go to montana and uh. That'S gon na be in september we're just looking at some dates in september. So if any of you tuning in and you live in montana, we will be going up that way and we're also going to atlanta and that's all been planned. Now, that's in the middle of september, we're going to be two days in atlanta uh doing uh, six haircuts hands-on all right! So if you live in the atlanta market, uh we've also got pending new jersey and also an international trip going to norway or i've not been to norway for many many years, so it might be going to norway in november all right uh. So what we wanted to just give it a few seconds just to get a lot of people on uh. This is a live. It will be uh saved. So if you're in the salon and you're like damn, i can't watch it all. I will post it. So you can watch it. This is a really good haircut guys because i've been playing around with it for a while. This haircut is going to be a short haircut as you can see with a mannequin, it's already short, and this haircut is going to be like a shaggy pixie, all right, you've heard of the shag haircut lots of layers. It'S been very popular. We did the shag haircut, what about three or four years ago now, and it's got more popular and more popular and consumer driven now what consumer driven means is a client comes in and says i want to shag all right before it was fashion driven, and it Was hairdresser driven, but now a consumer? You know a client actually knows what a shag haircut is and a shag haircut is lots of layers. It can have a curtain bang, it can have a diff a wide fringe. It can be open up and then look like a mullet and that's where you start to see lots of inspiration over the last 12 months of the mullet, the shag lots of layers um. Another key haircut, which i see a lot of, is the french bob all right, a bob which is shorter, giving a little bit more volume, i think, of the queen's gambit. You know that a great little haircut there, but this haircut. What we're going to do is like a grown out pixie so think about if you've got a client in the chair and she's had a pixie or a crop, and she wants to grow it out or it's the opposite. Where you've got a client who's got a bob yeah she's got a bob she's had a bob for a while she's had layers she's had it short of the back she's. Had it long at the front she's had it reversed, she's had fringes, and she just wants something fresh and exciting, and that's what we're going to take you through? It'S called a shaggy pixie all right, if you don't, if you want to get away from this shaggy word like shaggy pixie, then you could just say grown out pixie all right. It'S a little bit more lived in all right, so it's not really short all right. So i sectioned it off to make it a bit quicker for everybody all right, uh any dates for orange county uh. We are in san diego, so unfortunately we haven't got anything up in orange county at the moment, but uh. You know if we can get a few people up there to do a class. We'Ll uh will easily come up. It'S not far orange county to us san diego. We have classes all the time but orange county. We would love to come up there and do a class, so you know if you want to dm us privately and we can maybe schedule a call and tell you how our education works, how many people we need to cover the cost of our travel. We can do that so if any of your salon owners - and you want to get us in your salon - you know we are traveling and we are doing you know back on the road all right. So let's take you through the haircut. That'S what the whole um quick kind of demonstration is this morning is just to inspire you all all right. I'D love to share i'd love to tell you what's happening within our academy. What'S what's trendy? What'S hot um, you know i'm a cutting specialist and and that's what we've been doing, a lot of is obviously working with our collections. We'Ve got our moving collection and then also we've got our 20th century boys, which is our boys collection. So this haircut is not in any collection. I'Ve just been playing around with it in the academy, it's a new kind of shape, uh. So it's hot for you guys, no one, i've! Never i've never really done it on a facebook live yet. So it's brand new uh and i hope you like it all right. So how do we do it right? So you can do a center party all the way down the head so profile from the forehead down to the nape. Then you put a part in from the top of the head to the top of the ear, all right so chopping it so you're splitting the hair into four sections center and then top of the head to the ear. Okay, then, what you're going to do then? You'Re going to go on this from the from the parting and the sides you're going to go a diagonal forward; okay, so it's going to diagonal forward the highest part being above the curvature of the head. So if i put the cone flat on my mannequin the highest part of the triangle, because that's what we're creating here is a triangle section on the side. So the point of the triangle yeah is at the top of the curve of the head. So if you put the cone flat on the head, the highest part of the head there, the curve yeah is literally the highest point. Then we're going diagonally down to the corner of the eyebrow, all right, so corner of the eyebrow. If you prefer to say recession areas, then you can go high, mid or low. Again all depends on your density of your hair and your client's hair type. All right. This is what i love about creativity, haircuts, yeah. It'S i give you an idea and then it's very open for you to play around with all right. It'S not me to dictate i'm just here to share some inspiration. You might like it, you might hate it. It'S just inspiration, guys all right. That'S what i love about creativity, all right! You make it your haircut, not my haircut all right! So, as you can see, then we're going to diagonal forward and then from that part from that top of that triangle we're going to diagonal back. So what that's doing is creating a large triangle through the sides. Okay, so a triangle through the sides. The top of the triangle is parallel to the ear all right. So where that parting would be here, then you go and make a triangle. Guess what you did exactly the same on the opposite side, all right! So exactly the same! On the opposite side, all right! Just to give you a little bit of an idea so diagonal forward, diagonal back and creating that cheeky little triangle all right! So when you come and look in a mirror and you get your mirror and you look in the mirror, then the top of the triangle should be symmetrical. So it's at the curve of the head and then the bottom of the triangle is at the corner of the eyebrow so again symmetrical and then literally working back into the back. Now we're going to the back. What do we do in the back? We worked a triangle: you can either make it very pointy or you can make it a little bit curved again personally up to you all right. So how high do you go in the back below the crown? How do you find below the crown? So if i put my client on a profile put the cone flat on the head, then i start to find below the crown so below the crown and we've gone diagonal forward, diagonal forward to create a third triangle. Okay, so that's how we've done it. So i literally worked a triangle on the side triangle on the opposite side and then a triangle through the back okay. So if you're just tuning in this is a grown out, pixie we're going to approach a shaggy pixie, a lived-in pixie, something like that. Okay, uh lots of people saying hello. My hairdressing students are watching too fantastic. Thank you. So much katrina, all right lots of people saying hello people from uh belgium. How are you got belgium tuning in we've? Got people from all over the u.s. Give us your shout out where you are and i'll give you a wave or give you a little shout out while i'm putting right so we're going to start on the sides. Okay, we're going to start with the top of the ear all right! So we're going to start in the middle of the triangle: okay, so in the middle of the triangle and we're going to work a vertical section, all the way through i'm going to take this area shorter and while we're taking it shorter when you're growing, something out When a lady is growing a hair out say, for example, this is a grown out, pixie a grown-out kind of shape, a lift in shape. So if she's cutting this off from a ball - and she wants it a little bit more lifting and playful, where does it grow out the most all right think about the head shape the widest part of anybody's head? If i put a cold flap - and i work it to the head, where does it hit? First, the top of the ear? Because the head starts to curve around at the front and curve round at the back? Because the head is round or over all different shape, face shapes, but at the end of the day, yeah the widest part is usually at the top of the ear. So what we're doing here on the on the sides is we're taking out the weight through the side, so we're not going to get a lot of width with this haircut. The client says i hate it. When my hair grows out, i feel like i've got a bowl. I don't like it. When my hair grows out, i'm trying to grow it out a lift in kind of pixie. So what we're going to do is we're going to take out the weight where it's, where it sits, the most so the top of the ear okay. So i'm going to work a vertical section as wide as my comb, so two fingers depth or as wide as you comb, whatever you prefer to say all right, so i like to just say wide as the cone okay. So then, if i go on a profile, you'll be able to see the section all right so as wide as the comb from the center from the top of the triangle, all the way down to the hairline and my distribution now and elevation is 90. all right. I'M going to bring that straight out from the head at 90.: okay, it's coming straight out from the head and i'm going to cut this shorter okay. So i'm going to blunt cut it! Why? Because it's a little bit more shorter! It'S not! It'S not not! Too lived in okay, so i'm going to cut that all blunt. So my distribution elevation is 90.. I'M doing a technique called palm to palm, so i'm actually working back through my palm and then my palm all right. My elevation is 90 from the head 90 from the head. Okay and you've just done one section all the way through all right. I want to get the balance right on both sides. Okay, so i'm going to do exactly the same on the opposite side, all right balance is really important to make sure that you get the right balance throughout so instead of completing one side and then approaching this side and guessing the balance, let's get it absolutely perfect. So we go back through this side, a vertical section topping it here. We lift it out 90 from the head and guess what you've got to guess kind of feel how much you cut off there. So what another little trick is, is you can get your comb and you can check the balance and you can check your balance and see how long it is. This is our famous orange edge comb and guess what it's a ruler, all right, it's inches on the on the spine. So if you've never seen this cone before it's from our edge academy here in san diego, it's designed by edge and it's an eight inch cone. So it's got eight inches all the way down the spine. So when i come to check the balance here through the sides, i can check it and i can see that it is two inches okay. So it's two inches long. So then, what i'll do is i'll bring that out measure, and then i can cut it and make sure that i'm getting the perfect balance all the way through all right. So my distribution, my elevation, so distribution is the way you comb, hair elevation is the way i'm elevating all right, i'm elevating out at 90, my distribution and elevation just straight out from the head at 90.. Okay, i'm happy with that balance. Okay, that's my first sections done everything out straight from the head at 90 degrees. So what i'm going to do now, i'm going to work with an inverted graduation, so what that means i'm going to come off the base now, all right, so i'm going to work vertical through the front, i'm going to go up and i'm going to over direct Now to that top of the ear, so all the hair now is over directed that. To that first section, i cut all right because we have a lot of different people watching from all over the world and all different um experience. You know i know: we've got a couple of students watching as well, and so what i would suggest you could take a couple of sections if you wish vertical and you pull it off the base to that first section. If you're an experienced hairdresser watching and time is money - and you like to be quick behind the chair - and you can do a haircut in like 30 minutes 20 minutes - guess what guys you can get that guideline and you can pull all the hair to that. One guideline in one go, but if i was teaching this to younger students, then i would say: look maybe take a couple of sections to make sure you see your guideline, so you can see that i'm coming off the base. So i'm combing away from the face. Combing away from the face all right, so my distribution and elevation is changing. Yeah, it's not 90 anymore, it's 90 to over directed okay and what that means is i'm over directing i'm coming off the base and i'm going longer towards the face. So what i'll do now, just over direct over direct to that stationary guideline and where the stationary is, is the top of the ear. So everything comes to the top of the ear and you comb that down and straight away on a profile. You can start to see it's shorter going longer, all right, so it's going longer towards that face okay. So it's a little bit more of a lifting, pixie. Okay right so you've done that, if you want to, you could alternate, if you prefer to you, can alternate what that means. You can go now to this side and pull it off the face. Why not so i'll? Let you get look get all that hair over direct it. So i'm a distribution elevation 90 to over direct, so we'll come into the top of the ear. All blunt working palm to palm, so working palm to palm okay drop that down all right. So you've done all that if you're a cross checker and you love, cross-checking and you're, like you know, i like to be very technical with my work, then cross check it just cross check it on a diagonal. Okay, just think about your sectioning pattern. Yeah, your sectioning pattern is on a diagonal working with your triangle, so you could literally cross check it and if you cross check it, what should it be looking like, it should be longer on the front and shorter at the tips of my fingers. So when i elevate this out, that's what it's going to be looking like it's going to be like going from shorter to longer okay. So if i elevate, if i just literally, do a cheeky little cross check and you can start to see straight away - yeah, it's shorter, going longer. Okay, it's nice to cross-check! That'S just always having a cheeky look! A lot of people cross check like doing on lives. A lot of people i'll cross check off camera, but it's kind of nice to show you all right. So we've done the front so now we're going to go into the back behind the ear. Okay, so we're going to go behind the the back. We'Re going to stop where the put there, where the uh the triangle goes down. So you see where the triangle goes down behind here, i'm going to carry that triangle down into the back there and we'll ignore the nape we'll ignore that nape area. All right. If you want to get a clip and just clip that out the way, all right and you're just concentrating behind the ear, okay, so you're gon na follow that triangle parting all the way down to the nape okay and what you're gon na do now. You'Re gon na come off the base and you're gon na pull everything to the top of the ear all right. So what we're trying to achieve here guys is a concave feeling, concave meaning shorter concaving longer so it's longer towards the face and guess what it's going longer towards the back. So i'm still working that palm to palm and what i'm going to do now, i'm going to reestablish the middle, so you can throw that front bit out of the way you know, keep clean the sections cleaner work. Okay, always be nice and clean all right. Actually, coming off the base now coming off the base, all right, and then you see that guideline nice and clear so you're over directing everyone can see on that all right, we're over directing everything to the property here, all right top of the air everything's coming to The top of the all right so you're bringing that right over top of the ear or blunt okay, if you prefer to and if it was a little bit longer. So if i was working on a little bit of a longer shape than this, you could point. Could it if you were working a little bit longer, you could even use a razor all right, a little bit more lifting a little bit more grown out all right because of the length we'll cut in this mannequin. I thought we'd use the smaller scissors from edge. These are the 6.25 from our edge academic section, so we thought we'd use them, because when i'm blunt cutting, i always prefer to use a smaller blade when i'm blunt cutting and when i'm personalizing and customizing and maybe point cutting and stuff like that. I like to use a larger blade, so when i come to the top guys i'll probably be using a seven inch scissor all right, but, as you can see now on a profile, that's the shape. What you've done you've taken it shorter at the top of the ear you've over directed to that guideline and you've over directed to that guideline, and straight away, you can see that beautiful concave shape okay and what that's going to do. It'S going to sit flat because when people grow the hair out, so if you've got a lady, who's got a pixie or crop and she's trying to grow her hair out and she feels like she's got a helmet on and it feels like it's too heavy. If you take the weight out at the widest part of the head, which is at the top of the ear, then you over direct everything to that stationary guide. Okay - and this is a great little haircut to do on someone who's growing, their hair out or you've got a client who has had a bob for a while, like something like a classic bob and she just wants to go shorter, but she doesn't want to go Short too short or if you've got a lady in the chair and she goes, i want to go short, but i don't want to go as short as a boy i don't want to go. I don't want to look like a man's haircut all right. So then, you could do something like this: okay, a shaggy pixie all right, so we carry that part in all the way down onto the opposite side and then we're going to over direct everything. Now to that station me guideline, which is at the top of the ear, so let me just bring everything to the top of the ear guess what guys just pull point cut you just blunt cut through whatever reaches just four to the top of the ear. Okay, so if you're a little bit nervous at the front bit comb that away on that front bit away all right, you're going you're not going to the front you're going to the top of the ear. So this hair should be traveling to the top of the ear all right palm to palm. So distribution is 90 to overdirected we're over directing we're coming off the base. Now we're coming off the base. What does that do? It makes it go longer, all right. The hair's going longer now and where's it going longer. It'S going longer behind it here, okay, so then i come to check on the sides and you can start to see the same same idea: okay, pretty good, very good. Okay, so literally we've done all the sides. That'S the sides completed all right, so you can see on a mannequin how it's sitting nice and flat already all right, it's sitting, lovely and flat this, so it's shorter at the top of the ear over direct off the base over direct off the base. If you cross check this horizontally, it's going to be concaved, it's longer at the front and longer through the back all right. So it's concaving! That'S what you're looking for all right! So what you're going to do now? You can do the back. Okay, so you're gon na go into the nape, the nape area, all right, so comb all that down now and we've got the nape, and this is where you can customize this freedom with uh with creativity work. Some of you might leave that you could leave that you could bring all that over directed and you could have a little mullet. You could leave this all out and you could rock a little mullet. It'S kind of cool if you felt like no, she doesn't want that. It'S too heavy all right. You could cut all this off and take this shorter yeah and you could literally carry on on the base if you wanted to take something shorter in this case, we're still going to work with a concave feeling, so we're going to work right through the center. All right so right through the center we're going to work a vertical section right through the center as wide as my comb. So i'm going to work that all the way through and why i'm doing it to concave again is where's the widest part of the head. Through the back all right think about the head structure, not everybody has an obsidial bone. Some people have a flatter head shape. Some people have a really strong head shape. So if i look at this mannequin on a profile, if i put my comb say, for example, vertical or horizontally - and i work it all the way to the head - where's it going to hit the head first, it's going to hit the head in the middle. All right it's going to hit here first, because the head starts to curve around and curve around. So usually your cone would hit where the occipital bone would be all right. So if someone's got a strong occipital bone, you could take it shorter within the middle and then you're going to come off. The base come off the base and it's going to sit a lot flatter through the back. Okay. So that's what we would do all right. So we're going to literally work through the back now the back doesn't have to be the same length as the sides. So if you've got a client who says i like to leave a bit more length at the back, you could make up this guideline in the back and now how short you take? The first section is honestly up to you. The sides will have to be balanced because the client will see that in the mirror she will be blow drying her hair on one side longer one side shorter. She won't be impressed, but with the back section here, it doesn't have to be the same as the two sides. It could be a little bit longer. It could be a little bit shorter. It all comes down to customization your consultation. Your clients likes your clients dislikes in a way as a hairdresser, you're customizing, a haircut to suit the client's face, shape yeah, her hair, her head her lifestyle, yeah, a density of hair. So, in a way as a headless, we're like a plastic surgeon because we can make somebody look amazing and if we don't like them, we can make them look bloody, awful all right. So your distribution on your first section palm to palm so everything out. 90. 90. So my distribution, the way i'm combing the hair is 90 degrees. So my first section was 90 off the base. Now, i'm going to over direct to that guideline, so palm to palm i'm going to over direct, so i'm going to over direct all that hair when i'm over directing i'm using the larger teeth yeah. So when i've, when i was cutting the first section, i used the finer teeth when i'm over directing i'm using the larger teeth working with more hair in the cone all right, so i'm just keeping that all into the middle okay. Push that opposite side out the way, if you're a bit nervous, just clip it out. The way personally clips are the hardest things to find in a hair salon. You go to work with three clips. You come back with, maybe one or not all right. So if you've got a few clips, don't be afraid of clipping hair out the way cleaner work clean, a haircut yeah. You don't have to cross check and check it all the time and you've made mistakes. Okay, so you've come off the base and you've over directed everything into the middle and guess what i'm going to change my body position. Now, i'm going to go over to the opposite side and i'm going to over direct the hair. So body position is really important. My posture, so i'm coming off the base. Yes, i'm going to come off the base now and i'm going to work into the middle. So just to recap it guys the underneath is basically a vertical graduation, but it's concaved all right. So there's three concave shapes all right, so you've got a concave for the sides. You'Ve got a concave through the back all right, and what does that do? It makes it sit flatter because the whole point of this haircut is a grown out pixie or a lived-in pixie or a shaggy pixie. So you've got ladies who come in and they say i want short hair, but i don't want to cut it all off or a little bit nervous all right. So then you could do something like this kind of shape. Okay right and then move that around and you can start to see how that's looking nice on a profile and then looking through there you'll be able to see you've got longer pieces through. Here it's going to sit a lot flatter! Guess what guys i'm going to dry it now, it's disconnected the top and the fringe. Okay, the crown is going to be layered and the front is a fringe all right. So what we're going to do now, i'm just going to get a hair dryer, i'm going to dry that off. Let'S get it absolutely perfect, all right so because it's short just use your comb and you dry that through, oh smith, how are you paul great educator watching? How are you my friend, fabulous as always? Thank you. We keep trying all right. What'S uh yeah, while i'm drying guys, but lots of things happening within edge academy, we've got lots of classes. All our classes are online. If you want to look and see where, when they are, we've got classes online in person in different salons around san diego uh. If you want to know more about our classes, we can send you an educational brochure where it's got all the prices and everything else like that in it. If you want to know a little bit more about our academy, but yeah, we're probably got about three or four classes every month at the moment, going on it's all about education sharing is caring all right, so you're, just blasting that through dry that off, if you Prefer you could use a brush yeah if you've got a plant if you've got a bit length in there, and you think you know what i actually like to use a brush. You could use like a little round brush there and get that nice and smooth and polish. For me, the product is key, making sure you've got a good product in there if you're using a volumizer. Are you using a smoothing cream or lotion? You know what sort of product choice are you going to use? Your haircut looks great, but how can i make this haircut? Look even better color product yeah, so placement of color would be great and then also a nice product in there all right. So we tried that off just using that nozzle really in the comb using a nozzle, a comb get all that nice and smooth. I don't want to be too long drying it and boring you up all right and then what i'm going to do now is literally we're going to go in and customize a little bit okay, so you can start to see the shape. You can start to see what we've, what we achieved: yeah working from that kind of concave feeling all right. So now i'm just going to change my um, my scissors, i'm going to go over to the old sevens. These are the seven inches from edge academy. They'Re, a larger blade, but they're really good for customizing. So what i'm going to do now, i'm going to go in to the sides and i'm going to go horizontally and if you want to see that look guys, let's, let's just show you, i love showing you a cost check anyway. So, let's get that a bit closer like that, if i go horizontally there, can you see it? I don't know if you can see yeah you can so it's longer going shorter, shorter going longer, so there you go beautiful kind of shape just to see. So if i can maybe lean over my camera so i'll be able to see kind of what i'm doing there and actually what i'm going to do, then i'm just going to do some deep point: cutting just break that up a little bit. Okay. So i'm just going to go in horizontally, don't destroy it all right! Remember it's longer in the front and longer in the back, don't start going in and chopping into it too much. You think you can see. I can see it perfectly that little concave shape beautiful. All right, so again what you see and what i see it was gon na be slightly different. That'S why it's called customization all right, so you can customize all right so, but some of you might go yeah. I want to go crazy, all right um if you've done a really good job and it's all clean and it's all balanced, you don't need to ruin it all right. So just a little bit of deep point put in but again this is freedom. So everyone's choice is different. Some of you get carried away. Some of you might not want to do up any of this all right. Okay from your consultation, does the client like it a bit more choppier all right and then you go into the back and we're going to the back and we'll do the same through the back area. I'Ll go horizontal and you can start to see shorter in the middle longer on the outer edges, so you've created that lovely, concave, feeling, okay, so deep, parallel point cutting in parallel with the blade not cutting anything off the actual structure. The length you put the foundation in okay, then you're gon na go out to the perimeter now all right. So if you have a client who likes it, a bit wispier and a bit softer onto the face okay, so you bring that forward. Yeah and you just take off a little bit of the front, so again point cut through there. If you look at that - and you think i want to carve that off, i want to cut that completely off. It'S a different technique, guys because the technique is to create length at the front and length behind the ear all right. So if the client says i don't like it on my face, i hate i hate it. When it's longer through the front, then don't do this technique. Okay, because this technique is meant to be left longer at the front. So then, if we've got a client and she wants a bit of softness - you can just go in and do some deep point cutting yeah. She doesn't have to wear it forwards. You can still wear it down, but there is an element of softness through that front. Okay, behind the ear you know just tidy up ever so slightly and then how short you go over the ear. Well, we've decided that already because of the graduation, we wanted just to see maybe an earring. If the client says i want to go shorter and i wanted this area above the ear, she wanted this area above the ear. Maybe above and you could see all the ear, then guess what guys your first section you cut is the shorter the shorter you go with the first section, the more you're exposing of that ear yeah. So if the client turns around and goes, i want it above the ear now well, you can go back in and take that shorter, the graduation, yeah and then open up the ear more okay. So in this case it's a grown out pixie. So i can just literally just break that up a little bit on the perimeter just to have it a little bit more grown out. Okay right, so i'll do exactly the same on the opposite side, good thing about these mannequins, you just spin them around all right! All right so just at the front now bring that forward onto the face and we'll just tidy up that front. Hairline again just a little bit of point cutting not too sure because you'll lose the length. Don'T try not to switch off always remember, like you've left areas longer and you've left areas shorter with this haircut, the shortest area yeah is at the top of the ear. The longest area yeah is going to be behind you, okay and then, if you want to open that up a little bit more just go there and just break that up a little bit there once the sides done, we bring that forward. You can check your balance. Check your balance check your balance through the perimeter always check your balance. It'S always good to check. Okay, then your final bit at the back yeah all right. So what we're going to do now? We want to make this a bit more interesting through the back. So we want to make it a little bit concave the perimeter at the same time, so we're going to pop her head slightly forward, okay and then we'll literally work with a little concave hairline all right. So i'm just gon na take a little bit shorter in the middle and we'll just keep that perimeter the same kind of idea. We did with the uh with the graduation okay. So when you work in the hairline always think about how the client's hair's gon na sit, are you working on wavy, hair, curly, hair, yeah how's it going to sit? Is it going to sit flat? Is it going to stick out? You know? Sometimes it's always good. Personally, on a real client to do the hairline when it's dry, because you can start to see where it's going to move to left right, is it going to ping up and stick up? Have they got a strong hair growth pattern? Is the hairline really strong? Is it up high hairline, low, hairline, okay and then we'll just go in and keep that nice and soft as well? The whole point of this haircut was a little bit more lived in so a little bit more broken up on those ends all right and then you've got like longer pieces just behind. There just gives a little bit of interest through that back through the neck right. So yeah quite a lot of people tuning in today, which is good. You know thanks for tuning in guys i really appreciate the love and support all right, so you can see that a little bit concave working through right. So now you can see on a profile. That'S sitting nice and flat yeah, because then it's pushing the hair longer and then sitting flat and it's pushing the hair longer. Okay, that's all the underneath finished. So i've only got two more bits to do and the whole haircut is finished. Okay, so we take the crown out all right. So what we've got here now is above the triangle yeah, which is the crown, and then we've got a parting remember from ear to ear. So we've got this crown section now all right, so you just take the crown out. Keep this clipped up all right, we're just doing the crown. Now, i'm gon na stay with my sevens. Why i'm going to layer now i'm going to layer? What does laying do it takes that weight, but also gives a lot of texture and also creates volume all right, so we want to create a bit more volume within this haircut all right, so i'm going to lift it out from the base at 90 and i'm Going to work following the head shape, so if you're not sure what 90 is from the head, get your comb put it flat on the head and there's 90. all right. My cone comes off the head, yeah, so there's 90, but then there's 90 and there's 90.. Okay, put keep the cone flat on the head. You have to see your perfect elevation large teeth of the cone elevation distribution 90 from the head and uh, nothing too crazy, really through the top, i'm just going to point, put it through and a round layer or uniform layer. Okay. So how short you take this layer comes down to your consultation, the shorter the layer, the more volume you're going to create. It'S disconnected, okay guys. So it's disconnected it's not connected through from the underneath. So we're creating like a little disconnection, then guess what we're going to cover direct everything into the middle, so we're still keeping that feeling of a concave. So everything now is combing into the middle into the middle okay. So i'm just combing everything in to that middle section: okay and then you're gon na have a little bit of interest through that side. Okay, we did exactly the same on the opposite side, all right so re-establish the middle. My distribution elevation is 90 to over direct. So it's 90 over direct into the middle, see the guideline nice and choppy when you're doing something choppy like that, keep it away from your fingers. Otherwise you give your clients free red, highlights and loads of band-aids. All right so be really careful when you point cutting and then when you come to when you come to check that i know it's dark, hair and we're on a screen. But you might not be able to see it, but there's longer pieces here and it's shorter going longer. Oh, i think you can see that like when it's falling over there, you can see that was like longer pieces just fall in there guys yeah. This is really nice because then, if you're a colorist and you're a creative colorist, this is a lovely haircut to color. All right trust me um, i've not colored hair for 35 years. The last time i colored hair was through a highlighting cap all right. So luckily my wife does all our colors or we have you, know a couple of girls who work at the academy and they uh you know, do the colors for us for collections and stuff. But for me you know like this is really nice, because you've got like some fun areas. You know nice color placements, all right, so, just to recap the crown it's 90 off the crown over directed over directed into the middle to create concave right. So now is our final section through the fringe and guess what we're going to do through the fringe. The most popular thing you hear behind the chair at the moment: a curtain - bang, okay, so i'm gon na do a curtain bang through the front all right. So basically, gon na have a curtain band all the way through. So each element is basically an inversion. When you think about this whole haircut, you've took an area shorter at the top of the ear. You'Ve inverted all the hair. To that guide. You took an area in the middle of the nape and you inverted all that hair to the middle of the knee now you've gone to the crown and you inverted everything into the middle and that's what we're going to do exactly the same for the front. All right, so we go center. We split it into three sections. I'Ve taken my time because obviously i'm educating today but say for example, guys this was in a salon situation. This is pretty quick yeah because you think about it. One section bump one section bump one section at the side bump: you know how quick is it for the experienced hairdressers who are watching this? This is quick all right. This is money making all right. This is a money-making haircut. Trust me. It'S short, hair she's got to come back every six weeks with this haircut yeah. This haircut looks okay when it grows out, but guess what it looks better when she maintains it all right. Add some colour in there sell us some product wow how much money have i made behind the chair that day, color products haircut see you in six weeks for another haircut, see you in 12 weeks for your next color. This is money all right and that's what edge academy is all about is sharing haircuts that we can do behind the chair. There'S no shave sides, there's no lines in there, there's no kind of weird hairdressing and that's what we're what we do at the academy. We do hair what we'd want to do behind the chair. Okay, so we're gon na do here now we're gon na literally work from the guy. We'Re probably gon na use that front that top bit, i'm probably going to connect the uh, the top in so we'll connect the top in all right so see that short bit there we'll connect that in we'll probably use it like a round layer technique, we'll just Connect the top the crown and with the top and then we'll follow the head round because the head's round, so that means it's going to be 90. It doesn't come square if you've noticed there. It'S rounded so it's 90 and then it's 90. This way, because the head's rounded so you're in a way you're doing like a round layer all the way through the middle, all right. So a little center section. We'Re opening up that front section a little bit more okay, because we want to have it shorter in the middle and longer on the outer edges. Okay, so what you do now? You grab all that hair and guess what the hair was dry is not going to reach anyway, this hair underneath not going to reach and then you're, going to literally over direct all the hair up to that guide. Okay, so all that hair now travels just over directing into the middle okay, even past the middle. If you want it more of a curtain band, you can go past the middle if you prefer the more you over direct the more length you're maintaining. So if the lady wants a bit more of a curtain, bang or she wants it more disconnected and wants more of an undercut feeling over directing more okay think about the density of the hair. If you're working on someone with really really thick hair, then you might want to leave this top longer, because undercutting is fantastic for thicker densities, because you're taking out the weight underneath and you're leaving some length on the top. So the hair is going to sit flatter. Okay and what you do, then you just over direct. I can remove the little bit on the old, instagram, okay i'll just put that like that all right and then we're just literally over directing all that into the middle. So everyone can see that everything into that stationary guideline, okay and then we drop that down and i think you can see it guys straight away. I think you can see that even before detailing the fringe yeah before we even customize the fringe or anything, you can start to see what you've done so we're gon na do now. It'S gon na get ahead right, we'll dry, that top off now, and then you just detail wherever this is a lovely little haircut, we've just been playing around with it. In our academy for the last few uh weeks, we've been doing it on some clients uh. It'S really nice on curly hair. If you have a lady with my naturally curly hair, it's a great little technique to do yeah, probably either round a big old brush. Here. I'Ve got a bit of length there, so let's just get a bit of use a round. Bush, if you want we've got time to blow dry it. I think we're okay, okay, we've not been going an hour yet or anything we're not going to get cut off, but thanks for tuning in guys, i really appreciate it like i said, we'll repost it. This haircut so then, if you've got any friends who want to watch it, you know please share it. On your pages. Just share the video and we'll uh. You know you can share it with your friends if you've got a client that comes in this week and she's got a pixie or she's got a bob and she wants to do something a bit different. She wants to grow a pixie out or she wants to get away from the box and do something a bit different. Maybe you could uh you. Do this haircut? Okay, a shaggy, give it a little flip on the sides. So it's nice, okay, so just dry that through and if you have you could blast it through. You know a little bit lived in, don't want it too perfect! Put your hands through it, break it up a bit okay and then just get detailing wherever necessary. Now guys, so i think it's obvious. I want to break that fringe up a bit more, i'm loving what we've got going on fantastic cup thanks darling. Thank you very much. Thanks for the class. Thank you so much guys so nice for all your love and support. I'M always about you know, sharing is caring and i know we have our members page where we do a lot of our videos. Now uh we have a members club so if you've never seen us do haircuts before we do haircuts every month on our members page it's 75 and you get free haircuts to watch whenever you want and we also do an online class. So if any of you like you like the haircuts, we've done, you know i'd love to see him do more. Then we do a members club where we do all our haircuts now online um or you know, once a month i'll try and do a facebook or instagram kind of cheeky haircut for you all to share, but, like you just literally customize that fringe a little bit More opening up a little bit more in that fringe, so maybe just a little bit more open up in the middle and he's still keeping that real nice curtain feeling to it. I still like that kind of curtain band break it up a bit. If you wanted just a little bit of slicing here and there, customizing is again honestly up to you what you see and what i see always going to be different i'll, just cut that a little all right. I have finished guys. Um really thank you. So so much for tuning in what we've done today is a grown out. Shaggy pixie um! You know with a little curly bang going on i'm just using my uh. My screen is a mirror all right. So again, it's a little bit more lived in. If you want to put some product in there, it'll probably look better, so you put get like a little paste or something and work that through that'd be nice. A little bit of a paste would break that up, even more okay. So, for the guys, if you just literally just tuned in - and you missed the haircut, you can watch it again on ask on our social media platforms and uh, but just to break it up. It'S just literally broken up into a triangle, a triangle through the back and a triangle on the opposite side shorter at the top of the ear and over directed shorter in the nape and over-directed same on the opposite side, and then for the top. We work rounded. All the way through and then over-direct everything into the center, so we create that kind of little curtainy. Bang all the way through it's a little bit more lifting it's really salon friendly yeah. If you've got a lot of clients who love this kind of shape, um, you know if i put that against the wall now you know, i think, that's definitely a money maker all right, so she's got the screens there for everybody all right, but uh. If you want to see more from edge, you can be one of our members at edge academy uh. So it's edge74.com, you can join our membership program. We have classes here every month in san diego. So if you're in san diego come down do a one day, two day class uh and also, if you're a salon owner - and you feel like i'd love to get this guy to come into my salon, we are doing in salon education now all right. So we are offering some classes all the way through as well that way, all right, so that's the kind of shape. What we've done, beautiful, all right,

Comments
Lisa Rios: LOVE this!! I am growing out my pixie so this is fantastic. Thnx
Louise Fält: This is the haircut I want ! <3
Heyam Alomari: Thank you ❤️ you are doing great
Gypsy Witch: You did a great job
Beverly Robinson: I really like the cut , I like the fly away look or messy
Lisa Rios: Where can I get the comb??
fa sanch:
Lizzy N.: You coming to South Florida anytime soon? :)
Angela Hagood: I wish you could use a different camera. The angle looks like an iPhone and is too narrow and too far away. Could you have a live camera person to walk around for a closer look and maybe get a microphone so you don’t sound like you on the other side of the room? Looking at the picture of the final style is why I clicked on your channel but it is just too frustrating to watch. I think you’re very talented but need some tech skills.
Gypsie Malone: I would love to learn how to cut my hair this way however, he talks too much!!!
Eileen Steere: Where is your salon? Our salons cannot due this type of haircut and they won't watch these videos.
D M.: Asu madre ....... cuanto habla !!!! si no es monólogo Ay los vidrios me avisan cuando acabe jajaja
Angela Maria Martins Ribeiro: Fala muito e não corta !
Franco Fanny: Vous parlez TROP ♀️
Maru Montesinos: Boring, slow. Bye!
hadi seno: To much talking