Pixie Hair Tutorial ~ How To Get That "Beachy Wave" Look
Another requested tutorial! This is how I styled my hair in a few recent videos and you all wanted to see how it was done...hope you enjoy!
PRODUCTS USED:
Stylus Sheer Remedy Liquid Satin Treatment ~ https://bit.ly/38IU5N6
*Tigi Catwalk Root Boost ~ https://shop-links.co/chi3ud73F7E
*Kenra Nitro Memory Creme 18 ~ https://shop-links.co/chi3tSP8i1k
*Enjoy Dry Wax (Amazon) ~ https://amzn.to/38ITZFe
Enjoy Dry Wax (Official Retailer) ~ https://bit.ly/3h29FEv
*Aussie Instant Freeze Hairspray ~ https://shop-links.co/chi3tlQjeTq
*T3 Cura Professional Hair Dryer ~ https://shop-links.co/chi3sJYAuWj
CHI 1” Flatiron ~ This model appears to have been discontinued
What I’m Wearing:
Top: Amazon (Army Green) ~ https://amzn.to/3GrL7k5
Makeup: Tutorial Coming Soon!
Nails: Igloo Spa “Champagne Glow”
SOCIAL MEDIA:
Instagram ~ https://www.instagram.com/sharaleesbox...
Facebook ~ https://www.facebook.com/sharaleesboxo...
Blog ~ http://www.sharaleesboxofchocolates.co...
SHOPPING INFO (affiliate/referral links):
*Desk & Cabinets for Makeup/Craft Storage ~ https://bestcraftorganizer.com/#a_aid=...
*Earn CASH back by shopping online through RAKUTEN:
https://www.rakuten.com/r/SHARAL130?ee...
*Sign Up for BoxyCharm or BoxyLuxe:
https://www.boxycharm.com/refer/Shara-...
*BK Beauty Brushes: https://go.magik.ly/ml/yw9m/
►►►Get 10% off your order with DISCOUNT CODE: SHAR10
♥♥♥♥♥♥♥♥♥♥♥♥♥♥♥
If you are a brand interested in having me try some of your products, email me at:
MUSIC: Provided by YouTube Audio Library
FTC Disclaimer: This video is NOT SPONSORED. All opinions are my own, honest opinions. Links denoted with a "*" indicate a referral and/or affiliate link, meaning I earn a small commission if a purchase is made through that link. However, it in no way changes the cost to YOU, the consumer. There is no pressure whatsoever to use these links, but thank you in advance if you do!
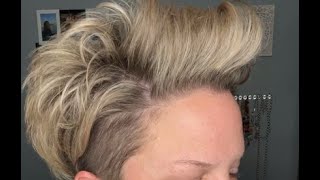
Hello there welcome back to my channel today i have another requested hair tutorial. It'S the style i was wearing in my recent top 10 holy grail, hair products, video and today, i'm going to be using several of those products, so if you've not seen them in action. Yet this is the perfect opportunity for you to see how they work. If you're new here hit that subscribe button and now let's go ahead and get started all right as always roughly coming through my hair now, my hair has grown out for another week, since i did that tutorial. So hopefully, everything still works well, but the style of today is going to be going over to the opposite side. So starting off i'm using the sheer stylus remedy. I love adding just a little bit of this to the scalp and ends of the hair. It just really helps add that little extra shine and then helps nourish the scalp, and i feel like as long as you don't use too much. It doesn't weigh the hair down and then next i'm going in with the catwalk root boost and i'm using this not only in the back here at the roots kind of at the crown of the head. But i'm also going to do a little bit here up front because i need a little extra body. So you can use this anywhere where you need just a little extra lift, and i know so many of you have become fans of this product and you have seen the wonders of what it can do now. The key is also you don't need a lot. So, just a little bit goes a long way now the other product that i was debating, whether to include in that video - and i did not, but it is quickly becoming a favorite - is the kenra nitro memory cream and you do need to shake this really well And the only problem with this is sometimes you get a bottle with a faulty nozzle. Apparently that's very common, but i only use a tiny amount. This is kind of a hybrid between a cream and kind of a mousse, and i just really lightly put this through the hair. I actually don't scrub this into the roots of the hair, but i work it more through kind of the mid to ends of the hair. This adds a little extra hold power. It'S quite amazing, and especially if you have fine hair, this is a great product. All right, so i'm working that through and as i said, i'm going to be going to the opposite side, where i normally part my hair going. This way we're going to go the opposite way today, and sometimes you can do this in multiple ways. But today i am actually going to blow dry it going that direction so taking my t3 cura, i get asked a lot. This is the t3 cura hair dryer, i'm using it on high fan, speed and medium heat. So so do do so. Okay! So here's where we're at so far and you can see - i have a lot of volume here now. One thing that you may not have been able to tell what i was doing as i was blow drying it over here. I was pulling really firmly like grabbing a chunk of hair and pulling up and shooting the blow dryer there and then doing the same thing here and here and part of the reason for that is, if you have never worn your hair, the opposite direction than you. Normally, do you might not be aware that your scalp, it's so interesting how it gets used to the hairline one way and unless you really kind of help direct it the other direction, you can end up with a headache and your scalp can actually feel a little Sore the next day, i know right crazy, so i found that sometimes by just helping to kind of just pull the hair, i mean firmly, but you know, you're not pulling your hair out, but i feel like that kind of helps the scalp kind of get trained Of what direction that hair is supposed to go all right, i'm going to take my flat iron and i'm going to just kind of work this through and depending on how your hair is. Laying you may not even need to do this, but what i'm doing is i'm pulling the flat iron over to the side kind of going underneath and almost curling it over, so that it it's not a straight under curl like i normally do on this side. I kind of like to curl it to the side to almost make it look a little bit more wavy and it just adds a little extra texture there and it helps the hair kind of go more over to this direction when, typically, it doesn't want to okay And then, here on the side, i'm going to just kind of pull this down and through and then over here. This is always the quandary. What do we do with this hair? Should it go up? Should it go down? What should it do and you just kind of have to go with whatever your hair is wanting to do? I'M kind of trying to get mine just to kind of lay down and we'll add a little texture with our enjoy dry wax in a moment, but i'll just take that through and then the top i feel like is actually cooperating quite well. I think even the back doesn't look too badly. It'S laying down. I am only a week away from haircut and color, believe it or not. I get my hair highlighted every three months and this is what my hair looks like at the end of kind of nearing the end of three months. So my hairstylist does a fabulous job really getting that bleach close to the scalp. So as it grows out, i'm able to go quite a long time in between highlighting all right. We may do just a little fine tuning after we get some wax in our hair, but let's start with some. This is the enjoy dry wax, and i am at the bottom of this jar here and i'm just gon na work that, through my hands, the key with this product is start with a little. You can always add more, but what i love is this product remains pliable until you are ready to set it basically in place. So a lot of pomades dry quickly, and this one allows you a lot of time to work without having to add more product. So i'm going to work that through kind of the back and then here in the front, is where i just kind of start taking sections and i like it to look like we've got textured kind of almost curls here and so that's why i take kind of Groupings like a little group of hair or section of hair and twist it together, and it just kind of separates it from the rest of the hair, making it look a little more textured all right and then here sometimes i like to flip this out a little Bit: let's try that i know it gets a little scary once you start flipping it out, it's kind of gon na flip out. So you better be sure, that's what you want so and then you can kind of flatten it just a little. So you don't have too big of a you know. You don't want kind of like this sudden turn outward, but that's kind of a nice gentle flip there. It'S kind of what i'm going for and now on this side kind of same thing and i'm sorry i'm looking kind of through the camera to the mirror. So sometimes i can't see quite as well that way, so i'm just going to work this through and i am going to add just a little show lift here and then this section. I want to kind of curl that just a little bit more and this one right here so once you have product in there, you want to be careful not to leave your flat iron in your hair too long because it can heat up faster. So just be careful with that and here over the ears, this is where you can tell. I need a haircut it's just long enough to where it's kind of sticking over the ears, so i just kind of either plaster it down to my my sideburn or just kind of work it over the ear just a little bit like that all right. Let'S finish off with some hairspray i'm using the aussie, instant freeze, hairspray and as i go, i just spray a little bit and then use my fingers to kind of hold sections of hair in place while it dries all right. So here's our finished look and i always love how different the style looks just by parting it on the other side, and this is something that i will do at any point during cuts. I think this is a great way to style if you feel like your hair got cut just a little shorter than you wanted. If you go over to the other side, sometimes it can make it look longer. I also feel like this is a great way to style it when your hair is really long, because you've got extra length to get it over to the other side. So i hope that you enjoyed this. As always, i will leave links and the list of products and tools i used in the description box below you want to click that little arrow, that's over here or click where it says, show more you'll see all that information. Also, i will leave links to my facebook and instagram accounts and you can head there and i will post still photos of this style, and i have lots of others there too, that you can take with you to the salon and show your stylist. Thank you. As always, so much for watching, if you enjoy hair tutorials, be sure you give this video a thumbs up on your way out and i'll see you next time, bye,

Comments
Kathy Retherford: Love this style. You have taught me the tips and tricks of styling a pixie cut. I try to follow the tips, but I have the most contrary hair (flat on top and curly in the back). I got it cut in a pixie, but the stylist was afraid to cut it to short (from a right a shoulder length) to a shorter pixie. She said next time she will cut it shorter. I just love the way you can style your hair. I have always stuck to parting on the left to the right. I will switch it up. I did run my hand through and comb right to left and it did feel funny on my scalp. On the eves I do a leave in conditioner I will start parting right to left to start getting scalp (and my reflection) used to the change. Thank you Sharalee you are such a breathe of fresh air and a blessing to us all.
Sylvia Vandegrift: Love this cut it’s so easy to keep thank you for this style it’s beautiful!
Lisa Pierce: Hi Sharalee! I love that you give so many wonderful tips when you do these hair styling tutorials. I have learned so much from you. Thank you so much for these hai videos. I do enjoy them very much. Tell your stylist we said hello! I appreciate her to. You are so blessed to have her. Much love and God bless!
Miriam DeVries: Super cute! I regularly style my hair on the opposite side for variety, and sometimes it lays better! ❤️
Katie Carlson: In a previous video you suggested the Kenra Nitro Memory Cream. Having fine hair I purchased it the next day. I love this for my fine hair, it holds my curl for a least 3 days and I have straight hair. Best product I have tried. I use just a small amount on the ends. I have a chin length bob. Thank you for a great suggestion!
Sunny Smith: I love the root boost. It is wonderful
Ursula Harmon: You always do a good job the Lord has blessed you with a wonderful talent . I never get tired of watching your videos you have taught me a lot thank you.
Jane Fleet: I just love your hairstyle. It's so pretty.
Ric Calendar: Adorable as always! Love that beautiful sweet smile! Have a safe and fun holiday!
Cindy M: Beautiful!
Sandra Sealy: Beautiful
Terri Laycock: I really like watching you fix your hair!
X O: I'm about to order my 5th jar of dry wax!!! The only pomade type product I can use!!!
samantha mann: Great video thank you .When you get your hair highlighted do you get a lot of fine foils , do you have a base color or is the darker color your natural color?
Beverly Hardy: I love this haircut! Do you still have the undercut on the sides?
Michelle Miller-H: Love your videos, I would love to know what products to use in 90-100 percent humidity!!!
Beverly Hardy: I love this haircut! Do you still do an undercut?
catmama54: You gave such beautiful thick healthy hair. I used to but age and lupus have me looking like Tweety bird. Lol
linda sedillo: Soooo cute.. does your hair have to be thick for this hairstyle?