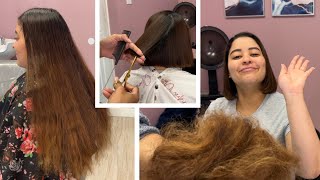
Classic Shear-Over-Comb Short Haircut With Mandy Mccullough
These days, short haircutting trends cover a vast array of techniques the hairdresser must be well versed on to stay busy behind the chair, from: disconnected undercuts, scissor-over-comb to clippered fades. Join Sam Villa Ambassador, Mandy McCullough as she shares her salon owner expertise on men's haircutting tips so you can build frequent & loyal guests.
Class Takeaways:
- Hear Mandy's pro tips for executing a thorough consultation so you can land on the correct cut your guest desires
- Learn how to determine when you should pick up a clipper or go for scissor-over-comb on the sides & back, depending on the hair type
- Watch how to softly blend the layering on the top of the head to the sides & back using the right finger angles & texturizing techniques
View all upcoming live online events at https://www.samvilla.com/education-cal...
So mandy mccullough is about to join us with a live human model, so this will be very impactful and mandy is a veteran stylist of over two decades and 16 of those years. She'S been a redken artist, she's. Also a salon owner near seattle, washington and has hermandia's goal is to inspire each person inclusively. She is driven to help career-minded stylists live their best life through continued ed and mentoring. Let'S welcome be wildly talented, mandy michola good morning. Katie, hey everybody. I just wanted to lean and say hi hi from wherever you guys are joining us today, another beautiful tuesday morning of zambia, education so excited to be here. Thank you for having me and thank you to all of you who are showing up to watch this video today, uh so yeah like katie, said we're doing guys, hair, but today i'm not just doing any guy. This is my husband. Joel who's been nice enough to volunteer to come, hang out he's playing hooky from work a little bit this morning to do that. So here's what we want to focus on today, one we talked about sheer overcome. This is really just about sheer cutting and i'll. Tell you if you saw on my instagram and social media posts, i cut men's hair, but i'm not a barber right and a lot of times. I have so much respect for barbers and they the clipper work that they do and the fades that they do. That is not my expertise. However, i have a lot of male clients in the salon and i think there's some really specific things that we can do as hot tips to make this better when we're working with our male guests in the salon they're different than our traditional female guests. Now, in addition to that, what i'm going to say, i'm going to just turn jules you can start seeing this section a little bit and i'm going to bring this in, because i want to just get right off the bat with doing some of this work today. The first thing, i'm doing so you can see, is i'm sectioning off at the parietal ridge and i'm just isolating the top out of the way. So i'm working from below the parietal ridge, if you come back to the front, keep your chin down just a little bit. If you want a clear guide of this to make sure the bridle ridge is, we take one comb and place it on the apex with the high point of the head and i'm going to take another comb and i'm going to place it on the side of The head - and you can see where that makes an exact 90 degree angle. That'S that change of direction right here. So when we work below the parietal ridge to start these haircuts, what i'm doing is actually working to build that square shape through the side of the head. So what we want to do, though, is recognize: how do we make this? A great experience for our male clients. I also was going to say that, as i go through this haircut today, this follows another haircut. I did for sam via live channels, a perfect pixie in a bit katie's going to put that up there, because the sectioning is all still the same, and this is why this is a really versatile haircut, whether we are cutting on honestly any gender, because this really Could be for any gender of hair right? This doesn't have to be for guys we're just kind of speaking in that language today. So here's how we start so, first of all, what i always like to do guys is pre-prep their hair. So it's been shampooing, but i bet, if you know, let me see it in the chat part most of our male clients, don't like to use conditioner in the shower right, like they're one and done so. It'S really important that we prep the hair with a product like this is redken's one united. So this is a light leave-in spraying conditioner. So it's going to make it easier for us to get our comb through the hair. Now, in a traditional haircut short, i might start in the center back, but for this haircut i'm actually going to come and start on this side. When we talk about working with our male clients a lot of times, they're, not sure how to use the language to, let us know what they want. So if i start on the side in this first panel, i'm going to have you turn here. So if i start in this first panel, what we can do is come to an agreement about what that length is going to be for the end result. So we always start in this first part so that they can see it. So i'm going to have you turn back to the front. Now i'm going to come in and i'm going to work in vertical sections, starting from the front picking up the hair, and we've already decided that we're going to take this at about finger length for him, and i just want to talk about these shears see. This is these: the sam via dry, cutting shears. These are the six and a half inch. I think i don't think the sevens, but when i'm cutting with men's hair, i like a long sheer it gets me through the hair, faster, i'm taking vertical sections. So look now i can just put this sheer in and cut and come in and done now i'm going to take another section, i'm going to have them turn, so you can see this line of section, i'm taking a vertical section, i'm going to make sure that The hair has been saturated, so it helps me stay control and out of the way now i'm going to have you come back to the front. You can see here's my fingers now notice what my finger position is doing notice, how it's flat to the head, but as the head starts to curve in my fingers, still stay straight up and down. That gives us more of a square silhouette. So once i come in come in using my long shears to cut into that length and i've done two vertical sections now, i'm going to do one more so again turn on your hook for me, but here's my vertical section, what i don't need out of the Way: here's another thing: how am i combing this hair notice, i'm going to comb from both sides to make sure that it's pulling straight out from the head shape and go ahead and come back to the front again. So now we've completed the length on the side. Here'S where i would talk to my male plane and say: okay, let's look at this in the mirror and does this feel comfortable to you. So i might even give him a hand mirror. So you can see a little bit closer up what's happening, but then we can decide. Yes, this is the length you had in mind or you could say: no, let's go a little bit shorter or maybe we even need to move into clippers to even take that down closer to the skin. So now all this detailing that's going to happen in the sideburns and around the ear, i'm going to save that for the end. So we can talk about how to do all that detailing when i travel and i'm teaching. This is one of the number one questions that people have. How do we get that clean up around the ear and how do we do the neckline so now that we've established this length, i'm going to continue all the way around, because i'm starting from the side and i'm going to go all the way to the other Side how we comb the hair is going to be vital for consistency in this shape, so i'm going to have joel turn again we're going to just continue with these vertical lines of sectioning and if the hair starts drying out, i need to make sure that i'm Wetting it down think about. We want the fabric that we're working with to stay consistent in its weight and texture throughout the whole thing. So if the hair starts drying out, it starts skewing. My guideline wet hair, is way easier to see, see the guideline when the hair is wet so continue with vertical sections. Now, keep in mind watch how i comb i'm going to comb from the back. Now i'm going to turn and come from the front. My finger position now come back to the front like right turn around just a little bit more just that way so notice how my finger position is vertical straight up and down. So it's close to the head shape on the base, but it's moving away from the head shape as it turns to where the head's curving and i have my guide from the previous section. So i can come in and cut now. Once i get below the occipital. My fingers are going to start cutting to what we call the planes of the head they're going to start following the head shape. That'S how we're going to taper that shape in once we get this length cut in then i'm going to come over and detail it with shear over comb. So i really want to give myself a head start with this now joel um. How long has it been since you had a haircut? Do you remember uh um, three weeks, four weeks i spent longer so i asked joel if he'd be a model for this like probably three weeks ago, so he hasn't had a haircut. I bet in about five weeks, so he's been really patient, so he's a really good model for us today, because we're really going to get in here and be able to cut off some length so coming through. Now. Here'S the beauty of this when i'm working with cutting principles. So what are principles? That means i understand my finger position, my finger angle, what type of shear i'm using the head shape once i understand those principles. All of this goes super fast and i can continue through so now i'm going to have you turn to your knees. Go that way perfect! So now you can see me cutting around the head so vertical sections now. Imagine if my habit is to comb from one direction, comb from one direction, comb from one direction. What do you think is going to happen? I'M going to keep pushing the hair this way lining up with my guide. It'S going to continue it's over principle of over direction. Right, it's going to get longer as it goes back, so that's why we need to make sure our combing stays consistent. One side, the other side, make sure i see my guide watch. My finger position come in and cut then one side, the other side come in and cut. Now you can see. Let me turn you nope go the other way a little bit there you go now. Do you see how my finger position is changing? It started here right so as the head curve that comes in, but my fingers still straight. Once i get to the round of the head, the occipital bone down now, my finger position starts cutting to the planes of the header to the shape of the head. So that gives me that tapered line in all right, so i'm going to continue through here from both sides, and this is where you can really use your mirror as your tool to help you stay consistent with your finger position, your elevation, all of those mechanics. Okay, now here's another hot tip a lot of times. Let'S say if you're cutting, i'm just going to say, like a little kid's hair like a little boy's hair and they're, really swirly and round and they're really swirly and round no they're, just squirtly. They move around a lot in that situation, i'll go through and cut all of this from above the occipital all the way around the head, quick, quick, quick fast. You can get that done really fast, then i'll, say: okay tip your head down i'll come through and match that line through the base at the end, just to try to make it as fast as possible, because a lot of times when we have planes that move Around a lot, it's hard to continue that line vertically, all the way down around the head shape. So it's a quick and easy way to work through these haircuts. Okay, i'm going to continue through here and again watching my finger position. My finger angle make sure that i'm combing from both sides now notice how these shears, because they're so long notice, how much hair i can cut at once. If i have like a little detail, sheer like a small shirt, that's going to take so much more time to cut through this haircut, my hair cuts in the salon for these type of shapes short haircuts. I book 30 minutes for it and it tends to be still enough time. We can talk about home care. We can get the next appointment pre-scheduled all the things that we want to have happen so continue through. Now you can see how much more quickly once we've established the guide once we've established our pattern and we understand head shape now. I can just work through this almost in salon, speed for you and keep going okay, so now jill. What i'm going to have you do is you're going to turn all the way to the other side. They work through the back of the head. Precariously there we go good okay, so as i'm doing this, here's what i want to hear from all of you who are watching how many of you are barbers or how many of you aren't barbers, but you cut men's hair. Let us see in the chat, what are you doing and what are some hot tips that you do in the salon when you work with these types of clients, let us see it and i'm going to just keep working through this head shape. Oh, my gosh, this hair is so long. It'S going to feel so good, okay and now turn a little bit more towards me, good all right! So now, working more in salon, speed! Remember! Here'S how we started this off! You can see on the side to tilt your head a little bit. This way, we section with a horizontal line around the parietal ridge to separate the top from the bottom. This allows us to work in a square shape and follow the head. Um follow the shape of the head and then build out that more square shape, which is more like what we want for guys if we want to match the face structure of this awareness in their face here. So that's how we tend to follow that line of sectioning. This line of sectioning also follows another class i did with the sam via team, and that was pixie. Perfect, i think, is the name of the class katie's going to get a link up in the chat for you, because the whole idea is. Is that, while we happen to be doing a guy client for this haircut, this sectioning that i'm going to show you, particularly when we get to the top, can be done anytime? You just need a short haircut. We just change finger angle or finger position or the length in which we can't cut the hair to get to that end result. So the section is great for any really short haircut. Okay, katie did we have some. Do we have barbers in the house? Do we have hair cutters in the house? What are we we got? Both we have lily who's, a barber cherie, who's, a stylist or not not a stylus, but just learning from the videos, and we have a lot of other styles zoe. So, thank you guys for participating nice yeah, that's great um and, like i said you know like when you have somebody who's, truly a trained barber. It is such an awesome craft. You know their work is beautiful and looks so cool and i love watching it. But for me my passion is being a hairstylist in the salon and working on all genders of clients, all different types of haircuts, and i never went in and specialized in those barbering techniques. But nonetheless, i have a lot of male clients who come in and i'm going to turn this a little bit more um a lot of my clients who come in and it works for them because they keep coming back. Okay - let's see yes, okay working through this, i'm gon na get these last two sections done. Okay, now put your knees back to the front perfect and finish this now. Here'S the other hot tip, i'm gon na, say and let's see, if you can take your head all the way down down down down down. Okay and there you go down a little bit more if you can't go okay, so i just want to talk about head shape and where how the head shape moves as we move around the head this way, because if we put a comb on the side of Joel'S head and we look at where it lifts off. You see if i put it so it's right above the ear, the head is continuing to curve as it comes to the front. So let me just see if i can maybe go over to this side. So do you see if i put the comb here where it sits flat to the head but see how the head starts curving and turning in as it comes towards his face, so think about that? Go ahead and come all the way back up now, because if my finger position continues to come straight out from the side of the head by the time i get to these front corners. If i'm coming straight out, i'm actually going to get length in this corner. So we need to watch where that head shape starts to curve, and even though this is the side coming here, you see, i need to actually curve my finger position in towards the face so that the length stays consistent as it did on the side. As it comes to the front, so when i come into this front section watching my finger position, finger angle coming in and cut that's going to make less hair for me to have to clean up afterwards because it stayed even consistent all the way through so finishing Up from the parietal ridge below, we were cutting in vertical sections, with vertical finger position at 90 degrees like just straight 90, vertical right, allowing it to gain a little bit of length as it comes up to that corner of the head of the parietal bridge. Now we're going to move to the top. This is where the sectioning is really important. This is where the versatility of this haircut comes in, so you can switch it up. So i'm going to have you tip your head all the way down again to there? Okay, now here's what's going to happen, i'm going to take a diagonal section that goes from the back of the crown all the way up to the front of that parietal ridge line. So i'm going to come through this and take that off. So now you can see this section that i've isolated now come back up and look to the right and then to grab sideways down. So now you can see this section now stay right there. Now what i'm going to do a lot of times! This is kind of where i'm going to break the rules a lot of times as i go through here. The rules would be continue with that vertical line of section as you come up and those vertical uh finger position. But what i tend to do is look at where the natural movement and direction is going to go with the hair, and i tend to follow that. So you can see, joel's hair is actually the movement is to want to go forward a little bit. So that means my line of sectioning is going to change from vertical, which i did from below the parietal bridge into this section. I'M actually going to follow that and i'm going to go on the diagonal. So i'm going to show you that section here in the camera, so here's my section my diagonal section: i'm going to pull this in just a little bit more, so you can see so here's my diagonal line of sectioning and i'm going to keep him in this Position just so you can see. I still want my fingers to be coming straight out from the head shakes. I still want to gain length as i come into that corner, but i'm going to change my line of section to diagonal because that's the direction of his natural growth coming in you can see. I have a guide below matching to this length here, find my guide and cut. Now, i'm going to do it again line up sectioning now, so you can see i'm going to have him bring his head back up. I want you to watch where my finger position is diagonal line of sectioning. My finger position is diagonal. Look to the right. My finger position is diagonal, but my finger angle is straight out from the head come in and cut. I have one more here, come in and cut so now, as this blends together a little bit now, we have that smooth transition from what's happening in the corner of the head, shape versus what's happening below the parietal ridge, but because the natural movement is forward, it's Going to have a softer blend than if i had continued to take these vertical so same thing on the other side, i'm going to have you tip your chin back down? Will you give it up in the chat for joel my model today? If you guys didn't catch in the beginning, this is my husband. How many of you have ever used your husband for a model and anything in life because they're available and they love you a lot and they'll sacrifice their time this way in the morning, so oh annette, thank you so much that blends beautifully. Thank you. I love that okay, so here we go with this section again. So what we're going to do, i'm going to have him turn this way, we're doing a diagonal line. That'S going to go from the back of the crown all the way up. That'S going to meet to the front of that parietal ridge line, so i'm going to come in and take that section and come out of the way a little bit cleaner. Now, if you get to a place where you're having a hard time, seeing your sections, what do you think you need to do, i'm reaching for it i'm reaching for it? We need a little bit of water all right, especially on short hair. If you want to stay in control of your sections, for consistency of end result make sure that your hair stays saturated and the same whatever you started with same saturation through the haircut okay. So here what we're doing - and we have you turn there - we go so again remember here: we're changing to diagonal lines of sectioning. So here's my section, i'm going to do that. So you can see it there's my section right there. I want you to see it, but then i'm going to place his head position back up, so i can cut because i can only contortion so much on these things for all of you. Okay, so same all the rules apply notice. My hand position has changed. I want to be able to see what i'm doing so. My palm is to me i'm right-handed, so my palm is to me we would say this is hitchhiking. You can see my thumbs this way verses, here's what happens a lot of times in this long. We get to this place, we come in and we do this. Let me turn you there. We do this so how many of you have done this before, but look at. I can't see the consistency in my line of cutting, because i've got so much in the way and it starts getting really awkward in my body position and as i continue to remove to move around the head, it makes it really tough. So as as a right-handed person as i move from center back to the right side of my client, i'm actually going to change. So i'm palm here versus cutting this way, all right, so coming in finding that line of sectioning finding my guide below once i have it, i can cut come in line of sectioning coming from either side and i'm going to cut, and you guys know on these Education, videos we're doing this from the comfort of our own home right, so literally at our feet. Over here is our dog georgia, the pumski. She is loving, joel's haircut, so much that we told her. She could give a little bark every time she liked what we were doing. So i don't know if you heard that, but she liked what was happening good job, georgia, okay, so now we're completing the other side. Okay. Now the next thing i'm going to do. I want you to pay attention we're going to talk about cowlicks in the back. I know this is a big challenge for a lot of stylists when they go out and teach so we're going to talk about this. So here you can see. Let'S turn this way. You can see that blended perfectly, so we did vertical finger position, uh vertical finger angle below the parietal ridge. We followed the direction of hair growth as it came through the parietal bridge, so we changed to diagonal finger angle but still kept it square as we came through there, so we're gaining some length as we come through that parietal ridge area. Now we're going to go to the back, so i'm going to have you turn your knees that way for me um? Actually, no, let's do this turn your knees to that direction. Sorry, you're, good! Okay, and now i want you to turn your head back this way. Okay, so here's what i want to talk about with calyx is that what we want to do. Everyone has this directional growth in the back of their head, so we need to again, just like we did in the parietal ridge. Look at the line of growth, whereas the direction of growth and comb the hair into that place. So i'm going to find that natural growth and comb it into place. Then my finger position is actually going to follow that line of growth. As i go all the way through, i also want to watch how short i can cut this. So you don't get like the rooster bits right that stick up right there. We don't want the rooster bits. So, what's going to happen, let me just adjust that a little bit for you unbox a nice back light in that area. There we go okay, so as i come through, i'm going to come in and find those lines remember we come from either side. So we stay even and consist consistent straight out from where it grows, bring it up and work around the directional growth in the back. Now, if i want to, i can play with my finger angle, if i think i'm going to get too short and get roostery here. I can take my finger angle from here now. You see how i'm going to start getting a little bit of length in the crown. That'S going to give us more of the ability for that hair to lay down and guys don't have to wait till like their second or third week after the haircut. To finally get that to lay down for them, so let me move this up for us a little bit there. We go perfect, okay, so coming in all right katie. How are we doing we're doing great um we're just getting a lot of questions that are asking for more men's education? Oh good, yes! Well, i think um i mean i'm not going to give anything away, but i think sam via has some exciting stuff. Coming up later this year in regards to men's cutting, am i right you're right and we can't really share too much, but you guys keep following us because you'll hear about it, yeah, that's all we can say. That'S all. We can say to you right now, but um i was tipped off on some stuff and i think you're going to be really excited and i think you'll start seeing a lot more men's, cutting coming up with zambia. Okay, so just to recap, we first sectioned from the private ridge below our finger position and our finger angle was straight out of the head shape. So it stays tight below this line bridge in the mid mid area of the head, and then it starts to square out and get longer as it comes through the parietal ridge. We did that all the way around then from above the parietal ridge. We took a tip your head back down again. We took a diagonal line that went from the parietal ridge, all the way to the base of the crown, and then we went through and connected that our line of section followed the direction of growth for this client. So it's very customized to them. Now we're going to go through the top again, let's talk about maybe breaking some rules. We want to customize this. Traditionally, what we do is we go into what we call it redken straight graduation, meaning we elevate the straight up off the head into vertical 90 degrees and we cut that's because it completes that square silhouette that we want right. But what happens do that? So you can see my black pumps wear silhouette. What happens is then a lot of times our male clients come in and they say this haircut was great, but this corner they got too long for me. I couldn't handle it well, it was too square. So if we know we have a client who doesn't want that length as it comes through here, we need to change the principles of how we're going to cut rather than cut straight all the way through i'm actually going to cut to the planes of the head. So i'm going to have you switch over to this side one more time doing a good job today on your directions? Okay, so i'm going to cut to the planes of the head, meaning i'm going to cut and it's going to arc and follow the head shape as it goes through this way and i'm going to start in the center of the head shape and then i'm going To move to the left and then i'm going to move to the right. This means that i'm actually going to shorten the length in the corner, so it'll be balanced and consistent through that head shape, but as it grows out, it's going to give more longevity. So we're sacrificing what we would do as a traditional square silhouette with guys, but we're giving them something that fits a little bit closer to their head, and so it's going to give more longevity to how they wear their haircut so coming in and cutting and noticing. I'M still using my longer shears, i love these dry cut shears from samvia because they can be really effective and quickly. Work me through these shorter haircuts, but also i know katie was just talking about it. There'S that amazing promotion right now with samphia the bogo buy one get one half off, because when i come in and do detail, work, that's going to be too much shear. And so i'm going to want to come in with my shorter shear for detail work and we talk about how to accurately cut around the ear and cut around the neckline. So perfect promotion right now, bogo buy one get one half off for all sambia shears, because it's going to help you complete your tool, collection as you're, working into understanding with short haircuts. Why we need more than one length of shear okay, so you can see. Look at that just blends, so nice that looks great on camera. Okay, now we're gon na. Have you come back to the front? So i want you to see how this looks on the silhouette tip your head there just a little bit. Okay! So here's the side! We'Ve cut here's the side, we haven't cut right. So do you see you can see the silhouette how it's rounding to the head shape? This is what's going to minimize that extra growth in the corner and give a little bit more wear into the haircut now we're going to do the same thing on the other side. So, let's see now, let's turn this way: good, good good and i'm going to continue over to the other side, so remember we're cutting the planes of the head from the back of the crown to the front of the face, shape coming in establishing my guide. Finding my guide, for my previous section make sure you're still coming from both sides to cut that guide in to that length, and then now i just have to connect from the parietal ridge to what i did above that line of sectioning mandy. We have a question: do you ever use a razor in your blending? If so, where in the cup, would you use the razor and why great question so right here i have my zamvia razor, and so yes, the answer to that question is, i would but here's what i use if it's getting really short right like this is finger Length for me razor for me works great when i want texture, it's an up and down movement that takes hair from straight to breaking it up into pieces like that right, but when i'm only working with one inch of hair, it barely gives me room to work With my razor so sometimes the end result is more fuzzy than texture and the minute that hair starts growing out by week, two or week three, it doesn't have as much smoothness to us because it's been so fuzzy. So for me, at this length i tend to start working with shears and if i want to remove weight i'll come in and do it with point cutting versus coming in with razor. But if i have somebody if this was a client who wanted to have, let's say like a full one and a half to three inches of length, that would for sure be an opportunity for me to come in with my razor to work with that cut. So to me it's about the movement of the razor. How much movement do i need to get the accuracy of texture that we did? We expect with a razor um, but because it's a shorter length, i tend to just work with shears and all point cuts. So hopefully that answers your question but awesome. Thank you for asking. You guys keep the questions coming, it's great all right, so i'm just making sure that this is connected through here cheers. Okay! Now as we come through, i have this front front length right here. If we cut to the planes of the head, it should be the same length here and here, but depending on how they wear their hair. So that needs to be part of the consultation. Do they tend to kind of push that up with product? Do they push it down? I know that joel is going to wear this in a way that i don't want this. Let me see if we can um tilt your head sideways a little bit. Okay, so you can see this length. I don't want this to completely. Follow to the plane, because it will start cutting this so short that if he wants any versatility and movement he's going to lose it, his only option will be to wear it straight forward. So i actually want this around from where you can see the round of the head coming down. I actually want to square that out a little bit, so it's just about where i want it to be. There'S just a little few baby hairs that i want to catch up in that spot. Okay, all right come all the way back up and let's go so you're back to facing the front again. Okay, so now we're starting to get into the details - and i think this is where a lot of questions come in about how to do this so, like i had already mentioned now, i'm going to switch, and i love a good sam via swivel shear right because Now i'm going to start moving around the ear and i want to be able to have control so this swivel makes it so it's still comfortable on my hand and my wrist so now coming back just look that way: let's start working around the ear here. So what i'm going to do is just cut out the ear all of that length in the front and behind the ear. Now, if i want to - and i might pop out just some little trimmers to do that too - you totally can. But this just gives me a little bit more control and now, let's turn to the other side and do the same thing over here so combing this down, i'm coming with my shears, shorter shear, swivel shear, so see how now i have control look at how this Shear helps my hand stay more comfortable, as i cut around the ear and then i'll do this, so you guys can see that down and just come in and cut all right mandy. I love that your entire cut, your wrist has been neutral yep and for me i struggled with a lot of like short haircuts with doing you know the bent wrist in those like tight areas, so yeah, and i mean just think how long do you want to Have this career right, we have to really think about our body position and what tools we're using. So one thing that i think is really special about. The samvia tools is that sam is always thinking about comfort. Sam has been in this industry for such a long time and i'll just tell you. His physical ability is just incredible, and it's because he's been so thoughtful about not only how does he position himself when he's cutting the hair, whether it's his body, his arms, his wrist or his hand, but he also thinks about that. Every time he makes a tool. So that's why we come in with such incredible things like these swivel shears, okay. So now, let's go here shear over comb. Let'S talk about it! So what i'm going to do is i need to tighten up all of this where the sideburn is around the ear, and i want you to think of the head shape. I now want you to take. We did the parietal bridge below on the side of the head. I want you to split that in half one more time, because there is this kind of bone that comes out comes back to the front. If i take a comb - and i put it on the side of his head, do you see how it starts lifting off right about here? The parietal ridge is here, but the head shape lifts it off of the midway, so we're going to do shear over comb from the base of the hairline up to where that extension or width starts happening in the head shape. So come here and we'll try. This a couple different ways, so you guys can see my comb is going to come in fine teeth with my shears horizontally and then i can start taking this length off now. I will say this for me is easier once the hair starts drawing, so it works out perfectly. We do all of the cutting work and getting the silhouette in while the hair is wet. But then, when we do shear over comb, we really want to transition to something a little bit more dry. So we can see the line that we're creating, but you can see just right there that one little bit just took us up to where that width starts happening in the head shape. So that was my first panel in front of the ear. Now i'm going to work on top of the ear, so my comb comes in now i'm going to come in, i could do short or long shears with this. It just depends on how detailed i want the work to be keep in mind. If we look at what the curve of the head does every time i place the comb where it lifts do this, where the comb lifts off is one flat spot on the head, so here's a flat spot, here's a flat spot, here's a flat spot. If i come in with longer shears, what's going to happen, is i'm ultimately just hold this one here for a second? If i come in with a longer shear, you see now i'm extending beyond those flat spots and i'm going to get length on the furthest. Outsides of it so by working with a shorter shear, it gives me more control, so i don't have to keep going over and over and over again. It helps me stay flat to that bubble that i'm working in so coming through and remember we're only doing this up until that width happens in the head now come back to the front. Let'S see, i think if i stand in front you can see. Where are we? Oh there we go. Oh wow, look at that. You can see a difference between this is the side that hasn't been shear over comb yet versus this has we're getting this really nice and tapered on there. Now, let's do it over. On the other side, so you can see so, let's turn this way so coming in my cone is horizontal. My shears are horizontal working up until that width starts on the head shape and again do you see how i'm working around this curve of the ear? If i had a longer shear that would make it really challenging to do so. This is why it's so nice to have different lengths of sheer so that you have control in those detail areas. Now. I still have a little bit of length in here, so i'm just going to turn my comb to a position so that i can get right into it and now come through this next panel. Our next bevel make sure i know this is hard to see on this side. So forgive me as i go through there, but you can see how nice that blends. So now, as we come back to the front, see lily's saying. Thank you, mr via yeah. I agree. Thank you, mr via okay, so come here and then there we go. So, do you see how nice and tapered that is on the sides we're going to do the same thing in the back so now joel i'm going to have you turn to your knees? Go back about that direction again. Now we need to start detailing here and the same thing shear over comb, i'm going to start from the base of the neckline and i'm going to work up to where that occipital ridge or where the width starts in the head shape. So keep your chin down and now i'm going to come in with horizontal comb. Let'S do that way, so you guys can see, and this and i'm going to come in and start cutting now the movement of my comb. You need to think about that. Here'S! What'S going to happen as my comb moves, i want it to follow the head shape until the width happens. Then it's going to lift off the head and continue to go straight. So i'll say that again the comb is going to follow. The head shape come up to the width on the head. Where that happens, then it's going to continue straight up. If the comb continues to follow the head shape around, then i'm going to continue cutting this shorter and shorter and rounder and rounder so be really thoughtful about what your position is with your comb and what the movement is that's happening through there and here's where my Comb starts getting straight and lifting off, then i can continue through these bubbles. Remember the reason i'm using the shorter shear is because it helps me stay in control with the round of the head, as i move from right to left through and let's have you turn all the way to the other side. Looking nice joel um mandy, we got a question when is the best time to use a longer, shear perfect, so longer sheer is so when i started this haircut and i was working below the primal bridge in vertical sections with finger vertical finger position. That'S when i was using this long shear because look at where my fingers are i'm working down this head shape. Look at that shear. It fits perfectly within the section that i'm cutting, so this is like just get it done versus. If i had done this part of my hair cut with a shorter shear - or i know some of you even maybe have a shorter shear than what i'm showing you then look at, i have to take a cut and a cut and a cut and cut, and Every time i cut it can change the consistency of that guideline. So if i have one lung shear just to get it done, i don't have to keep guessing on that guide and consistency of my length as i go through. But when i come in - and i start detailing i'm doing things where i have to be more aware of the curves of the head or what's happening with the bevels or the panels of the head - that's when i like to come in with my shorter chair this Okay, so i'm going to come in and work through this section and now i'm coming over here to this part of the head, i'm going to have you tilt there, so you can so you guys can see what's happening and let me see if i can. Even oh wow look at that close-up of your ear. You probably have no idea. You ever have your ear, that close all right. So here's my comb and i'm going to come in and clean. This all up, don't be afraid to move your plane's ear out of the way to get in there and get that blending done all right. Okay, okay, i'm just going to check this a little bit. Here'S the other tip a lot of times. You really want to make sure you come all the way up, use your mirror, especially when you're working with shear overcome and you're trying to make sure you're, even and consistent in that graduation or taper. That happens because from here close up it's hard for me to see exactly how it's doing, but if i have you turn the look to the back, but if i look in the mirror so now this is more true for how it would be in the mirror. I can more accurately see the big picture and see how that taper is working and if it's consistent throughout the head shape so make sure that you're, using your mirror on that. Okay come to the front and i'm going to have you actually just stay right there. So, let's go through a little bit more in detail this and here's going to be some things. That'S going to maybe position you a little bit differently than what other stylists are doing the salon and how you detail. This end result. So, first of all, let's talk about cleaning up this neckline right here. I actually always go to using my razor tool, make sure it has a garden on it make sure it's a brand new, fresh razor because we're going to be doing this on their skin. So you want to make sure that we're not going to, i don't know, transfer anything from somebody else's haircut onto their skin, so i'm just going to have him go there and i'm going to just start putting this line in now. This versus trimmers in this section right, so i know a lot of you probably use trimmers for this. This is going to get a little bit tighter than you would with trimmers. It also is going to create a softer, more natural, organic line in the hairline around the base. Trimmers, remember like when i go to the grocery store. Do you guys look for a guy's haircuts you'd be like oh? I know you got that haircut done like two minutes ago, because that line is so strong. It looks clean and it looks sharp, but if we want it to be a little bit more organic and natural, we want to soften that so using a tool like a razor along the hairline to do that is going to help you get that end result. So, coming in and now just turn your shoulders a little bit, so you guys can see - and that looks turn and now turn your shoulders a little bit. I know i'm asking him to like really switch his body position around turn that way: okay and we're gon na come in and clean that up good. So you see how soft this line is as we're putting that in there and come in and detail that a little bit more okay, now i'll come back just to your face and decide. Now, let's talk about around the ear, i actually i'm gon na grab my trimmers out for this. So i have these right here and i just like, like just these little baby, trimmers they're super great. I want to use trimmers, not a clipper, for this detail. Work. The same reason why i use a short shear versus a long shear. I want to be able to come in and work around the curve of the head as they go through so swimmers are on. I can come in and detail anything around the ear move. The ear down come in clean up anything that needs to still be cleaned up now. The other thing is, i always like to check and see if they have any hair in their ear on their ear. I'M going to use a trimmer to do that versus like the razor that i used back here, because this is such soft sensitive skin. I don't want to nick it and you know, ears bleed forever. So then i can come just over the hair over the ear. If there's any hair in there clean it up and then that side is done, okay come back to the front, so the other thing i wanted to talk about that. I do with most of my guy clients, and i think my guy clients appreciate it, but if they have girlfriends or wives, they even appreciate it more and it's about making sure you're checking with them and asking can i trim your eyebrows for you today, something we Don'T think about now, i'm going to come back in detail work so which shears short shears, so i'm going to come in with my short shears and i'm going to do shear over comb in the brow area to clean that up for them. So i just come here now. The first thing i do is always say: go ahead and close your eyes for me and their eyes are closed, so make sure you're telling them what you're doing i'm coming in with my comb right here go ahead and hold still, and then i can just scissor Over comb, anything in the brow area and then i'll say: okay, i'm coming over to the other side, because their eyes are closed. They can't see what's happening, come in and come back and trim that okay go ahead and come back to the front. Okay. So we're getting there now, for the sake of time, you guys saw me demonstrate the detailing work on this side. I'M going to go ahead and do this after camera today, because i think you guys have it um, but here's how we want to finish this at the end of any short haircut, no matter who it's on, i always like to take them back to the sink And rinse out all the loose hair, so whether whatever gender you live in, it's an important part of a short haircut because nothing's worse than going home, your hair cuts fresh, but you have all those loose hairs coming down. So that's what i would typically do we're not going to do it today, but we do want to make sure we finish with blow dry. So i have my samvia blow dryer here. Let me get it out for you so come in now. Remember we started out this with haircut this haircut with using redken one united, because we know a lot of guys skip that conditioning step in the shower. So this is great hair education for home care. For them, then, what we're going to follow up is with texture and here's the one thing i'll say to product with guys i always ask to like them. What'S your favorite delivery system, do you like it as a pump? Do you want it as a spray? Are you used to putting your fingers in something because guys, don't always have the terminology to say i want a pomade or a mousse or a gel, but they know like how they want to touch it. That'S an experiential process for them, and then they sometimes will know. I kind of want the finish to look like this, so we're using actually redken's dry shampoo paste. We just have a little mini one, which is awesome, and this is a combination of a texture paste with dry shampoo in it. So we get a matte finish because it is a little pot. It'S going to be where my fingers go in it for picking up the product, making sure that i'm showing my client. How much is on my hand, working it through guys, won't ask for direction, but they want direction. So don't take that for granted. The more you're able to target what their needs are through your conversation and kind of giving them, maybe more than you think they need that's. What gives longevity to your clientele in men, clients, and i know i have guy clients who have followed me to every salon. I work at no matter how far it is because they feel confident about knowing that i know their hair and i give them the education that they need through them. So, oh, my gosh honey. This is well deserved haircut. So joel was such a good sport because he um has been growing his hair out for so long. So he's gon na feel frisky and fancy free now that he has a new haircut. But hopefully you all have some tips to take home. Joel gets a haircut. Hopefully, you all have some tips about guys haircuts, but can we just say short haircuts in general if you want to see more versatility on this be sure to go back into the zambia youtube channel or facebook page for my other short haircut, video, which was pixie Perfect same sectioning, but just how do we cheat change it up to get a different silhouette but um? Thank you so much for having both of us here today. This is so nice, uh katie and this whole sambia family. We always love spending any time with you, but particularly tuesday morning for transformation tuesdays. Absolutely thank you mikolas. You both look, amazing and all of the tips were just so jam-packed. All of our comments coming in are just like. We want more of this education so mandy. If and joel, if you want to be back and maybe give some more tips on fading in the future, we would love to have that on our platform, but you guys make sure you follow manny on instagram and tick tock. Her platform is full of robust educational videos, so, head on over there follow her and mandy. We can't wait to have you back on our platform. You are always a treasure to watch. Thank you katie and kate katie. I also know for all of you who are looking for more live, hands-on education opportunities. I am part of the team of everything's included at the redken exchange, which is hair, color and hair cutting in a three-day program and that's coming up in mid-july and of course, you can find that information from my instagram or from redkin.com awesome. Thank you so much. You guys always continue getting advanced education because it will just further your business behind the chair. So thank you. Mandy have a great rest of your day.


Comments
jerkyboy43: Wow he look very good look hair !!
Fonny Irawati: