The Pixie Kids Cardigan Crochet Tutorial Right Handed
Written Pattern available:
https://ravel.me/the-pixie-kids-cardig...
This Video is Available in Left and Right Handed Tutorials
LEFT: https://youtu.be/iFnlTnO-DtU
RIGHT: https://youtu.be/YDYLqATZWWI
ADULT:
Written Pattern:
https://www.ravelry.com/patterns/libra...
LEFT AND RIGHT Handed videos available:
LEFT: https://youtu.be/bJk2dpLYR4I
RIGHT: https://youtu.be/Q6m_tufXryo
Like us on Facebook:
https://www.facebook.com/jolieknotscro...
Join the Jolie Knots Crochet Community Facebook Group:
https://www.facebook.com/groups/254138...
Ravelry: https://www.ravelry.com/designers/crys...
Standing promotion on all written patterns, all of the time!
Why Just Buy ONE?! Get more patterns and save more.
Buy 2 for 20% off
Buy 3 for 30% off
Buy 4 or more for 40% off
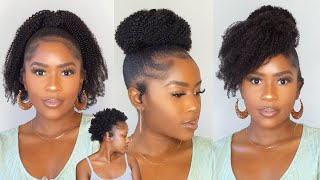
Don'T forget to Like and subscribe to, jolie knots crochet share with your friends, hit that little notification bell, so you can get notified when new patterns release, all our videos are available and left and right handed tutorials hi. Everyone welcome back to jolie knots, crochet, I'm Krystal and today we're going to be making the pixie kids cardigan. Now this is a longer cardigan for a child made with the blanket stitch and half double crochets for the sleeves and the border. It'S super super simple. It comes in size, small, all the way through extra large for a child. Now the length of the cardigan is customizable to the size that you want. The way that I have the pattern written is that will small right to the knee of the size that you are looking for now. There is a written pattern available for this cardigan and you will find the link in the description box below as we work this. We will start at the bottom part of the body work our way up to where our arm holes will start and then we're gon na go ahead and separate splitting the panel's into one back and two fronts and then attaching the arms and, lastly, doing the neckline. The yarn that we're going to use for this project today is a red heart Super Saver. That'S what I'm using it's just a regular four worsted weight yarn. Now you could just use whatever four size yarn that you want and I will go ahead and scroll up on the screen. The approximate amount of yardage you will need for each size. The hook size I'm going to be using, for this is a six millimeter hook. You'Ll also need two stitch markers and a tapestry needle to weave in your ends, go ahead and grab your materials and let's get started, okay, so to get started. You are going to take a slipknot and you're gon na chain the correct amount for the size that you need. That'S going to be listed right here. All right. I'Ve got my chain getting started on Row, one that this is going to be the right side of your work. What we're gon na do is yearn over and into the second chain, from the hook, we're going to place a half double crochet and then we're going to half double crochet into every chain. All the way down and that's going to be ro1, go ahead and finish out Row one. I don't meet you back here for Row, two all right now I have got my first row of half double crochets complete. This is the right side of your work. So if you want to mark that it and somehow, if you won't be able to tell later then go ahead and do that now if we're Row, two we're going to chain one turn our work and we're going to do another row of half double crochet is All the way down go ahead and do your half double crochet. It'S all the way down and I'll meet you back to begin Row three alright here I am, we've just completed Row two and now what we're going to do for Row. Three is chain two and turn our work now. Our chain two will count as a stitch here and throughout the pattern for our repeats after you chain, two we're going to put two double crochets right into that first stitch, skipping two stitches and into the third stitch we're going to put one single crochet and two Double crochets all into the same stitch skip two stitches, one single crochet and two double crochets all into the same stitch, and that is your repeat for the row. Continue working that all the way down your panel and I'll meet you back. So we can get started on Row. Three, I'm sorry Pro for me back. We can get started on row four! Alright! Here I am at the end of round three. I'Ve got three stitches left, so I'm going to skip two and then put a single crochet into the last stitch and that's the end of your third row now to get started on row. Four. This is your repeat row you're going to chain two that still counts. As a stitch and we're going to put two double crochets right into that first single crochet, now we're going to skip both double crochets and working into your single crochet. You are going to single crochet and put two double crochets skipping. Your double crochet is working into your single crochet. Now, that's your repeat: row you're, gon na repeat that over and over and over until you get the length that you desire and you're gon na measure from about two inches below your armpit and then get the length that you want for the bottom, where it's gon Na fall, hers is gon na fall right around her knee. It'S just pretty tall, so do about 20 to 22 inches, that's for size, extra large for a size, large, approximately 18 to 20 for a size, medium, approximately 16 to 18 and etc. So go ahead and get to the length that you want and then we'll start working on separating our panels. I'Ll give you the counts for each size to separate your panels and I'll meet you back here. Okay! So when we get to the end of our repeat, rows, we're going to have this chain two and that's where we're gon na work. Our last single crochet, just like that you're going to work your panel into the length, does approximately two inches under the armpit and down to whatever length okay. So I have completed my panel approximately 20 inches long, which is going to be just above the knee. For my daughter, what you do want to keep in mind when you're making this panel is. This pattern has stretched to it. So you can pull gently lengthwise and you'll have a better feel for the length that it's going to be as you're wearing it. So if we pull it with wise, it shortens up a little bit so make sure you give it that light tug lengthwise, because you will have that extra pool. And if you make your panel to the length that you desire and then it gives it an extra pool, you might have a couple of extra inches on that. So just a fun note to notice when you're making yours so now what I'm gon na do. This is the body of my panel. I am going to split my panel in three, so I'm gon na have my front side panel here my back panel and then my next front side and then those will fold over. So let me show you with this one where I'm splitting my panels is where we're going to have those arms and they'll fold over and that's what we're gon na put our shoulder seam. So if this was opened up all the way, I'm splitting my panel here and working into three separate panels and here so I'm going to let the numbers scroll on the screen for the amount to count in for your panels. And here's where my front panel will be I'm gon na stick with my stitch marker right into the single crochet okay. So each of these groups has three stitches and then you've got your plus one single crochet here. So this is gon na, be my my front panel. Now I'm going to count in the same on the other side and taste my stitch marker. So this will be my back panel and these will be my front panels, so I'm gon na work them into working. My regular pattern working my regular pattern. I will work just this portion. This one is separately and this one next now, when you're working your panels into your stitch markers, this is the front of my panel. My last stitch will be in the stitch marker when you begin your back panel. Your first stitch will begin in the same stitch marker, so you will have one stitch for your front panel. I'M one stitch here for your back panel, so just to notate that when you're working on your panels - and I will meet you right back here when I have my length desired for my panels - I will also leave on the screen how many rows to do approximately. For the size that you're doing now keep in mind, if you're going down a hook size for gauge or up a hook, size for gauge your length might be off now, if your child is short or tall and they have maybe smaller arms, you just do it Up to the size, you know the top of their shoulder. Okay, when you get to the top of your panels, we're gon na work a row of single crochet, so your back panel is just going to have one single crochet for every stitch across your front. Panels are going to be a little bit different, so let me show you we're going to chain one and our first and our last stitches we're going to decrease by one so we're going to go into the first stitch, pull up a loop into the next stitch. Pull up a loop so we're doing a single crochet two together and then we'll single crochet down all the way to the end, and then we'll do a single crochet two together at the end - and this is just going to help us with a larger opening at The back of our neck for the cardigan okay, so here we are at the end. Remember your chain, too, is counting as a stitch, so our last single crochet, two together, will be over the last double crochet and the chain two. So now our stitch count should be two stitches less than what we started with so we're not decreasing the single crochet two together in the back panel, only in the front panels so go ahead and finish out your panels, and I will meet you back here. So I can show you how we're gon na join the shoulders? Okay, making sure that you leave a long tail to sew your panels. What you're gon na do is fold over your front panel to your back panel. So, of course, you'll have two sides and you'll have this opening in the middle. Now, if you're doing a large or an extra-large, you should have nine stitches open. If you are doing a small or a medium you'll have seven stitches open. So what I'm going to do is take the long end that I left go ahead and put that on to my tapestry needle the whip. Stitch is my preferred method of seaming things up, but if you prefer, another method then feel free to use. It remember here at the end, on our front panels, we did two single crochets together, so we want to make sure that we are not adding an extra stitch at the beginning or the end from those and with my whip stitch, I'm just going through the top Two V's on one side and then straight through the top two V's of the next stitch. On the other side, going back around and doing the same thing so do that on this panel. And then you want to go ahead and do that on to the next panel and I will meet you back and teach you how we're going to create our arms okay. So we here is our armhole here's! What we're gon na get started working on our arms, our top shoulders are now seemed up only have an opening in the back of the neck, so getting started on our arm holes. We'Re going to start right where our stitch marker was there at the bottom, where you have two stitches one for this panel and one for that tunnel. So we'll start in here we'll take our yarn and we're going to half double crochet all the way around the arm, making sure that you're working on the right side of your work, it's pretty much reversible. But when you make your arms, it will be the right side of your work. Okay, so now working up what we're going to do is we have music meant for you. We have our single crochet and we'll also have our chain twos. So we're going to put one half double crochet into the single crochet, we're going to put one half double crochet into the chain to the chain: that's unworked and one half double crochet into the chain, two space where we worked our single crochet, and so you should Have three stitches per two rows: half double crochet into your single crochet, half double crochet into your chain space and then half double crochet into the top. So the second chain, where your single crochet was worked so you're going to do that all the way around. Until I get back to the bottom and I'll show you how we're going to begin our decreases on the bottom of the armpit area. Now, when you get to the top here, you'll just work: one half double crochet into the single crochet and one half double crochet into the single crochet on this side. Okay, so here I am, I've worked my first row of half double crochets all the way around. My sleeve - and here is my first half double crochet, so what I'm gon na do now is I'm going to take my stitch marker you're gon na need your stitch marker to be working in to note where you are doing your decreases, so we are going to Do a decrease over the first two stitches so into your first half double crochet and then without yearning. Over going into the second half double crochet you'll go in and pull up a loop. You should have four loops on your hook and then you'll yarn over and pull through all we'll take our stitch marker and we'll put that right there. So this way, when we come back around this will be the first stitch that you work into for the decrease and then the next one will be the second, so you'll decrease over your stitch marker and the next one I'll show you that one more time. So let me work around my sleeve and I will meet you back I'll show you that decrease one more time and what we'll do is continue working until you have 25 stitches on any of the sizes, and then you will stop decreasing right here, 25 stitches and Then just continue with the length of your arm without decreasing it any further until you get to the size, your desired length that you want. Okay here, I am. I'Ve worked up to my stitch marker again and I am going to remove my stitch marker and do my decrease over the SOOC that read the stitch marker and the next stitch. Okay, so all sizes are gon na decrease to 25 and then you'll stop decreasing and continue with your length once your arms are done, we'll do the border of the Front's of our panels behind our neck and down the other side. So Fleur. I didn't finish your arms out and I'll meet you back here to get started on on our border. Okay, so I have completed my arms and to finish out my arms. What I did was just do two single crochets and then a slip stitch to make that step down. You know you can fold your sleeve if it's too long or leave it this way my daughter likes hers folded. So I went ahead and did a few extra rows, so I decreased down all the way to 25 stitches and then I did 15 extra rows of 25 stitches so, depending on the sides that you're doing and the arm length of the child that you're making it For you're gon na do what the amount extra that you need? Okay, so this is the right side of our work with the front of your half double crochets facing now when we're working the border or doing the three rows of half double crochet up the side. Around the back and then down the other side now, what we want to do is make sure that our third row of half double crochet is going to be on the right side. So we are going to turn our work inside out, see how those arms look different. So we'll turn our work inside out and starting from the bottom. We are going to be making sure we're going to be working on the wrong side, because we're working inside out we're going to be working on the wrong side of our work first. So that way the right side is facing out. Does that make sense? Hopefully it does and if it doesn't it's not really that big deal, I just think it looks a little bit cleaner, okay, so we're gon na get our yarn and we're going to attach at the first row last chain, okay chain, one and into the side of Your first half double crochet row. You are going to put one half double crochet and then into your next half double crochet row, you'll put one more half double crochet and now we're going to be working the same as we did in the arms making sure that we have one stitch in your Single crochets one stitch in your chain space and then one stitch in the top of your chain: two single crochet, your chain space and the top of your chain, two single crochet chain, space top of your chain, two we are not increasing and we are not decreasing. For any of these rows and you're just going to continue this way, all the way to the top of your neck, not decreasing and not increasing. This stitch here is counted as worked already. It'S not really a stitch because it's worked into so you're gon na skip that one go around your neckline come back down. I mean, I don't think you guys really need to watch me doing half double crochets as a boarder and when you get to this side, you'll just chain one turn and then go back around and you're going to do three rows. Well, you can do more. If you would like it to be a thicker border or a thicker edging around this, the front of your sweater, but I'm going to do three okay and then that will complete your work. Thank you. Everybody for watching Jolie knots crochet. If you are not a part of our Jolie knots, crochet community on Facebook find us and show us what you've created.

Comments
Bruna Pinheiro: This is just perfect. I made one for each of my girls and all my friends want one now. Thanks so much for this beautiful work.
heather dawes: Very lovely pattern. The stitch is awesome and I really have enjoyed making this. I did have a problem with the second half of the panels and trying to figure out how you did them since you did not show us how to do it... every other part of this has been very easy to follow though. I can't wait to make one for myself now!
Amber K: Hi there, I just wanted to thank you for such a beautiful project and well explained tutorial. I made two of these for my two daughters and they look amaaaaazing. Lots of love, from London
Ashley Briones: So very awesome! I can't wait for adult and plus size ones!
Terri TN: Please, please do this for adult sizes!!!!! It's so pretty. Thank you!!
curlycords: This is gorgeous....so glad I found your channel . I am looking forward to the adult size. Thank you so much!!
Dee Ramos: Absolutely love this one! Question is I'd need to make it at a 14/16 size. What are the multiple stitches for the beginning chain? Can we look forward to seeing adult sizes in this pattern? Thank you very much!
Triple ZZZ: Great video tutorial. Thank you. Love the cardigan. New to your channel. I'm impressed
Debbie Graves: This is beautiful I would like to make this for my granddaughters and also a adult one for myself thank you so much for this pattern
Debra Weir: Love to see adult plus size pattern !!! Lovely pattern !!! Thanks !!! Subscribed !!! : )
Nina Scudder: Great tutorial, would love to do the adult size :)
Sandra Collins: Hello... I just watched this video. I love it. I make afgans & baby blankets with this stitch. It's one of my favourites. Looking forward to the adult pattern for this sweater. New subscriber here.
Crystal Johnson: Thank you would like to make the sweater for my granddaughter
Lorraine Smith: Gorgeous sweaters
Vanetza Menjivar: It's really awesome . Love it so much
Margaret Metherell: I've just completed the kids version of this cardigan. Great pattern. Do you have a link for the adult version please. Thank you
Amiee truth matters: Beautiful, my next project. Many thanks ⚘⚘⚘
melody mhandire: Beautiful. I want to try it
kirujah senathirajah: You are explained very well easy to understand
pamela johnson: Hi- I love this, but wish you made it for adults??? possible to do this again in adult large or extra large....so hard to find nice duster cardigans and I love your tutorials...so well done and easy to follow!
Wendy Schmidt: Very interested in plus sizes It is beautiful stay safe
Inez Ann Estes: This is so nice.
DEBORAH JOHNSON: Love this
Brenda Sweetapple: I made the extra large which was big enough for my daughter and she is a small/med size in women's. :). I've only been crocheting for two years and fond the arm holes. little difficult picking up the stitches so its not the best job hehe
Jeanette Duncan: Very nice Thank you for sharing
Sharon Densmore: Have you done an adult design in this? I just subscribed and love this pattern and it is now Nov 2021.
Priyanka Bakshi: This is Amazing.... Request- plz plz make some summer wearable fr boys ....❣️
Mig 2020: Where can I find the adult sizes..I want to make me one .
Jessica Kampa: Where does it say how many chains I need for my sleeve panels?
Sybille Piorr: Hi again is it this week you release the adult size pattern for this beautifull cardigan?
Ollie Alexander: Beautiful but hard if you are new to crocheting
carolyn carolyn: Just a suggestion, it would be easier to see what your doing with a lighter color yarn.
Heba Abdelghany: It is beautiful hi I am new and I don't know how to make the panels can you make a video where you are making them if it is possible.
Andrea Ramirez: Is it possible to know the measurements in inches? I've started making a Large but with different yarn and it seems to be a bit to big so I have to start over and try maybe a Medium for my 10 year old daughter.
L E: When you mean stitches. Is that the dc sc or the amount of the main st that you showed?
Margaret Lewinski: how do you do a decrease in this stich
Linda Cornelius: I would love to have this in an adult size I wonder if the large child would be a small just under a small adult so maybe you could just add a few stitches here in there
Imelda Martinez: saludos me gusto mucho solo q yo nada mas hablo en español no podria ser traducido
shanti sarvani: can you please tell me how much yarn needed in grams for a medium size you made.. jus wanted to confirm , if i have enough yarn beffore starting making one.
Sheila Wilson: I am trying my hardest to make the little girls pixie cardigan i am stuck on how to separate the panels it's seems to me that you cut the panels into three pieces please I need your help on this I'm making this for my grand daughter thank you
Smaira Saleem: Im attempting this but a little stuck.....when we do the first big panel.....the are the other smaller ones done separately?
Teresa Noce: Lovely . But I’m also haveing problem with panels
Gandi Jordaan: Is the 12 to 14 the age its suited for?
Sybille Piorr: Hi i was wonderring iff there is a adulte size pattern for this beautifull cardigan?
Tyann Thomas: Can we get this in adult sizes?!!?!
Penny Drysdale: My granddaughter wheres size 16 in girls so how would I know how much much yarn and how many stitch to do
Samina Shaiq:
Francesca G: Can you please tell me The stitches multiple please and thank you
Priyanka Bakshi: Lovely...❤️ Do u hv adult size??
sally ann males: Do you have pattern for size 20
Dominga Esquivel: Como ago disminusiones
Jennie D Novella: Does S fit a 3 year old child, or is it to big?
Elizabeth Miller: I was good up until adding front panels then ya lost me. I'm making the child Xl but I don't have a kid to measure for arm holes. Do I just make the front panel as long as the back? I'm confused..... I feel I've done all this work just to frog it ugh
Susan Williams-Payton: Help I need a hat to match this. I've made one for one of my granddaughters and I need a hat to match it. I'm going to add a fur trim also. Can you help me. I have to make 5 more.
Sara Pilozo: Las letras no dejan ver el tutorial
Aylin Mutlu: Hi is this suit for seven years
Bayar Gelenkhuu: What age is this for?
Smaira Saleem: Do u have an email address?
Creation crochet Nanny: You crochet adults sizes
Gabryl Mack: I’m trying to make this. However I feel like she should have zoomed out more, it’s really hard to see the whole thing because it’s so zoomed in the entire time .
Annick David: Wish I had a picture for the video. Not sure why I get a black screen.
Nandini singh: why rupess
Nandini singh: why rupess
Mig 2020: I Frige up