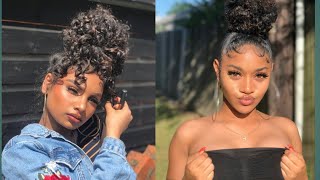
3-In-1 Kinky Curly Ponytail Hairstyles Ft Luvme Hair
- Posted on 09 May, 2021
- Ponytail Hairstyles
- By Anonymous
In this video I show you 3 different styles you can make with 1 drawstring ponytail hair
Hair deets ❤
Hair company - Luvme hair
Hair length - 20 inches
Link to hair -https://shop.luvmehair.com/collections...
Check out my other hair video
DIY butterfly locs - https://www.youtube.com/watch?v=4VKFHM...
Get to know me
Ethnicity- Nigerian
Location - London, Ontario
Filming equipment - iphone 12 pro
Guys i was feeling myself so much in this clip just you know giving all the poses and the looks yes give it to them queen hi guys. My name is martha dunn. Thank you so much for stopping by if you're a returning subscriber, you already know the vibes here we'll do with diy hair, as well as personal finance and immigrations to canada. If you're, a new subscriber, definitely subscribe down below you're, going to learn a lot um from this channel and welcome so on today's video, basically, i'm going to be showing you how i achieved this look as well as two other looks with an ordinary drawstring ponytail. So we don't always have to do the whole side, part or the middle part here and just you know clip it behind. You can actually switch it up and achieve really nice and unique looks so if you're interested in learning, how to you know style up your dress stream, ponytail or achieve this looks then definitely keep on watching. So the hair i'm going to be using for this video is by love me. Hair inside came this pack of goodies. You have a headband or a scarf whatever you choose to call it as well as a clip and a pair of tweezers. Although i have no idea why, since it's not an actual week, it also comes with two wig caps and as you know, you can never have enough wig cap. So that's always useful and of course the star of the show. Is this really nice um kinky, curly ponytail? I believe it was in you know, 18 inches or 20 inches i'll leave it down below um. The hair is on the lighter side, so it's not as dense if you're looking for something very full, and this is not the hair for you, but it is very affordable. So i guess you get what you pay for. So, as always, my hair is freshly washed and clean, i'm just gon na. Take it out of this weave and i'll be right back so for this first look: we're gon na try to create something, a bit exotic, something indian looking! You know just something you know unique and nice with some rings. So what i'm trying to do right now is just create an arc at the left and the right side of my hair. So i guess what you can see right now is me trying to create the left side and you'll notice that i'm creating the arc well the arc to the center of my hair um, where i'm going to attach a ponytail to i'm just going to let you Watch the rest of the video and you see how i create the arc at the other side as well. So at this point i was frustrated because i realized that both arcs were different. One was a lot more curvy um than the other, but i guess uh. Well, it's not meant to be perfect! That'S why it's diy here! What you're, just seeing me do is take that part and move it out of the way so that we can get through with the rest of the hair, i'm just taking some oil and oiling that part. So it's neat, and you know that demarcated part is, i guess very obvious. So what i'm going to be doing now is parting out a very thin line and that thin line is going to mirror the curve so you're going to part it in the exact same direction of the curve on that side, comb it out as usual to avoid Tangles and what i'm going to start doing now is weave it. So if you don't know how to weave, you should go and watch a tutorial on youtube or let me know if you want me to create a tutorial for beginners um. You know for simple cornrows and i'm going to do that, but yeah i'm just going to cornrow that side of the hair and then do the other side. And you know i'll be right back so you're going to take out that demarcated part obviously, and we're going to see me do - is try to create a small part at the front of the hair. So this part has to be small because, as as you're going to see further on in the video we're going to try to be inserting you know some gold, um hoops or you know, rings through the hair, so it definitely has to be small. So these are the rings or the hoops that we're going to be using. You can find them anywhere well match your beauty, supply store, and what you can see now is that i've just bunded up that section of the hair and i'm going to be twisting it up pretty tightly because, as i said previously, we are passing this hair through Some pretty small rings, so it has to be tight so that it neatly passes through without any snags. I'M going to put two rings through and i'm just going to, let you, i guess, um watch what i'm doing so. I know that you guys can't see what i'm doing properly, but don't worry in a couple of seconds. I'M zooming in and you guys are going to. You know, see how i place the rings or how i put the hair through each section of ring. As we go on nice, so we move again and, as you can see, it's all zoomed in for your viewing pleasure. So i'm putting in the fourth ring now and what you can see me do is just push that ring. You know to the same level as the third ring slightly below or to the same level. I'M then going to take my hair and place it inside the third ring. So not the fourth ring now, but underneath the third ring flip that fourth ring over and pass the hair through it once more, i'm going to do this um a couple of times, you're still gon na see um what i'm doing so now that that section is All banded up together, i'm gon na try to put the rest of the hair up in a bun. So now my hair is 4c. It'S also natural, it's kinky, as you can see, and i don't well. I hardly use gels for my hair um, except i absolutely have to because i have a hate-hate relationship with gels. I don't like how flaky can get sometimes as well as how much work it takes to get it off my hair. So more often than not i'm going to go jealous, but sometimes i guess i will use gel on my hair anyways. This is me just attempting to you know, put that hair up in a bun, and i will be back weave up that section girl, because we don't want any bulky. Looking you know top knot or bulky looking ponytail, i'm also going to spray my hair with a bit of conditioner just to lay down and also spray the hair as well to make everything, sleek and freeze free. This is the easiest part of the hair and, of course it's attaching the ponytail. So, as you saw earlier on in the video, it came with a comb you just put in that comb through your hair and wrap the velcro around your hair. Take that hair! That'S attached to the end of the ponytail and wrap it around the velcro. This is to conceal that velcro and make everything just look very seamless. I'M now going to be using this wax stick to tame down any freeze that i have at the top of my hair, also arranging the hair so that it kind of falls in the direction that i want, and you know not just at the back of my Hair, i'm using this headband that i got in the package to kind of secure the body of the hair just so that it lays a bit flatter. As i mentioned, my hair is natural, so it does need all the help it can get. This is the hair out of the headband. It'S a lot flatter and there you guys have it my very first hairstyle um with this ponytail. Let me know in the comment section: if you guys like this one, i feel like it's a bit exotic. You know with the rings at the front and everything and yeah it looks great. It looks really good, let's just get straight into the other hairstyles, so that this video doesn't take too long. So for this next hairstyle, you still want to keep your hair up in a bun, obviously not with the rings. If you didn't create this hairstyle before and we're going to be, taking a third of the hair, that's in a bun and wrapping it around the hair, wrap it tightly as neatly as possible. As i said, leave out a fourth of the hair and only wrap three quarters of the hair around fluff it as much as you can make sure there are no loose curls. If you need conditioner put some conditioner in there. If you need some bobby pins, you know put some bobby pins in there as well. Now take that fourth well, one quarter section and move it to the front of the hair. What you want to do now is grab a couple of bobby pins because we want to create a fringe effect at the front. So you want to secure that front section that we just moved over to the top of your hair, so grab some bobby pins and pin um that front section on top of your hair. Do it, as as you know, as best as you can and spread it out, so that it kind of creates that fringe effect as well, when you've done the best you can, what you want to do is grab a scarf any fancy, looking hair tie or headband Here, i'm just using an ankara material, wrap it around your hair and create a very tight knot at the middle of your hair. Take one end of that um tight knot and twist it up twist it up as best as you can twist twist twist and you're going to secure it underneath that ankara, as you can see me, do take the other side and do the exact same thing now. I'M just taking a pair of scissors to trim off the ends, because really so the strands look like straggly, you know struggling strands and we wanted to kind of frame our face, even though i i probably still made it a bit longer than it should have been. But yeah trim off those ends, um if you need some moisturizer again going with that. This time i took the best thing: it's better to not use a scissors because it will give you blunt ends. If you use something like this, it will give you a more tapered effect that is better for this hairstyle, so there you have it again guys. This is the second look created from this kinky curly ponytail we've been able to create a full fringe, um effect, and i really like this style. It'S i don't know something about. It is just very romantic. If you ask me and um yeah, i love it. Let me know in the comments section um you know which style you prefer out of the first and the second. Obviously we're still going to go into the third look. So, let's get into the third and final look and my personal favorite um. So what i'm doing here is just parting, an arc by the left side of my face, that's kind of like um one third of my face. I'M now going to also part um that side from i guess from front to back, even even if i'm not explaining it correctly, i guess you guys can see what i'm doing so, i'm going to do the same thing on the right side as well parting. It from front to back now that that's all done, i'm going to take the rest of the hair and band it. As you can see, i'm showing you how i parted the hair. I'M now going to take a chunk of attachment and um. I'M going to be dividing this one, big piece that i showed you guys into um a number of various small parts, so um from what you're going to see in the video each part i use is going to be a bit bigger um than the next chunk. I guess um, i guess you guys will see the explanation a bit better, i'm trying to cornrow the hair um using the feeding, braids method. If you're not used to it, then you might have to watch a tutorial on this. Although further on in the video i'm going to kind of zoom in so that you guys see what i'm doing so, i'm taking that first small piece putting it in between my index finger and just weaving. So i'm going to weave one i'm going to take another piece. This piece is a bit bigger than the first piece that i started with. Just you know in graduations, um make the next piece bigger than the previous make. The next piece you know bigger than the previous one, you know weave again one you know, take another piece of attachment, put it in between your index finger and keep on weaving, like that, i'm going to show you a close-up version when i get to the next Side so you're able to see a lot better, what i'm doing um with the hair, i'm just going to play it forward so that this video doesn't take too long and we'll get on to the other side of the hair. So this is at a closer angle. Now um, this is the right side of my hair, i'm just going to first of all use my hair to start the weaving. So that's one two three, it depends on you. You can do one you can do. You can do three, but no more than that and then take a small piece put it in between my index finger grab, my hair and one side of the attachments put it underneath grab the rest of the hair with the other side of my hair and continue Within one take another piece put it in between that index: finger use the attachments to grab one side of the hair. You know weave under one two grab another piece of hair again put it underneath your index finger grab that attachment and that the hair that falls on that side with under one to grab another piece of hair again. So that's that's basically the way you want it to be, you know, grab a piece of hair. Do two motions: one two grab another piece of hair, a bigger piece of hair, one two motions and you keep going until you get to the end of the hair. Now that we've woven the hair, you know all to the back we're just going to secure every single thing behind, because this is going to be a low ponytail. So somewhere, you know at the bottom of your hair and of course you want to weave that section. So there is no bulk now i've just grabbed that hair, and you know i'm securing it on that low knot that i created at the back. So as always, you want to finesse the hair. You want to cover up or conceal that velcro with the tail end. Tuck it around move it around make sure that it looks a bit more natural, i'm going to allow you watch and i'll be back. So finally, we're done with the hair. It looks beautiful, but i just felt like something was missing and i had to put some accessories on it. This style just screamed. You know gold accessories and yeah. That'S what we you know kind of put on the hair, and the look is all done. I was, i took a couple of pictures that day because i was like girl, you look so fine, like, ah giving you back angle, side angles. Just oh, yes, girl, i loved all three hairstyles. Actually i would rock them for different occasions. Let me know in the comment section down below which you would rock, and i will see you guys on my next video bye guys you
Comments
Jennifer Ogbeta: All three hairstyles were bangers. Like you said, the occasion will determine the style. My personal favorite is the last hairstyle
Osama Oni: I would try the second one, it would cover up my lost front hair. Thanks for always sharing
Shenathe Diva: I very much like your creativity! I definitely will be trying these unique styles I have a full face and need to create a frame around my face. I am not sure that I can actually do the 3rd style. I am not a good braider/weaver. Too hard.
Elvis Osaze: Second looks really cool