Curled Ponytail With Bangs | Loose Wave Lace Wig Install|Mslynn Hair
- Posted on 13 April, 2020
- Ponytail Hairstyles
- By Anonymous
▬▬▬▬▬ஜ۩Mslynn HAIR۩ஜ▬▬▬▬▬●
Hair Details:
"Bouncy "Loose Curly Glueless 360 Lace Front Wigs Preplucked Natural Hairline
360 Lace Loose Wave Wig; Brazilian Hair; 22 inches 150% density
The same hair link in Official Website and Aliexpress:
1、Same hair in Official Website: https://bit.ly/3b6lgxn
The biggest coupon code YTB7 for any item 7% off unlimited
2、Same hair in Aliexpress: https://bit.ly/2RoEJSe
●▬▬▬▬▬ஜ۩Mslynn HAIR۩ஜ▬▬▬▬▬●
Mslynn 360 Lace Wig Series: https://bit.ly/2V4sg8D
Mslynn Transparent Lace Wig Series: https://bit.ly/2Vj0uE8
Mslynn 6*13 Fake Scalp Lace Wig Series: https://bit.ly/2V1pm4h
Mslynn 6*13 Lace Wig Series: https://bit.ly/2wA55tb
Mslynn Bob Lace Wigs Series: https://bit.ly/3a8tiV3
Mslynn Full Lace Wig Series: https://bit.ly/3a6bZUE
Mslynn Bundles & Closure Series: https://bit.ly/2V1VcxV
Mslynn Colorful Hair Series: https://bit.ly/2JZek9B
●▬▬▬▬▬ஜ۩Mslynn HAIR۩ஜ▬▬▬▬▬●
SUBSCRIBE MSLYNN HAIR NOW: https://bit.ly/3b7ZREe
Follow Mslynn Instagram now: https://bit.ly/34ALO7t
Join Mslynn Facebook team: https://bit.ly/3b5nAou
●▬▬▬▬▬ஜ۩Mslynn HAIR۩ஜ▬▬▬▬▬●
Want to Promote or wholesale Mslynn hair?
Contact: [email protected]
Whatsapp: +86 18039917601
Welcome to IAmBeautifulHustler Channel
Be sure to SUBSCRIBE & TURN ON YOUR ALERTS
CONNECT WITH ME✨
Personal IG: Iambeautifulhustler
Business Instagram:_Beautifulhustler & @thebeautifulhustlerbrand
Twitter:_Beautifulhustl
YouTube: IAmBeautifulHustlerTV
✨SLAY WITH BEAUTIFULHUSTLER✨
TO PURCHASE MY PRODUCTS :
WWW.iBhSlays.com✨
Lace Melt Adhesive,
Melts Belts,
GLAMWAX
and more ❤️
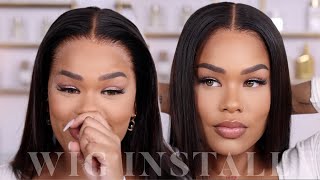
Akari, hey beauties and welcome back to onion beautiful hostel TV. Today'S video is sponsored by mrs. Lim hair and they just sent over this 24-inch loose wave week and it is a front two week. So it's kind of like a lace front in the front with the trucks in the back. But for today's style we will be doing a ponytail look with two little like curl bang pieces with the curl ends, and if you just pay attention down to the bottom left section of this video, you can see the whole unboxing process and the little goodies. That came in this box as well, but on the other hand, I'm going to go ahead and jump straight into this tutorial right now. I am taking that Ruby, kisses foundation and level 16, and I actually blended both of the shades and I'm applying it on the inside of the lace and on top of the lace as well around the edge area. Only just to make sure that it is completely covered and it will blend to perfection, and once I do that, I will go ahead and begin to start applying my layers of glue. I went ahead already and then my BOB cap method and clean of the hairline with that with the beautiful hustles, the lace, prep alcohol, and it is a 99 % alcohol to get your skin really clean from all those dirty oils. And I'm just going to go in with my large bottle of lace, made adhesive and taking my spurted and just begins to spread out my layers. And I would do about four layers today on her installation. And then I will jump straight into laying down the lace and you know blew him back blowing down the back of the wig as well, and I will begin the styling process now. After applying all the layers, I'm gon na go ahead and begin to pull my legs down into the gloom, and I know it's things like we're going pretty fast with this tutorial, but um with all my tutorials. It'S pretty much the same steps over and over. I do have full detailed tutorials from beginning to end on how to install the legs, but my main focus today was pretty much unlike corner styles. So that's why I'm going through the actual. You know melting process kind of quickly, but I really did, as I mentioned, one to focus on a style, but, however, I'm just going to go ahead and blow-dry. This lace only he's steady and cut off the extra lace tuck everything down, and then I will begin to glue down the back of the week. As you can see, I'm almost done taking down the rest of the lace that is still lifting, but it is looking very natural and matches with her skin tone so nicely, and after I finish doing this, like I mentioned, I will go ahead and glue down the Back of the wig and then, of course I will tie down the lace and you know, spread the hair, along with the holding spray, to give it that extra melted effect. But before I do that, I am going to like section off the parts that I'm going to leave out for the little bang pieces. And then, then I will try go ahead and spread the hair line and tie you down so just stay tuned when pulling out the bank pieces. For this look you do want to start by parting, the hair down the center first. That way, you can ensure that this section will be in the right like in the right area on the head, and once you split it down the middle first, then you could go ahead and begin to create your two different sections and try to make them as Symmetrical as possible, and once you get your two pieces, the way you need to be in a size and a shade just go ahead and plot that out the way, and that way you can focus on gluing down the bag and then tie down the hairline with The elbow another thing I'm going to do is go ahead and pull down the side bird pieces and also the baby hair section is too because you do want to have that pour down already. You know just to kind of help. You hear the idea of where everything is going to lay and you know fall into place with this style. Okay. So, as far as laying on the back of the wig they're saying well, you go ahead and clean the hairline in the front of the before you apply your lace, you do the same with the back, just make sure you go ahead and clean that nape area And then you can see that your layers of glue as well. So I went ahead and let that melt bail set sit until the adhesive in nothing adhesive. But the holding spray was completely dry and I'm going ahead and removing in I'm just gon na go ahead and comb the hair line out until it is nice and soft, and you know combing out the sideburn area, where it's nothing. I should be a cyber and I'm actually gon na curl those two pieces on the side and I'm just gon na do that on both sides of the head and then I'm also gon na pull down the two pieces where the baby hair is going to fall. You know with this look: you just want to pull out two nice little thin sections and you know do the same thing above sighs and then once I do that I will go ahead and begin to. You know put my ponytail in to form the easiest way to get a nice ponytail, it's trying to put the hair up in a ponytail in sections, so what I did was I took the top area like okay, basically, where I actually, where you want your ponytail To sit like that's the section, that's most important, because you want to make sure especially the front you want to make sure it's super super neat and everything is like pressed down. So that's what used to be going with the hot comb just to get everything nice and straightened out, so it lays down flat, and this first ponytail will basically be like the kind of like the guideline to where how the ponytail is gon na say how high Is gon na sit, and you know you know just want to do it. You want to do it as smooth as possible, like you want to make them their first ponytail as neat as possible, because, with the rest of the hair, all you doing is making the rest of the week meet up with their section. You already pulled up. So that's why I'm taking my time here and really straighten out those roots and getting everything, nice and sleek, and you will see how I will do the top ponytail first and then I will bring the rest, the hair up to match that ponytail and I'm just Gon na call up all of the hair up in the direction that I needed to flow for, so I can fall in place for the ponytail and once I get it, how I need it and I get a nice scrub. I'M gon na go ahead and secure that ponytail using two of the beige, like stretchy big rubber bands, so now that the top point is the cure, I'm gon na go ahead and detangle out the back of the week, so I can prepare to comb it up To meet in with the rest of the ponytail - and I was secure, I'm all of that hair with the hair - that's already secured in the top ponytail and I'm just lifting up to me and making sure everything will be nice and smooth and a bag just combing. It up and make sure you have them hold the bottom down, so you do not do too much pulling and put too much tension on the bottom of the lace and um. Once you once I get everything all smooth up. Like I mentioned, I will go ahead and connect that hair in the back with the ponytail in the front and just tie everything together. So now that everything is up, I'm just want to go ahead and take some Tresemme holding spray and just smooth everything down getting rid of any flyaways and just make sure that it's nice and neat. So now that everything is all smooth. I'M gon na take a bit of a dig the exception um to do the wraparound puddle on the rubber band and the reason why I did it - I'm gon na use so much hair because I didn't want them to just be like this small wrap around. I wanted to be like a thick high one to give the ponytail some height. So, that's why you see me using a thick amount of hair for this part and I'm gon na wrap it up just a tad bit higher to give that pony tail some height and I'm gon na secure it with the butanol using the Tresemme and a blow-dryer On the heat set and now for the curls, I will be using my Jim Wong curler. You know it is like a 301. We can take it off and change the size of it, but I'm just gon na use the bigger one to create me. Some big curls that way when I you know kind of fluff it out it'll just be you know, cute or whatever. So now that I'm you're done curling everything, I'm just going to go ahead and kind of tease the cars out a little bit and then I will get to curling the sides curling the front bank part and doing the baby hairs. So now that I am done cutting up the bank, this pretty much sums up just tutorial. I'M just gon na touch up a few more places, and only thing. That'S really enough for me to do now is um. You know like flex, pay and consider the part in the middle, so it's nice and crisp, and I'm just gon na consider the little round part around it as well, and I got missing just touching up little places I feel needs to be fixed up, but that Will pretty much sum up this tutorial? As I mentioned, this was a quick, simple and um cute style. Did I just repeat myself huh my mind is fried right now, but yes, I'm just want to touch up a few places and there now we're putting my thumb up. This looks so stay tuned for the finishing results, the finishing video and thank you guys for tuning in till next time.

Comments
Tonya Graffread: This really looks natural very pretty ❤
Jamilla Worsley: That hairstyle ♀️ is absolutely beautiful. I love it
Mslynn Hair: The hairstyle is beautiful and natural.
Ngozi E: So cute! In doing this look
Queen Leo: Gorgeous . You really do have blessed hands. Gotta get to Georgia and let you slay my head fa real! Make a whole trip out of it. I’ll be in touch soon lady!
LovelyAshley: The clients skin is radiant!
Ayee Court: Yesssss 1st up ❤❤❤❤❤ sitting on couch bored thank you
Aareona: Her eyes are so pretty
BeChicTOO:
jhhf jff: Thank you for sharing this helpful video,you are so kind,I like your channel, I order the wonderful one from newigstyle..com last week
KingScentCo.: What’s the name of the wand iron??
Deelkas Jones: To pretty
Ms. Syms: Scalpiana
Abel Ellison: Thanks for sharing this great video, I buy the best quality product from newigstyle..com last month