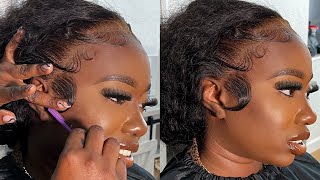
Lace Wig Install Tutorial Very Detailed Beginner Friendly |Vlogmas Day 8
- Posted on 08 December, 2021
- Ponytail Hairstyles
- By Anonymous
Im 19. Capricorn. 5'6 .
Clothing biz : JOYCEANNE.US
hair growth line: WWW.SHYDESIREEXTENSIONS.COM
FOLLOW ME ON ALL SOCIAL MEDIA : --@THEYLOVEESHY @JOYCEANNE.BRAND @SHYDESIREEXTENSIONS
What'S up, you guys welcome to my channel or welcome back and i'm going to show you how i executed this super cute lace install so first, of course we're going to bleach our knots and to bleach my knots. I use the bw2 powder bleach and i usually use 40 volume developer because it works way quicker, but for some reason i have not been able to find it. I don't know, maybe everybody been buying it up, but so i had to get the 30 volume developer. It still works fast, just not as fast as the other one. So for this lace i'm going to use about two and a half scoops, i believe, and then i'm going to take some of the 30 volume developer and mix it in. So when you first mix it in kind of go light with it, you don't want to put too much because we don't want it runny. If it's thick, we can always add more so now, i'm just mixing it up, and the reason why i did not speed this part up is because i wanted you guys to see the consistency and how your bleach and developers should mix together. You do not want runny bleach, it will run through your lace and get on the actual hair and you'll have blonde hair um so make sure that it's still kind of thick, not too thick, but you guys are going to see what i'm talking about you wanted. It to be like icing, so when you pick it up on the brush, you don't want it to fall off. So now you can grab your wig and with the little baby hairs you want to push those back so that no bleach gets on it. So i'm just gon na take my god to be glue, spray and spray, those down all the little flyaways and all that extra hair, you're gon na just spray it down and get it out of the way of the bleach. I believe the next part is gon na be sped up, but it's basically just me spreading the bleach onto the lace. Just like butter do not use a heavy hand with this, because you don't want to push it through the lace it's already going to see through a little bit, which is okay, because we do want it to look as natural as possible, but just don't really like Forcefully push it through that is not necessary at all and make sure you really focus on that hairline. If anything, you really want the knots on the hairline to turn brown. We do not want black knots on the front of our lace, so this is how it looks before you can see it's still black. All the knots are black and now you're going to see after i let the bleach sit on there for about 25 minutes came back, and now you can kind of see like the brown, even through the camera. So now you can go ahead and rinse off that bleach. I use warm water. I believe i don't think it really matters, but i'm just getting all that bleach completely off. Sometimes there's some left behind and it really irritates me so i was trying to make sure i got all of it and it's very much given scalp already. You can see those brown um knots now i'm taking the shimmer light. This is so that you don't have brassy orangish looking you know knots because we don't have orange scalps so make sure you use your shimmer lights or a purple, shampoo or conditioner, and just massage that onto the lace, let it sit for a little bit. I added some water because mine was shampoo so right now, i'm just rubbing it through on the other side also, and then i'm going to i'm not um getting that water on the lace part by the way. But now that that's sitting i'm going to take some conditioner, i always wash my hair co-wash it or whatever, because i don't like how it smells when it gets to me. So i always try to get that smell off and plus. I just feel like you get a better effect when you wash your hair, so even if you have straight hair, this is just a tip co-wash, your hair. When you get it, and if you get your hair done by someone before you take them, your hair make sure you wash your bundles your frontal, your wig, whatever, unless they're customizing it but like. If you wear traditionals and leave outs - and you just got some fresh hair and some fresh bundles still wash them or co-wash them with some good conditioner, i promise you. The install will look 100 times better. The hair will feel better and you just get a better install overall. So after you wash your units, it is time to plug those knots. This is where, where the customizing comes into play, so make sure you pay attention, but anyway make sure you have your white towel. I got this method from arrogante. He says it's really good to use your knee, which really helped me out a lot. So i just got a white towel and the white towel is so that we can see straight through and we can see exactly what we're plucking, okay and right here, i'm using a rat tail comb, i'm just combing all of the hair. Back before i begin now. I'M just sectioning out the very front hairs in the lace. This is basically going to be your baby hairs. So make sure you section those out, you don't want to over. Pluck those and then i'm going to take my tweezers, not the very pointy end. You want to use the other hand or you can pluck a hole in your lace, and you do not want to over. Pluck so you'll see that i just moved basically back and forth back and forth back and forth. Plugging those knots out focus on the knots and not on the hair, or you will have strands of hair, just sticking up all over your hair, especially if you have a straight unit focus on plucking out the knots, not the actual hair. It'S just going to look like split ends in the front of your wig. You know, and i do not like to over plug. I have learned my lesson. I used to put bald spots all in my lace, so now i just know like when to stop, and you don't have to do too much of these days. The frontals and the wigs are already coming very natural, so this part is just customizing it to how i like it, and i am going slower than usual so that you guys can really see, and i'm also going to zoom in a little bit. But i'm just going back and forth make sure you do not plug in the same part, please you will put a hole in bald spots, all throughout your lace, okay, and also another tip - is not to pluck at the very very um front, plug behind the thin Part so, where you see it already thinning out it, you want to plug behind that, not at the very front that can also cause bald spots. You don't have to go directly where you want the knot to come out. You can plug behind it. Right. Just make sure you're not pulling at the hairs and that's about how much i plucked out, which is really not a lot. But you'll see how like the difference that it makes so once you feel like you've, plucked enough go ahead and push all those hairs back and now we're going to just you know, do a little general plug this. You don't have to go too crazy on we're. Just going into the parts that are still a bit thick and trying to thin those specific parts out, i like to do the sides where your temple are thinner than the middle of the part, actually stay away from that middle part. For some reason it seems like the middle is always the part where bald spots come first, so on the sides where your temple is was where you want it to be thinner the middle. You want it to be thin, but not too thin. So don't overdo it and the reason why i say the size by the temples is because on a natural hair line where your temple is is usually the part of your hairline. That is thinner, so don't forget we're trying to mimic a natural hair line. So you can already see how thin it's getting in the front and it's already looking super super natural. I haven't even pressed it out or anything, but i'm about to go on to the next side. So i'll, just let you guys see that part. So to me this is perfect like for me. This is absolutely perfect. It'S just thin, just how i like it, and now i'm going to take some heat protectant. This is just some heat protectant. I grabbed out the beauty supply because we're going to use our blow dryer to dry it first. Oh i'm glad this is my wig. Okay, so put your wig back on your knee. If you feel like mine did and just blow dry, it um make sure you get it dry. I also got this blow dryer from my beauty supply the same place. I got the blow dryer. What am i talking about? No, but most of these um products. I got from the beauty supply. Besides my um flat iron, i got that from ulta. This came from the beauty supply though, and it's actually really good. It came with like three combs: it hasn't broken on me or anything, and if you know me you know, i have really thick hair, but surprisingly, the combs do not break on these blow dryers. So these are really good. So once you finish blow drying, you can take that got to be spray again and just spray, the top of the hairline. This is the portion that we're going to be pressing out really good. I feel like pressing your wig before you actually put it on with the hot comb, makes a huge difference for me. I feel like it just lays it down so good, and it also helps you when it comes to actually gluing the wig down. So that's what you see me doing right here and it's really looking like a silk press. If you ask me like do not skip this step, if you want to choose any skip any step to skip, do not make it this one! So now that i'm done with the hot comb, i just really wanted to show y'all the naturalness of this wig like look at how freaking good it is plucked. It already looks like it's melted. This is how you know your wig is going to be fire when it looks like this before you even put it on your head: okay, okay! So now that we're done customizing the wig it's time for the natural hair part and my hair is already in braids. So yeah, i know i leave my braids in for months, i'm not kidding and i've been using my oil, oh god, you can't even see my braids, no more! That'S how much my hair has grown out like look at this. These are my braids they're grown out. The hair okay, so for my edges, y'all, you really want to make sure you lay all your edges, all your baby, hair completely down, so that you get no glue on them. So i'm going to be using gorilla snot. This works really good for my edges. I know some people use edge control to me. Edge control is just very, very greasy, so i prefer to use something a little more sticky with a super strong hole and this works for me, then i'm going to take this rat tail comb and just push all my hair. Let me scoot up push all my hair back everything completely back. This feels so good. You want everything to be gone, not gone, not going. We don't want our edges to be gone, but i see even my edges - they're still really thin, especially up in here so, but these have grown in so much more, so of course i'ma oil them up, okay and at the top too, because you have hair on Your face, and you don't even realize you have hair like all right here. You need to get that. You don't want that to to go so look at my big asset. Okay, so usually y'all would have seen me put on these, which i do not use these anymore. It honestly depends on the client, but i don't use them on myself anymore. I have a big forehead. I have a lot of room from not right here, but from here to here i have a lot of room to place. My frontal right, so with me using the cap. I was actually accidentally putting it on my edges because it's really not that see-through and it was not benefiting me because obviously my edges were thinning when i was taking off the cap, so i don't use the cap no more. It depends on the client's hairline and how it is. If i'm use the cap - and it also depends on the wig - because sometimes those knots you can really really really see through them. So you do need that um brown you know undertone, but for the style i'm doing, i'm not even gon na have a part. So if you have the lace laying on your skin, if you have good lace and stainless is hd lace or whatever you're gon na see skin, so you don't necessarily need a cap, but anyway, i'm about to use my hair oil y'all know where y'all can get This oil um and put this into my braids before oh lord, before i put my wig on hey and then for my edges, i did i put it in like that, not too much, and i just put it all around not too close to my forehead, because Then the glue is not going to stick see, so i'm just going to rub that in okay. So now what you'll need is a concealer that matches your skin or whatever concealer you use in a makeup brush i'm using the color fawn. I always use this. This is like the color that i use, and this is what we're going to put to match our lace with our skin right and put a little bit on your hand as if you're about to you know, do your makeup. That'S about how much i use and then don't leave it like that. I like dab it down and i'm just wipe the rest of that off right like that, then i'm gon na take my makeup brush. What is this from blush brush? I got this a long time ago: rt 400, rub it in all over your brush and y'all divided noises and just brush it off inside, don't forget about the size and this time we're going to do the top. So you really want to make sure this is not um too much go ahead blend it blend this one in even more even better. So once you blend it, get your wig and go on top of the front of the hairline. Don'T go way back here. Of course, you're going to be able to see because the other way right there just go at the top top of the hairline right right. Okay, you see now it's like brown on both sides right, you can open it up and see. If this is not, i usually barely focus on the inside of the waist. I mainly focus on that. So now get your razor and let me show y'all. I got this from aaron's hair you're, going to cut like an inch in front of where your hairline would be. Okay, don't use this and go and cut it directly right here, because you still have to place your glue, so you want to make sure you have you know that safe space, so i'm just going to go in front not too close, but you do want to Make sure you're still inside the brown areas? Okay, but not so close to the actual final cut our yeah, so go ahead. Put on your wig so now place your wig in front of your hairline, not on your hairline and try not to go near your hairline. We got to save our edges, ladies, i'm just making sure that everything is unrolled and not folded up, because i have done that before. Okay, look at that; it's not even glued down yet, but you can still just like put it down and see that our units is about to be melted. Ladies about to be real, cute watch see don't give a scalp and yeah. I have actually never gone. This short before this is supposed to be a 16 inch, so i'm gon na write a review, but i like it like it's thin, so watch what i do. Okay, so now take your lace. Oh first, okay, make sure that this is even on both sides. So it's placed on both ears in the same place. You get what i'm saying so like you'll, feel these little um, where you're connecting elastic band is make sure it's even so that you have the same amount of space to cut on both sides. I actually am still trying to perfect that i always basically my wig is always never censored, never censored. Okay! So now that we got that off, you need to get either a towel or a cotton ball and get you some alcohol or some sea breeze. I ran out of sea breeze, so we're using alcohol put a little bit on your towel and just y'all see how this is white watch. You just want to wipe the area where your glue is going to go. Okay, we need your face to be clean so that our wigs will last and the glue will stick right. Look at that so there's makeup on my skin from when i basically laid the frontal down you want to clean that up, and this is you don't want your glue to look brown, you want it to look clear and just clean so once you do that, make Sure you really clean it, let that dry, let it dry. Let it dry, see the big four egg comes in handy when it comes to these frontals baby. Okay, then we're gon na take our bold hold active um. I have the big bottle. This was 109 but of course that's only because um it has to last for me and my clients, because i'm not that girl, who only do two or three layers you come up in here and you get in five or six layers. Okay, so come out and we're not doing dots today, we're going to outline don't go in a straight motion. Go in a zigzag motion i like to copy my natural hairline, because it just looks even more natural. I don't be trying to create a hairline unless i'm doing like a widow's peak in which i'm not wearing a middle part, so i won't be doing that. But if you got to a bust down middle part, jet black, try it widow's peak it's gon na hit. It'S gone hit. Trust me okay, boom. So now i'm gon na use the end of my razor, i'm honestly bad for this. I used to have these um sticks. I don't even get them anymore, but go ahead and just smooth that lace that glue out smooth it out then. Oh, that's our first layer keep on smoothing, see how this is already turning clear. It doesn't take long y'all, but you can use a blow dryer. If you want, i kind of just let it sit, i just let it sit, i'm usually like on my phone or something so enjoy this montage of me applying glue and letting it dry, because i'm not about to sit here and talk the whole time yeah. I will talk y'all ears off for real. Let me go to a youtube video, because i really want this to be super detailed, so i'm trying not to cut um any parts out. You know you know what i'm saying you know what i'm saying so yeah. Okay, so now that the glue is pretty much like almost dry, i'm gon na lay down my lace, but i'm gon na talk to y'all first and then i'm gon na do it because i really concentrate when i do this part you and see how i still Didn'T get like all my hair laid down slicked down, i don't like that, but it's okay, so you know how we didn't cut all the way in front of the lace so make sure you bring it kind of far down it's going to look like a helmet. A little bit, but it's okay, we're going to cut that part out, so y'all are going to see what i'm talking about now. You know something really doesn't matter, but he reached out to me asking me if i wanted to do um a blind baby blind baby. Okay, so i let this elastic band sit on my head for like three minutes and i feel light-headed, so i'm gon na take it off. This thing is super tight. I would not suggest you sleep in it at all. I literally only put it on me and my clients for like a hot second um, because it gets really tight, so i told y'all don't put these away because we have to go in with this and fix this now. For me, i don't know why, but these sides are always a problem for me so for this i'm gon na leave this alone, because i really need scissors for this part. Actually, i'm gon na go ahead and if you like sideburns, you can take your sideburns out and kind of like mold them down before you go ahead and cut that lace so that you know okay, i'm not supposed to cut this right here and i love. I love sideburns. I don't know why. I just love them. I hate when people cut their natural sideways like that is so cute, so you can take your own razor, lift up your lace and then don't so like i was saying make sure you don't cut in a straight line. You want to do like a zigzag motion and the reason i like to use a razor and not scissors is because the scissors is just too harsh and it just looks too lacy like i don't know if that makes sense, but this just gives you like a Natural cut the scissors is like damn. Did she cut that you know we don't want that we want it to look like damn. Is that a real hair? You know so use this? Go like zigzag have fun with it, just whatever you do, don't do it straight and then once you get down to those sideburns, you cannot tell me, you cannot tell me pl don't play with me and this is not even cut yet. So, let's just focus on right here: okay, so see like right here. Wait am i tripping? Oh no, i'm tripping. I thought i was seeing lace where it wasn't even lace. That lace is melted. It'S melted! Okay! So let's do the other side yeah. I know i get real excited when i you know see like i really did that and i've been doing hair for since i was 16 and i still like amazed myself, like you're that girl, okay you're, that girl. So let's go ahead and do the other side be careful to y'all, don't nip yourself and don't nip your clients either get as close as you possibly can you don't want to leave? No leftover lace. Uh oh hold on okay, okay! So, for this side part, this is really messy right here. I think it's from that band. I'M gon na use um got to be for that. So this happens to you. Basically, the lace is starting to lift up on the sides, probably because it's a bit small, i'm going to pull it down further, pull it way way down. Okay, clean up that hair, you don't want hair down in your glue right, get your got to be and spray it. Okay, push it back, pull this down and you're going to grab it make sure it's super clean, i'm gon na spray it one more time. Okay, take your elastic band. This is like without this, my installs are not my installs and tie it, but make sure you pick up um whatever sideburns. You want to keep and don't cut your ear. I have to cut my hair too many times so once you have that off nice and clean now check to see if any of your lace is lifted up like that, you can either glue it down or cut it. I like to cut mine because um i feel like if it didn't lay down it, wasn't meant to lay down. You know like the glue, wasn't there, so why go apply extra glue, plus girl. That scared me fluffy and i did add in a track in here. Two three tracks: i added in three tracks, i'll, probably go back in and have my mom sew some tracks in because i like big hair, i, like big, curls, see look. You can see how long it is i'm about to cut that straight across yep boom. Okay, that should be it so for my baby hair, i'm going to use my rat's hell comb, that's what i say rat tube. Is it right tooth or what red tail red tail home and section out a little bit of hair? Whatever you don't use, you can always push it back. I prefer to be a perfectionist and take out exactly what i want to use for baby hair, although it doesn't always work like that. So i feel like this is like a good amount, but oh i'm gon na bring it up a little bit more so bring it up, okay, yeah and then for my sideburns. I had already pulled that out. So now i'm just going to pull it down and then don't forget your other sideburns, okay, a little bit wow thicker! That should be enough. So for my baby hair, i'm gon na take my pressing comb. First, you take your press and go be very careful. Y'All. I'Ve burnt myself not too many times, maybe like two or three but um. It'S not a good feeling at all. So you get your pressing comb and go like right in the middle. Try not to go against your skin, but you want to, like you, want your baby hair to lay real flat towards your skin. So this is just the method i use and if you're too scared and you'll be running from the hot comb, you can also use your elastic band and tie it down. Is this all it's on, but it's not on high, then i'm just going to push the excess hair back? Okay, okay! So after you do that, you can go ahead and shave your baby hair down if you're like a real beginner, beginner um make them kind of long at first, just in case, because once your baby here are cut and they're too short, and you don't like them, It'S not going back, so if you do it long first and then like play around with those at least you can always go back and you know make them shorter. So, oh then i have. I hope i didn't lose my tweezers. Oh, no, my little half an inch flat irons. What brand is this keep posey? I think i got these from my local beauty supply because once a tell you to get something you get it, and these have been heaven said ever since so now, i'm just gon na curl, my baby hair upward. You can do yours downward if you want, but i like mine, to be like y'all gon na see and then for the sideburns. What happens to my sizers? You can go ahead and curl those two now for the sideburns. I do do them downwards. Let me show you take them and curl them that way. Okay, then, for these ones you do the same thing: curl it downward boom, see how it's curly cute right and then for baby hair. I'M not going to use mousse if you use mousse. So this is the thing about using moose and moose. Is this um a lot of body? I call it mousse when you use that i feel like because it has alcohol in it. It helps your lace to lift up, which is what we don't want. So i had to stop using that and that's unless you're about to sit under the dryer and lay your lace back down. I feel like we don't have time for that. So i want soft baby hair today, so i'm going to use got to be spray. Let me get my baby hair brush, so you're going to take your brush, get your got to be spray. It down real good and then start to play around with your baby, hair and y'all baby hair takes time, don't get frustrated, just keep on brushing and swooping. Until this to your idea of perfection, not no one else is okay, i'm gon na spray it again and using the spray is going to give it a really really soft finish. So y'all will see what i'm talking about. I like mine, to look super curly with curly hair. Now i'm gon na spray, like the comb side. Look at that baby. You don't know what you do to me between me and you. I feel chemistry so now that we have that pretty much. That'S how like i want this to be so if you want bigger hair if you're doing curls like me, this is the method that i use. I'M gon na take my spray pull it up. Let it sit for a little bit and then i get my pressing comb and i comb it upwards and for some reason this adds matte volume and it just looks so sleek y'all do not run from that pressing cone. My container y'all ain't gon na lie, so i'm not going to be ready for the press to come and i'm like girl trust me not gon na lie. When i first started, i did burn a few people on accident, so see how it's like going up. So it looks bigger where my baby hair is where this part is curl is where that whole flip over method is gon na go, so i'm gon na continue fluffing this out and then do this part, but i don't want to mess up my baby hair. So i'm going to kind of go on the side and then get your pressing comb, not silk this out. Like a steel press, i love it so now i'm just gon na figure out um the fluff i want it to be, and it's still partially kind of like wet. So i hope when it dries, it's a lot bigger and all the details on this unit and the baby hair and everything will be in the link in my bio. If you want to go, get it, but so far, i feel like it's a look. What do y'all think i love the whole flip over action. I got going on y'all. Let me go get some of my product and then i'll be back with the final look. So let me put y'all on this is bouncy cream. Now this is a big bottle. This one was 28.99. I think i got it from sally's, but they have smaller ones in the local beauty supply. This is amazing for curly hair like it adds the shine. You need all the moisture without making your hair look. Super greasy see what i'm saying even just a little bit. It'S just. I love this stuff and it's not going to have your hair hard either it's still going to be super soft and it's just gon na be a look. You know. Oh, maybe i should add baby hair on this side too, and have like a mm-hmm all right child. So i threw on some lip gloss and a little bit of mascara and i switched my part because it just looks fuller on this eye, but it also dried more. But let me know what y'all think this is to me. This was really really beginner friendly and super detailed if it wasn't put it in the comments, if it was put it you


Comments
Alice Erin: OMG, EXACTLY WHAT I NEEDED --------------------------------------------------------------------------------------------------------------------------------------------------------------------------------------------------------------------------------------------------------------------------------- i got it from *bestcards.online* *"**4:39**"* dmd
Brianna Ware: Early gang