The Easiest Ponytail Scrub Cap For Long Hair - Easy Beginner Sewing Tutorial With Free Pattern!
- Posted on 04 August, 2020
- Ponytail Hairstyles
- By Anonymous
#sewingtutorial #youtubetutorial #sewingbeginner #scrubcap #ponytailscrubcap #freepattern
Welcome to Meghan Grace DIY! I have been sewing since I was 8 years old and have done lots of great things in the sewing world from making figure skating costumes to teaching high school fashion to freelance costume design to college fashion professor. This video is a step by step tutorial on how to sew a scrub cap with a ponytail pocket and tie. This is a perfect scrub cap for those with long hair or a ponytail. Print the pattern out by clicking on the PDF links below. Before we get started I think it is important to note that there are many different styles and techniques in the sewing world, so take with you what works and leave behind what doesn’t! Also when it comes to making any kind of PPE, always consult the CDC and a medical professional.
Supplies for this tutorial:
24 x 22in piece of cotton fabric - Outside Print
4 x 20in piece of cotton fabric - Contrast Fabric
7in of 1/4in wide elastic
Pattern Piece Link -
Piece A - https://drive.google.com/file/d/1tO-cm...
Piece B/D - https://drive.google.com/file/d/1bZkkg...
Piece C - https://drive.google.com/file/d/144zD8...
If you would like to see a tutorial on making a bouffant scrub cap, click below:
https://www.youtube.com/watch?v=NDgLEU...
If you would like to see how to make travel and scrub bags, click below:
https://www.youtube.com/watch?v=mZvpWN...
If you would like to see the tutorial for a fitted mask, click below: https://www.youtube.com/watch?v=UfzVmK...
If you would like to see how to make a simple scrub cap, click below:
https://www.youtube.com/watch?v=tmcnP-...
If you would like to make a BBQ Apron, click below:
https://www.youtube.com/watch?v=MxjctB...
If you would like to help my channel grow, please don’t forget to SUBSCRIBE and click the notification button so you will know when I post new videos! Watching my channel grow has given me a lot of motivation to keep up the work during this trying time! You can also get to know me better through MeghanGraceDIY on Facebook, Instagram and Pinterest. If there are additional tutorials you are looking for, please feel free to leave them in the comments below! Lastly, if you are looking to purchase one of a kind masks, check me out on Etsy at MeghanGraceDIY.
DISCLAIMER: Links included in this description might be affiliate links. If you purchase a product or service with the links that I provide I may receive a small commission. There is no additional charge to you! This provides essential support so I can keep bringing great content free of charge!
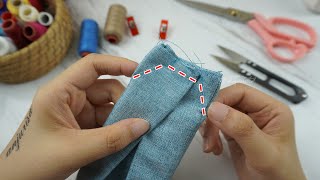
Hey guys welcome back to megan grace diy. Today'S tutorial is going to focus on how to create a ponytail style scrub cap. The pattern for the scrub cap is located in the description box below as a pdf file that you can print out. There are four pieces total to the pattern to cut out the main pieces of the scrub cap you're going to need a piece of fabric, that's 24 inches long and 22 inches wide here. I'Ve got it folded in half. Another question i've received quite often is: how do i lay out the pattern if i'm doing a directional print, so i'm making this scrub cap out of a directional print and i'll just note here and there if there's anything special, i need to do with my pattern. Pieces, the piece i'm pinning right now is the part that holds your ponytail in the back, so i'm making sure that my print goes from top to bottom. When it comes to the piece that's going to be the side of your scrub cap, i actually have to flip it over to make sure that the print is going the proper direction. I'M flipping it over to make sure that the print that goes along the side of my head isn't upside down and then i'm going to pin down my last piece, which is the crown piece as you can see, you kind of end up with a little bit Of extra fabric in that upper right hand corner which you could use to make a matching mask now that i've got all my pieces, pinned i'm ready to cut out, and while i do that, i'm going to show you really quick how to find the pattern pieces. In the description section, so one of the biggest questions i tend to get in the comments or by email is: how do you actually find the pattern? Link youtube has recently kind of changed the formatting of their description box, and it makes it a little bit harder to find if you're on a laptop or a desktop. You want to scroll down beneath the video and find the little words that say show more. That'S how you're going to be able to drop down the rest of the description once you've got the description box open scroll down a little bit, usually underneath the supplies. I have a link for the pattern and, while you're clicking around there, if you haven't already, you can very easily subscribe to the channel by clicking the red youtube button in the corner. Now, if you're on a phone or an ipad, finding that description box can be even more tricky. So i want you to look at this screen and find that little drop down arrow, that my big blue arrow is pointing to you're going to click on that arrow and the description box will drop down below and once you find the description box just scroll down. Underneath the supplies there will be a pdf link to the pattern. Okay, now we're going to cut out our contrast band, you very honestly, don't have to have a contrast band, but i just thought it looked nice. So that's why i decided to add it on you're. Going to need a piece of fabric, that's four inches wide and about 20 inches long. First, i'm going to start by pressing it in half widthwise. Once i'm finished pressing, i'm going to fold it in half lengthwise because we need to do basically a double cut unfold. Right now, my folds are, on the right hand, side of the fabric and, on the top edge, i'm going to pin the pattern along the two folds and then cut it out. Now that all our pattern pieces are cut out, i want you to put the crown and the side cap away for now, we're going to start with the ponytail section. Take the pattern off and open up the piece of fabric. Our goal with the ponytail section of the cap is to put a piece of elastic all the way around the edge. So in this case, i'm going to recommend making a casing versus trying to stretch that elastic and sew it in one shot before you head over to the sewing machine. I want you to take your iron and press the edge of the entire curve over by a half an inch now, because this is curved, you might get a couple little folds in your casing, but that's okay. This is the time to place them and make sure they look nice to stitch down the seam allowance. I'M going to use a thin zigzag stitch that way, it'll kind of encapsulate the raw edge of the fabric, while creating my casing in case you're, relatively new to sewing a casing is basically a tube you put into a project or a garment that you're going to Thread elastic through or cord through to scrunch the fabric up in this project's case, we're putting a casing all the way around this curved ponytail section, and it's going to scrunch up with an elastic, creating a pocket for our ponytail. One friendly reminder as well that your seam allowance will not lay perfectly flat as you sew it. You might have to sew a couple little folds in now we're on to elastic time, you're, going to take a seven inch. Long one-quarter inch wide piece of elastic and put a safety pin. At the end, i use the safety pin to basically feed the elastic all the way through my casing, since the piece of elastic you're going to use is much shorter than your casing, you want to be vigilant to make sure the elastic does not disappear into your Casing then, you'd have to start over and do the whole thing again. So i put a pin in place there to make sure my elastic doesn't do any disappearing axe on me. Then, once you have both ends through you're, going to do a quick zigzag stitch to hold them in place. Let'S put our ponytail holder aside for now and work on the cap portion before i unfold my fabrics, i'm taking a pin and marking the center front of the crown portion and center front of the side portion use these pins to line up the side and the Crown portion then take the straight seam of the side pattern piece and pin it to the curved edge of the crown now. This is probably one of the more difficult things to do in sewing. Pinning a straight pattern piece to a curved pattern. Piece can take a little bit of practice, but it's a really great tool to master, because that's how you create a lot of shapes that aren't flat it's okay, to take your time when pinning these two pieces together, it's important to make sure that the seam will, In the end, lay flat once you've completed from the center front down to the end on one side, you're going to do the same thing on the other side and once you're completely pinned you're going to come, join me at the sewing machine. We will be sewing at a quarter inch seam allowance or basically have the fabric lined up right on the edge of the presser foot, i'm using a straight stitch here with a length of three again. This is a place where it's okay. To take your time, even professionals don't go whipping around those corners. We take it nice and slow to make sure there's no folds in the fabric and our seam comes out nice and flat once you've completed the straight seam go back and do a zigzag finish around the entire seam allowance. Next, we're going to add our contrast band to the edging of the cap. Now, if you don't want a contrast band, you could just easily do a rolled hem around the edge of the cap with your band folded, widthwise you're, going to find the center front of your cap and the center of your band and pin them together then continue Pinning the band around the entire edging of the cap now keep in mind we're pinning it on the inside of the cap. So that way, when we flip the band towards the outside, the seam allowance is hidden. Once you have the entire band pinned to the cap. You'Re going to go over to the sewing machine and sew it at a quarter of an inch then come back to the ironing board and press that seam flat flip your cap over and take the band and fold it upwards. Hiding the seam allowance press that in place, another decorative touch would be to add a layer of top stitching to the band i decided not to for this project, but when it's, your project feel free to get as creative. As you'd like. I took the edges of the band and i pinned them in place to make sure they stay flat, while i'm attaching the ponytail portion at the center of the ponytail bag. I'M adding in a small half inch box pleat for decoration, if you don't want to add a box pleat or don't like how they look, you can always add in two inches of gathering this little bit of fullness will give an extra amount of space to those With really really thick hair, once you're ready to attach the ponytail bag to the scrub cap itself, you want to mark the center back of the scrub cap and then line up the two centers for the cap and the bag. Once you've got the two centers of each piece lined up and pinned together, you're going to pin together the rest of the seam, attaching the ponytail bag to the scrub cap. We are also going to sew the seam together at a quarter of an inch i'm using a regular straight stitch at the length of three after your straight stitch is completed, go back to the machine and apply a zigzag stitch to your seam allowance. Last but not least, we need to create our ties that get tied around the ponytail bag. I'M creating my own rolled ties from the scrap fabric and, if you'd like to see how to do that, i've attached the link above, but you can also use ribbon or any kind of cording as long as you have 20 inches on each side to attach our Ties to our scrub cap we're going to start with the rough edge facing the right and placing the tie on top of the seam, that's between the ponytail bag and the actual scrub cap, using a straight stitch you're going to secure the tie by stitching over it. Two or three times at a half inch inside of the cap, then flip your cap over and push the tie out towards the right covering up the initial rough edge, apply a straight stitch, two or three times out towards the edge of the cap, and your tie Will be locked and loaded and ready to go now that you're all done with your cap, it's time to do our fit test now i feel, like my hair, is pretty good to test this out. It'S very long, but it's not very thick, so i do wish someone with thicker hair could test this, but you know i've got to use my own hair. That'S all i got i'm putting my hair in a ponytail, but on the last loop around i'm gon na pull it halfway through. So that way, it's easier for me to get it inside the bag, as i'm sure you guys know by now, i don't wear a scrub cap on the regular. So please forgive me if i'm a little bit awkward while trying to get it on my head. I do get to the end point eventually, once you've got all of your hair inside the ponytail bag and got the cap put on your head, where you'd like it to be take the two straps and cross them underneath the ponytail then cross them. On top of the ponytail holder, tying it in a bow, i think this is my favorite type of scrub cap that we've made so far, mostly because tying it around your ponytail really secures that cap onto your head and here's the final product. It'S super comfortable to wear and it easily stays in place, and i feel like this pattern has a little bit of room if you got a slightly bigger head or more hair than i do and that's all there is to it. Hopefully you followed along with me and were able to easily make a ponytail scrub cap thanks again for stopping by my channel. You can check me out at megan, grace diy on facebook, pinterest, instagram and etsy and, as always, happy sewing

Comments
Carmel Horvath: Hi, I have tried 4 different scrub caps and this is by far my favorite, I even added a ribbon to the band. It’s easy to follow and the patten is great. Thank you
rose m: Thanks a million for sharing this pattern , and your clear instructions! The measurements were perfect and it came together nicely. I also made your bouffant cap.
Lucy the Blue Crown Conure: Thank you so much for this amazing pattern! I just made my first one, but it definitely won't be the last one!
Yessenia Castillo: Thank you so much for this tutorial! I recently started sewing my own caps and this has been the easiest "how to" video I've seen! Very easy to follow!
Kristina Silva: Thank you so much for the video - I ended up making two scrub caps back to back and I must say I have lots of hair, so I made the ponytail section a bit larger but it turned out great and I am so very happy : ) Thank you so much for making this!!
Rhonda Kowle: Thank you so much for such a great pattern! I had tried two other patterns--one too big, one too small. This one was just right!! Making several foe my daughter.
AceL Domingo: This is a beautiful and easy pattern. Thanks for sharing! I’ll be sewing Christmas scrub caps this weekend
Gianna Wu : Cute! I've just gotten back into sewing. Thanks for the tutorial, will try it out :)
ladygrommet: Thank you so much! Turned out perfect, great pattern and tutorial.
Morgan Wilcox: Fantastic! Worked great and loved the fit. Thanks so much.
Genny Mendoza: Thanks Meghan. Ive downloaded your pattern and can't wait to try it. I worked in the OR and been sewing caps for my colleagues since the quarantine started. But some of them have longer and need more room in the cap. I'm going to try it out.
Julie Sakioka: Thanks for having this pattern available. I was just told I needed to wear a hair net. I wanted something cuter and now I’m going to make this hat.
April I.: 1st attempt of making scrub caps. I think my printer shrank the pattern pieces but that was easy enough to enlarge. I did increase the ponytail pocket a bit more & decreased the elastic length to 5.5", so the pocket opening is tighter. Am so happy with how it turned out. Thank you for sharing your talent.
Elsie Murray: Meghan I enjoy watching your tutorials, I can watch them over and over again, you are a great teacher.
Julie Cabrera: Thanks for your generosity sharing your pattern. I just cut my fabrics. About to start sewing. Am excited to see my finished project, from the pattern you shared. Very clear video demonstration.
Monique G: i love it, this is awesome, i work in the o.r and i make the regular scrub bouffants for my self and never made the pony tail scrub hat but you made this look really easy
Jane Hill: Thank you for sharing your pattern, its always easy to listen and watch the videos. I don't sell the scrub caps, I've been sewing for friends who work at a dental office (the office I worked at before) and my daughter needs me to sew this pattern since she has long hair plus works at two hospitals.
Cindy Kiefner The Copper Torch: Thank you so much, you simplified several steps and made it very easy and attractive!
Mishelle Kochel: Excellent, just what our daughters need. Thank you.
vnsv 1984: When pinning, place the pins from the outer edge in, so it is easier to remove them when sewing. This is a nice tutorial, thanks for sharing.
Sandy Morgante: Thank you for such an easy pattern and instructions. Sending a few to a Covid response team. Thank you again!
Anna Mauricio: I've made many scrub caps but this is the best and I love how esay it is. I'll be making caps for my colleagues as we work in healthcare. Thank you so much for sharing your patterns and this video. I love it!
Donald Lokken: Thank you for the video. I have tried to find the right video to try to make a pony tail scrub cap as for my next step in making scrub caps. This is the one and it looks easy and fun. Keep up the awesome work.
Jannet Small-Francis: Thanks for a “seamless “ demo
Maria Stone: This is a wonderful scrub hat to make!
Richard Hendricks: Im a little late at making these but my quilt store is cutting kits to donate to our local hospitals. your pattern was selected and it was fun watching and making them with you and in the end seeing you demo the fitting. Thanks for your video. Rich.
Anna lapointe: Thank you for the pattern and great tutorial.
Radha Vishwanath: Meghan, it's such a lovely & neat cap! Thanks a Lot for Sharing your Knowledge.You are a Great guide.I am your new subscriber. Wish you a Happy New Year! Of 2022! Please share more of your Tutorials.Bye & Tc..
Joy McQueen: Meghan, thank you!!! These worked perfect and your video is the best! I watched it a few times and print, cut, sew and bam! I have a daughter & future son n law in medical school, these will save some $ for sure! I do have a question, I noticed that you cut with your fabric right side up? Easier or just your style? I guess I’m just use to always having it the other way, but just wondering. Thank you again, the video was simple, very easy to follow, great directions and advice! Joy
K Jordan: This is great! Thank you!
Creaciones Mirnix: Excelente gracias
Pamela Daniela Panisso Bueno: Thank you so much for sharing it with us . Regrads from Brazil
Milexa Sanchez: Gracias por este excelente tutorial un abrazo fuerte en la distancia desde Venezuela
Darky Johanna Martinez: Hola amiga, acabo de coser el gorro y me quedo muy lindo. Mil bendiciones desde colombia.
Jayson Vanessa Thatcher: Hi! Thank you for the wonderful tutorial. I’m wondering if there is a way for me to make this lined with satin?
Charlotte Herbstsomer: Hi, Love this pattern. Do you have the directions in a written format? Love the video but I think a written copy to take the sewing machine with me would be very helpful? Is it here somewhere - did I miss it?
jngregg: Very nice, great tutorial, thank you! I need to get sewing!
DebbieQ TravelAgent: I have a question I hope you can help with. I used the pattern for my daughter and some of her co workers need one made. But the pattern is a little too small for some that have really long thick hair. Is there an easy way to make it about 2” bigger all around without losing the basic shape by just drawing it a little bigger around the current pattern? Thank you.
Leena Hate: Thanks for the pdfs, cutting is very very simple. Video is so good and so much in detail sewing the cap was very easy. Thank you so much.
rube: I made one and a nurse loved it it fit her head very well. However your pattern piece for the headband is only 2 inches wide instead of 4 inches so it came out half the size it shows in your video but I will fix that with the next one, thank you for this great pattern!
Halina Menthe: Merci beaucoup! Joli travail!
Karlene Male: Enjoyed the tutorial. Easy to follow. How do I get the free pattern?
Nancy Correa: Me gustaría este tutorial en español
Kelly Colechin: Just printed the pattern thanks so much for that. When printed it says pattern B is 5” but it’s actually 4.75” will that be a problem or should I make it fit 5”? Same with other pieces they have printed shorter. Should I make to printed pattern or make it to the sizes on the pattern?
Karen Cragle: At what % do you print the pattern? I couldn't seem to find it
Mia_mali: How long does it take to make one from beginning to end?
health record: Subbed. Best sewing tutorial on YT.
Nevaeh Peterson: hey! quick tip for everyone without a printer but does have a laptop/chromebook open the pattern in Kami or something and use your laptop as a light box to trace it! :)
Cheri Williams: Hi there, Are there written instructions anywhere? I have printed the pattern pieces but was just hoping for actual written instructions? Thanks!
adperler: Hello! No matter what I try I can't get the pattern pieces to print the correct size. Can you please tell me what the width is supposed to be on A, B & C. Thanks!!
Cela luz Mendoza sanchez: Excelente
Michaela Matthews: Can I use a 21”X18” piece of fabric for this?
Tammie Hutchison: I love this pattern but when I print it up I think the pattern is printing too large. Maybe I didn't understand what everyone else says is so simple. Should I change my settings on the printer? My first clue was with the contrast band, I cut a 4x20 inch strip, ironed that down the center and then folded that in half. The pattern I printed is too large for the 40x20" strip that I folded in half. Any help would be appreciated.
Stephanie Brooks: Am I the only one having issues matching the sides with the top. I measured the sides and the dimensions don’t add up to fit correctly
Marianna Besosa: Do you have a pattern similar to this but with ribbon instead of elastic? I’m wanting to make this for a nurse and she told me she prefers ribbon
Teresa Moore: I have to make some of these.I have many friends that worked in nursing. Thank for it information.
Ljomack: How do you make the straps? Do you have a video for that?
Maddie Jacobs: The actual cap part turned out super small and I couldnt get it over my head. Any suggestions? I double checked and the pattern pieces are correct size
Cara D: I could use some tips for the interfacing....is it for the contrast band?
Gladys Nevarez: Me gusta como esplica aunque no se inglés la entiendo
Cony Vega Salmeron: Beautiful. Saludos desde Nicaragua
Sherilyn Kinsman: Where can I find the pattern?
SuperNaturalbeauty11: The ponytail holder cut out is measuring 9 1/2
Theresa Crawford: thanks for your video, I have to try it.
rube: Thank you, I love this But I cannot find the pattern? Please tell me what link to go on. I just keep getting a bunch of pictures of different caps.
Yonis bautista Verbel Jacome: Desde colombia, muchas gracias
Ivete Vitor: Thanks very good. I'm Brazil
Carol Whaley: I am in unable to locate your pattern to down load for your scrub cap. Could you please email it to me. I feel this is a must have. Thank you- Carol
Raynelle Byerley: Where are the directions for making the ties
Alicia Walker: Best tutorials on the internet
Deb VanHorn: When I printed from the PDF file, there were not lines to actually cut. I have to guess how wide, length of pattern piece etc. Can you help me Please??
Handmade Soaps By Annette: In this video with a directional print your crown piece is upside down. is this how it should be?
Maggie Williams: how do I find this pattern please
Maryfaith Cartwright: I can't seem to find where to download the pattern. Please help!
maryam Jafaripour: Where can i find panal for sweng cap
Anna Di-Caterina: how to i get this pattern please
Allyson Bradley-Rule: are your ties a half-inch in width?
Christina Campbell: I was able to find the printable pattern pieces. Is there an actual pattern to print? My mom has agreed to make a cap for me, so I'd like to send her a printable pattern. Thanks so much for any help!!!
Holly Coley: Am I looking wrong or is piece A upside down. Should it but cut on the opposite side on the fold.
Priscilla Irwin: HELP!! I can't find the pattern. I just keep caught in a loop back again and again to the video. Where can I find it?
Lan Le: Thanks Meghan..
Lan Le: Thanks Meghan..
Cecilia Packard: I could only Pattern Piece C. Pattern A and Pattern C were blank. :(
kuttisra kudiyil: Nice good
Shyanne Robles: How can I get this pattern
RUBY PAREDES: como ubico los moldes o patrone
Flor Reyes: How i can get the free patern please
Hazel bannister: I dont see a pdf link at all - i cannot find the pattern
Kelly Colechin: The supplies information on your pattern is wrong compared to the tutorial video! I have cut the supplies out and you state 24x12 on the pattern and 24 x 22 on the video! I’ve just wasted lots of fabric. I’ve had to modify your pattern as they don’t measure he same. Sorry but it’s a thumbs down for that part the tutorial is easy follow so it’s sad that part let it down.
sibusiso23: Yay! First comment. Great video!
Cynthia Coppola: Meghan Grace I cannot find the pattern.
norma stone: what size head do this fit? She has a big head and a lot of thick hair.
School Stuff: Hello, what is the size of the rolled ties that you used.