Crochet Towel Topper | Easy Crochet Pattern Tutorial
- Posted on 23 March, 2019
- Ponytail Hairstyles
- By Anonymous
Learn how to make the Towel Topper Pattern with this video tutorial. This is a beginner-friendly crochet pattern made with worsted weight yarn. Make this towel topper in a variety of colors to fit your kitchen decor or for an upcoming craft fair.
Slipknot and Chain Tutorial: https://youtu.be/VOoFNHPdqks
Single Crochet Tutorial: https://youtu.be/32q181tupfM
Double Crochet Tutorial: https://youtu.be/XC2NP_8m8jc
Written Pattern: https://www.amandacrochets.com/crochet...
Materials:
H-8 (5mm) crochet hook
1 skein of Hobby Lobby I Love This Yarn
Goody Ouchless Hair Ties: https://amzn.to/2MH6EZm
Connect with me on social media:
Website: https://www.amandacrochets.com/
Facebook: https://www.facebook.com/amandacrochet...
Instagram: https://www.instagram.com/amandacroche...
Pinterest: https://www.pinterest.com/pixiedust113...
Etsy: https://www.etsy.com/shop/amandacroche...
#toweltopper
#crochettoweltopper
#beginnerfriendlypattern
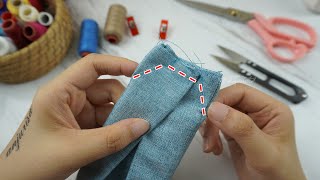
Hi everyone and welcome to my channel. My name is Amanda and I'm from Amanda crochets comm in today's tutorial. I'M going to teach you how to make this simple and easy towel topper, I'm making a bunch of these for an upcoming craft fair next month. So I thought I would share my bedroom with you, so this is what the finished product looks like, as I said, it's fairly easy to make and it requires little time to complete. So I hope you enjoy this tutorial to make today's towel topper. You will need some worsted weight yarn. This is a great scrap Buster project, as this doesn't require a lot of yarn. So I'm using some leftover yarn from a previous project and I'm using I love this yarn from Hobby Lobby. You will also need a towel. I like to pick my towels up from the dollar store, but you can go ahead and purchase your towels anywhere. You like you, also need a size. 8, 5.0 millimeter crochet hook. You'Ll need a hair tie a pair of scissors, a tapestry needle, and you will need one button. This particular button is from Walmart and it is a 3/4 inch button. If I could focus on this here there you go, let's get started with today's tutorial. Okay, so first you want to grab your hair tie and you want to just put your hook underneath so it's just sitting on top just like that, then you want to grab some yarn and put it on top of your hook, be sure to leave a little Bit of the tail, so you can weave that in and now you just want to pull your yarn through your hair tight grab on to that long strand, and it's kind of like a sloppy Slipknot. If you want to go ahead and make a traditional Slipknot, you can go ahead and do that. Then you want to go ahead and chain 3 so to make a chain you're going to do yarn over your hook and pull through that loop on your hook. So that's 1, 2 & 3. Okay, then you're gon na go ahead and make a double crochet all the way around your hair tie. You don't have to make any specific number of double crochets. You just want to make sure that your entire hair tie is covered in double crochets, so to make a double crochet you're gon na do yarn over your hook insert your hook underneath that hair tie pull up a loop. This might be a little tricky at first for beginners, if you're not used to a crocheting around a hair tie. But then you're gon na have three loops on your hook: yarn over pull through the first two loops yarn over pull through the last two loops. Okay, so that's your first double crochet, so go ahead and continue making double crochets across around the entire hair tie I like to hold the tail of the yarn close to the hair tie and actually crochet over it. That way, it's one less tail for you to weave in at the end, but if you prefer to not do that and leave all your tails and at the very end, that's perfectly fine as well, whatever you feel comfortable with so again, you're just gon na make A double crochet around your entire hair tie until you get to the very beginning, so I'm going to go ahead and finish that up and I will meet back with you when I have finished okay, so now that your hair tie is completely filled with double crochets. You want to make a slipknot into that very first double crochet that you made so this one right here, so you want to skip that chain, three that you made at the beginning, and you want to make a slipknot in the top of that double crochet from The beginning to close up your round, so this is what it's going to look like next, you want to go ahead and chain one, and you want to make one single crochet in that very same stitch as your chain, and then you want to make a single Crochet in the next eight, so nine two single crochets all together so to make a single crochet you're, going to insert your hook into your stitch yarn over pull up a loop two loops on your hook, yarn over pull through both loops. So that's one two three! Four: five: six: seven, eight nine okay, so you should have nine single crochet. So two, four six, eight nine to go on to the next row. You'Re gon na make a chain one and turn your work just grab a little bit more yarn here. So now, you're gon na continue this and you're gon na make sixteen rows altogether. So again in that very first stitch, you're gon na make a single crochet and then you're going to make a single crochet in each stitch across so a total of nine stitches again. So this is two three or five six: seven, eight and nine so go ahead and make a chain one and one single crochet across for a total of 16 rows, and I will come back and show you how to complete the final two rows. Okay, so I completed 16 rows, so this is what it looks like next you're going to make a chain 1 and turn your work. So this is going to be your button loop row, so this is going to be a little bit different, so you're going to go ahead and make a single crochet in the first four stitches, so 1, 2, 3 and 4. Then you're going to go ahead and chain 1 you're gon na skip that very next stitch and you're gon na make a 1 single crochet in the last 4 stitches of your row so skip that one and then you have 1, 2, 3 & 4. For your last row, you're going to make a chain 1 and you're gon na single crochet in each stitch across and across including that chain 1 space that you made so should have nine altogether. So that's 1. 2. 3. 4. In that space you want to just go around the entire stitch, so 5 see how it creates that button loop right there, 6 7, eight and nine okay. So that's what your towel topper will look like. So next you want to just take your scissors and you want to cut your yarn. You want to leave a little bit to weave in your ends at the end and then finish you're going to do a yarn over and then pull through and then tighten okay. So then, you're going to go ahead and weave in this end and you're going to take some of your yarn and you're going to insert it into your button loops, and I will show you how to attach the button on to the front of your towel. Topper. Okay, now that I have threaded my button, you're going to put it on to the front of your towel touch break. So this is your ring right here and you're just going to place it in the center right around the first or second or even third row of your single crochet stitches. So what I like to do is I like to get my crochet hook and kind of just pinpoint what the middle would be and I would insert it from the back grab one of the strands and pull through completely and then the same thing. With the other side skip a stitch or two, so it looks like it's going to be in the middle grab, the other strand and pull through. So that's what your button will look like when it's completed and on the back. This is what it will look like. I like to tie it together with a double knot before I weave in my ends. I kind of feel like it gives the button a little bit more security to of staying on. So I'm going to go ahead and complete that, for you guys and I able to show you what the finished product looks like. So this is what your towel topper will look like once you saw the button on and then you want to simply fold down this and insert your button into that button. Loop that you need and there your job. Then you want to just go ahead and grab your towel and you want to go ahead and insert it. That'S why I like using the hair type, because it gives you a little bit more flexibility plus. You can also coordinate your towels with your towel topper. I usually like to do this with the different holidays and such so. If you want to use different titles, then you can keep the towel topper and you can just switched out your towel and that way you can just wash your towel without having to wash your towel topper unless your towel topper is dirty of course. So there you go, this is what the finished product looks like with the towel inside again, it's a very beginner friendly and easy project to work on, and it will take you no time at all. I like to make this for a different crafts fairs and whatnot, but it could also be used for a great housewarming party as well, and I really like making them and I feel like they are very beginner friendly, like I said so. Thank you so much for joining me in today's tutorial. I have to meet the crochet towel topper. My name is Amanda and I'm from Amanda crochets. Please like comment or subscribe to my channel to get all the latest videos and tutorials and if you ever want to see any kind of tutorial or pattern review or yarn review on this channel. Please leave me a comment below and I will try my best to get to them. Alright, thank you. Everyone and have a great day, bye.
Comments
Jayden Fenton: So easy took me a few hours and it’s the first ever crocheted project I have ever made! My mom will love it! Thank you!!
thatjerseyb: i ABSOLUTELY love this! i've wanted to do towel toppers for awhile now and never wanted to crochet yarn TO the towel and not crochet all the different holiday towels that i use! awesome idea!
Manda Hope: Awesome pattern and so well explained. It was filmed nicely, I could see the stitches clearly(you can see the small but important details) Thank you for this video.
Linda Bunker: Thank you so much Amanda for this fabulous towel topper tutorial! This is the best tutorial I've seen. The end product is adorable! I just made my first one and my family loves it. My button is too large so I'll need to purchase the right size buttons. You mentioned selling these at a craft fair. Can you mention the price for just the topper itself without the towel? Thank you so much!
LINDA SEALS: OMG!!! This was so easy and you explained it so beautifully. I immediately started making them in different colors and will buy some towels to match. I'm giving mine to the disabled seniors in my community for Mother's Day. I will be making dishcloths to go with them. Be Blessed.
Serenity: I appreciate your easy-to-follow instructions. They are very clear! Thank you for such an awesome tutorial! I just got done making one . I plan to make a bunch more . Thank you tons!!
Jan Keeling: Thank you for sharing this pattern/tutorial with us ❤️
Renee Rucci: Awesome! I've never made a towel topper before. Totally going to make this. Thank you for doing this tutorial
Cheryl Sheehan: I love this! I will be making this very soon! Thank you for sharing your pattern!
Lisa Hight: Thank for doing this tutorial, Amanda. Your explanations and instructions were clear and easy to follow.
Alberta Rappoccio: Great tutorial! I made a few! Thanks so much!
LISANDRA MAURAS: What a GREAT idea! I love the simplicity of it.. Our group from Texas is getting ready for a fair in October, this will be a good seller. Very easy to follow your instructions., I like this idea better than crocheting across the towel. Thank you so much!
Vee's Sayin: Excellent demonstration/teaching! Great idea!
Sandra Ouaguena: This will be my first time to crochet this, it’s really lovely!!
Remedy: Love the simplicity and result!
Denise Smith: Thank you for sharing! This is great gift idea. It will also come in handy for me. I like to keep a towel hanging on the oven door and it always ends up on the floor. This will keep it where it belongs!
Carol Clark: Thanks for the great tutorial!!!
Linda Willey: Thank you for the very easy topper!!!
Denise Yokley: This is so cool and adorable Thanks
Katharina Thiessen: I love this!! Thankyou for making it!! Now i know what my next projack is!!
Julie S: Definitely a must add to my i want to make list. I love crochet. I can knit a little but seem to be spending my time crocheting. I love the hair band idea what an easy way to start this project. I still want to learn the Thermal stitch and the Moss stitch. Cant wait to make one of these.
Amber Schneider: Wonderful teaching thank you for sharing.
Anarose Abreu: Since I have ample time of being home I will be making these. I'm going to give to my family and friends. This looks really easy to do. Thanks for sharing this with us.
bojczukm: Thank you for this video. I was able to follow your directions easily. I wish you had shown the weaving in part. I am a total beginner and I was not sure about that part. Great video other wise.
Emilia Rodriguez: Beautiful. Thank you for sharing.
Sandy Elder: I love this ! It is so much better than trying to attach to the towel itself. I will be making a bunch of these !
LeAnn Miles: So cute ☺️ I'm excited to make some! Thank you so much for sharing! I'm also going 2 subscribe to your channel
Lauri Kotch: Very good tutorial, easy to follow. Thank you.
Anna: Thank you! This was so well done
Karen H: Great tutorial! I like how you attach the button.
Judy Merrifield Rankin: Great video, so easy to follow AND just what I needed. Moved into a new house and there isn’t any place to put a towel holder by the sink, that is until now. Thank you for sharing!
Estelle Wood: Loved this video and pattern. Thanks so much!
Janet Corner: This is by far the best video for beginners! Thanks so much for sharing.
Cozette Wendemu: These are gorgeous. Thanks for sharing. I just found you and happy I did. I look forward to seeing more videos of items you sell at craft fairs. Please share a video on some of your character toppers. I would also love to see a video of your craft table in the future (if allowed). I not only appreciate you sharing your gift of crochet , but also your answering questions on pricing and links and recommendations on where to purchase products. You have a kind heart ❤️. Praying for much success on your YouTube channel.
Sondra Swenson: Hi! Nice job! Thanks for the tutorial. I like your video.
Idarean Devers: You have introduce something new and never tried this crochet towel topper the instruction were easy to follow. Thanks
Clumsy Mumsy2: Hi Amanda ! I am a new subscriber and (sorta kinda) new to crochet. My friend recommended you. I have trouble with my memory and your tutorial is simple in the sense that you specifically show exactly where the hook is to go in which is often difficult to see in other videos. Thank you so very much. I’m excited to learn more from you. Thank you kindly.
Sandra Sheets: What a great idea...thanks for sharing I have been crocheting for about 5 months what a great gift idea. New to your channel. You explain things very well.
Denise Romero: This is wonderful, i am trying to teach myself how to do this..thank u
Kelly Coleman: Very nice. Thanks. I love them
Nicole Gaspard-: Thanks tried it, turned out great!
Lloma Fatnaowna: Thank you Amanda so much nicer than crocheting onto the towel and sewing the potholder to the t-towel.
Virginia Garland: Hello Amanda I am new to your channel and happy to find you. Love this tutorial and my one question is can a plastic ring be used in place of the hair tie? thank you for sharing and have a wonderful day.
Vicarious Shenanigans: I have been making these for a long time, so glad someone else thought it was a good idea too, great video
Wendell Monster: Thank you very much for this tutorial on making the towel topper I’m going to make some for Christmas gifts thank you Amanda crochet friend Sue ps. Happy Hooking
Lydia Nannen: Thank you for the nice video I was looking for a towel topper crochet pattern for my mom for her mother day gift from me and I made few of them for other people.
Maria Cortes: I love it thx for sharing
Cindy H: Thanks for the tutorial. Great idea.
Judy Stites: I really enjoy this video. I love making doll clothes using hair ties.
Michelle_ T: Hi Amanda Great tutorial, thank you so much. Do you sell the towel topper with or without the towel? I saw that you sell them for $5 and that's why I'm asking.
Duckster183: Love this. So much quicker and easier than crocheting all the way across the towel which is so popular too. I also want to say how well done your voice and presentation was. I don’t think I heard the word “um” which I loathe! Well done! Thank you!
Christine Soto: Tks Amanda so easy, now I'm ready!!
Jackie Jindra: I have made these before. I used a metal braclet in place of the hair tie. To me, it holds the weight of the towel much better when it is hanging
Cecelia Ellingwood: Great idea
Maria José Simões: Olá muita linda uau UAU ♥️
DanielleAF: Amanda I love your tutorials.
Lynne Davis: Thank-you for sharing !!!!!
Fatima Hussain: Thank you ❤️✨
alice Gregory: Fantastic idea
Nancy Kinslow: How do I keep my yarn flat at the corners? One end always curls and won’t lay flat.
Pamela Mejia: What a smart girl, I watched a lot of videos about towel toppers and this one is the BEST!!!!!
DanielleAF: Amanda do you give permission to sell the finished products at craft fairs?
Charlene Hurley: love this
Shohreh Sarem: Thanks 4 sharing!!! ❤️❤️❤️❤️
Linda Horger: This is so adorable
Loretta Thornton: Great idea, may I ask What you sell them for? Thanks I'm not good at pricing.
Sandra John: Thanks for sharing
Gen Gordon: It's real quick to make and very simple..but the strap is way too short for a good amount of oven door handles. A good four more rows in sc to extend will be a great fit.
Gal Sanchez: Thank you
Angela Ponder: When you are first doing the double crochet it would help if you do at least 10 or so in a slower motion. 1 wasn't quite enough.
Dimitra Tzamtzis: Thank you!
Copper Penny Crew: Thanks for the tutorial. I enjoyed it and your voice is pleasant.
Suzanne Bourgeois: I like this idea so much more. Ty
Nicole Hawkins: Can I use Caron cakes cotton/acrylic for these
Nancy Strand: hi Amanda,i will be a my 1st craft show.i will be crocheting thwew towel toppers.may I ask what you sell them for?will you be making more tutorials on things to sell at craft shows?please could you say what you sell your items for?thank you,nancy from wasaga beach,ontario,canada
Lynne Duguay: I absolutely love this idea. I love the way that you explain things. But one thing what is that scratchy noise in the background
krazymammaw: Tried hair tie stretched way to fast some I tried bracelets much better I used your tutorial thou thank u
krazymammaw: What is that noise in your tutorial? But I still love your tutorial I prefer a bracelet I tried hair tie it to me stretches to much so I switched to circle plastic ring or a bangle bracelet
Vanessa Mccarter: Just courious how much do you sell the toppers for qithout the towel. If your not comfortable sharing this info i do understand
Tina Ann Vyze: Thank you great tutorial but what was the scratching noise drove me mad
عيشه بغويله: Veire nice
Guadalupe Garcia: En español pf