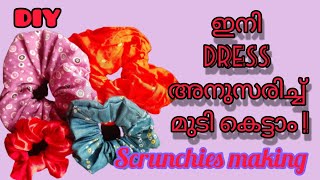
Friendship Bracelet Elastic Hair Tie Tutorial
- Posted on 27 July, 2020
- Ponytail Hairstyles
- By Anonymous
I made a few elastic hair ties for my wife and now I'm gonna show you how I did it. This tutorial is easy though I may have used a pattern that's a bit more difficult. If you need more inspiration for tube bracelets, check out the playlist:
https://www.youtube.com/playlist?list=...
Hey, Kevin AKAAWOL here with more than 30 years of experience to share with you. I hope you find my video entertaining and come back for more.
Subscribe if you haven't and please give my video a thumbs up!
This is a beginners tutorial, so if you're looking to make more advanced friendship bracelet projects, perhaps you will find something more suitable at https://akaawol.com/course-directory
If you love my work but don't have time to make it yourself, don't worry! Head over to https://akaawol.com/shop and buy one for yourself!
Find me on
Web: https://akaawol.com
Patreon: https://www.patreon.com/akaawol
Instagram: https://instagram.com/akaawol
Facebook: https://facebook.com/AKAAWOLdotcom
Music by Cults - 2099 - https://thmatc.co/?l=5D071F
Hello and welcome to another video today we are going to make a headband using this stuff. Here we have the the string there's just like eight strands already cut. We have this really super long needle with um, just a bit of strong string attached to it. We have a piece of scrap string off of a previous project. We have some elastic, that's kind of essential. This stuff is kind of thick. I don't know how thick that is. Actually it is you can find out. It is almost four millimeters, so that's kind of just more than an eighth of an inch for americans. So that's pretty thick and we have a big clip and i have my clipboard. So what i need to do is take all this string and get it ready. That'S going to be easy um, i would show you the ones i was already playing with. I think the wife ran off with it. That'S funny, yeah, okay, so i played around practiced a little bit tried to see a couple. Different patterns see what i liked and decided. I was going to do something completely different for this mostly so she has some kind of variety, but also because this will be a fun pattern to show off all right, so just like magic. I'M gon na have all my string ready in no time, and i have to admit i much prefer being able to do that than to say: hey, let's make a project and go and then try to cut up a bunch of string out of a box or Something that's not fun at all all right so now my objective is find the center of this. So what you can't see off screen is i just matched up the two ends, and this is the center and that's where this comes into play. This piece of string is how we're going to be able to hold it with a clip without having to tiny knots or anything. So we can have a really really smooth finish and that's. Why we're using this clip? Because this thing is really super strong and is going to allow me to do that with no trouble all right now here the color sequence is all about trying to well, basically, i'm going to try to make this pattern. Um, i'm gon na put one of these down on either side, just to sort of help. Keep everything from moving around on me. So we're starting out with the dark blue. Then the next one will be the light blue, then it'll be this lighter orange and the brighter orange then the brighter orange. Again, then the light orange oops and the light blue and then the dark, blue and we'll do the same on the other side. Now i'll include the the layout for this pattern on my website and try to actually show how we can do this now. This is a tube, so it kind of throws everything off from the usual flat. How i usually do the the stuff and that's going to be a little bit tricky, and i actually don't have the image drawn up that i'll actually be sharing with you guys yet, because i'm really not sure how to display, but not that's technically on either side Of this it's once you start to go 3d going into something like a um, a tube form, as opposed to just a flat bracelet drawing it out becomes really a whole different thing, and the only reason i can like kind of halfway do it as i've done For this is because i know kind of what's going to happen, i know how this is all gon na come together so, and that's that is my challenge - is how do i convey this thing that i just know in my heart? How do i teach that? How how can i convey that to you i'll try to show you as we go along here? What that is about see if i can zoom us in a bit all right, so i'm kind of going trying to go with a relatively simple pattern now this is. This is not exactly a beginner's thing, it's got some zigzags and it's got some difficulty to it. But it's not horrible um mind you any of the other two patterns. There was a number of those that i've already done. Tutorials on any of those would work as well, so if uh, if you've already played around with it, i know a few of you out. There have done those, so you could do that with this and voila you will have a hairband and i think that's kind of this is kind of fun too um my wife really likes doing the hair band things it's hot here in singapore, so you know keeping Her hair up is a is a thing i can really. I used to have long hair. That'S probably why i don't have any now yeah, maybe not i don't know, i don't know how that works um, but i get it. It'S not fun. Having a lot of hair in the when it's hot out, you don't want on your neck and shoulders, so you put in a hair tie. This just happens to make them really colorful. I picked blue and orange, because orange is her. Favorite, color and blue makes a really nice contrast, so that's no real magic. There just happens to be a cool uh accompanying colors, and you can tell, since all we did was we basically started out with that smooth start for of a bracelet and i've done that. So many times i don't like to always put you know every single detail in every single video. You there's plenty of them out there being repetitive kind of sucks, but i did the same thing i usually do when it comes to the tops of a bracelet and made for a smooth start. The only difference is there wasn't a knot in the center or loops or any of that nature. As a result, when we pull out that little piece of string, i have the there'll, be nothing there. It'Ll be a really really smooth beginning and that's kind of neat, because we kind of want to, i don't know, maybe create an illusion that it's just in her the hair itself like there's, no whatever i don't know you'll have to. When you see the final product, which i don't have yet you'll kind of get why what i've planned for and what this is all about now, this string was all in one-third lengths which is seriously seriously overkill. The previous two i did um by cutting that in half so that'd be what 1 6. um. I left these, as is mostly because the pattern i chose is really going to use the brighter orange and the darker blue way more and i'm kind of kind of make this one just a bit longer just to be different from the other ones that i made. So you can see again, this is just making these little diamonds. It'S going to bounce back. Like i said this pattern is not very difficult. There'S basically, four going one way, four going the other, and then you make this little diamond in the middle of it and then bring those four back in i'm gon na. Do that on the other side as well, and this will look really pretty cool now earlier when i was playing, i did this two different ways. So if you don't have the needle right this really great big long one over here, if you don't have this, you can make it go around the elastic as you're knotting part of the problem i had with doing that was that um, the clip is either wanting To hold this little piece of string or this, but because there's two different sizes inside there, one of them is going to be slipping. So we end up having to kind of find a way to double, clip it or something or tie this string onto here. It was just kind of a headache, but that said, let's say you wanted to make one much longer. Maybe even you wanted to make an anklet that had this at its core, so that way the person wearing it would be able to take it on and off at will. This is all possible with what we're doing here right. So, yes, it is totally possible if you i was going to do something like that. I might um actually take a needle and put this straight through the through the elastic. So that way, it really doesn't go anywhere and just have it exactly at the point that i want and then just go ahead and make the whole thing that way, knowing that it's going to be in there, knowing that it's just going to stay like that. Just start right out the gate and and do something of that nature um in this case i can just slide it through. I have the big needle it won't be longer than this right, so i don't have anything to worry about there, but trying to give you some options in case. You want to take this other directions. I encourage, as always to be inspired, try new things. This would not be the first elastic bracelet i have ever made. Um did something for a client quite a few numbers of years back. They were quite adamant that there was no way they wanted to wear every day, but they wanted something. Super super complicated and doing a tube works out really smooth, because then i don't actually have to stitch this to the other right, because you can just run it through the inside and if it starts to get worn or whatever they. You know one side's always been against them. They can just kind of give it a little rotation and it looks all nice again. It lasts really a long time like that. So if you actually want to see one made or you want one in the shop well, if you want one in the shop, i would suggest find the bracelet that you want it made with that way. I can make it exactly the way you want it and then you can just purchase it, because i can do custom orders as well um. You could even do a custom order, while it's becoming a tutorial. If you're wanting to be able to say hey this, this is where it was made so up to you guys, anyways. We are almost done with the other orange diamond. So since it's sort of hanging on that little string, it likes to kind of wiggle around. Despite the fact, i'm trying to apply tension onto it and shape it to be nice and straight so what i just did was, i put the clip actually onto the blue portion of my knot, work to kind of get it to stop moving around all right. That is much better all right and we're going to go ahead and we're going to do the next blue diamond. Now, if you hadn't guessed, this is exactly all the pattern. Is it's just creating one diamond after another, i'm not going to make it too complicated. Sometimes, a pattern that is simple can seem super super complex if done well, and this will be one of those for whatever reason, i think the way that the knots lie always gives it just a little twist and it could be, could be tension on my part. Perhaps i favor one of the knots or something, but they always seem to twist a little bit so in a pattern where it's just going to be like this checkerboard thing, it's still going to have something of an interest running through it, as it's worn. So i am not worried about not going all crazy and doing a pattern like my um traveler notebook bag or one of those kind of things so or even that uh kind of celtic-y tube. When i did, that would have been pretty cool like i said she likes orange likes to wear orange, so i thought this would be kind of fun, so hopefully everybody has been enjoying all of these things and trying to help them get themselves through this quarantine. I don't know what uh what it's like for everybody else. I know that me personally, i'm a little frightened by the thought of going out and contracting the virus, so i'm rather found a state of contentment sitting here and making this stuff whoops, not that one. This one, so if you look at this point, the colors are in the same sequence as when we first started off dark blue light, blue light orange bright orange, bright orange light orange light. Blue dark blue, exactly like how we started out, and that means it's just going to keep repeating this indefinitely as long as we get to our pattern so, and here you can see that this has been a very, very smooth start to it. Now, as i was saying before, if you don't have the needle, what you could do is you can lay this in here and maybe wrap this around or tighten up or put a needle through it and put it right through and bring these two bits together or If you have the needle, as i suggest then all you have to do is bring these two ends together now mind you, when i do a tube, i typically like to have something inside of it, just to make it easier for myself, especially with the bigger is, But these are relatively small and it's not um. It won't be easy for me to try to put something in there and, like i'm, not even sure what i could. I'M not sure that even like uh, the chopsticks i would use, would work here. So just follow the same pattern come down for and then the other side - and i know i say this - is four: it's three. It'S only three knots because the first one has already been done from the other side. But when you look at the pattern on paper, you see there's four knots in a row and that's how i do it in my head. I don't know if that's how you guys do it? That'S how i do it. It works for me. Hopefully that works for you, if not, you can count it in whatever mannerism that actually helps you the best. Okay. Now it's just a little diamond at this point. You really do have to be paying close attention. Because, again you don't. You may know what your colors are, but you don't want to grab from the wrong side. You will mess up the tube on the inside and that will certainly make it more difficult to get the needle in. Like i said you, if you have the elastic in there, then it's, i guess it would make it easier for that to not happen. You should be able to easily see what is in front of you what you're working with so when trying to weigh that out one way or the other. That might be a more advantageous way of doing it. If you want to see me, do it leave a comment? You can possibly make the wife another one of these things, although this makes three i'm sure she won't mind one more or if that's something that you really want. Well, you can leave that in the comment too, and maybe you know i can make you one. I don't think i charge a whole lot, because it's not much more than a bracelet sized project. It'S this stuff. I don't know where to get okay, so you can see. Now we have the two oranges across from each other right and the two blues across from each other and then i'll go ahead and make the orange and then the other orange and it'll just keep going and going and going. And i will come back and show you how we put this rest of this together now we knot this up and that's it all right so back in a minute. Okay, so obviously i've been busy nodding, um and in between doing this, i also created this picture. So you can see this is not quite like my normal uh graph papers. I added the extra joining row off to the side and then the kind of emptiest squares that you see on the left. Those are the squares that are actually over on the right hand, side so when it makes the tube. So if you look at this, as it makes the tube that's how it's actually creating the extra row of diamonds, so now you have seen the pattern i'm going to have that on the website, for you so now that uh i've gotten this far. I can take this string out of here and that doesn't hurt anything no longer needed. So i'm going to take this needle i'm going to go in this side. I could have finished this first, but i think it'll be easier to put this through, i'm being careful as i put the needle up through it, so that i don't stick it out the sides all right now, i'm going to take this bit of elastic, put it Through here there we go and pulls right through okay, we're trying to hurry up here, because my wife has lots to do, and i need to bow her her wrist okay. So what we're going to do is we're going to try to make this really comfortable for her to be able to wear it around her wrist when she's just out and doesn't has her hair down. So we're not applying any like tightening it of the elastic right and i'm just going to make a square knot. Actually i'm going to have to pull a little bit more through because not enough to tie a knot there, all right! That'S better! Let'S see so now. This way, okay, nice little square knot that too tight. Oh all, right tighten this down there. We have it so now she can wear that around her wrist it'll be a pretty little bracelet and when she wants to do her, hair up it'll work now as far as this grab, my clipboard put this under here and we're gon na close this off, like We would any other bracelet just case of getting the string separated to either of the two sides. All right we just take. The first string hold it still, while we put once around with the second one, and then this goes around those two and so on, and make this just a little bit easier, just turn it around a little bit. So i think it actually took me longer to make the revised graph paper and try to figure out how i was going to display that than i actually made took to make the whole bracelet thing itself. So yeah - and these are the other two in case - you didn't notice them. These are the ones i already made for um. I didn't size these to be able to go around her wrist and then kind of realized, as we are sort of playing around talking about this, that that's something that you know she likes to do and so uh. You know why not, why not make a little bit more practical for her, so i'm not sure that that's i don't know how i would do that for like if i was going to put these in my shop, because my wife's wrists are rather small, i could Maybe try to find an average or something because with like the bracelets and stuff, i usually leave like these really long tails that way it can fit to anybody's size, but this is kind of a little bit more personal. So if you have any thoughts or comments, please leave them in the comments section, i will try to get back with you, um, okay, we're at the end here i'm going to go. Take one of these and i go around the whole group, just kind of pulls. The whole thing together and then i'm going to tie a knot like that. I have no idea what that nut is called. You just know that if you make a loop and pull the tail through it, you end up with a really good, strong, holding nut. So and now i can trim this bit off and i can trim these bits off and there we have it another hair, tie and yeah. I think this has uh turned out really. Well, hopefully, you guys have got the hang of this now and can do these for yourself and until next time don't get your strings in a bunch.
Comments
Nicki Silvers: @ 2:25 in the video....That is a genius idea! I never thought to do that! Thank you for another great tip! And this whole project in general in an awesome idea!
Nicki Silvers: I love orange and purple together! I made a bracelet using a purple gradient and an orange gradient and I love how it turned out! Orange and blue is good together too!
Tone Hjetland: Excellent idea to knot a hair tie! A little guest appearance of your wife’s arm too in the video
Nicki Silvers: Please tell your wife(sorry I don't know her name!)that I love her nail polish! It's a really pretty color!
Leigh Beltrame Markon: Orange is my fave color too =^.^=