Haircut Trends For Women 50+ 9-21-20 12Pm Est | Woke Up This Way 060 #Hairshow
TEXT ME! 215-608-2612
Create a FREE Profile and Watch Hundreds of Hair Education Videos Here!
https://bit.ly/FreeSalonEducation
Shop the FSE Store Here!
Get the FSE NOW App!
iPhone: https://bit.ly/FSENOW
Android: https://bit.ly/FSENOWGoogle
Follow me on Instagram: https://bit.ly/FSEINSTAGRAM
Follow me on Twitter: https://bit.ly/FSETWITTER
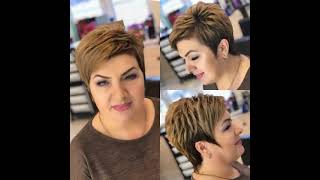
Podcast woke up this way. He'S got a lot of cool stuff. He'S gon na show you today the latest news, industry, topics and business tips for all hair, stylists and salon owners. It'S time to flip the script grab your precision scissors, barbara combs and swivel twist razors. Let'S cut a bob, a quick shag pick to cut with a little bit of flavor check out the live flashes product reviews. Let'S rock on don't forget to check out free salon, education, it's gon na be a great day chop. It clip it spray, it flip it. I woke up this way. What'S up guys welcome to the class? Let'S see i want to see all of you guys popping in on the chat there we go all right. We got some youtube people here. What'S up what's up carly, i see you uh. What'S up all right there we go everybody's logging in all right guys. What'S up welcome to the show super excited today i got some really fun stuff: we're going to go over we're going to talk about hair trends over 50 uh, so uh that's going to be super fun. I'Ve had a lot of requests for that over really the last few years and i have never done it so today's the day. So we're going to talk about that if you're new to the show type new in the chat, if you're an og you've been watching. This show since march uh we're on episode, number 60 uh, so pretty exciting stuff, we've done 60 classes since march, and so there's a lot to learn. So if you're new go check out some old episodes after this uh and if you're an og type that in the chat - let's let's say hello and uh, everybody get to know each other. The whole point of this class guys is to make sure that you guys are growing as a group as a community uh saying hello to each other, so uh welcome to everyone all right, very cool zelda. What'S up good to see you lynn good, to see you rita, hey, hey, felix, christina susan, very cool stacy, welcome, welcome, very cool all right, guys, so also exciting stuff. We'Re live on minerva, beauty's, uh facebook as well today, so we're gon na do this every tuesday. On minerva, beauty's channels as well, so you can thank them that i will absolutely be doing this at least every tuesday um from now on. So you've got that going for you. So thank you to minerva beauty. For that also i got an announcement. I'M going to be using their brand new blow, dryer color um today on the show. I'Ve got it in this box right here. So that's exciting! I'M gon na be announcing a giveaway that i'm doing in partnership with them. Uh that we'll be doing over on instagram. Later today and uh - that's about it, that's about it so go check out! Minervabeauty.Com uh! If you haven't and you're looking to upgrade your salon. Furniture they've been a huge partner of this um. Everything that i do really everything that i do they're a huge partner of always so i love them for that. Thank you all right. So, let's get into it. So what i want to do first guys is. I was looking up um trends. I also want to text on everybody, so if you guys are not on my tech's platform yet make sure you text me 215, 608, 261, because anytime i go live or do any kind of live class i'll, send you guys a text forgot to do that today. So i'm gon na do that right now, uh. Let me grab the link over from youtube. Let'S see here we go all right youtube. So all you have to do is text me just say hi and then it'll get everything started for you, so uh save share the link copy link and the text is going out. All right join me, live all right, cool all right, guys so um with that. Being said, let's get started with the show um. What i'm going to do is i'm going to break down some of the styles and haircuts first, because i want to share with you guys some thoughts and different trends that you guys could go with and then we're going to cut one of those trends today. So let me share the website that i got all these images from just so we are covering all of our angles here so who? What, where wear dot com is where i got all these images. I read this really great article from them and they showcase tons of styles for uh women, hair trends, 50 plus so um. So i want to share with you guys some of those and then we're going to get into cutting. So this is the first one. Now i think this has been like kind of a 50 plus women's style that feather back um bob haircut, but it's got a ton of volume. So i think that that's where it really changes - and one thing i want to talk about today and what i want to go over is the reason i haven't done. A 50 plus class or video is because 50 plus women wear the same trends that all women wear so like i've. Never really. Whenever i have a woman in my chair, i'm not thinking oh she's, 50 plus, so i'm going to give her this style or this cut. Let'S say this cut: now a style might be a little bit different or a length that fits somebody's personality or who they are might be a little bit different. But that doesn't mean that because you're 50 plus you're going to want one of these styles. So, let's just kind of start there, all right and uh, let's see so that's the first one i like this one. I, like the the featherback effect um the way that i would cut this is. I would over direct a lot of it forward or i would follow the head shape to create those layers. You can see um up towards the back, where i really look at it. It'S a feathered fringe and then the back of it's kind of feathered as well. So that's really uh to me. It'S saying that they're following the round of the head, as they uh, cut that haircut. So i like that style, pretty cool if you're looking for something like that, um we've got that one and now here is another. Let me move that over here, so i'm not going to pretend to know any of these celebrities names or be a celebrity expert. I'M not so um, i'm just going to talk about their hair, but this is another feathered, layered cut, but the the big difference between these two when you look at the this cut, has a lot longer layers so um, but has short pieces around the face. Still has that kind of feathered fringe, but it's not it's not so much a round brush blow dry or something that gave it that feathered effect. What this is a more natural blow dry may be done with a wave iron at the end for some finishing pieces, but i like this one because it's more lived in. I personally think that this is more of a trendy look than obviously the the one we were just looking at, which is this one. So for me um now, would this cut look good on the other person? Probably not wouldn't fit her quite as well um. So you know it's just a little bit more undone, but i like i tend to go towards undone styles, a little bit more. What about you guys? Let me know in the chat um next one love, this love the curl um. This is again following the round kind of. You would obviously cut it differently um. For me, i would pick individual curls and cut them uh and i would take some pieces a little bit further than others, but i would go with the overall shape of that, but it's still got that same kind of fringe. So when you look at it's kind of the same idea as this one here really all three of them, they all kind of have the same. They have a fringe and a layered effect and a round layered effect. So for me i would cut them differently. Oops, but uh make this one. There we go that one go away, make that one go away here. It is but i'll cut them very similar uh shape wise, but obviously the technique would be different when cutting. I would cut this one dry for sure, like i said individual pieces, but then just keep that silhouette. Think about cutting with the round of the head to create that overall look all kind of bob shape, but with volume um long, bob ish, and so i like it, it's cool all right. Next, we've got this one. I love. I love the undone effect of it. I love kind of the round feel me personally. I'D probably take the sides right around the parietal ridge area. I would take that a little bit tighter just for my personal preference but um, but overall i love kind of that that really um textured outer perimeter and but still kind of put together and feathered on the top. So i think it fits somebody that is a little bit older, maybe wants a little bit more uh of that put together, feel, but then says something like has a little bit of texture has a little bit of personality around the outside. I, like that uh also easy to style. I feel on this one. Alright. Next one love this. This is more to me, cut straight with the head, but um diagonal forward kind of parting. So that's how i would do it and i would cut all of it around and then it's got kind of that cropped front. So i really like that as well, but really to get that feathered. Look. You want uniform layers moving forward. So that's how i would that's how i go about it. Um, let's see next one. This is cool because um, i i feel myself kind of in this same category here. My hair is a little bit skinnier, we'll call it um, and i think that this is a little bit skinnier as well. So when you look at what short hair can do for somebody that has thinner hair with the right style, the right product blow drying, so here's a little tip for people that have a little bit skinnier hair. They you can blow it dry fully and then start adding products that aren't wet, that have more of a matte finish to them, and that will give you a thicker appearance on your hair and it'll. Give you that textured effect. So that's kind of like for me. I never um my hair is a crazy, always crazy, but um, but it looks thicker because i blow it dry. Always i never style it wet, and then i put my product in afterwards makes it feel and look nice and thick so kind of the same thought process here, um giving what appears to be a little bit thinner, hair, a thicker appearance, um all right couple more! This one, i love classic style, feathered um over the ear, so this is definitely good for somebody that wants to cover their ears a little bit and just have that little bit longer effect, but yeah. I really love this. One again would cut it with the round of the head um on the bottom and then the top i'd, probably over direct a little bit backwards. So it would push some of that weight forward and then feather the fringe which we're going to kind of do. Some of that today, uh in our cut all right couple more and we're done. I love this one blunt bob um. I love everything about it. So if anytime, a client wants to pull something like this off, i i think it's awesome, but what works about this is look at the jawline um and how it connects so well with this haircut. I think that's what really makes it stand out for me. Um all right one more and then the one we're gon na do so. I like this one, because it's a tucked effect um. If it wasn't tucked i'm sure it has just some nice layers, um laying on the sides, but probably feathers back. I bet you. It replicates um. This first style probably looks if she had thick hair like this, but because she doesn't have thick hair, she tucks it um or for the look for the night um. She she went and tucked that but um, but this is probably a similar, but a little bit shorter haircut version of that with thinner hair. So then she tucks it and creates a totally different style, same concept in the cut, but totally different style all right and to the one that we're gon na cut today. The reason i chose to cut this one is because i think it's the most salon friendly um, it's a pixie cut, but it's long um. So i think this is gon na be fun for us to go over. I love the volume in the front. I think that's super cool and then um yeah. I think all of this is it's. It screams, um salon, reality so uh, so i want to go through and showcase this cut today. So if you guys have questions, let me know in the chat we're going to get started on the cut. I hope you guys are excited to watch it. Let me know if you have any questions and i'm going to have. Oh that's good all right here. Let'S do this because i want to record obviously doing this cut as well, so one of the things that happens on this channel as we do these live classes and then, when the live class is done, i've pre-recorded recorded the um, the whole class and then i'll Put it out as a smaller video on our youtube and facebook as well, and i give it to minerva and they put it on their website, so you guys can always be on the lookout for that on their blog and all of that, so, let's see so We'Re formatting so, while we're doing it um, let's start getting the mannequins set up here, we've also to get you guys excited, have a few different camera angles. So let me show you guys this one here. So we've got the second camera angle, which is gon na. Be nice and close to my hands and then we've got an overhead camera angle as well uh. So i can show you guys those angles too back out here, all right, so we're going to go over to this one, all right, ready to roll all right. So we're going to start by sectioning off the hair, um pretty simple sectioning on this cut. I don't want to go too complicated, uh, obviously a lot of times. Let me get the camera back a lot of times, uh, with shorter cuts, you're starting to work with a shorter head anyways. So you wouldn't be sectioning it you just kind of push things off and away, but what i want to do is first look at where the parting is um in the picture that i've been given. So what i want to pretend is that i'm in the salon - this is my client and the picture is something she showed me on her phone that she wants to have me create for her. So i'm going to look at. Where does my client part her hair? Maybe it's not the same size as the picture today, we're going to pretend like it is. If it wasn't. I obviously would then coach her on where to part her hair, so i'm gon na comb it straight back. Just like this, and then i'm gon na go right about the point where our celebrity here parted her hair, which appears to be a little bit deeper. Of a parting like that, and then what i want to do next is go over top here and i'll start combing the hair in the direction. I want it to go so the direction i'm going to part it. I want to meet over here right above the eyebrow right about where the recession point is in the head. So i'm going to draw sort of a triangle on top of the head right here around over to the edge of the eyebrow and i'll. Take this whole section up now: here's the other thing guys uh during this class. If you have a question type q and put in your question in the chat, i will try very hard to see it uh and put it up on the screen um and answer it for you guys, or at least when i go back, i can easily see Your question, because i'll see the cue in there so combing the hair up and i'm going to twist it away like that, creating that triangle on top. The reason i want to create this triangle is because i want to always see that heavy side. I want to separate the heaviness from what's going to be the weak side over here and we'll comb the rest down. Why do you make a triangle section on top teresa great question. Add that up here, all right, theresa, so the reason that we make this triangle so first off, i want to separate the hair as much as i can for the cut, so i can kind of keep myself organized so already i'm thinking this is going to be My heavy part of the haircut so i've got that separated away. I'M going to create a second triangle: that's going to then bring everything together. So i think that that'll make a little bit more sense of my thought process here, but this top section. If you look at our picture, that's up in the corner. What i want to do is i want this part here to be a certain length and then it's going to be a little bit disconnected from the sides. So the sides i'm already thinking about cutting first and different. So i section this away, so it doesn't move into the side. So that's why it comes right here to this parietal ridge area. So we've got our bottom half and our top half. The other thing is, we talk about head, shape, a lot and when you look at the head shape here, the head shape starts to curve up right, so as it curves up that becomes a totally different plane. So when we cut hair, if this is 90 degrees and i'm working up the head and now all of a sudden, i start bringing hair from this section or above this ridge, i start bringing that into my hand, that's automatically going to lay different and heavier than This bottom part is so you just got to be really aware of, where you're at when you're hair cutting that's. Why we section it off the way we do so. I'M choosing a triangle because it's sitting on her part and then it comes around and cuts the head in half. I don't want to create a square on top, because this hair in the back right here all of this hair is going to fall into the back. Anyways, so this hair has to do with the front of the haircut. This hair has to do with the back. So i want to separate those different. So now, what i'm going to do is i'm going to create another triangle. That'S going to come around the head shape here to a point right above the occipital bone in the back, so i will show you guys that in a sec and then another point is going to come right off of the edge of our parting here, we'll see Where i'm at - and i will show you guys this section so i'll clean it up, so i started my initial thing is just to start the parting try to get it where i want it, and then i'm going to go in and clean the these sections up To get them exactly how i want them and now the reason i'm working diagonal back lines is because we're going to be cutting with the round of the head. So that will continue my flow, so diagonal back is going to be more of a rounded shape because it's following the head shape and diagonal forward is more towards the face triangular. So i'll show you the other angle, so you guys can get a really good look at. This looks like a weird shape up there, almost a figure, eight all right. So let me switch to the other camera here, so you can see that triangle that we're creating in the back. So that goes to the occipital bone right above and then it's a diagonal back line right here and my finger angles are going to mimic that and follow the head shape back. So that's the only sections that we're going to do in this entire cut. So it's basically separating the front and the back of the head. Oh and i'm kicking her all right. So, let's see any questions so far. Let'S see cue, if you have someone who wants a trim with this type of haircut, would you still section it like this? So gene, that's such a great question. I would section it like this in my mind, i would think about it and if i could section away, i would um, so it kind of depends on if how long her hair is obviously, but if she already does have this type of haircut like you're saying I would just go through and i would section the top or the parietal ridge area separate the top and the bottom and then go through and do my cut. I wouldn't worry so much about creating the triangles uh. Thank you, lynn, appreciate it all right. Where are we at here any other cues? What happened to the recording stuck stuck on the sides? I'M not sure what you mean. Adele uh, oh, you might mean the virtual class. I sent out an email adele, so you should have gotten that if you didn't send me a message on instagram and i'll, explain: um all right cool, i think we're good. I have silver thick, very coarse, hair and hey joanie, of course. Here, i'm looking for a new hairstyle, i'm 65 years old and shoulder length, hair love the messy style. Thank you for your time, love watching your videos. Thank you! So much all right! So um! This would be a great haircut for you, great change, all right, cool, we're good good morning, guys, good morning kathy all right. Let'S get started, let's cut some hair. So what we're gon na do. First uh is work, the weak side, that's kind of um, the most important side for me, because the heavy side's just going to kind of flop over. So as long as we get our weak side where we want it, then we're going to be pretty good to go on the rest of the cut. So let me go like this: i'm going to make this picture go away for now i'll bring it back later. I'M gon na drop the head down a little bit all right, i'm gon na comb, all the hair backwards, get it moving that diagonal back. Basically, when i comb the hair, i'm gon na mimic this line right here, so combing mimicking that line just getting my uh partings ready. I'M gon na have a clip in hand just in case i need it. I'M gon na take my first diagonal back parting to the ear like that. I slide my clip up underneath clip the rest away. Now i've got my first section, i'm going to work with the loose teeth of the comb. The reason i'm going to work with that is because i don't want a ton of tension in this. It depends on the hair texture with thicker hair textures. I like to work wide teeth through and then, as i work with the wide teeth i go, i get a little bit less. Tension gives me a little bit of a forgiving line, which, to me falls a little bit nicer on thick hair, thick hair. I never want a bulky blunt line within the cut, so i'll even be doing a little bit of point cutting throughout this haircut as well. Look my desk is falling apart on my hand, i got ta get a new desk. So what happens when you make your own desk and you paint it all right so straight out from the head now i don't want to tilt my fingers in at all. If i tilt my fingers this way, i'm going to automatically start building weight. What we should know as hair cutters is that this head is already going to start to turn in right. So it's automatically going to build that weight line for us, so i'm just going to work straight up the head shape. So just like this grab the hair loose teeth, bring it in my hand straight out from the head fingers parallel to the parting parallel to the head and then point cut. Let'S go go tap it longer than that. So i'm point cutting through like that and that's our first little cut now take out my clip slide, the hair again get it moving in the direction i'm going to take my parting, and i just work straight back comb. The hair back slide my clip up underneath so just like this, bring it into my hand straight out from where it lives right, not down to where it was up to where it lives, and we caught all right. Everybody good if you're, good type good in the chat, see we got a question. Aren'T you sending texts anymore? Yes, i am kathy. I actually um just went to send a text and it says the beta is out. So i'm not sure what that means, but i am sending the text still so make sure that you text me um and stay on that all right here. Is this finger length? It'S not uh zelda, it's not finger length, so i'm going about. Let me show you where i'm at lengthwise, so i'm probably about an inch long, because this is a long pixie right uh, so i'm not going too short in there all right, let's continue through. So i comb the hair back and i take my diagonal back parting. Like that clip it away so bring this up into my hand. Now, here's the other thing guys i'm only working to the hairline back here and then i'm stopping um that for me i've talked about this a lot recently, but this hairline up, i always treat as a totally different haircut. So i'm just going to continue my line to that point and then i pause and i cut. If it helps you guys, you could totally separate it, which maybe i'll do just to give you guys a visual um. Let me do that real quick. So let me separate that hairline area, so you can see where the hairline starts to grow up right here. So i'll go in here and separate with a line first, just like that i'll comb that over and clip it away so that i don't even cut into any of that hair and then this is the only hair that i'm i'm really focused on right now. So just like that got another clip so diagonal back and again guys just working out straight from where it lives point cutting my lines. Thanks, guys, sorry, i'm trying to read your comments and cut at the same time all right again, diagonal back so another tip. Don'T take too thick of sections, because if you do you'll start over directing too much down uh and creating too much of a weight line right away, all right cool. So now this is all coming out to me, but notice. The head shape is starting to move away so because it starts to move away. It'Ll automatically start building that weight line that we see in the cut. So i want to show you guys a picture again, so this weight line that sits right on the edge there's not too much of it. They round it pretty well, but it does sit a little bit heavier. There'S almost like a graduation if you're looking at her face to face on her left side on your left side, you see that slight bit of weight but notice that on the right side on her heavy side, it's not much different. So that's kind of the things you got to think about as you're cutting this all right, so here we go so bring it up. So if i start dropping too much like this, then i start building too much weight. All of a sudden she'll have hair growing out this way, as opposed to starting to round with the head. So just be well aware of your elevation as you're working through here. It'S why we like to work slight diagonal instead of just straight horizontal, because straight horizontal becomes a little bit harder to be aware of your elevation. You see that you can see the elevation there. There we go last couple sections. Some of you guys might want to try to grab all this at once. Just refrain, try not to because if you take too much that's gon na that's gon na automatically lower that so just push yourself to not take too much hair there. We go okay and last bit here, i'm going to give it even a little extra lift, because we're now we're really starting to round off so a little extra lift, keep it nice and light our line cool now take a look at how it looks so far. So you can see how it's not too heavy right here, that's the plane, so that elevation helps round that off. If you don't elevate it, then it's going to start growing out like this and then you you end up with a shape that you didn't want. So think about head shape, how that head is curving as you're cutting and then work from there all right. Now, i'm going to do honestly the same thing on the opposite side, then i'm going to work the back so now we're not working with the parietal ridge. So on here we were cutting on top of the parietal ridge. We had to worry about head shape, the question that happened at the beginning. Why would i cut that or why would i make that triangle that triangle takes away that bit of head shape, that we have to worry about so now this is all flat for the most part uh pretty flat, and so every bit that i'm taking just needs To come straight out from the head and it'll start to collapse, this whole side of the head shape and then this top part can fall over so um same thing. Let me separate front and back first i'll, go right here so to separate front and back. I just take a line and then i see where i'm at and then i'll go a little bit further over and i'll just continue until i get perfectly inline in the back and comb this forward. So you can see when i say i'm separating the front and the back, i'm separating where the hairline goes straight up the head. All of this hair is the same thickness. All of this hair is now the same thickness. So as i work, i know exactly where i'm at. Let me clip this forward and let me comb the back nice and tight and away just like that, all right. So now let out the clip, and now i'm going to add a little bit of h2o to this section. I want to keep everything nice and saturated as i'm working that helps me keep my sections clean, helps me see my guide better, all right and now i'll comb straight back now i guarantee somebody in the chat saying how do you know what length to cut this? So here is my thought process here you can do two things for me. I like to just cut it because i kind of know where i was at. I don't need them to be exact, but they need to be really close right. Otherwise, your client's going to be feeling lopsided for a while, or you can actually take a piece and measure it on your comb like this goes to this third dot right here on my comb. So i could come over here. Take a piece cut it to the third dot um, and then that is so right there i see it. I see the third dot i could come in here cut this. Actually you can't see that. Let me turn it so now: third dot right there, there we go. You can see that i don't do this, but for today, because i think it is helpful. You got third dot right there. So now i take it and i cut this little piece at the third dot. Now i've got a guide for the rest of this side. As long as my elevation stays the same and i'm working through it i'll be able to see right where that guide is bring it up into the hair. Just like that and there it is so right here, comb it out and i'm going to go through and point cut my section i'm going to see if there's a better angle, for you guys here something i'd love you guys to post in the chat is where You'Re watching from because that's always fun to know all right turn see. If that helps, i don't know, i think we're just going to continue the way we were you guys, you guys get the gist of it. So i want to work through this side. Pretty quick, we'll go salon. Reality speed here, diagonal back comb, the rest flip. It away bring this section up into my hands. Elevation straight out from the head, make sure you can see that guide through it. Good cool you guys are all over the place. Let me go overhead, so you guys can see the uh zoom in a little bit. So you guys can see the point. Cutting action here. Stream close up right here in my hand, see my guide through it point cut knuckle recon cool, continue, working starting to work above that ridge a little bit there. We go so actually something good for you guys to notice here. Is that see how my finger is? Parallel to the head shape, so the head starts to curve around like this. So when i comb here, my fingers are parallel with the head shape and then i'll show you when i re-comb what happens to my finger angle so watch so now. I take it and i re-comb and i shift my finger angle, so i'm no longer so i go here parallel and then, as i come back now, i'm still parallel. So we got to be aware of the head shape horizontally through and then also vertically here. So i got to know how much elevation do i want to lift, but then how am i shifting in the shape as well? Those are both really important to the overall outcome of the haircut and remember this one. I want to actually remove weight. I don't want to have a graduation happen at all, so on this side, i'm going straight out from the head the whole way up so now my elevation is even higher and my finger angle follows around the head. I'Ll show you guys the last section on the other angle, because i want you to see where i lift it so see how the two sides are different right, but they're different, because there are different, like we wouldn't cut this side. The same as this side, because this is still going to fall over it so now look at see how flat this falls. That'S nice! That'S what we want, because now we're going to cut this and we'll go over it. So my elevation on this last piece is not going to be down like the other side, it's going to be up like this through and then same thing. I'M still continuing to shift my finger angle, but it still lays nice and flat no graduation right. That'S the goal all right so now we're going to continue through the back i'm going to go i'll start on this side. You guys can see better on this side too. Let'S see here all right, any questions, let's see where we're at ah look like i'm working hard. That'S what i look like at the beginning. That'S not true! That'S not true! All right q, all right, no cues seem good. If you guys have a question type q put your question in the chat and let me know all right back back to it so now for comfort sake, i'm going to move the mannequin head here and i'm going to tilt her slightly. So i have a good angle to then go at the back here. So now saturate a little bit even this section, i just cut i'm going to add a little bit of h2o2 because i want to be able to see a clean guide, as i start to cut, because i'm going to use that as a guide. So when i look at this from the side, if we went to cross check it right through here, this should all match up in a line right so through there. So now i'm going to use that line for the rest of this cut, another important reason or another good reason to have consistent elevation throughout the cup. All right, um over here here, like this, let's zoom in all right, i'm allowed to change my mind a little bit shifting her head slightly okay. So now i'm going to still take diagonal back sections, but they're going to be a little more vertical diagonal so like that and then i'm going to work these sections into my hand just like this and start to cut my line connecting front and back so working. My way, all the way through this following the round of the head, keep your finger parallel to the section and then we've got our line there. So we take our clip comb. The hair draw another diagonal back parting. Again, don't make them too thick. You'Ll start over directing too much and you'll lose that guideline in the cut right here straight out from the head point. Cutting letting the head shape start to build that graduation towards the interior of my finger towards the up here right, because the head shape curves around. So as the head shape's curving up here, i'm cutting here. So i'm it's lower elevation. Here, it's straight out from the head here when there's lower elevation up here it starts to build weight so we're building weight in the crown area. We want that. That'S good and then, as i work around i'm collapsing with 90 degree, uh cutting through the bottom everybody's following along. Let'S get a thumbs up in the in the chat for me there we go lots of you guys on facebook good to see not as many on the minerva facebook, so hey, minerva, minerva fans there. Why don't you uh hit that share button? If you can or start chatting with me, let me know: let's get more people in that room. All right, haircut's got a nice flow to it, see all right. I love the thumbs up cool good to see all right diagonal back so again. This is still straight out from the head, but it's shifting towards the top because of the head shape, so i'm watching that making sure it doesn't get too extreme, but i definitely want that build up of weight to help with the um the crown of the head. I want a little extra weight in the crown here. I need it to be parallel, 90 degrees out from the head, and i want it to be straight out from the head, so we're not building any weight in the back. Looking good looking nice there we go. Remember, like i said at the beginning of the class, we're going to be doing a giveaway starting today over on instagram, so make sure you're following minerva, beauty on instagram and make sure you're following free salon, education on instagram, because that's where it will be giving away A blow dryer, what's going to happen in the back here is this line, starts to crisscross with the opposite side. That'S good! You want that to happen because that's going to become my guideline for the other side as well, so we'll connect those two points together. So i want that criss cross. I want diagonal back or diagonal back through, which turns into diagonal forward and then diagonal back is going to criss-cross cross-check and it will complete the back of the haircut right here go and if you're just joining. I'M point cutting because i want to create a textured line as opposed to a a really blunt line. It just creates a softness that i like especially on thick hair, which these mannequins with brown hair, tend to have a little bit thicker hair than the blondes. So i'm just taking that into consideration as i'm cutting it as well. All right this will be the last section i cut on this side now we're going to work back, so the reason i quit working on this side now is because i've now met that triangle. In the back, so those two sides connect. You can see how smooth look at the shape follows that head shape and then builds up in the crown. It'S exactly what we're going for now we're going to start connecting this side, which is barely any hair and we're going to connect through we're almost done guys we're the hardest part is building this shape around the sides, but once you have it, and if you do It right it looks really really nice, so we're going to saturate everything again we're going to take the hair that we cut here. So we've got our line. That'S going to be our guideline there, so i'm going to take a more extreme diagonal back parting. Just like this down that hairline comb, the rest back all right, let's see i'll, probably cut it over here. I did this last time, but let's see how does it work this time? It'S a little trick. Your comb comb helps focus it combs, blurry you're, not in focus a little content creation, fun fact all right. So i follow this line right here. There'S my guide. All right guys got to turn a little bit all right. Now, i'm going to continue through the back. We'Re going to go salon speed here, not going to talk too much over comb this back. It'S not much hair to go so i tilt the head a little bit because i'm i want to make sure my body position is right and i was starting to shift my shoulders and i don't want to do that uh. So, to make myself more comfortable, i shift the uh, the head of the person, the guest and bring it here, and now it's less turning of my body to cut and we're connecting these two points. This is all that previously cut section that i did straight out and then the last piece literally piece of this cut bring it back cut into it all right. So now, just to do a quick cross check, you could do scissor over comb work. If you wanted to um - or you could just literally like i'm, going to take a little bit of diagonal forward, move some of the hair just to check the corners edges so we'll go here. Take a section i'll pull some of that hair out and just look at the line, and you just want to make sure that you have a nice consistent line throughout the cut all right here. We go cool all right. So now we're going to work. The last two sections of the cut that one of them is going to be this top section in the front and the other one's going to be the back section, we're going to work the back section. First, i'm going to bring it right here, i'm going to show you guys two angles top and here to the side. This is all going to be cut vertical uh. So let me show you the top real zoomed in there all right. So here in the top section - okay right here, so we take out this top section here - and this is really just going to become. You could do a couple different things if your guest has really thick hair and you want to remove a little extra weight from this, you could layer it a little bit more if you want to build up more weight, because basically, what i'm always looking for is This side profile view so with this part of the back um, i can even comb her hair and start to give her a little bit of volume and see if that kind of makes everything kind of make sense. If it helps this shape and then i can decide do i want where do i want that weight line to sit? So that's that's number one: where do you want the weight line to sit? If you want it to sit a little bit lower, then i'm probably going to cut in my fingers this way. If i want to sit higher, i'm going to cut on top of my fingers and just follow the head shape up today, we're going to follow the head shape up she's got a little bit thicker hair. I want to round it off just a little bit. I don't want too much weight in the back and that's how we're going to go about it so um, let's see, let's go tilt her head forward like this and then carly. Let'S do i'm gon na, follow it so right there and then let's go the overhead as well. So you guys can see how i support this first. So i'm going to take it section by section i'm going to start in this corner and i'm going to work. My way, through around the head, just like this following the round connecting it to the underneath, that's my goal: i'm not going to over direct it straight up in the air, so i'm gon na show you guys that angle, not gon na go straight up in the Air i'm gon na go more with the round of the head and then drop it the weight off a little early. Okay. So what i mean by that is, i take my first vertical section: i'm cutting shorts along, so i can cut from my guide up. So i bring this hair out. I can see that guideline right there and what i mean by dropping the weight off early. The way that i think about hair cutting is kind of like if you've ever used a squeegee on your windshield and you push the water to one part, no matter what you're pushing it to a place so with weight. I feel like when i cut something i've now pushed weight to a different place when i over direct it and cut it, it's pushing the weight to a different place so as i'm cutting this vertically, i'm cutting it. And if i just keep my finger angle here, i'm cutting it and then dropping the weight off here. If i cut it - and i work my way up this section even further - and now all of a sudden - i'm cutting it here - i'm dropping the weight off here. So here, instead of here, that's the difference and it's a big difference when you think about the side profile of your guest. How do you want that weight to look so i'm going to go here and where i'm going to drop that weight off is right at that point, i don't want to go any higher than that, because then the weight will sit a little bit too high. I think this is going to be the perfect spot for it to sit. I'M also going to cut into a little bit more hair on this side, but not too much so i want to go through and cut it just to get it done. So this is all coming straight up and then i'm cutting that weight off all right. So now we're going to continue through this side vertical section following the head shape we're on a pivot here, bring it up comb it to me so comb in that new hair towards the guide. Like that, i see the guide i'm going to go in and i'm going to cut. I want to see if uh again remember guys if you have questions just type q put in your question and uh i'll answer it for you so vertical on that pivot bring the new hair towards me see my guide. I'M gon na point cut a little bit. Re-Comb and cut just keep working vertically, so um adele's asking. Is this 90 degrees? So yes adele? It is 90 degrees, but then once it gets to this point, this is not 90., so you can see there's a short to long point going up. That'S because my finger angle is staying very similar uh as i work my way up the head, so it starts at 90, so we're like 90 here come on there. We go good old microphone, so adele back to your question. So, yes, i'm going 90 degrees, but then i keep my finger angle. So my finger angle is here and i'm going to keep it there all the way around. That tends to make this even longer because, as i'm going around it, it's stretching further and further from the head shape, so the head shape was here and i was cutting it now. It'S all the way up here, so the round of the head is playing its role in that as well. I want a little bit of extra length starting to work towards um that inside so extra length there, so we're almost turning into a little bit of a forward feel to the weight there. We go one last section. This is where that disconnection starts to happen too. It'Ll happen even more on the top, but we were talking about that at the beginning. How that disconnect is going to play kind of a role in this haircut? You can see there is a tiny bit of disconnect, even though this will be combed backwards, all right. So that is almost the end of the cut, so we got the top left and then we're done so it will blow dry i'll, show you how to style it and if you guys have any more questions at that point, we can answer them as well. All right, okay! So, let's see where we're at. I want to show you guys the top angle, because that's going to play most of uh how we do this so remember the picture. Let me put the picture up there too, so you guys can remember or those you guys that are just tuning in where we're headed with the top of this cut. So this, if she was gon na, wear it in her face, then i would probably be cutting this more with over direction back because she wears it um off of her face and back. You would cut that totally different, and i think this is where and if you're a barber watching this as well um. These are things that you could maybe put into your arsenal. A little bit is thinking about how the guest is going to wear it. Are they going to wear it back or forward a lot of times in short, hair cutting, we cut it the same, and then we force it with product, let's not force it with product. Let'S talk about how we can do it a little bit more with smart. Do it smarter with more um over direction and how we cut it? So with this, i'm going to cut diagonal back moving with the head shape and try not to over drag too much until i get to that very um, um front part, and then i'm gon na over direct it a little extra to get a little extra length. The other thing is when you look at um the style right here on the top right there on the top, you can see a little extra weight there. I want to build that weight up as well, so that could be a little layer popping, but i think a little extra weight right here in the center is actually a good thing. So that's we're going to work with that as well. All right, so diagonal back. This will really connect to what we just cut that we started in the back so diagonal back parting comb, the rest of it forward bring that hair up into my hands and i'm going to continue that line up into the air here and i'll show you guys The angle on the other camera that looks good, so, let's go to the front, so we're going to continue those same diagonal partings across the top, bringing it up traveling the guideline so bringing that over to me point cutting it. This angle gets longer at this. This side, so what i'll do is i'll slightly comb it into my hand and instead of taking that whole corner off, i'm just going to kind of destroy it with a little point cutting. So it has some length a couple pieces that are longer it will give it a little extra bulk, but i'm not taking it all away. I don't want it to be too heavy of a corner. It'S really the the reality of that. So diagonal back again bring it up into the previous section, pulling that guide from what we cut on the underneath in the last section and then directing this up cutting into it cool couple left see my guide. Are you connecting the front triangle with the second triangle? Yes, so second triangle, we just cut through here through the front uh this triangle - i'm connecting to that not to this short underneath but to the triangle, the disconnect it was connecting to that now. This is totally gon na be disconnected because the triangle didn't reach all the way over here. So now i've got to use my guide from the interior. What i'm seeing from what i cut in this section and as it traveled, but to get my initial guide, it came from the previous triangle, all right amir, thank you. They are very comfortable. They uh. These are the scissors i developed uh in partnership with mizutani and they're they're great scissors, which you can get on shop fse. If you want, if you would like all right and then the last section so remember, head shape always plays a role in our haircut. The head shape is starting to move forward. So if i keep moving this hair and just bringing it straight up, then i'm going to get a ton of extra weight in the front of this cut. Now that could be okay for some styles and then other styles. That might not work that well, so you got to really be aware of how much overdirection is happening in this top section. I'M going to take two sections here and i'm going to bring it up to me in this first one, i'm gon na bring it straight up from where it lives and then in this second section, i'm gon na bring it straight up to the previous. So one section back of over direction just to give a little extra length now. I might not need that length in this style, but i will use it to then see if it's where i want it to be, or i can always cut it shorter. You can't grow it longer in an instant, so you don't want to take anything too short, so i always like to error on it being a little bit too long and then i can cut into it in the dry cut. So here's, where we're at in the style so far there we go. I don't know if this camera's backwards or what, but hers part, is on the opposite side of the lady. How that happened. I don't know it wasn't supposed to all right so um here we go now we're going to blow dry, so i want to do a little unboxing for you guys so we're going to use the new minerva so the blow dryer isn't new, but the color of Gold is a new, so let me share with you guys some things about this blow dryer. So, first off it's super powerful um. It includes three nozzles, a diffuser, beautiful and uh. Let'S see another nozzle here. Let me get out of the way some paperwork mini nozzle, wider nozzle and now the blow dryer - i'm psyched about this because they asked me which color i wanted and of course i wanted gold so matches the shell. So you can see beautiful blow dryer. I love it. Everything about this blow. Dryer first off minerva was like we're gon na throw it off of our uh warehouse and it won't break and all this stuff, it's super durable, but then the other thing about it is the power and just the build quality, and i love the fan um. I forget what what it's called self-cleaning technology yeah, so it really like it builds up the hair in it and into a thing, and you just remove that piece that thing that little bit of hair. So it's that's pretty cool about this blow dryer.
Comments
butterflygirl093: thank you for this video,I hope you will do more!A lot of women in my country want this short hairstyle and its kinda difficult to find some tutorials for older women
Lisa Rios: The hardest thing for me still, as much as I follow you, is how to do the sectioning for the different styles as you do. Front and back and fringe yes but those semi-circles and split triangles...not sure when or why to do them.
Lisa Rios: Would love to see a review of your shear kit over there! Also the case they're in maybe.
athoi kram: Matt I learned a lot from you for watching your show how to cut the hair in different styles
Vickey Castorina: U are great so inspiring and easy to understand never boreing
Sandra Jara: If I wanted to leave the part of the crown longer would I have to cut at 45 degrees?
Hope Bell: Where are the clips you use from?? Also thank you for your videos! I have learned so much from them.
Paula: Just because one reaches a certain age .......does not mean all one's hair has to be chopped off. I'm 64 had hair 4 inches below clavicles with a fringe. Had it cut a few weeks ago to my shoulders. It's made me look older and feel miserable. It has aged me 10 years. Growing it again.
Chilli Rodriguez: Remember this for your 70 plus year old women.
Jennilyn Bernardo: Thank you so much for this vedeo I like to know how to do this hair style because of your vedeo I learned this hair cut.. Thank you thank you so much...
elena mill: You are the best! Thank you! ATL . GA
Wijitra Reewngam: Top thank you for the information
maraki: A lot of love from Greece!!!!
Luann Nielson: Thank you so much for the video! I always enjoy your talent. I'm from Western US
Adele Chalhoub: Love your video Matt!!❤❤
John J Noonan: Love watching your videos
Santucci Pontarelli: I've unsubscribed you talk too much bye
Lisa Rios: OG..oldie but goodie
Robin Badger: Hey Guys New!
HANDS R ANOINTED SALON BY SIR RYAN FLORES: Hello from the Philippines
Pretty Mamacita: More like 70 and over .
Dolores Cook: Hi Iam new
Linda Stevenson: hello hun
Marcia Carvajal: Hi
Chilli Rodriguez: Over 50? Really? Lmfao!
Normalita Kimilat: Hi..
Janeth Cuizon: Hi
Patti Power: Hi
Lisa Locke: Hi
sharon kilday: Hi