*Detailed* Full Face Makeup Tutorial For Black Women/ Woc Ft Isee Hair
Hey Baddies! This is a detailed makeup tutorial for beginners and for black women/WOC. This is the perfect makeup tutorial for anyone wanting to learn how to do a full face. Make sure you guys like comment and subscribe tell me what videos you guys wanna see, I have so much more to come!!
H A I R I N T O D A Y' S V I D E O:
Merry Christmas Pre- SALE , Get New Hair For New Year ! ! !
More Information ALL on https://www.iseehair.com/
The hair I'm wearing in this video is :https://bit.ly/3n0KaEy
#ISEEPrincess
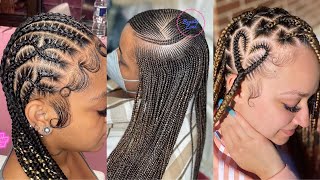
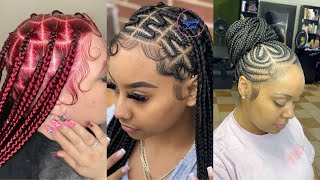
Texture: Mongolian Kinky Curly
Density: 180% Density
Length: 26inch
Cap Construction: 13*4 Lace Front Wig
Merry Christmas New Arrivals Highlight Wigs Brown And Blonde : https://bit.ly/2Lbm1Nw
Special Discount --4*4 Lace Clsoure Wig ALL 30% OFF + $15 Coupon (Code: 15off)
4*4 Lace Clsoure Wig For All Textures :https://bit.ly/37LCkZc
Other Deals:
Bob Mongolian Kinky Curly 13*4 Lace Front Wig: https://bit.ly/33QBauj
Mongolian Kinky Curly Bundles With Closure Deal:https://bit.ly/3qCEOS9
Mongolian Kinky Curly Headbands Wig: https://bit.ly/3qHjStt
Nice Packaging (Free Shipping ) 27mm 3D Eyelashes: https://bit.ly/3oK9BeW (Free Shipping)
♡ C O N T A C T ♡
Email: [email protected]
Imessage/whatsapp: +8613271220951
♡CHECK OUT MY OTHER VIDEOS♡:
Weekend Trip To LA https://www.youtube.com/watch?v=53LNH...
3-in-1 GRWM: LA Edition https://www.youtube.com/watch?v=HWriF...
20 WAYS TO STYLE KNOTLESS BOX BRAIDS https://www.youtube.com/watch?v=I76fJ...
▷ CONNECT WITH ME!
TWITTER ‣ https://twitter.com/iamtosintee
INSTAGRAM ‣ https://www.instagram.com/tosintinubu/...
SNAPCHAT ‣ tosin.tee
email me at [email protected] for business inquires only!
Hope you enjoyed this detailed makeup tutorial for beginners!
#detailedmakeup #makeupforbeginners #iseehair
Hi guys welcome back to my channel. It'S me tell some tea. Oh my god, there's like something in my turn. Hi guys welcome back to my channel. It'S me till city. If you're new to my channel, please make sure that you subscribe. Today'S video is going to be like a detailed tutorial of my everyday makeup. Look that i do um. You know like the glossy lips and like just the just a cute face. I guess i don't know how to you know whatever in the cute face or whatever i'm going to just be, showing you guys step by step, but i do instead of just like slowing through it. Like i usually do. My makeup swears i'm kind of like breaking it down what i do, how i do it when i do it and why i do it? Okay, i hope you guys really enjoyed this video before we get into this video. I want to shout out to icy beauty hair company for sponsoring this video, i'm going to tell you guys a little bit about their hair in the next clip and then we're going to go straight into our makeup. Like i said guys, this video is sponsored by icy hair company, so i wanted to show you guys the goodies that come in my icy hair package. When i do get it, it comes with an edge control brush an elastic band, also some lashes that i probably won't be using, but i like the best i've seen in hair packages and a hair wrap. The quality of this hair is amazing, and the lace melted perfectly i'm going to leave you guys with the details of the hair. So if you are interested, you can go ahead and grab it. The link and more will be down in the description box right here. This picture kind of did go viral on twitter. I know he was not expecting it like. I thought the pictures was really basic, but you know sometimes twitter just surprises you sometimes i love this hair like i can keep this in all day. Every day, every day that is giving the girls what the girls is not giving i'm trying to get to 10k subscribers before the year ends. So if you're watching this, please do me a favor subscribe, it's gon na mean so much to me. Thank you. So much for tuning in thank you so much for all my supporters for liking, for commenting and for just continuously watching my videos. It helps me so much and that's really what encourages me to continue making videos for you guys so i'll see you guys in my next video, and i hope you guys enjoyed this video okay guys so, like i said today, is going to be a detailed makeup. Tutorial and so hopefully i can be as detailed as possible because i feel like i'm not good with my words, but i'm going to try so the first thing i usually like to do when it comes to my face. I don't do my eyebrows first, i haven't done my eyebrows first in a long long time, because i do my foundation first, i'm going to go ahead and start on my face and when i start on my face, i like to go ahead and go in with Some airspun powder - and i just kind of press that into my pores this is just going to fill my pores up just so our foundation application can be smooth. I feel, like my nose, is sweating already so yeah we're just going to put it everywhere. You don't want to put too much like don't overdo, but now your face should look ashy and white. I'M going to take my milani make it dewy setting spray i'm going to spray this. On my face this lighting. No! No! I don't know why the lighting just changes, because it's outside, i hope y'all - can see, though, but we're going to let this dry a little bit. So next is next we're going to next things. Next, next we're going to go in with our primer and for my primer, i'm going to use my favorite primer, which is my milk, hydro, grip, um. I thought this primer is just it's simple and just gets the job done. I like that. It'S like not slimy, but it has that, like that, feel to it that most primers don't have. I feel like it makes your makeup. Stick literally, stick to your face. I'M gon na put this everywhere, including my forehead, and i'm just gon na, have that in this time i'm doing a makeup tutorial. One of my nails has broken off everything's set in put in done, okay, so next thing's. Next, you need to go in with your foundation. I have to mix foundations, my undertones are kind of red and it's hard to find a red lip undertone, so i have to mix mix until i get my perfect combination, it's funny because it's drugstore and high-end, so the high-end one, is the nars um, the nars. Sheer glow in the color machial, medium, dark, four and then um. The drugstore that i use is the l'oreal infallible 24 freshwater foundation and it's in the shade um 515.. So i put majority of the l'oreal one and i put a little bit of this one. So i kind of just put the l'oreal like here here on my chin and a little bit on my forehead. I'M gon na take like this paint type brush that i have i'm going to open up that nars and then i'm going to just take a little bit. I kind of concentrate this in the center of my face because the color that it is, i just feel like it, fits better not towards the outer layer of my face, but the inner. So i'm just going to put that around here on my nose and then boom we're going to get our brush. Some people like to blend it with the beauty blender i like to blend it with a brush. I just like a brush. I don't know if i can just pack the makeup in better, so i go ahead and take the makeup brush that i want to use and i spray some of that milani on it. Then i also spray my face again: oh my god, out of my mouth, but i like to do that because i just feel like it continuously makes your makeup set in at every step like so at the end you just set everything in, and so i feel Like i don't know why this combination works so well, but it does so i just like to pat in my face. I'M not stripping, i mean not stripping, i'm not like streaking my face, i'm literally padding in and like placing it exactly where i want it and then, when it comes to my forehead, i'm a little bit more gentle, because i don't really need that much foundation. On my forehead, because it's not like um i've noticed about the forehead, you can put foundation there, but it's not like you, don't really need it. Unless you have some dark spots up there like, i feel like you can go without having foundation on your forehead. So now the foundation is all set in. I kind of look weird and orangey next thing: you're going to need is your concealer shades and your beauty blender. I like to blend my concealer with a beauty blender. Some people like to blend it with a brush. If that works, for you that's fine, but in my tutorial i'm going to show you guys how to do it with a bead blender, so make sure that the b button that you get you go ahead and dampen it with water and squeeze the water out. Please squeeze the water out. If you already watch my youtube channel, then you'll know that i like to use two different concealers, just because um i have there's multiple reasons. I don't want to get into it right now. You can use one concealer. A lot of people always comment on my videos like you're, using two concealers. Why do you do that? Do i have to do that? You don't have to do that, but if you want to make it look like mine, then do it okay. So i'm going to take my milani, conceal and perfect, and i'm going to take my nyx can't stop one stop. The milani concealer perfect is in the shade. 160, warm tan and then the nyx can't stop wall. Stop is in the shade um golden take the milani and i'm gon na just put it right under my eyes, i'm not gon na go to him. I don't like going to him because i'm i i can admit that i feel like i'm, not that good at blending. So it's like, if i put too much, i'm just having a lot to work with, and it's just too much for me. I'M gon na put a little bit down my nose a little bit on my chin. I'M not gon na put any here because i'm gon na put the excess that i get from here and here down i'm going to just blend it down here. That makes sense. I'M going to take my nyx cake stuff, won't stop and i'm going to put that on top of that area, but i'm not going to go as far i'm going to keep it right here at the um. I don't know the word, but right in this region. Right here, i'm gon na do the same right here. Okay, so let that sit for a little bit, not too long. I don't want it to dry too much we're going to take our beauty, blender and we're going to just blend in that area and keep it where it's at. Don'T drag it too far. Unless that's how you like your makeup, but if you want your makeup to look around, my makeup looks: don't drag it out too much just kind of keep it in this region right here, okay! So i'm going to just press. I don't really move i'm just blending. It exactly where it's at if i move i'll move out a little bit okay, so this is more of a watch. I can't really tell you just watch the way i'm doing it so once we get to right here, you're gon na take the butt of the beauty, blender and you're gon na just kind of dab it so that it's seamless, like you, can't see where i stopped So just dab the end just pound it boom and then come back here and blend here and worry about this area and this region. And now it doesn't matter what goes on here because that's all going to be fixed when you contour your nose and stuff. So it doesn't matter how far you kind of drag it this way, but when it comes to this way, it matters how far you drag it you're just gon na pat back here and then do whatever up here and then pick that excess down. Here i don't like too much concealer, i'm going to blend the other side and then come back for the next step. As you can see, we blended under our eyes. So now we're going to just kind of focus on the chin and the nose when it comes to the chin. I don't really like to to take it too far out. It needs to stay where i put it, i'm going to take the butt of the beaver. Now, i'm just going to focus and kind of do like this twisting motion to keep the concealer circular. I don't want it to turn into a triangle. I don't want to turn into a rectangle. It needs to stay a circle, so we'll just do that boom and then for the nose. We'Re going to just kind of stay very straight and kind of continuously go up and down until it's blended seamlessly in a straight line. That'S done! We'Re done with that. First set of concealers and then now we're going to move on to our contour section. So when it comes to our contour, i like to take this anastasia beverly hills. Contour, stick the shade um! I think it's in ebony, but i'm gon na leave it on the screen. I'M gon na take the contour stick and i'm gon na. Take this like cream brush that i used. I guess it's a brush that i use for any type of cream. I'M gon na go right in and i'm gon na literally just kind of um place it where i have cheekbones. So i'm actually going like right here. So i'm really gon na. I feel like once you conceal your eyes, you kind of see where you need to place the contour which is like right there, so i'm gon na just literally boom, i'm gon na just place it right here and just dab it there and then we're gon na. Just do the same here: you're gon na come from here go straight over here and then place it boom. No long talk, no long, talk, okay and then we're gon na just do the same thing for our forehead, but not too ham on the forehead. Some people, don't i like to go ahead and carve here this just you know, cuts that thing down there at me and then we're gon na do our nose as far as our my nose is sweating, and that's just so disgusting, i'm going to contour my nose, But i'm not going to go to ham because i like to go ham at the end, but this is just to outline where i know my contour is going to go. So i just kind of this one's a little bit a little bit hard to explain. So i'm going to just take the cream brush, i'm going to just kind of go and i would say, follow the natural shape of your nose. So the natural shape of my nose goes up, so i'm just going to and boom keep it there we're going to blend it out later, i'm going to take this foundation brush that i've had for a very long time and i feel like it's a good um Blending brush i'm going to use this to blend out that contour, and so when i blend out the contour, i kind of don't move too much when it comes to your cream. You can't move too much because you can't fix it once you place it there and you blend it there. It'S gon na stay there, so i like to just dab, so it can stay exactly where i put it and i'm just going to blend it out. That way, i don't really move this way or move that way. Just you know, if anything, move upwards, don't move downwards if you want to move that back, move up okay! So if you want to move just go ahead and go in upward motions, because there's no harm in that. But if you start going down, you're gon na make your face like a droopy and the contour is just not gon na. Look like how it needs to. Okay, so that blends seamlessly, then we're going to go ahead and do the other side and then same thing for our forehead, but for the forehead i kind of like moving, because i just i don't really care. I just split it. However, just do it, but down here i kind of just go in and blend it out, we're going to take that same beauty, blender that we used to we're going to go here and we're going to just tap in and you're going to touch bases with the Contour a little bit so that that transition from the concealer to the contour can be seamless, take that same cremate brush that we use for our nose and you can take like a tissue paper or anything like that. You'Re going to clean the cream. I'M going to take a little tissue that i have i'm going to just clean that off and then we're just going to blend it out blend it out, which is not going to be too hard and you're. Also, as well already going to add more concealer within the middle and on the side, so don't worry if it looks too contoured or crazy or chiseled, because i'm going to show you how you're going to snatch your nose with more concealer. The main objective here is to just blend it out all the way, because this is just an outline for what you need to contour. In the end, we are going to go ahead and go in with our last concealer, which is our true match. Super bendable concealer um in the shade, a warm child. I think it is light medium w45. I'M going to leave everything in the description box, but this is how it looks. It'S a drugstore concealer we're going to focus this right here. You see how, with the first concealer, we were like all out here we're going to focus this right here, even though we are going to move it out a little bit. I still like to place it in the middle because i don't want it to move. Then we're going to put a little bit two dots on our forehead. We'Re going to put dots on our nose, because this is going to help us with our concealer and that's pretty much it with that. I'M going to let that sit for a little bit and then we're going to blend it in okay, guys. So we're going to go ahead and blend in that concealer and to blend it in we're going to just um, take our bead blender and we're gon na just tap in and we're gon na bring it out just a tad bit and we're gon na blend. This one a little bit quick because i realize this concealer tends to dry up a little bit but you're going to go in a little bit towards where you contoured your nose, you're going to cut it out. I know how to describe that, but you're going to literally cut out right here and you can see as it doesn't look too harsh anymore yeah and then we're gon na do the same technique once we drag it out here. We'Re gon na take the butt of the beauty blender and we're gon na just beat it up same over here and just tap tap tap in. But this is not meant to show out too much and then, as far as our nose we're going to go ahead and blend that out as well we're going to keep it in a straight line because we don't want it to move too much. So everything's, nice and blended out and so we're going to go ahead and set our concealer. I like to just go back over and make sure everything blended out. I personally like to set my concealer with the sasha buttercup and i usually mix it with a little bit of the airspun powder. This shade um translucent original the original formula translucent, and so i'm going to take the same damp beauty, blender, tap it into the banana powder and then i'm going to take a little bit of the airspun and tap a little bit in there. I don't want to put too much setting powder, so i'm going to just tap both of these areas. Top here tap my forehead tap there and then we're going to blend everything up. So it's like that one tap into the banana powder and the translucent is what we're using for the entire face. I do this because i don't want to look too big. Like you know, i like it to look like fresh. I don't want it to look like you know they just do me in an oven and now i'm just big for the gods. I don't like that. Look, that's gon na set and we're going to move on to our eyebrows. So for eyebrows, honestly, the eyebrow pencil. I'M using today is not my favorite eyebrow pencil, but we're just going to have to make it work um i used to like it, but when i started using something else i just she just doesn't hit the same, so the eyebrow pens i'm going to use today Is actually going to be my nyx professional micro brow pencil, and this is in the shade, um expresso. I don't feel like today's the best day to teach you guys, because my eyebrows are just acting out on top of like mirror. I'M going to take this too. Faced palette, some type of mirror - that's close up, instead of looking into the mirror that i have right here, it's kind of far i like to be precise with my eyebrows, so i'm going to just put this mirror here and i kind of just you know the Typical, like fill in, follow the line type thing, so i usually line the bottom first with a light hand, the good thing about eyebrows is you: can you can always conceal after fill and create the arch? That'S missing, because it's eyebrow lady messed up my eyebrows. You kind of have to just fill in, depending on the natural shape of your eyebrows, i'm going to take our spoolie and just brush that out, i'm going to take that milani concealer that we used on our under our eyes. First, i'm going to put some of that on the back of my hand, and this is the shade i'm going to use to conceal under my eyebrows i like to take this like really really really thin um i like to pat like press it so that it's Nice and um firm and, like you know, grasp onto the concealer very well not too at the front but kind of towards the front, and i'm just going to go straight to start off and i like to start creating my arch. I didn't really talk as much as i should but kind of hard to talk when it comes to the eyebrows, but then i take the excess concealer and i kind of just come towards the front right here. I love a nice and precise eyebrow you're just going to take that excess concealer and blend it down, so that it's not harsh and it looks very, very blended and seamless. I'M gon na go ahead and fill in this eyebrow conceal this eyebrow and then we're gon na come and do the top of the eyebrow together. Okay guys so i just finished the bottom of both of my eyebrows. So now we're gon na do the top. I kind of like leave the excess concealer that i just used. The milani and i took some of my foundation a little bit on there like that much. I just put a little bit and i'm going to take this brush and i'm going to just blend it. All together and then i just start from the end of my eyebrow, and i couldn't just sharpen everything up. I don't really need to go too too, too. Ham do the same to the other eyebrow you all. I like to use this by maybelline. It'S got their brow drama and it's in the shade deep brown we're going to put that on our brows. This is going to set our brows, keep them in place, so they don't move. I used to lose eyebrow gel back in the day and, like my eyebrows, look like a rubbish and i just kind of go through the whole brow go upwards and then over up over next thing, i'm gon na do i'm gon na take my mac studio fix Powder in the shade nc50 and i'm gon na take this fluffy little brush that i have i'm going to dab into this. This is kind of like close to my foundation shade and i'm going to just use this to clean up the excess, and i just sweep away all of that - we're not setting the final product. This is just setting everything that we just did right now: okay guys so i finished um letting my face set with that setting spray and i'm gon na take my um glow bronzer in the shade medium and my fenty beauty in the shade mocha mommy, i'm just Gon na place that where i put my contour up, i like to mix up both of them because i feel like it gives the perfect color and then i'm just going to blend it out almost like. If it was blush not really focusing too much on one area but moving it around, okay, so after doing that, we're not going to contour our nose with those same shades, take a brush! That'S a little bit more fluffy and i'm going to dab that into the same colors and just follow exactly where i contoured earlier on my nose. I'M going to also take it into my eyelids and then i'm going to take that same machine. I'M going to place it on my eyes, so the next thing we're going to do is we're going to place some blush on our face and for blush we're going to use the wet and wild in the shade um melon wine. I like to place some of this on my nose and when i i usually place it right above where i bronzed but blend it in with the bronzer. So it can look like one and then now i'm gon na go ahead and set my whole face with the morph setting spray and i'm gon na. Let that dry and we're gon na come back and put mascara on in our lashes. I'M excited because we're almost done next we're gon na do is we're gon na take some mascara and we're gon na just apply that to our lashes. This is gon na help us for when we are applying our actual fake lashes and the lashes i'm gon na. Be using today, here's the box of how they look. It'S the um mystery the volume lash in the number m302a. I like these lashes, they're simple and i don't really like lashes, i'm too crazy. So, like there's the lashes i like, so i just feel like they. Don'T take away from my eye, i don't like big big lashes because they take away from my eyes. But if you like big lashes, then that's a okay. So i'm going to take my duo glue and i'm just going to apply that to the lash line of my lashes and i'm going to just apply my lashes, really quick off camera. So we're finished putting on our lashes, um they're, still kind of drying a little bit but they're on for the most part. So now i'm gon na go to my lid. Before i come back to my eyes, everybody always asks me what lip am i wearing? I don't really have a signature lip, but i kind of just have this specific brown color that i like, because i feel like it matches my skin tone and it's actually, the kids new york professional in the shade dark brown likes to be really precise. So i'm going to show you how to do that. I just you're going to kind of just have to watch me. I'M not going to be able to talk because i'm lining my lips, but you got to just watch okay, so we're going to start here. Go up, and then i like to cross over like that because i feel like it shows you exactly what you're doing and if you're doing it correctly and i'm going to come here here and then we're going to open them up like this, so that it seemed Like when you close, when you leave your about like this, it looks like the whole thing is lined, there's not like in the stops right there and there's middle ground here, and it starts again. No, we don't like that. Okay and then we're gon na just color. In a little bit, not too much and that's it for the lip liner for the actual lip we're going to take our nyx soft matte lip cream, lipstick in the color tokyo and i'm going to just you know, get a good amount of that. It'S almost done. I use this like all the time and we're going to put on our lip so before we add any gloss, we're going to come back to the eyes. I can't find my black pencil, so i'm going to take that lip liner that i use and the only reason i'm using this using this one, because it has like a crayon type, feel so it's going to glide on it's not like a pencil type thing. So i'm just going to line my waterline and this is dark brown, so i feel like it's still going to look really cute and really like chocolatey. Oh my god, i actually love this wow see. This is how you find makeup. Hacks just try new stuff that actually turned out really cute. I like that it looks like a smoky eyebrow, but we're gon na take some mascara. I'M gon na just put a little bit under there just a little bit like this dark pencil that i haven't. I'M actually going to fill in my eyebrows a little bit over here, because i feel like the nyx pencil is just not dark enough and it's getting like some spots over here next thing, i'm going to do is i'm going to clean my nose piercing i just I'M going to be honest with you guys. I just take a look. Some tissue boom as far as um highlighter y'all should ever never use that much, but i like to put a little bit in the um in here the saharan by juvian palette. I think this is pretty pretty old. I'M gon na just take these really cute highlight this. This palette is disgusting. Do you know if you're disgusted this past disgusted i'm gon na? Take these glitters right here? I'M just gon na put that in here, just a little bit to add a touch of you know, add a little. I don't know some fun a pop-up fun, so there's that take the left over. Then i'm gon na place a little bit here, not that much and then, when it comes to my nose, i kind of take i'm really really gentle and i just put a little bit on the ball and then i'm going to take a little bit going up. I don't go too too high boom, okay, so the last and final step is gloss. I like to use two lip glosses. I like to use the nyx butter gloss and then i like to use the lip gloss by n.k. It'S like a dollar, a dollar style. Lip gloss, and so i'm going to take some of this just go here and just place that only where the pink is i feel like it gives the pink a better color and then i'm going to go here. I'M going to take the gloss, and i'm going to put this one all over. I hate that this lighting keeps changing, like is actually quite annoying, so guys we're officially done with our face. I really hope you guys, like this video, it's a little bit of a detailed tutorial. I try to be as detailed as possible comment down below if you guys have any questions or if there's something like you were kind of confused about, or you want some clarity on comment down below make sure you guys follow me on instagram waiting for you to Do that follow me on instagram. Follow me on twitter um. Follow me on clubhouse located because i'll be on there. Okay i'll do my clubhouse name on the screen. I'M gon na vlog today, or something like that. I'M gon na do something, but

Comments
Tamara Marie: The thumbnail really drew me in I won’t lie and you look so good girl! I’m tryna to learn to beat my face and your video just came up so here I am :)
Tula Antonia: The thing about makeup is you gotta find what works best for youuuu! It’s literally like a secret formula for each person, and I love that i’m at the stage where I want to figure out my formula. I never took it as serious but it’s about time! You look flawless babe. ✨☺️
a kamara: I love how detailed this is cause im over here struggling to learn how to do my own makeup thanks girl
Glory Gabs: I can’t believe I just watched the whole 30mins ✌❤️
Nyssa: this is literally the best detailed makeup tutorial
Forever Janae: You're gorgeous! The thumbnail alone brought me in
MIKALA SHARRI: love this tutorial, i never thought ab setting spray between each step. definitely gonna incorporate into my routine
Christiana A: This is the best tutorial I've ever watched. So informative, Thank you girl!
Karlisa: Girl, the way you explained everything was so amazing so easy to understand! Thank you for this❤️ Love your personality by the way
Kamisham 128: This is literally one of the best makeup videos I’ve ever seen. I loved everything about how you do your makeup and you are just beautiful! New subscriber❤️
Chelsea Hodge: I loved this tutorial!!! Makeup is gorgeous!!!!
Catherine C: This is so bomb love how detailed it is you did amazing
CrownJewel: This was a bomb ass tutorial
Nadia Peter: Best video ever. Flawless makeup and detailed content. LOVE IT!!!!
Chinenye Nkenke: “I don’t want it to turn into a triangle, I don’t want it to turn into a rectangle” not finna play with you. Loved the finished look
Toyosi Sarai: Loved this video , my makeup always comes out trash so this was really helpful. New subbie ❤️
Idiamond _420: Loved the look hun it came out flawless
The Diamond Mentality: YouTube’s algorithm is crazy! I don’t ever watch make up videos and you popped up on my feed. I’m a content creator as well. Your make up came out bomb! Continued luck on your channel! :)
Jade Morganfield: This was so helpful
nia ivy: im in loveeee with this look and you girl ! #newsub ! i want to do this look for my prom next week, did you by chance make a list of each product you used for this upload ?
ANNAJAY: Loved the look ❤️
Taylor Smith: This was great! Using the bottom of the beauty blender was a great tip
Janay: “If you wanna move that bad, move up” Sis that’s a word okay and I ain’t just talking about makeup!
Jonnai Brown: Saving this for prom❤️!!
Alexis Butler: your beautiful with and without makeup :)
Jordan Sargent: I literally love you !!! You helped out so muchhhh
Chakra_Body: This is so pretty, i love it
IshaMoy Williams: New subbie your skin is flawless congratulations on 11k ! I’m on my wayyy to 10k
Chelsea Daramola: Loved it
A B: in love with this tutorial
Cynthia Danyel: Wow..you’re really pretty with & without make up
BabyJuss: Pretty as always ✨
Raqq City: I’m definitely trying this method!!
Cece Baybee: Your eyebrows are perfect like the shape I’m jellyyyy
lotanna ob: You made me get the milk hydro grip ❤️I can vouch I love it
Luvlove Today: Tuning in to the rewatch as soon as I get off of work ♀️
electra sylvetser: Love the way u explain queen
The_CrownedBeauty: Must be too high I was a 30min video I was so fascinated by her makeup routine just wow
Vanessa Starter: Beautiful!
Hey Its Shasha: U look so good wow! That thumbnail is gorgeous sis!
laurel renee: Eyebrows after fondation is a life changing method!!!
Jasmine Asha: Got a new subscriber. Love to see black women win
FashionablyFrugal: So pretty
Chloe-Sue: I love this look !! Do you find that doing your eyebrows after your face leaves you with a better result?
Jessica: Just found this and soooo cute!
TheOjumi: I enjoyed it❤️
Crowned_Queendom: Gorgeous without!!
Diamond J: Oooo I loved this tutorial
Amara Arinze: I love your hair!!
Zion Cochran: i recently started using two concealers as well and omg a total game changer
saucey: great tutorial for us a tone lighter then you do we just up the tone on all of the products you mentioned when we buy them? or are the same colors you mentioned good.
Audri Love: I subscribed because you’re really pretty
Beauty Exchange Beauty Supply: Love the heavy lip liner
Itsmeslimtee: Doing brows after foundation I’ll have to try but you of course you look bomb ❤️
Lucia Creations: You look soooo goodddd!!!
Auda L: I like how most of these products are affordable
Sydoni Maitland: you're so beautiful! loved the video. Did your hairstylist just use water to activate the curls or did she use a type of mousse or curling product?
Juicy J: You're very pretty. Has anyone ever told you that you resemble Janay Mickles, another Youtuber. Does bomb hair!!!
Myeshia Shantal: What was the setting powder you used as far as the translucent one?
Wella Novee: Hair sooooo Pretty!!..
Jeannea: Best makeup tutorial I seen!
jess O: Beautiful! You said this wasn’t the brow product you usually like to use. Which one do you like?
Asia Logan: Absolutely beautiful like wtfff
DarealHailey: What’s crazy I just followed you on ig and you just popped up on yt❤️
Dorothy Petrillo Z: I like the more natural makeup look.
Richeal Fixon-Owoo: New subie here, loved the details❤️
Glory Gabs: Literally the cutest ❤️
simone pinnock: Beautiful omg
Theresa Ajayi: Sooo beautiful !! Who installed your hair? Would you ever just do your eyebrows & lip gloss, or foundation is a must to complete the look? Also where did you buy your nose ring? I hope you reach your 10K goal
AroundTheWayRose: Subscribed you’re dope and beauty! Thanks YouTube for the suggestion. Thanks for the video lovely ❤️❤️
Maiya Jay: When you do your eye shadow, do you still do your eyes last?
BIMMY BEAUTY: Yasss needed this contour Tutorial I just uploaded a Tutorial on Magnetic eyelashes
MissBritt99: can you do a video on how you lay your wig
Sims Style: it’s the random bursts of british for me
Diana West: you’re sooooo pretty
luvLyfe00: You look just like Asian Doll sis, especially before you gave us this bomb beat.
KennTori TV: gorgeous
Vanessa: Love it ! I had to comment because this is it!
Kaira Mack: omg loveeee this one
Keishia’s De: You so beautiful
Glory Gabs: Is it okay to contour down to your lips ?
Kadaay: Ohh girl you’re so pretty
Ta’Nyha La’Shay: Congratulations on 10k
TheThick Diary: That hair
khloe lou: what brush was you using for your foundation x
Unique Every: wow
India Ariel: Girl you so pretty
Ashleigh Clarke: Girl , you are gorgeous owkayy
Esther Baby: Been waiting for this video
Mayomi: Subscribed as soon as I saw your name & you’re gorg #naijagang
Sons of Elshamy: Sometimes you randomly sound British lol. Love from the UK !!!!
Marlene E: If you're reading this, a quick reminder never to give up, keep being you, stay safe, and I sincerely pray all your dreams to come true, as much as I pray my YouTube dream come true
Tam Winfield: Omg you & Asian Doll favor . So pretty
Seaniece Bolden: you have a new subscriber hey booo♀️
Penny _: Letting the ads play through entirely to support a black woman >>>
Karmen Danielle: ❤️
India Evans: Where did you get your headband from? It’s so cute
tumie segokgo: That thumbnail thooooo
Chrissy Thic: I watched this whole thing have you lived in London because you sound like one of us (occasionally)
Kelis Boutte: It’s giving me Vogue vibes .✨iykyk