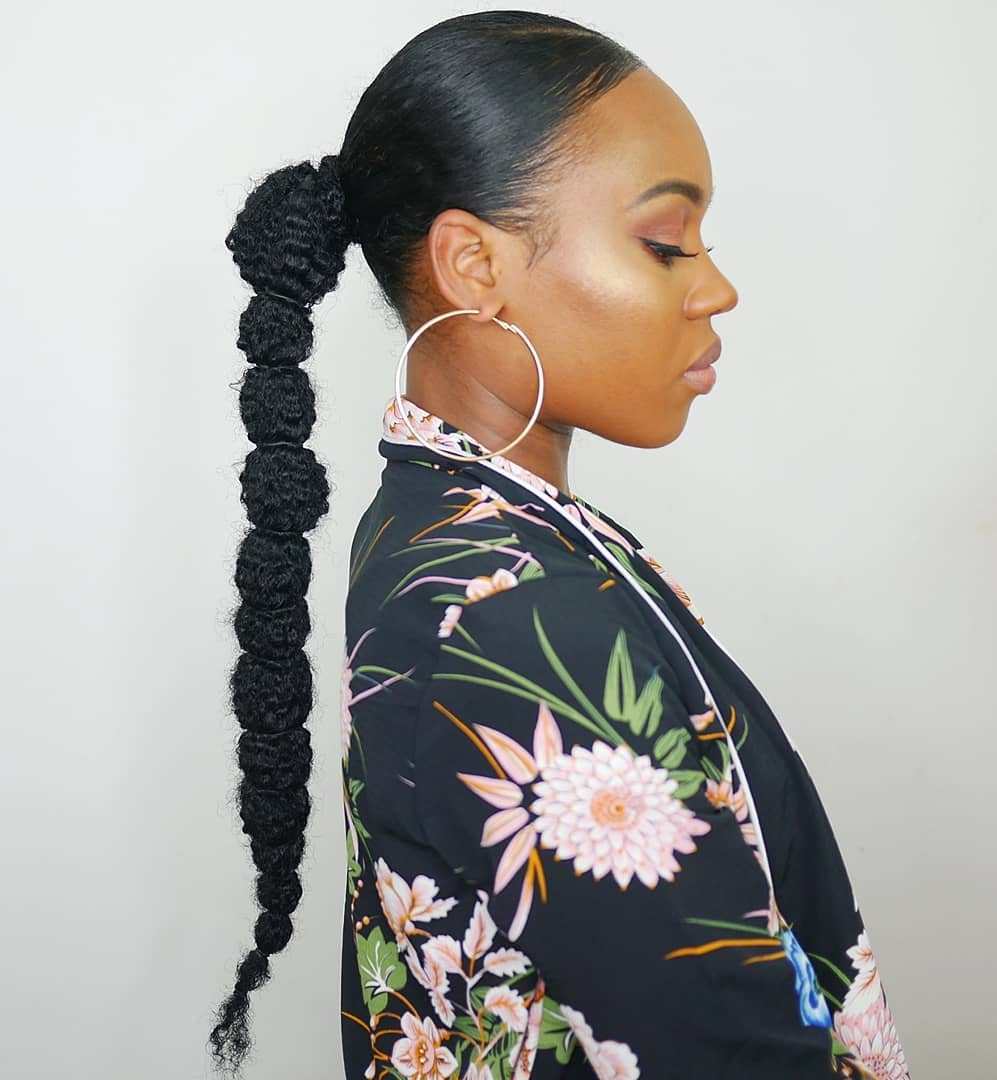
Super Cute Fulani Puff Hairstyle With Beads | Easy Natural Hairstyles
Hey Loves! I'm back with a cute natural hairstyle! I posted a mini video on my Instagram and y'all asked for the full thing so I came to DELIVER! I hope you all enjoy this super cute puff hairstyle with beads!
Instagram:
@truleytalentedbeauty :https://www.instagram.com/truleytalen...
Products Used
-Mister : http://shrsl.com/2e5j0 ( Custom one found in local Sally's)
- Beads: http://shrsl.com/2e5j3
-Jewels : http://shrsl.com/2e5j6
Music:
Buddha by Kontekst https://soundcloud.com/kontekstmusic Creative Commons — Attribution 3.0 Unported— CC BY 3.0 http://creativecommons.org/licenses/b... Music provided by Audio Library https://youtu.be/b6jK2t3lcRs
Hello, beautiful people, a TGIRLS Anita and I'm back with a super cute, avoiding washday hairstyle. So, if you're interested in seeing how I got this look and just keep on watching alright, so I'm starting off on some good old crusty hair and I'm gon na go ahead and create a little section in the front of my hair, basically going from ear to Ear, it doesn't have to be completely perfect, but you want it to be even for both sides. I'M gon na go ahead and take my cute new little spray bottle that I got from Sally's, which I feel like literally perfectly accents my aura and aesthetic and just go ahead and Remos your eyes. The back of my hair cuz, it's a little dry. My go live and I'm just taking the reparative leave-in conditioner from tgin, and just using that on my ends, I'm not trying to get rid of the volume that I already have at the reach of my hair. So I'm really just going in and defining the ends of my hair, so that when I put it up in a puff later on, it kind of looks a little bit more cohesive and not as crusty. Okay back is all nice and moisturized. I'M gon na clip it away, so we can move on to the front. The front is really inspired by the whole Fulani braids as we get closer to the warmer month. I really find myself going back to this kind of like style and aesthetic. I love it. So I'm starting off by parting, my hair in the front and I'm using my nose as my guide to create this really skinny braid in the center. You want it to be a little bit smaller, not necessarily the actual width of your nose. Then I'm going in with my og styler the shine and jam and I'm gon na use that to smooth the base down, make sure my part is nice and straight and then also use that rat tail comb to make sure that this section is nice and detangled. So it's a lot easier for me to go ahead and braid this section back now. If you cannot braid, you can definitely go ahead and flat twist this section I didn't put anything I guess, design wise on it, where I felt like it needs to be really really strong at the base. Just make sure that you're twisting really tightly once you've gone ahead and got to the end of the braid. You just want to braid it to about three more braids, I'm not all the way down, because we're gon na put it up in a pub then move on to the design, I'm creating a triangle, and I'm using about 3/4 of that braid. We use in the center as my guide, for how big the triangle should be. Taking that shine and jam, I'm smoothing around the edges and I'm making sure to pull out my edges. You do not want to pull your edges, we want to save them and then secure that with a rubber band, once I've secured that with a rubber band, I'm gon na go ahead and create the other sections and I'm using the base of the triangle to be Able to figure out where to park my hair down the middle and then once I've parted that down the middle. I'M gon na go ahead and also create a little small section around my ear, as my accent piece, and this just has to be straight across - and this is what's gon na give that piece. That'S closer to the ear more of a square shape, we're going with. Like an off guard geometric system over here, then I'm gon na go ahead and smooth the base of that square. Trapezoid parallelogram whatever to move the base down and secure that with a rubber band and then do the same thing to the other section. Creating these bigger sections just helps prevent having too much tension, especially using rubber bands in the front of your hair. So that's why I really liked using this method for this style. Once we got all the sections made, I'm gon na go ahead and twist the section down. This is gon na help with longevity, so that the style laughs. I told you the avoid and watch day. Okay, so I'm gon na go ahead and make sure I smooth the base of the hair down, add a little shine and jam and under rope twist it. I find that the rope twist just gives it a really nice neat look, but you can also just twist it regularly as well. You want to twist it till. It probably is around the link to actually reach that square in the back, and you wanted to the same thing to the other square, on the side, making sure that twist is nice and neat once you got them twisted you're gon na combine both the triangle and That square into that little parallelogram and secure the section with a rubber bands. So once that's done, I'm gon na go ahead and repeat the same thing to the opposite side, making my triangle using that middle part and the opposite triangle. As my reference, then, using the base of the triangle to go ahead and create the second section, as well as my tiny little accent, section, smoothing the base down with a little shine and jam going ahead and securing all the sections with a rubber band. And then twisting up the basis of the sections until they reach that peace and then combining them all kind of in, like a little, you know, pyramid or whatever and securing that with a rubber band. So once those are done, I'm gon na go ahead and move on to my baby's sections and I'm just flat twisting these sections forward. I tried braiding them, but I really did not feel like having to try to unravel these skinny braids. So I went ahead and flat twisted once I got to the part where my hair, supposed to hang, I switched over to like some really really really tight rope twists. I also recommend you switch over to braids, at least for the base part and then twist it down. So you don't have to worry about unraveling dreads later on. Once that's all twisted up. It is time to combine everything all things together, but the front it's a little bit frizzy, so I just went ahead and applied some water and again some of that leave-in just so that my puffs could be nice and popping and those curls can be nice and Moisturized cuz, I do not want to look crusty and once I've gone ahead and really applied that leave-in to find the curls for other sections in the front. I'M gon na go ahead and take my favorite tool to use, which is a pantyhose and I'm gon na use that to go ahead and secure the puff. I feel like this is really great, especially when you have a style that has already tension in the front, because you can control how tight the puff is going to be so I'm just using the pantyhose making sure to pull it away from the sections that are Already rubberband so they're not being pulled more and then I'm just gon na go ahead and secure the puff until I have the width or the puff size of my liking, love out my hair a little bit to get it nice and shaped, and then I'm gon Na go ahead and start working on designing the rest of this style because I feel like that accessories really pull it all together. For my accessories, I'm taking these super cute crown jewelry that I found from Sally Beauty. Everything in this video was found from Sally Beauty. I'M going to try my best to find exactly those same accessories on their website to see the guys can get it, but any gold jewelry will do. Then I'm taking these beads that I also found from them. They also had this in like another color scheme, which was super cute and I did not have the little bee pusher things. So I got creative and I use and of the rat tail comb to go ahead and secure the beads. I went with like all shades of brown, aesthetic and use a tan, a wood color and then a deep wood color and once I've gotten all the beads on. I made sure that they were even on both sides and then use the dark brown B to go ahead and solidify the bead so that they won't slide off when, in with a little bit of edge control, just a little swoop. Did he do on the edges, and once I was done, this is the final look. You guys super cute super easy and a perfect excuse to go ahead and bring your hair out for another week or two. So, as always, if you guys are loving me, if you're a loving, avoiding washed eight seed, do not forget to subscribe down below, like yeah, about messing up load and I'll, see you all in my next video bye, laughs, mwah

Comments
Ashley Thompson: When you said “ avoiding wash day hairstyle” I screamed because that’s exactly what I was looking for! Thank you for this video because I just did this in like 25mins and it’s SUPER CUTE!♥️♥️♥️
Kayla Thompson: This looks so easy! Wonderful instructions, the only thing that I'm gonna struggle with is getting my hair soft enough to do it
Emmanuella A.: this is a bombb style!! I will definitely be trying it!
Ty: I did this style and got compliments from all over the place
Felicia Bruton: This style is so beautiful & it looks good on you.
Manilove223: This took me 3 1/2 hours to do it was hard but I got it, only I didn't do the small side ones( my hair is thin there) and I didn't use jam, and did a twist on top. But my mom who was a stylist said I did good so I'm happy , thanks for this, I've always wanted to try this style❤️
Syrin Dabeatslayer: Love this I was looking for a style to do for this trip I’m taking next week. Thank you for this tutorial! It’s beautiful and so are you ❤️❤️
Nicolette Starr: It has been SO LONG since I have seen a style that I love so much that I can ACTUALLY do... thank youuuu.
Gemini Rising: Love it. Especially the front, will definitely be trying
Nicole Stevenson: wowww okay i just wanna day you did an AMAZING job explaining how to do the parts. any videos i’ve watched before are so confusing so thank you!! i’ll be trying this for sure
Ro & Mil: Omg this is super cute! Definitely trying this ASAP
SDRL Official: This style is so beautiful
I’M NESSASARY: You’re so beautiful and you explained this video beautifully thank you for the great content
Rita Sutton: I love your hair pattern. So pretty
Sincerely, Missy Renea: Thank you! I love this style
Victoria Triunfante: Quedó hermoso su estilo de peinado..
4cee Flower: Love your hair and the hairstyle ❣️
Tiara Marie: This style is so cute! I'm gonna try it today bc I am 1000% avoiding wash day!
Deborah Appiah: Your hair style is a bomb. Will definitely try this
Aracelis Velazquez: I just did it!!! I love itttt
Daniele Loriano: I loved. You give me a good idea to hairstyle tomorrow. Kisses from Brasil
shevonnie salmon: My hair isn’t this tightly coiled so I’d have to do a high puff with perm rods, or I can try braiding hair into a bun! Awesome video!
Malika Robinson: So cute, I'm going to try this
Noelani Gamble: your hair looks beautiful!
Desiree C: Cute style!
Cezanne Brewer: I love this!! ❤❤
Tawana Terrell: I’m thumbs up #941 and subscriber #8.94K! I just found your channel I’m so excited that I did. Psst...you are truly talented and your hair turned out super cute, gorgeous!
Rhea T-W: Gorgeous!
Lost and Found: So pretty! I hope I’m able to pull this technique off! I have zero skill beautiful hair art.
Kim Knight: I love it.. Im guna try this on my daughters hair....
BlankCanvas21: Definitely trying this.
Very KinkyCurl: That’s cute!!!!
yg 4 hunnid: so cute!!! you’re beautiful
Qara’s Care: Your hair is gorgeous honey!
Vera Six: Girl you are beautiful. I wish I had the boldness to go natural. My hair is soo coarse
Karen Jagers: This is gorgeous.
ìfss nevaeh: found you from Pinterest! Thank you for this video
Bellindah Gama: Wow this is so beautiful
Lynette Harding: Super cute ty for sharing
Yalana Allen: This is beautiful!!! And you only have 7,000 subscribers?!?! SIS!!!! People are sleeping on you!!!
Keneisha Brown: Cutee ❤️❤️❤️
AJ L: Love it
binta baldeh: I love this what is your hair porosity ?
D'SHANELL Rizos mi salón D'SHANELL Rizos: Yo la amo aahhh ella y me encantan sus peinados y maquillajes que se da
Innovative Wardrobe: What kind of edge controller you’re using and what us that tie you used for the back? Is it elastic or what? Thanks. I love your videos.
Roxanne Roxanne: You go girl
pinché dominicana: I love this style but my hair just won’t cooperate with shoelaces ): , whenever I try to do the shoelace trick my hair doesn’t go up.
Isabelle Joseph: Love ittttt!!!!! Did the gold color stay??
Ivelisse Álvarez: Cute
Lauretta Boston: Very cute
Khanya: ❤️
TaMara Phillips:
Kayla Woods: HERE FOR IT YESS
Wendi Martin: Afrocentric n awesome
Rebecca V.: wish i could have that that puff
Ntum Shwiri: U r beautiful gurl
Scarlit Blak:
Kiera Smith: will it still look cute without the beads and the little claps
Terica Anderson: This is cute. I will be trying this. Except with two afro puffs