Hair And Makeup Transformation Ft Donmily Hair | I Needed A Pick Me Up
If you’re reading this just subscribe... like now.....HAVE YOU DONE IT? yes?okay thank you you can enjoy the rest of my channel.
❤------------------- ❤#DonmilyHair ❤------------------❤
I'm wearing this in video: https://bit.ly/3H7u5XV
Use My Special Code For Discount Off: donmily8
https://www.donmily.com/ ➤Top Selling Wigs: https://bit.ly/3KNqCQh
Click To Enjoy Biggest Discount: https://bit.ly/3r1HKtW
Hair Info: Donmily 13×4 Lace Frontal Body Wave Hair 22”
Donmily Tax Season’s Sale is Rocking On the Way!!!
Save $8 Over $89 Code:TS8
Save $25 Over $169 Code:TS25
Save $38 Over $289 Code: TS38
——————————————————————
➤ Great Discount Lace Frontal Straight Hair https://bit.ly/3o2KQvM
➤ Great Discount Highlight Jerry Curly Wig https://bit.ly/3r4B9Pu
➤ Great Discount Highlight Body Wave Wig https://bit.ly/3G4pS5X
➤ Great Discount Balayage Highlight Curly Wig https://bit.ly/3oosN3x
➤ Great Discount V Part Glueless Jerry Curly https://bit.ly/3H7WD3h
➤ Great Discount V Part Kinky Straight Hair https://bit.ly/3o1ZCTI
➤ Great Discount HD Invisible Lace Wig https://bit.ly/3G6LZbT
Choose Your Favorite Lace Part Wig☛https://bit.ly/32DJal0
Big Discount Bundles with Closure/Frontal☛https://bit.ly/3KKhVX3
————————————————————————————
Subscribe Donmily Hair on:
Instagram: @donmily_hair https://bit.ly/3s0RNii
YouTube: @Donmily Hair https://bit.ly/3IDuqBS
Facebook: @donmilyhairbeauty https://bit.ly/3G6tYdQ
IF YOU LIKE ME DON'T BE SHY!
♡IG: yinkaa.bby
♡SC:mxryyy
♡Twitter:yinkaabby_
COLLABORATIONS
PROVERBS 31:25
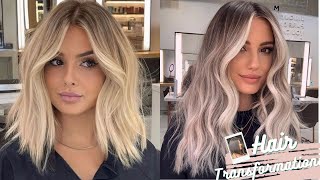
You know those ones where you just feel bummy, you have nowhere to go, but you just feel bummy and you need to pick me up yeah. That was this day. This was taken a couple of months back. I was chilling at home and i just looked beat so i decided to get cute this day. I don't know what happened, but my hair and makeup turned out so bomb after i finished getting dressed up. I just had to find somewhere to be so yeah. What'S up guys, it's your girl, you can be backing up with another video today is going to be a transformation, video featuring dawn, milly hair, i'm going to be taking you guys through my whole, install process. You guys just gon na watch, i'm not really doing like a tutorial style. I just want you guys to see me glow up. Okay, of course, we're starting off strong with the bald cap method. I knew i wanted this wig to be melted, so i decided to go with the vodka method today. Normally i completely skip this up now. It'S completely unnecessary, if, like it's an old wig but like for some for a new install yeah, bobcat method is the way to go. So this was around the time that the patch thingy was like raining. Everyone was having had the like little skunk stripe or whatever. So i wanted to do the blonde skunk stripe, but i was too scared to fully go blonde. I'M like okay, let me just go with like a chocolate brown, so i just took 30 volume developer and some bleach that i used to bleach the knots before and i sectioned off a piece of hair and i bleached it, and that was pretty much it. It was really easy to do and i was really happy with the way it came out. There'S just something about the way these donnelly wigs fit. My head, like it's literally, fits me from ear to ear perfectly. I barely have to cut off too much off the sides, don't mind me or don't remember, brother he's just running around in the background like i said this was months ago before i moved out um so right now, i'm just applying the glue to my hairline. I did, i think, two layers, probably like two and a half. I did two like thick layers and then i added some extra glue on the areas that i know tend to get more sweaty, so yeah. So, of course, after the glue has dried down, i'm taking my hand and i'm pretty much just pressing the lace into my skin, trying to melt it down. Um with my hand, just stick it down like like a real like a sticker, but yeah. So after that, i'm just gon na take a little bit of foundation and apply it on top of the lace. I'Ve already put some under um putting some on top now, and i also put some on top of the cap. I'M sure you guys seen that before and right now, i'm trying to put on my melt the lace band by um, the hilton hair ball or hilton's hair ball i'll leave her instagram down below it's my friend misia's hair company. I love these bands. I love the color. I love everything about her brand, so much so i'm gon na buy these like every three months. I suggest you guys to do too sorry, it's like two o'clock in the morning right now, but yeah i'm pretty much just hot combing everything molding. It the thing about these wigs nowadays is that they don't give us no parting space at all, so you have to make do with the liquid-looking parting space that they give you. Obviously i make it work, because i love side parts, so it's really been killing me. If you've been doing middle parts, like you haven't, been feeling the pain that i've been feeling, even when my clients come in, i don't even know where to start most of the time, but for this wig, as you can see, i made it work and look at That lace look at that melt. Look at that melt, this regular lace, ain't, nothing special about it, just the stylus! So yeah after that, after admiring the melt, i'm just going to go ahead with these tiny, tiny, tiny babysitters to cut off the lace. I want to show you guys how slow i'm going and how jagged i'm cutting up close first, really taking my time with how i'm cutting it. I really like to give it a tug - and this was not supposed to be a tutorial, but i'm putting you on. I give it a tug and i just snip snip snip little by little like like a little mouse eating cheese. I don't know why the hell. I said that, like i said it's two o'clock in the morning and a girl has worked tomorrow morning, so just allow me with the analogies but yeah, i'm just applying some glue here um to the spots that did not um melt. I mean it did melt, but i lifted it back just to super secure it and then i'm taking this. I don't know what the brand is called. I think it's foundation fantasia spray something spray um. What'S it called leave it in the description box below i'm? Probably not, but you know what i'm talking about so after that, of course, is like the most tedious part of this whole install process. For me, which is the baby hairs, especially because i was going for a certain kind of baby ears, i guess i just saw it on instagram and decided to follow. I do have a baby hair tutorial on my channel already. You can just click the card up. There um but yeah after i decide wherever your hair is going to be. I give it a little bit of a pluck, make it look more natural in a couple of sections or a couple of areas, and i do what i do with the baby hairs. Okay, this process, this baby hair process. It probably took me like a good like for myself. It will take me because i won't stop until i'm done. It'Ll. Take me, like 20 30 minutes to finish my baby hairs, which is a really long time to just between. Not even growing up hairs like miniature hairs, five centimeter hairs, it's crazy! It'S crazy! Girls are crazy for sure it came out good in the end. I just wanted to show you guys that it was literally like sun. There was. The sun was out some of that by the time i was done. The sun was down so once that was done. I took that fantasia setting spray and i sprayed it on the baby hairs, and then i took my blow dryer just to keep it in place, because i took a really long time with these baby hairs and i did not want it to go anywhere. So i just sprayed it into place, even though i used got to be glued to like mold the baby hairs. I wanted it to really stay there like for the whole week and that spray will make sure it stays there, and it gives it a little bit of shine too. So after that, i take my pretty baby silk scarf. If you guys want these scarves. Just let me know because a couple of people that did ask me they did buy it. I just haven't made it public yet, but yeah for this wig. I don't know why, but i was feeling like being blair world off or whatever she calls herself. I forgot how to pronounce her name once again. 2 am um, but i wanted to do some pin curls something about pink cause, there's just the bounce to it like it's, not really anything special other than the bounce, like um. Of course. The way i pinned it was kind of weird some of the curls came out a little bit floppy like towards the wrong side, so i had to re-curl like the front, but the curls these curls stayed for like a really really really long time. I really love doing paint cuz. It takes a really long time, but it's so worth it like. Just just look admire this, like look at the bounce. Look at the lustre look at the shine! Look at that, but yeah this is here. This is me fixing the curls in the front just to like make sure it frames my face properly, and i did not like cut layers into this wig. I thought i did when i was trying to wear it. The second time around i was like wow. I cut layers into this so nice, but there was no layers cut. I don't know if that's a good thing or a bad thing, but i didn't cut no layers before somebody asked me, but look at that curl. This side was curled with the pin curls and then the one that framed my face. Like the bang part that was well, you saw it but yeah that was pretty much it for the hair. Moving on to the makeup part of the video, this is my typical. There was nothing special about this makeup, routine other than the fact that nobody was rushing me. I don't know, but my makeup came out so sweet and succulent, like i don't know, i just felt like i looked so cute and i didn't even take no pictures and i'm really mad about that, but we moved this was months ago. I'M gon na. Look it again: it's okay! I will be posting my updated makeup routine within the next coming weeks, so stay tuned for that. Actually, if you've made it to this part of the video drop a white heart in the comment section to, let me know that you are waiting on the dark skin makeup tutorial just so that i can push that away faster. I want to see that people care but yeah. I really do i really really really love the way my makeup turned out in this video. I i wish i was paying more attention so that it could be a makeup tutorial, but i was also on live. While i was doing this, if anybody remembers that day but yeah, you guys are just gon na have to see it like this, i think maybe it's because i did eye shadow like a nice eyeshadow. I don't know what it was, but the shad turned out good. Get them solo but yeah after my makeup was completed. I did one curl to the side to frame the other side of my face. I guess the other one just fell, i'm just tweaking a little bit just tweaking whatever needs to be tweaked. To be honest and yeah, that's pretty much the completed. Look. I really just love the way everything turned out. The little brown streak in the hair just turned out really really really cute um. As for the actual hair down, my hair like this, was a really really really nice wig. The lace was super thin. I really loved that um, so it gave off like transparent, vibes or whatever, and the hair was really really really like. Luscious like i did not put any product in this hair for it to shine like this, but yeah, that's it. Hopefully you guys enjoyed today's video and i'll, see you in the next one bye,

Comments
Angie Adisa: Never disappoint
Neiyo Beatrice: Needed this!
Princess Dijah: yes please updated makeup tut! ❤️
Kiara Henry: this is what i needed !)
Nellehctim: Love the contents!
Yolissa Hair: Looking forward to our video!!
Aniyah Hughes: Okay yinka a fucking magician I could never
Tiffany Muthonjo:
Faith Osagie: !
Sarah-Claire: First ♥️